|
[#1]
tag
|
|
|
|
[#2]
tag
|
|
|
|
[#3]
Great pictures, both of you guys! And both jobs look very nice!
And you are both 100% correct: it is not that difficult if you take your time and have no fear of asking questions when crossroads appear. There are always different methods to the same project, and some will swear by one technique while others will prefer another. It is all installation preference and budgeted expenses. I think people that are hesitant to try these things themselves don't givem themselves enough credit. I've heard those comments around here many times... "I'm not very handy...." "I work with computers, so I know nothing about tools..." "I wouldn't even know where to begin..." The hardest part of all this is making sure your installation techniques LAST. Any dolt can make anything look good for a very short period of time, but the details of a proper installation will make it a professional job that will last through the abuse of use. Taking your time and asking questions shows a level of pride in the installation, and that is sadly missing in many contractors these days. Hey, AZ state requires a 1-year warranty - and that's what too many contractors build into it: a year's quality. That is absolute horseshit says I. I want my jobs to last as if it was my home home. Yes, I do have to abide by budgets and timelines, but there is no excuse for corner cutting. I have an aquaintance like that. His favorite line is, "Dude, it's just an apartment. Why are you going through so much trouble?" He just doesn't understand that the MONEY isn't the thing for me. Yes, it is how I make my living. But the PRIDE of doing a job better than most out there is the most satisfying aspect. He cannot comprehend that I know what is being built, even if others never get to see the myriad little details I put into it. |
|
|
|
[#4]
One other thing before I head over there today, concerning people's hesitancy to try these things on their own:
For those of you that do not know, Home Depot offers free classes on anything from tile, to landscaping, to roofing, to electrical, to sheetrock. Knowing and learning from a professional is better, of course, and even better than that is the hand's on training where they tell you what and how to do it, and you get your hands dirty. But for just general knowledge, 3 hours at the Home Depot class on a Saturday is a great way to enforce what you think you know and learn a few things. OK, I am off to begin tearout. |
|
|
|
[#5]
TAG!
|
|
|
|
[#6]
TAGGED!
|
|
|
|
[#7]
Hey, I DO work with computers and knew nothing about tiling. I was even brave enough to try some electrical work at our new house after reading up on it. Our dimly lit garage now has two new overheads plus I added an outlet on the ceiling for my 650s casefeeder and another outlet near the workbench I built, plus I took an old light out of one of the bedrooms and put it on a switch in the attic.    |
|
|
|
|
[#8]
tag thanks, always looking for tips and pearls.
|
|
|
|
[#9]
Ok, so the first thing today is to remove the toilet, sinks, and countertops so we can inspect the integrity of the supporting member structure and brace as necessary. I have done countertops in these apartments before, and some support has been fine while other has been woefully inadequate.
I’ll be throwing all of this stuff away, but I’m going to remove it carefully for those of you that want to re-use some stuff like sinks and faucets. They will re-install just exactly as my new ones will install, but if you want to keep the old stuff you have to be careful removing it to avoid damage. So, toilet first. First, shut the water off and then flush the toilet to remove as much water as possible. You can then use a cup or something to remove the rest of the bowl water, but I’m just going to let it fall on the floor – no way am I putting my hands in that nasty toilet, no matter how good my grout gloves are. Be careful – water and tile floor = accident waiting to happen, so be careful and don’t slip. After the water is shut off and toilet has been flushed, remove the supply line,  Remove the toilet tank lid, and then remove the tank to toilet bolts. They have wingnuts or plastic nuts on the bottom and screw heads inside the tank, so don’t spend an hour loosening only to find out they are just spinning in place, LOL.  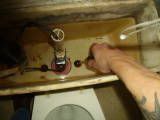 Then, remove the tank. Next, pull the caps off the mounting ringbolts and unbolt the toilet from the floor. 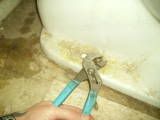 Get all of that out of the way, and use an old something (scraper or rag) you can just throw away to remove all the wax and wax and wax ring (trust me, it ain’t worth it trying to clean all that crap off your good tools). This is the wax ring, flange, and ring. 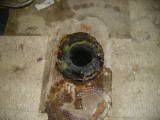 Scrape all the wax off, and remove the flange. The flange is NOT re-usable. Be careful not to damage the ring bolt threads if you are not going to replace the mounting ring assembly (I can’t in this case, as it is integral to the trap).  OK, while the toilet is off, now is a good time to snake your drain line. You don’t have to do it, but I suggest it. Snaking through the S toilet drain series is difficult, and doing it with the toilet off is much easier. If you’re going to re-use your toilet, snake it out, as well. Finally, stuff a rag into the toilet drain flange to keep debris from falling into the trap – THIS IS VERY IMPORTANT! Don’t even THINK about leaving that hole open or you WILL regret it! 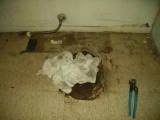 OK, next post, bathroom sink and counters. |
|
|
|
[#10]
|
|
|
|
[#11]
OK, on to the bathroom sink and counters. This can all be removed in one fell swoop, but like I said I realize some of you may want to re-use your sink and faucet. So I’m doing this just like I would be re-using them, too.
Shut the water off and then disconnect the hot and cold supply lines from the shut off valves. 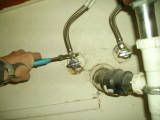 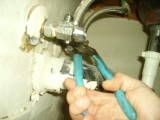 Next, disconnect the P-trap from the drain assembly, and then remove it from the wall to get it out of the way. Set these aside to use later, but new traps are generally 10 bucks.  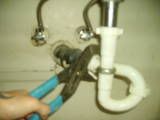 Then, look under the sink and find your mounting bolts – remove those. The sink is now ready to pull off the counter top, but if there is a bead of calk you might need to score it with a sharp utility knife. Well, hmmmm, there doesn’t appear to be any here – held in place with silicone. Fucking hacks. Guys, don’t do this shit. A package of mounting bolts is 3 damn dollars.  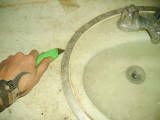  With the sink off, we can remove the counter tops. As you can see, these are linoleum tops with unattached backsplashes. If you want to re-use these, score both the backsplash to wall bead and the backsplash to counter bead. I’m just scoring the top bead because I’m trashing them. Now, use your hammer and flat bar to remove the tops. Score the calk between the backsplash and the wall, and then between the counter and backsplash.  Then remove the splash. 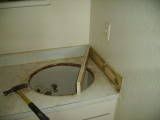 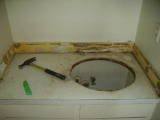 Now, remove the countertop itself. 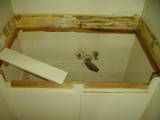 OK, as you can tell from the picture, we've already run into our first problem. The false fronts came off with the counter, because some numbnuts hacked it together. Obviously, we'll have to rebuild the supports before we put tile on. See what I mean about keeping the bid solid, but flexible? I kind of foresaw this, so I was prepared, but shit like this happens all the time in rennovations. You have to be ready for the "Ut Oh's" doing this kind of work, which is why I build a 15% bracket into my bids. Now, so far I've spent about an hour on all this. But I have to take constant breaks because of my leg, so I just will post the pics and updates during that time. You, of course, can do all this and the next installment, which is the kitchen tearout, in about an hour and a half, including cleanup. So bear with me and be patient, and look for the next post that will remove the kitchen stuff! |
|
|
|
[#12]
OK, folks, I know y'all are thinking, "C'mon, Richard! I tagged to see tile installation, not sink removal." And we are getting there. I am simply doing step-by-step as I work, because there are some people out there that may not know HOW to remove counters and such, so be patient and bear with me.
Jobs like this always start off slow, because you are a wise man to take your time disassembling what you will have to reassemble. If you just rip it all out without a good idea of the structure you'll be building back on, you're going to run into even more problems than jobs like these already contain. OK, so yesterday I ripped out the toliet, bath and kitchen sinks and counters, and then removed all the baseboards (which, like the rest) must have had a case of calk holding it all together. Believe it or not, folks, calk is NOT a building material meant to solve all the woes. You might as well duct tape your Aimpoint to your AR. Take some pride in your work and if the materials don't fit together, don't just calk the shit out of them. So removing the kitchen stuff went the same as the bath. First, turn off the supply lines. Then remove the traps. Then pull the sink. Like the bath sink, this one had no clips and was held in place with calk  . . I just LOVE this dandy professional installation. When they installed the sink they failed to center properly. There was a full 1/2" gap of airspace between the sink and the countertop. So, what else? "Hey, hold my beer and watch this!" Yep, filled the whole fucking gap in with latex calk   See these here thingamabobs on the sink that look like channels? Yeah, those are there for clips. Now, there are times where a sink is siliconed into place, such as custom tile jobs. But not in this case and NEVER latexed in.   Then score all the calk on the backsplash and countertops, and remove all those.  |
|
|
|
[#13]
The First Oh Shit Moment
If you want your tile to come out right, this post is a MUST read. OK, we have a major issue here. Take a look at this picture carefully, because this could COMPLETELY fuck up our tile if we don't consider it. 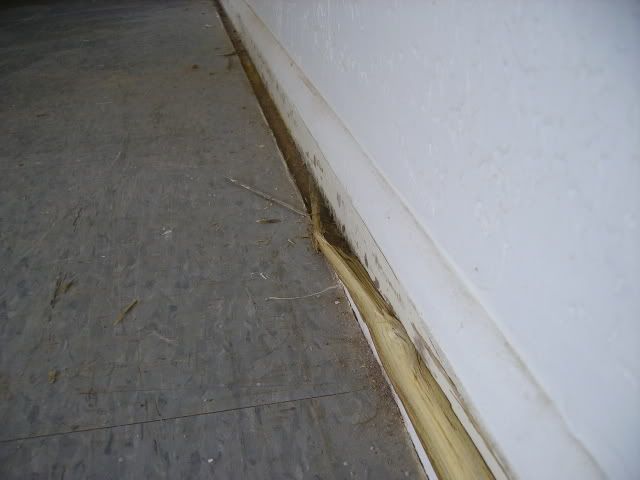 This shit is what happens when a piss poor layout is done. What they did with these 12 x 12 VCT squares (important because we have 12 x 12 going in and will be using 1/4" grout lines) is began on the outside walls and worked in to the demising wall of the hallway. If you look, you can clearly see where the demising wall is not squared to the exterior walls, so what happened is that the tile at the South end of the demising wall set flush, but then a gap developed as they proceded North. As the installation continued, the gap grew. Again, this is just poor layout, and it's one of those things that doesn't happen in these DIY shows - they have nice, square walls to layout from. I do not, and chances are you do not either. Guys will buy a book and some tools, and then they follow along until that "Oh shit" moment happens and they wonder what went wrong. To combat this in this case, they baseboarded the demising wall and then added a 1" x 2" filler piece of wood to add material to the baseboard to cover the gap. OK, seems an easy fix. Except it's not so easy for us. We have grout lines, and those grout lines MUST be square with the walls or the installation will look like SHIT. Especially in a hallway, no matter how short it may be. I'm going to show y'all how we are going solve this problem when our layout time comes upon us, but these details are important during tearout because it gives me a heads-up and makes me consider the amount of tile I bid and the sequence of installation. We cannot just do it like they did, which would seem to be the easiest way to lay ceramic tile over composite. When I measure the scope of the room and hall, I would have slivers of tile filling the gap. That's not acceptable. 12" x 12" tile is actually 11 7/8" square. That way, when you add a 1/4" grout line, you get a 24" length of 2 tiles together. So no, the space of the grout lines will not extend the tile all the way to the wall. We could "cheat" the grout lines by adding just a little more than 1/4" here and there, but I don't do that kind of work. A lot of people do, and it actually doesn't look bad if you do it right - really good installers can make it invisible. I am not that good. My spacers guide my lines, so I will lay the tile out differently. If it were 1/2 an inch or so that would be one thing. But this current layout goes right through the bathroom door, and I want my lines perfectly square with the door jam so it looks tits. If the demising wall isn't square to the exterior walls, neither is the bathroom door, and an "off" grout line in a doorway stands out like a sore thumb. I know the picture is big, but I needed the detail. Keep this post in mind before you even consider doing your own floor tile. |
|
|
|
[#14]
dammit when I finally got around to reading this thread all richard's pictures are dead
|
|
|
|
[#15]
OK, so after that hitch in my giddyup, I arranged things for the job a little differently. You should do this on the job, and then make your permanant notes in your office. Don't rely on your memory.
So day one is complete and the majority of our tearout is completed. I ran down and bought the floot tile yesterday, and here is what I decided on:  I am going to use a light sand grout with this shade. That will be a nice trasition from tan carpet to white walls. What do you think? Today is the bulk material day, so I'll get little or nothing done as far as labor short of buying, organizing, and storing the materials. And there's a lot of it. I'll be storing most of it in the unit itself, so I did a super good clean up and mentally organized where what will be stored. You should do this so that your storage area is the last thing on the job you'll do - that keeps moving material down to a bare minimum. I'll be using the bedroom, as the kitchen, bath and hallway are my main course ways. The last thing I want to do is hump 700 pounds of tile all over the house to move it out of the way. Here's a hint: make an Excel spreadsheet of your materials and update it daily. It will help you foresee possible shortages and overages so you don't get caught unaware So taday's tools including the following: 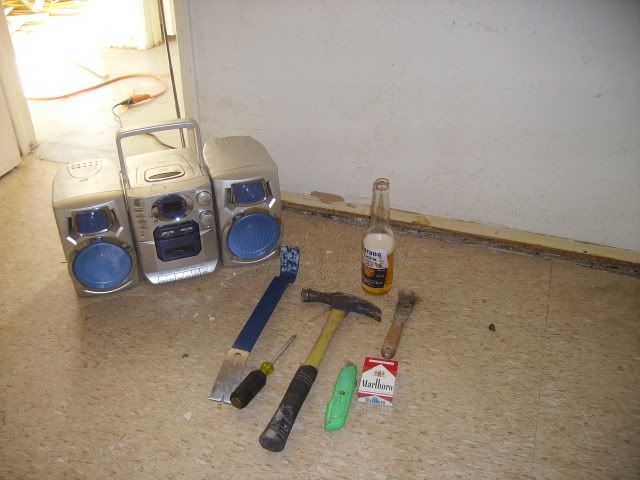 A flat bar (wonder bar), hammer, channel lock pliers, old putty knife, beater screwdriver, utility knife, a pack of smokes, the required radio for tunes, and an ice cold Corona for when I was all done and hauled out the trash can to dump it. Oh, and lots and lots of rags for the water spills and gloves for the bathroom. And that's about it for tear out. According to schedule, our next task is wall prep - do that first because that way slopping mud and paint and texture doesn't hurt anything. So we have a big ass hole to patch where another sparky cut it to install a ceiling fan, ran the wire, and never patched it. I'm going to show you how to patch sheetrock and do it right. None of those bullshit patch kits - those are for college students and women folks. Men make patches that are invisible. We'll install the new rock, tape and mud the seams, feather it all out, and finally texture to exist the matching walls. Then we'll "walk" the walls and make any other repairs and texture those as needed. Then we'll paint. After that, we'll get going on the countertops. Stay tuned folks! |
|
|
|
[#16]
You're shitting me? If I remove them from Photobucket they disappear here? Well shit, I did not know that. Damnit. If I put them back in to photobucket, will they re-appear? |
|
|
|
|
[#17]
Are they back up? I didn't want any to disappear
|
|
|
|
[#18]
I hope so - all of your pictures are dead to me
|
|
|
|
[#19]
I reloaded them all back into photobucket. If I have to, I'll edit all the posts to restore the pictures. A DIY thread with no pictures is like jerking off a cat. Someone tell me if they are still dead or if they are back up please? They show up fine here on my terminal. |
|
|
|
|
[#20]
Great thread pics are dead though at least the early ones.
|
|
|
|
[#21]
Great thread
I'll be referencing to this when I get time to do my own place. BTW, the first pics that I can see are from the post that starts with "OK, folks, I know y'all are thinking," on page three. |
|
|
|
[#22]
OK, all pictures fixed, but it re-sized them smaller. No matter, I'm glad I learned about this now, rather than when the really detailed pictures are needed with the tile and whatnot.
Sorry about the mix up and temp broken links. Now I know to avoid that in the future. |
|
|
|
[#23]
You should post bigger pics so I don't have to dig the microscope out of the closet.
|
|
|
|
[#24]
And away we go with day 2. Purchased, inventoried, and stored all my materials yesterday, and decided to go ahead and do a little work.
As I said, we work high to low, back of the unit to the front of the unit, to avoid damage in traffic areas of new material. We want the paint done before we install carpet and tile, and that means we need to patch any walls as necessary. Of course, mud takes time to dry, and I utilized this time to work on the countertops. So in this post we'll attend to a proper sheetrock patch, and next post I'll show y'all how to get the substrate decking started on the countertops. Couple of things doing sheetrock. First, quality tools will make your life MUCH easier. Oh sure, you can get away with the dollar store plastic putty knife, but you're going to get pissed when it just doesn't look right. Get a good metal mud pan, a 6" taping trowel, and a 14" feathering trowel. If you're going to be doing corners (which I will be addressing a soon future post for another project), then corner trowels will save you 90% of the work and make the job 100 times better. But for now, just to patch a hole in the wall, try and get the following: a mud pan, 6" and 14" trowel, a sheetrock saw, a cheese grater (sheetrock rasp), good utility knife blades, and a cordless drill. Some try and dry their mud with a fan or a hair dryer, and that is OK to speed up the process but it will make your mud crack. Best bet is to let it dry on its own. There are different weights in mud, ranging from heavy (for the first coat and taping) to light (for the final feathering). I use 1 and 1 only: medium, unless I have a really big job and can justify 3 different kinds of mud. There are also varying thicknesses of rock, so pay attention to the hole you are patching. Here is our hole:  As you can see, the sparky cut it jagged and not square. No problem if he would have saved the patch, but he didn't. So, the first thing I am going to do is square it up and measure for our patch. 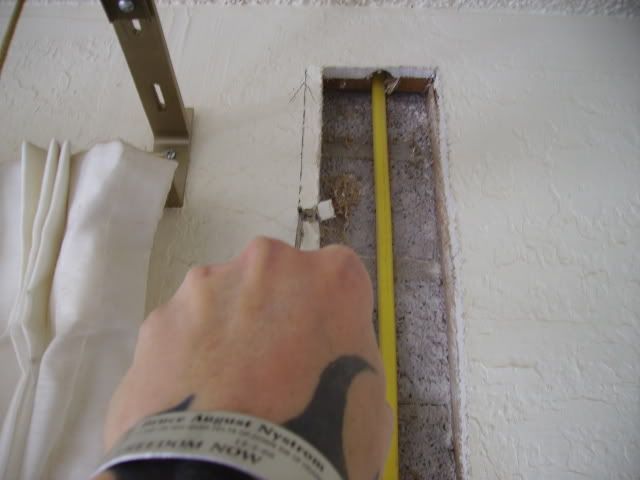 Now, measure the hole and cut the filler piece. This is some scrap greenboard (moisture resistant sheetrock) I had laying around.  Take your cheese grater and smooth out the rough spots and slightly bevel your corners.  Now, we need a way to mount this in the hole. To do that, we are going to use a scrap piece of wood, attach it to the inside of the hole, and screw our patch to that so we have a solid surface. IMPORTANT: Don't screw through the electrical wire! Ideally, we would install two of these braces - one at the top and one at the bottom - to secure the patch to. But, as you can see, sparky cut the hole flush to both the stud and the top plate. Because of that, we will have to use only one board at a diagonal angle. Measure the board so that it is 6" longer than the hole, giving you 3" on each end to secure the brace. 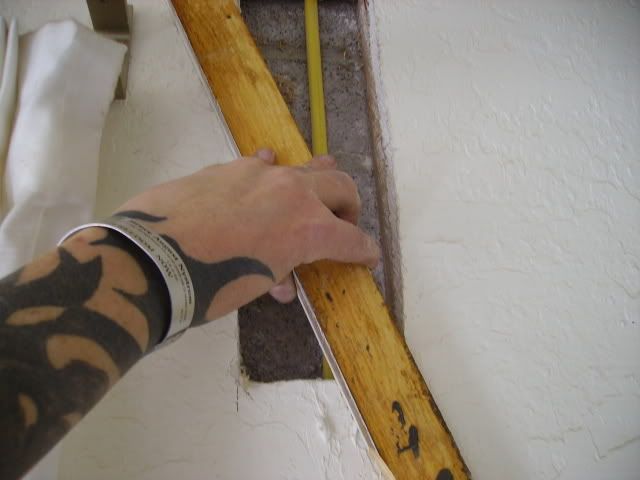 Now, with our brace cut, insert it in the hole and apply pressure to the back of the existing wall. Then, screw the brace into place by going throough the rock and into the brace, 2 screws each end. Recess the screw heads a little into the rock so the mud will cover them, and then clean up your edges. Put the patch in and screw it to the brace.    Get some mud in the pan and mix it up real good so you have a smooth pudding. Even if you have pre-mixed mud, you still need to mix well - and the more you mix the easier it is to work.  Now, using your 6" taping knife, apply a THIN coat of mud to the patch and about 4 to 6 inches past the edges of the patch. This provides a "glue" for the tape (which isn't sticky) to adhere to. There is a mesh tape that is sticky, and many sheetrock professionals prefer that to the fabric tape I use. But to each his own, and I like the fabric, so that is what I am using. Then, install the tape over the seams, 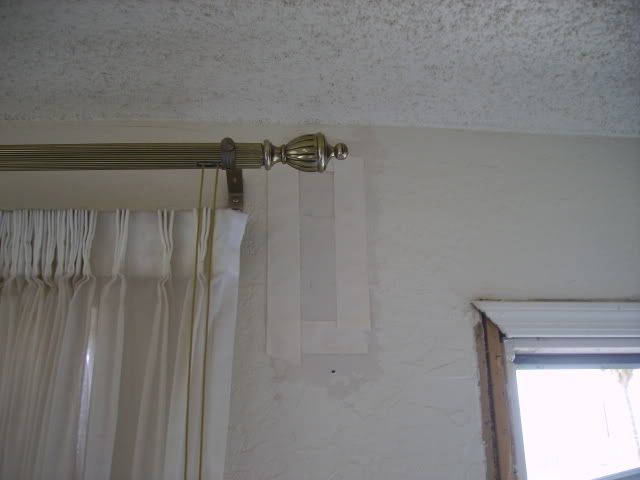 and flatten it with your 6" knife to remove air bubbles and excess mud. 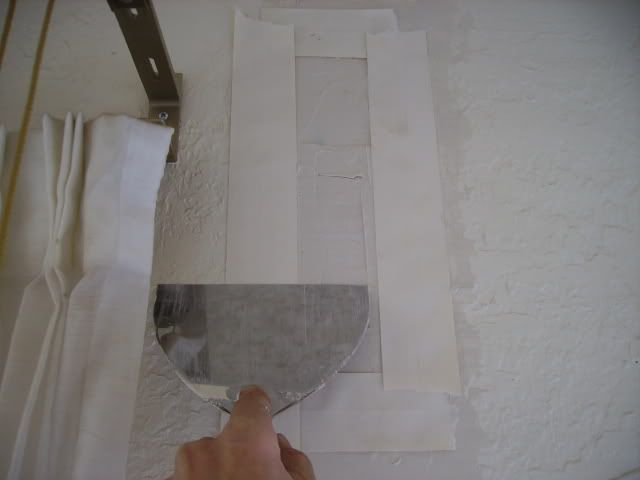 You should have no bubbles or "dripping" mud once finished. 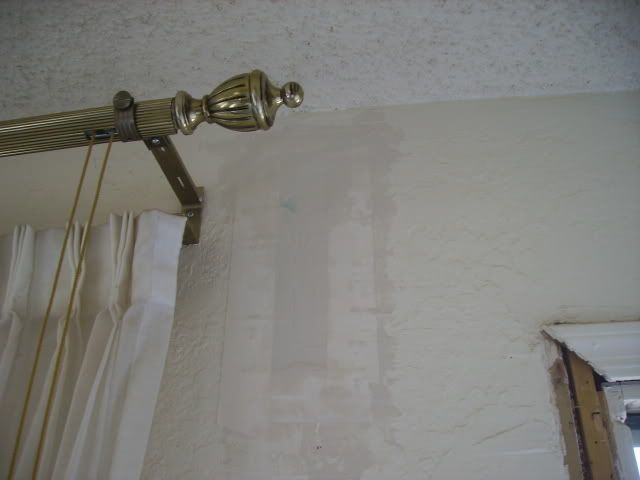 Now, apply a liberal coat of mud over the whole patch, making sure you completely cover the tape. Then, "feather" the edges of the mud by applying pressure to the outside of the blade, angling the blade in a curve - not like this / because you'll dig into the mud. The existing wall is the guide here, so you pressure on that while pushing the mud from the edge of the patch to the center of the patch. Your blade should have a curve, with the edge outside of the mudded area flat, and the inside towards the center of the patch gradually "snowplowing" the mud. Here is what proper pressure looks like when feathering: 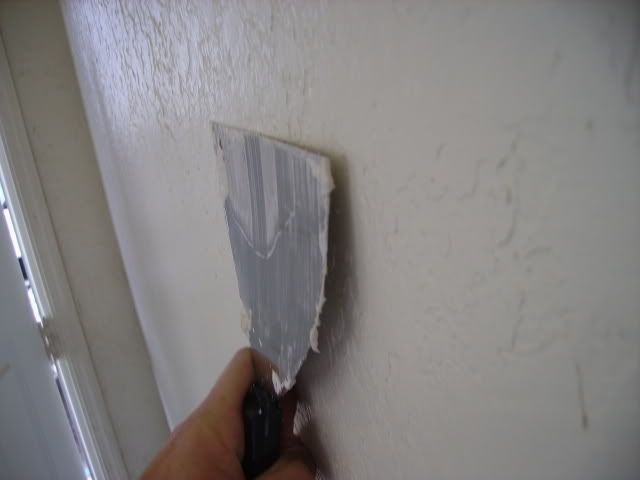 Finally, smooth the center as smooth and evenly as possible to get rid of the ridges and make the minimum amount of sanding possible. DO NOT EXPOSE THE TAPE which needs to stay complately hidden under mud. This all takes time and practice, but work slowly and you'll have the hang of it in no time. After all this, your patch should look like this:  So now, the first coat of the patch is finished and needs to dry. On larger patches, smoothing all this out is much easier with a wider trowel, but I did all this with my 6". Then I cleaned up all my tools (put em in the kitchen sink filled with water, LOL). But I'm on the site and my tools are already out, so might as well do something while waiting for this to dry. So, in the next post, we're going to start the countertops and work until my leg says stop. |
|
|
|
[#25]
Great thread! Tag!
|
|
|
|
[#26]
OK, so after patching that little piece of rock and cleaning up, I wanted to get started rebuilding our counters to prepare for tile.
This is the MOST critical process! You drop the ball here, and your job will look like doggy doo doo, no matter how much care you put into the tile. Take your time here. Work slow, inspect and measure everything three times, and check level and plumb often. Important point here: we are using actual drip edge, which takes more care and time to install, but is well worth it in the long run. I'm using air nailers and air staplers, but you don't have to. A nail, a nail set, and a hammer works fine. It just takes less time and effort going pnumatic. You'll also need a few carpernter's squares, a decent calking gun, and some construction adhesive (I'm using Liquid Nail, but carpentry glue (wood glue) is fine). A decent set of spring clamps is a lifesaver. Now look, you don't need to spend a fortune to get into air tools for carpentry unless you do it everyday to pay your bills. For you, and for me, el cheapo is OK. My compressor and air nailers are Central Pnuematic, which I got from Harbor Freight. I needed a good compressor for all the various tools I use, but it was on sale for about $170. For this job, a $50 compressor would be fine, as you don't need auto oilers and regulators and such. My air nailer (brad and staple taker) I got for $20 bucks at Harbor Freight. I paid a little extra for a 2-year unlimited warranty, so I can just take it back - but it has already paid for itself, as you'll soon see. My spring clamps were $1 each from the same place. All in all, under $200 will get you set up nicely, and if you can afford it, it is well worth your investment. Especially with all the linear feet of baseboards and countertop we'll be doing. So, I set up the compressor and nailer and walked into the kitchen. First step: level the countertops. Use shims where necessary, but the supporting areas have to be level. My first thing to address was the stove area that was falling apart. It had to be rebuilt.  So, a little Liquid Nail on the mating surfaces 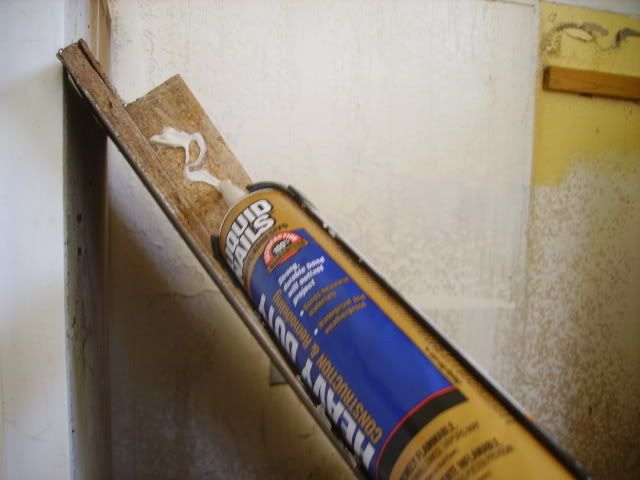 And tag her in place 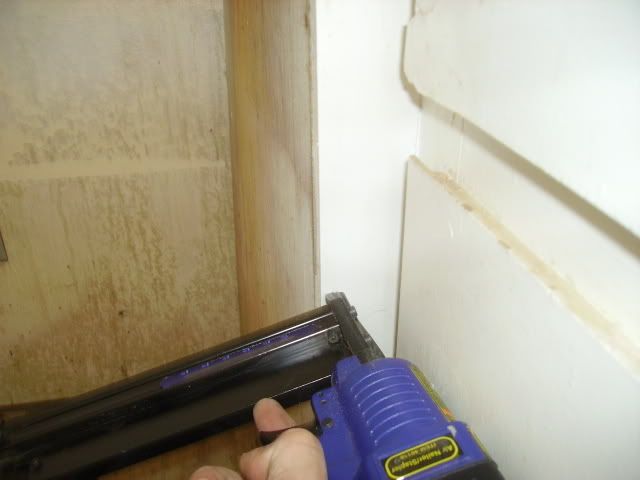 Then, working with your clamp, finish nailing from the inside out. This picture is looking from the top to the area inside the cabinet. 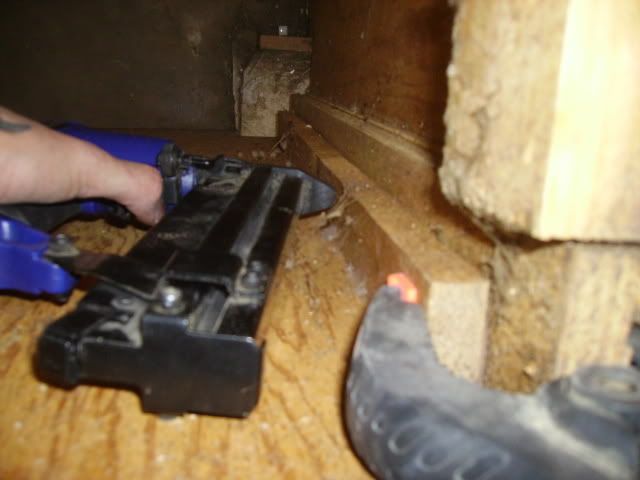 All fixed.  Here's a hint: use a red wire nut to keep the Liquid Nail from clogging. 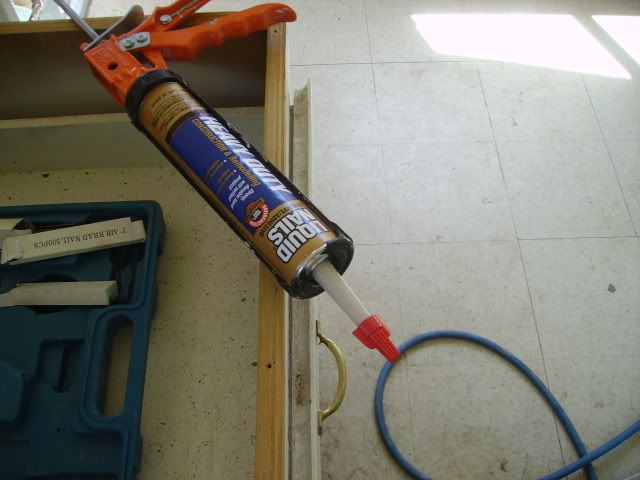 |
|
|
|
[#27]
OK, so we are ready to begin the countertops. Again, make certain you check and check and check level.
There are many ways to do this, but I'm going to show you the easiest. First of all, we need to bring the drip edge away from the cabinet face. To do this, we install 1" x 2" backers level with the existing top edge, which will keep any escaping water from dripping into the drawers. Cut the board to length, and apply a small amount of adhesive in a wavy pattern.  And now tag it into place, spacing your nails about 12" apart. If your new wood for the backers is slightly bowed, use a little extra adhesive and nail from the middle of the bow to the outside of the bows, and then clampp into place until dry. Most importantly, the backers need to be flush with the face and level with the top.  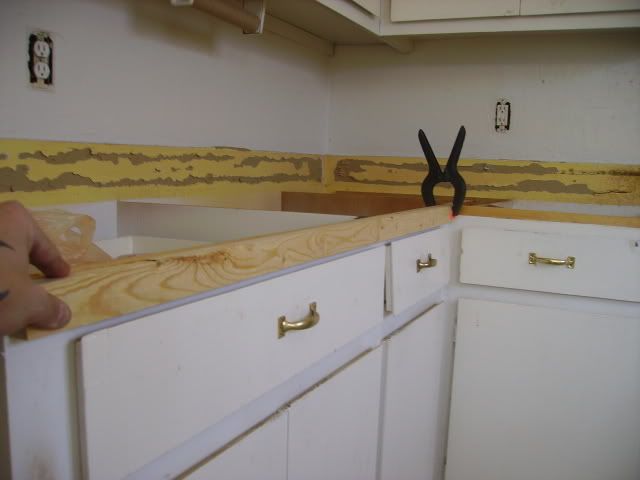 Do your longer pieces first, and piece together cut offs for the smaller pieces if you have to. But you want to installe the smaller pieces first so you don't get stuck trying to fit a 1" piece anywhere. Also, gaps are OK, but the corners must be at true 90 degree angles for reasons you will see. This is ok, because I have a true 90 degree corner.  Finish all of the backer before doing anything else. Last piece! 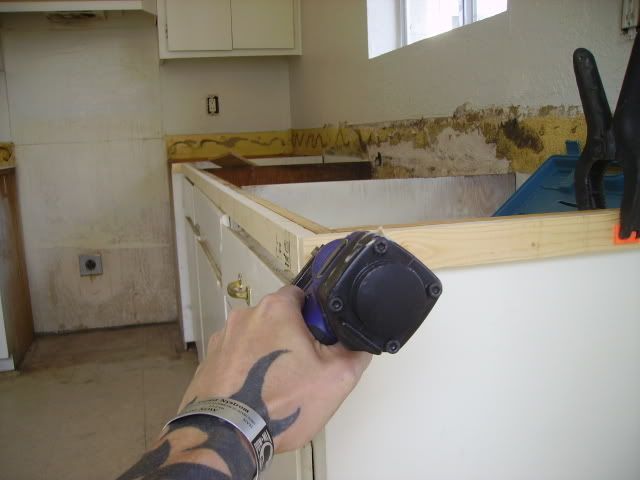 Now is the perfect time to inspect the drawer runners and clean and paint the inside of the cabinets. You'll thank me later when you're not squished into a cabinet hole trying to paint and fix stuff. We need to fix this runner. Someone used a curtain rod Good Lord, the shit you see in these jobs! 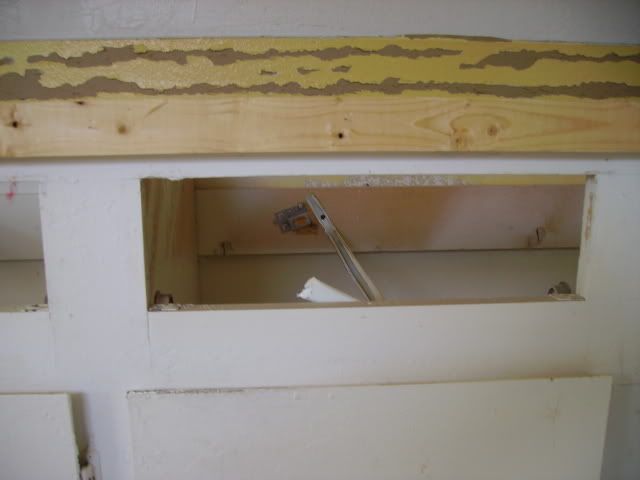 Also, scrape off any excess calk from the walls at this time (before painting and cleaning, of course).  |
|
|
|
[#28]
OK, we are ready to deck. This stage is especially critical, and the wood must be level!!!!!!!
We are using 1/2" plywood for the underlayment, over which will go 1/4" cement backer board (also called bonding board). Remember, the running backers for the drip edge have to be in place before this step, or you'll be 3/4" short from wall to drip edge, which will NOT work (see previous step). There are many ways to do this, and no one way is perfect for every situation. You can measure and scribe to your heart's content. But I know these walls are not square, so doing that is a frigging waste of my time and energy, and I don't have the budget on this job for wasted materials. So, I am going to lay the entire 4' x 8' sheet on the top, and square my corner edges. Bur before we do that, we want to transfer the center of our nailing points to the walls and the face of the backer so we can pencil a true nailing line and avoid penetrating the sides of the interior cabinet walls once our plywood is on.   Now, put the whole sheet of plywood on the top, and make certain your outside edge is perfectly aligned.   This counter is too long for one sheet to cever it, so we need break it somewhere. The line we transfered to the wall and backer piece tells us the center of the last area we can nail to, and we need to mark that so that both pieces have an area to nail to. That is, we don't want any edge of any piece of plywood hanging into an empty area: it needs support, and the edges have to be nailed. So, I am going to use my 4' sheetrock square as a straightedge, and transfer the mark on the wall and the mark on the backer to the top of the plywood, which tells me where to cut to make sure that piece and the next piece both have an area under the edges. Here's our mark closest to the edge:  And then I match up the line on the wall to the line on the backer. We do this because we know the counters are NOT square, so measuring the distance won't do much of anything but have the potential for disaster. Much easier to do it this way. 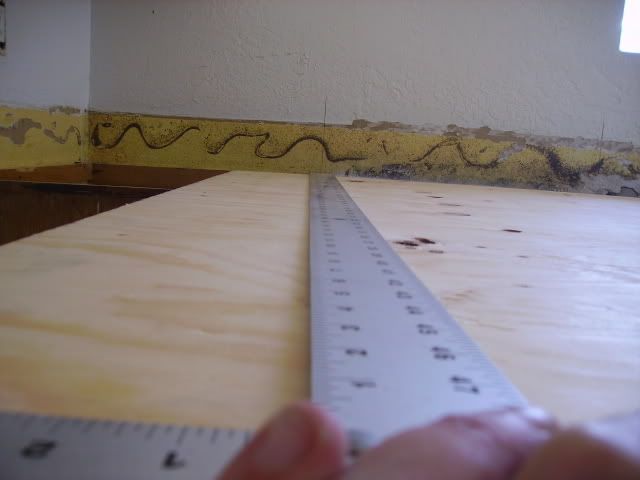 Here I have made the cut to edge join:  Now, I just make sure my wood is even with the outside edge and flat to the wall, get underneath the overhang, and pencil my cut line. Again, we are doing this because it is fast, easy, and accounts for the walls being out of square with the cabinets.  Cut the wood heavy (in other words, you can always cut off more, but you can never add to what you've cut) and check the fit on the top. Good to go!  |
|
|
|
[#29]
OK, we are ready to install this sheet.
We started with this one piece because of two things: One, it is the outside corner. And two, it is where the sink will be cut in, which is critical. We want to make 100% certain our sink is exactly where we want it before we deck all the tops. So we will be installing this piece first, making sure it is what it is supposed to be, and then build from there. This is the most important piece in the process, so take your time and get it right. Some things to consider with the sink, which is what will make or break this job: First, we are using drip edge. We need the sink front edge to cover the drip edge, but not so much that it hits the bow in the tile designed to keep water on the countertop. Any other way and it will look like shit. Too far into the drip edge and we'll never seal it. Too far away, and we'll not have room for some tile and grout. Second, the back of the sink has to clear the wall so we do not obstruct the inlet lines or P-trap placement and have to go modifying stuff. Third, the sink has to be centered with the existing under-sink cabinet doors. And finally, we need the sink to have enough material under it so our clamps will grab and give us a nice, aesthically perfect mating surface. So with that all in mind, the first thing we are going to do is actually install the piece because we have double-checked that it fits perfectly. Lift the sheet up and apply adhesive to the supporting runners. 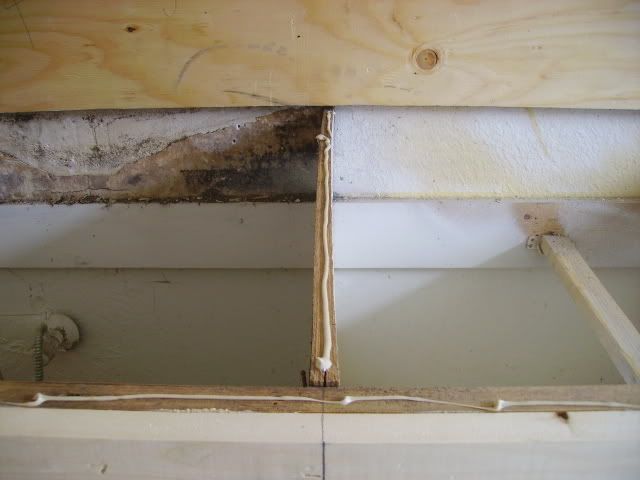 Now, lay it down and get it back into position so that our corrner is perfect. If you have to cheat anything, cheat it to the wall, never to the corner. But if you have followed what I have been doing so far, cheating anything will not be an issue because you have done it right. The outside corner is the most important. Once it is in place, tack the corner. 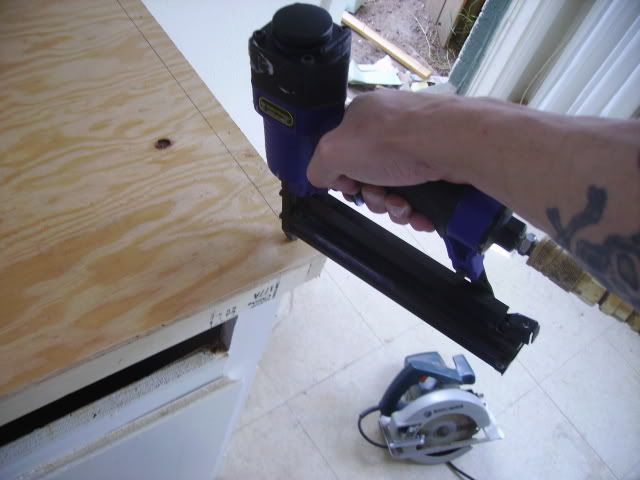 Now, go to the opposite corner and tack it. 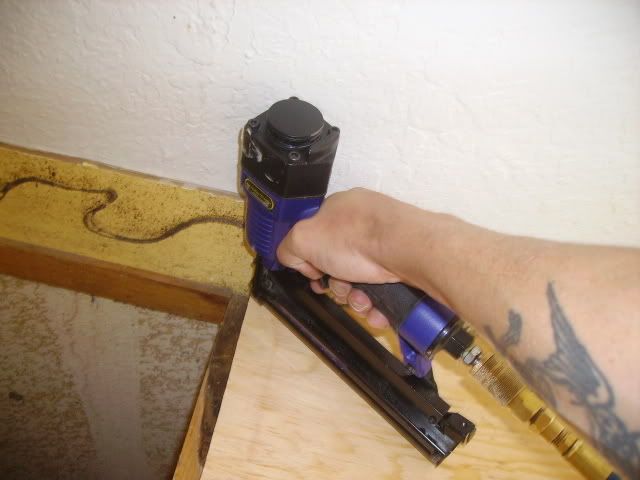 Now, transfer your nailing lines. 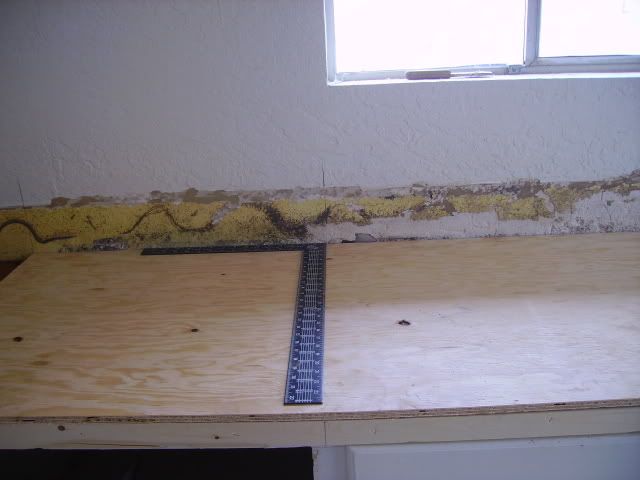 Now, nail down the body, spacing your nails 6". Start in the middle and work your way towards the edges, and then nail the edges on 6" centers, too. 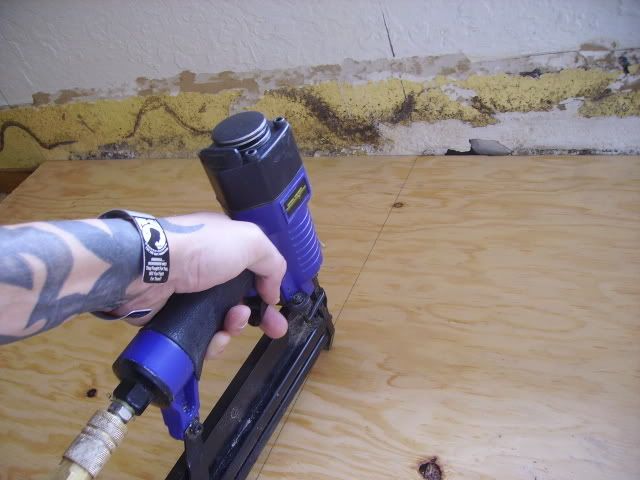 Next, using a framing square, centerline the cabinet doors that will be under the sink. The sink MUST be centered with these doors, or it will look wrong. Transfer this mark to the top of the plywood, and then measure from the squared (outside) edge to that mark, and make another mark towards the rear of the sink area. Find the front center. 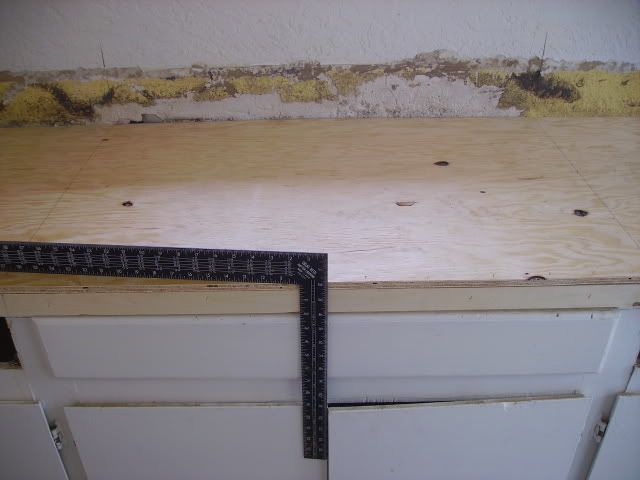 Now, measure to that mark. Then measure to the rear area of the sink's location and mark it. Take your framing square and check for square from both marks to the wall and the face of the cabinets. So, in other words, the "bottom" mark will get penciled in using the square against the outside edge of the plywood (the face of where our bullnose is going). Then, the "top" mark gets squared to the wall. If those lines are off, erase them and split the difference. The sink has to be parallel to both the wall and the face, so how it actually sits in the cabinet box is not important. We only have about an 1/8th of an inch to work with here, so those are our two crucial dimensions: parallel to both the wall and the drip edge. 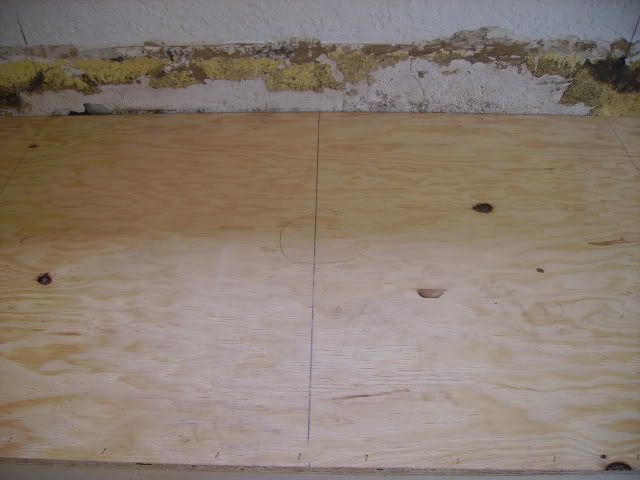 Now, take a break and come back and quadruple check everything! If that center line is not right, nothing will be. You'll be doing all this over again or filling shit in with calk. Wrong answer either way - do it right the first time, and take your time and have pride and know it is right. If the left edge of the sink is a little different than the right edge of the sink on either the wall or the bullnose, the installation is ruined and will look like shit. Either your grout lines will look crooked or your sink will. If either of those happens, you just wasted a shitload of time and materials because you were sloppy. Make sure your lines from the wall to the sink and the drip edge to the sink are perfect by using your square and splitting any differences. We'll lay out the sink next post. |
|
|
|
[#30]
OK, let's lay this sink out. You triple checked everything, right? After this step, we are in cakeville.
Using our center mark, we are going to measure from the face to the wall and make another center mark.  Now, extend that center line using both squares to the back wall (IMPORTANT! MUST BE SQUARE TO THE WALL AND FACE).   Now, we need to know the OUTSIDE dimentions of the sink rails. 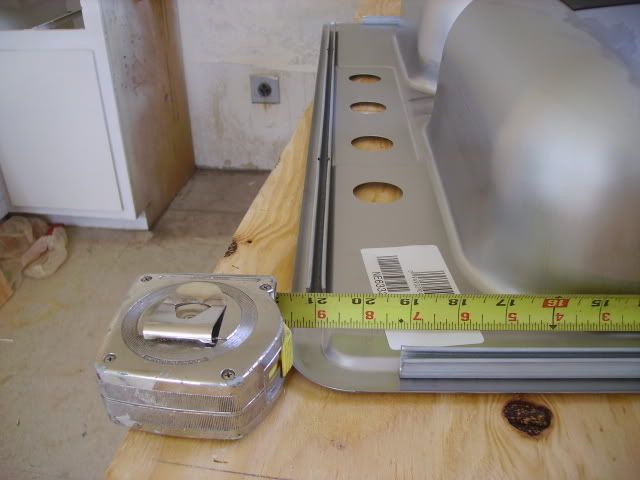 That's one. Now we need the other one. 32 1/4" Got it. 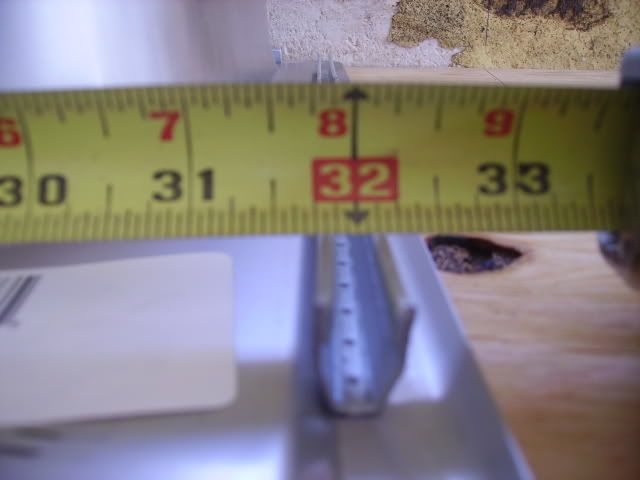 That is going to be the actual size of the hole we cut, which will allow the lip of the sink to sit on plywood AND tile, rather than just tile that will break when someone throws a hot pan full of noodles in there. Now we know all of our measurements, and if your centerline of your sink lines up, more power to you! But mine does not. And I'll tell you why. Remember that I am using drip edge that has a curve to contain the water? Perfectly centering this sink means that my front edge will not meet up with the drip edge the way I want it to. I will have about 1/8" gap between the sink edge and the drip edge, which will look like me - ugly! We can't have that. Another thing to consider is that I need to have tile on the back of the sink. Too little tile will just look horrible, but too much affects the drip edge on the front. See, the lip of the sink needs to sit ON the edge of the drip edge. Not too much closer, and no further. So, I need to lay this out with the front of the sink in mind. After I measured the drip edge, I determined my optimum edge is 2 5/16" from the face of the backer. If I center it, I get about 7/8", and that just won't work. 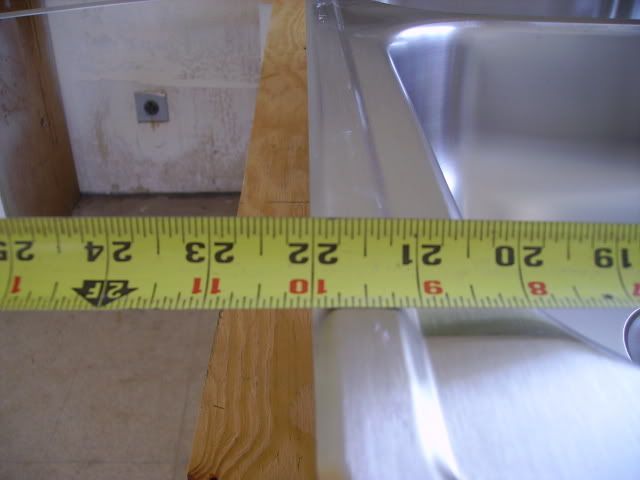 So I need to center from there. 1 1/2" from the back wall is not ideal, but it will have to do.  Then, that give me the dimension of 21 1/4" for the sink's rough opening. 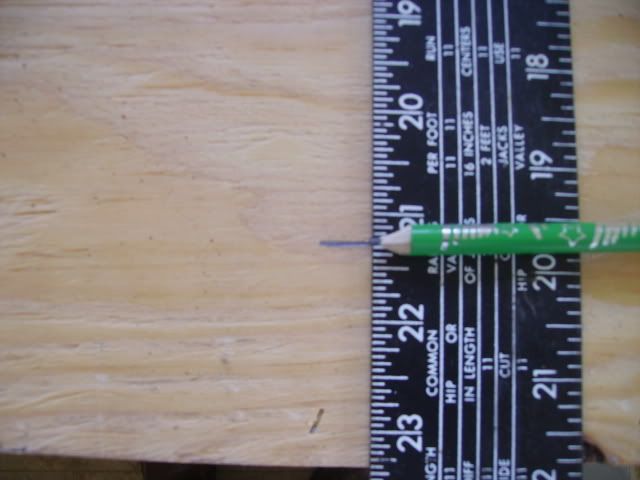 Finally, I connect the lines for cutting and mark my corners just to make damn sure I cut the right lines. Notice how my front cut mark is not proportional to my back mark? That's planning for the drip edge, folks, and all this planning is going to save you a world of hurt later. Take the time now, or you'll regret it later. 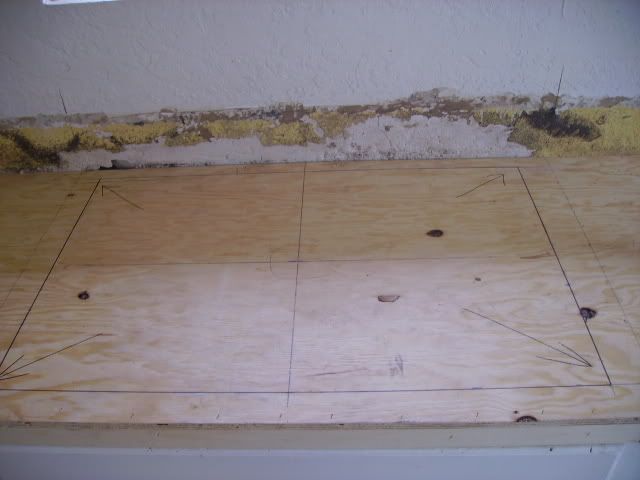 OK, I am going to head back over there. If there are any questions so far, please post them here and I will attend to them as soon as I grab a break. Also, input is appreciated. How am I doing so far guys? Too many pictures? Too few? Explaining it OK? Not enough? Talk to me people. |
|
|
|
[#31]
BTT for "my active topics"
|
|
|
|
[#32]
cool thread. It made me realize just how bad I would have dorked it up.
I'm curious how many years experience do you have doing this kind of stuff ? |
|
|
|
[#33]
tag
|
|
|
|
[#34]
Great pictures and instructions.
I've done some house renovation in the past and I will be doing a house this spring/summer. New roof and replacing a rotted deck are the biggest jobs. I wired my friend's barn in conduit once, only spoiled about 4' out of about 150'. I'll post some pics of my jobs, should I start a new thread? |
|
|
|
[#35]
Tag for my 1960s kitchen and 1970s bathroom and rats nest patch job wiring... |
|
|
|
[#36]
Tag!
Already started my own home project -- painting, adding crown molding, etc. I could have used some of the tips in this thread when I started out! Thanks for doing this -- this is great. |
|
|
|
[#37]
I started as an electrician in Jan of 1993, and worked for a company that did residential, commercial, and industrial installations and designs. On the weekends I framed houses with a local framing company. An industrial electrician has always been my primary job, but I loved the other trades, too, and made a lot of friends doing different things on the side and weekends. These were all professionals and dedicated contractors, and they taught me to always have pride and do the job the right way. I started doing property management about 2 years ago out of necessity after my leg was ruined, and I just took the experiences and applied them to multi-family housing. This is still a learning experience, and I learn a bunch on every project. But that's half the fun of it! |
|
|
|
|
[#38]
It doesn't matter to me. You can post em here or start a new one. But if you start a new one do me a favor please? At least put a link here or PM me the link - I'd like to see em! It would probably be better to start a new thread just so no one gets the pictures confused since this one is going. You agree? |
|
|
|
|
[#39]
Once you are 100% certain the sink lines up exactly where it needs to be, go ahead and bore out the corners with a spade bit and then, using your jigsaw, cut out the sink opening.
 Remove any excess material to square the corners. 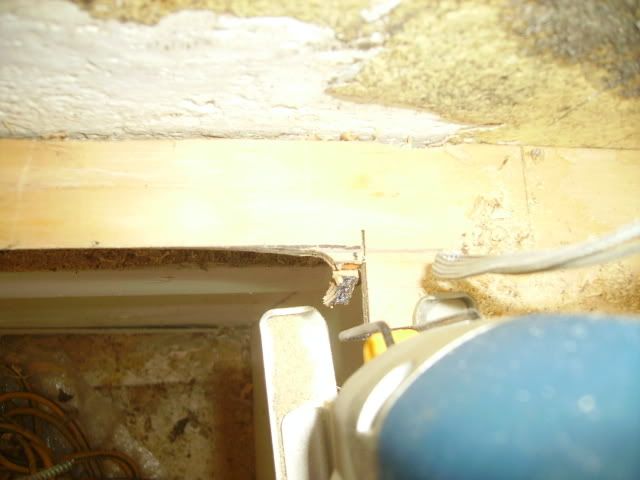 Now, test fit the sink in the rough opening, and open up any area you have to to get a good, solid fit that is perfectly parallel to both the front of the cabinets and the wall behind it. Once you are satisfied the sink is where she needs to be, go ahead and put your drip edge under the lip to check to make certain you are covering the rear edge of the bullnose, but that you are not in the cove. A good idea is to have the lip of the sink cover the bullnose by about 1/8" to 1/4". Adjust the rough opening as needed, and when it is all said and done it should look like this.  This will look awsome when finished. 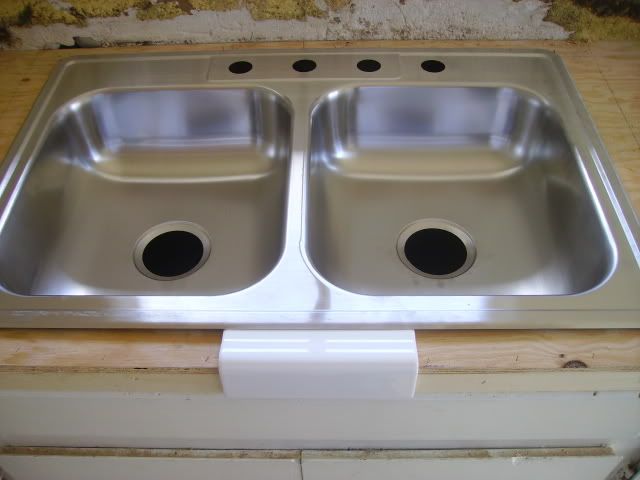 And now that sheet is in I can finish the rest of the deck surface. Some more Liwuid Nail:  And tag her in place, making sure you leave about a 1/16" gap between the sheets at the seam for expansion. 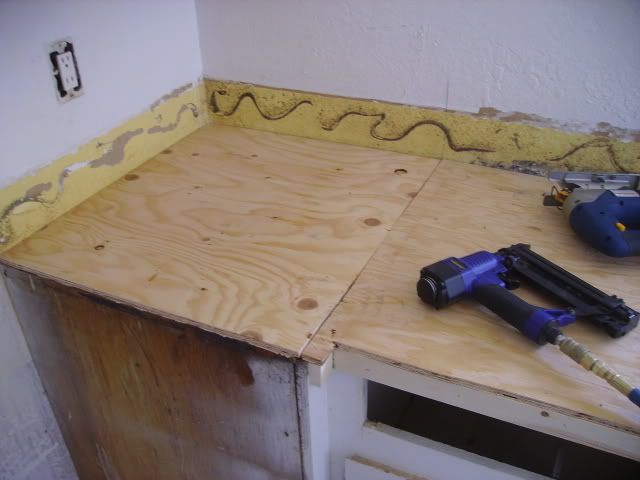 OK, we are ready to move on to the cement backer board. Most cement board for countertops comes in 3' x 5' sheets, and this product I am using is called Wonderboard - a composite material that is like cement, but lighter and not as prone to warping as actual cement board is. It is also textured on the top to provide extra grip for Mastik, which is the adhesive we use for shower and sink areas. I laid my pieces out to make certain my cement seams are not in the same location as my plywood seams - this is important. When I laid it all out, I found that keeping the first piece 3 feet from the wall would waste as little material as possible, so that is what I did. I then scored a pencil line for when I moved it and replaced it. 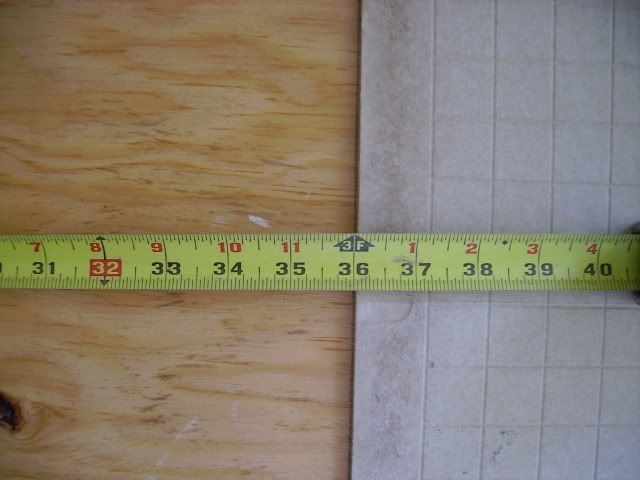 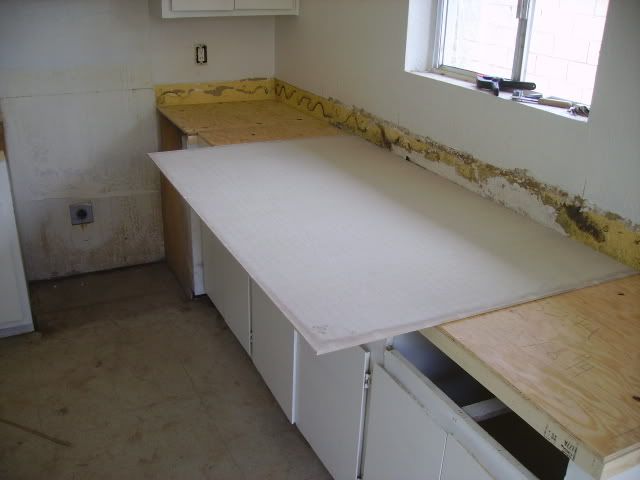 Then I crawled underneath and scored my cut line, flipped her over, and clamped her into place. 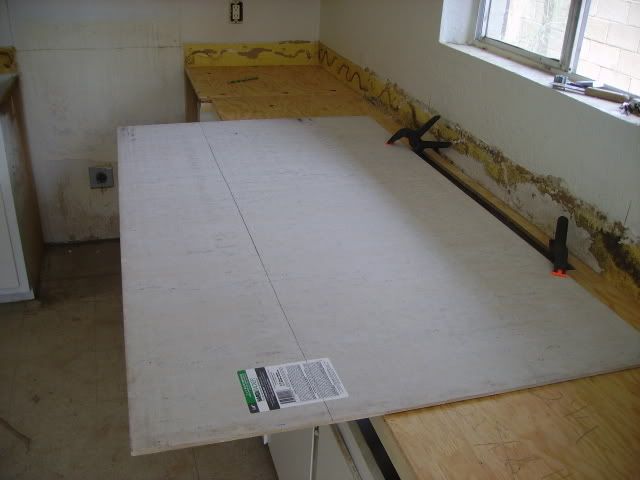 VERY IMPORTANT! Do not try this without the proper tools! I am using a grinder with a cement cutting wheel, but they also have them for circular saws. I just prefer the grinder because there are often rounded corners on some of the other counters I do custom tile for, so I am set up for that. You also need a dust mask, eye protection, and hearing protection. Cutting this stuff is NASTY work, best left to do outside. It creates an enormous amount of dust, and needs to be cut dry. 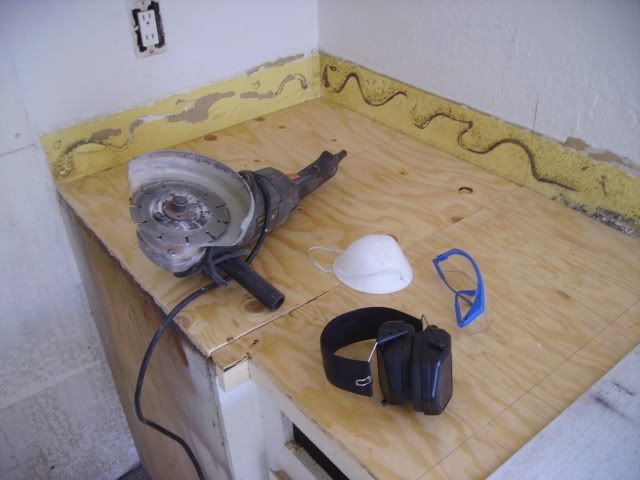 Begin the cut working one side to the other, and remember this stuff is both heavy and fragile. You'll need another person to support the cutoff piece or it will break, which makes the installation harder.   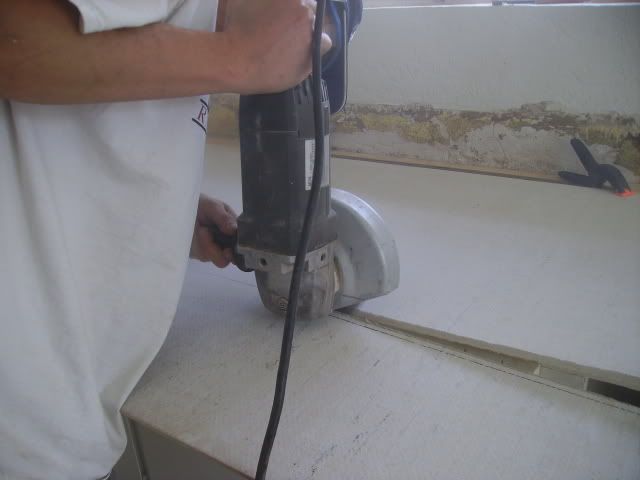 Now, use your sheetrock rasp to round the edges and remove any straggling coating that has the tendency to look like string cheese so you have a clean edge.  Lay your other pieces down, using the cutoof from the first two to fill in the smaller areas. In other words, cut the smaller areas last.  Trace from underneath 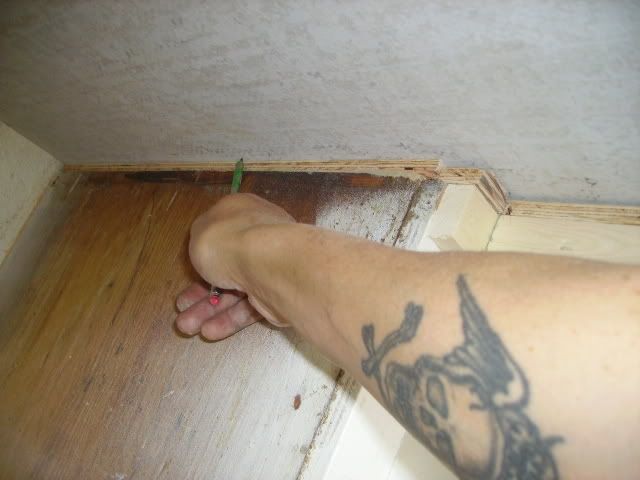 Cut those, and then trace from underneath the sink opening. When you cut the sink opening, make sure the cement board completely covers the plywood so that the sink will not be supported by the backer board! If the plywood isn't right and you try to make up for it with the cement board, it will eventually break and the sink will fall through the opening. The cement board is for bonding and is in no way intended to support ANYTHING ever.  Cut all of this and then lay it all into place, but do not secure it yet. First, we want to check the sink again. Again, this is the focal area so we need it to be perfect! Make certain it is parellel to the front of the cabinets and the rear wall, and that it is supported by the plywood and is centered with the cabinet doors (or opening if you will be installing doors later). Absotively perfect!  And with the window, no less! You can also see where my work was not properly supported and the board broke and had to pieced in. Tsk, Tsk, Richard - you know better than that!  And next post we'll install this and prepare the other cabinet. |
|
|
|
[#40]
Now that I am satisfied everything is how I want it, it is time to secure the backerboard. Clean the area real good so it is free of any dust and debris! Use a wave pattern of Liquid Nail with a 1/8" bead, and space the waves a few inches apart (not an exacting science of course).
 My breakage   Once you have it all glued, press it down into the liquid nail and then nail it. Cement board should be nailed every 4 inches on the perimeters and the every square 6 inshes in the body. In other words, nail the perimeter and then do a center row of nails spaced 6 inches apart. Then, every six inches apart from the centerline working towards the perimeter with the nails spaced 6 inches from each other in all directions. But I'm telling you, a pnumatic stapler with 1/2" staples is going to save you a LOT of time nailing in nails and reduce the rish of you penetrating the side walls of the cabinet rails and internal dividers. Trust me, it is a worthy investment and if you have ever done this with a hammer and small nails you'll vow never to again. A 1/2 nail and hammer is really, really difficult to work with, and the cement board bends the crap out of them, so you WILL have sore fingers, I promise. If you do decide to nail, make certain the nail heads are perfectly flush or recessed a little into the backer board. Anyway, once that cabinet is done I moved to the other and did the plywood and backer the very same way as the first sans the sink considerations. Lay out plywood, pencil cut lines from underneath, cut the wood, test fit. Then, apply Liquid Nail  And tag into place, perimeter nailing and using the scribes to locate the internal supports. 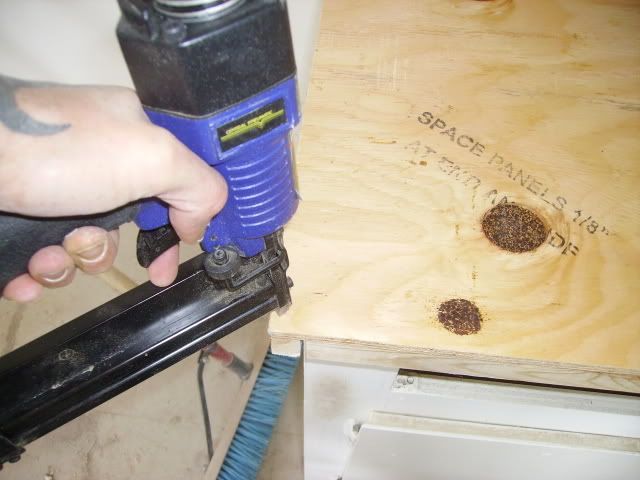 Lay out backer board so I have the minimum waste 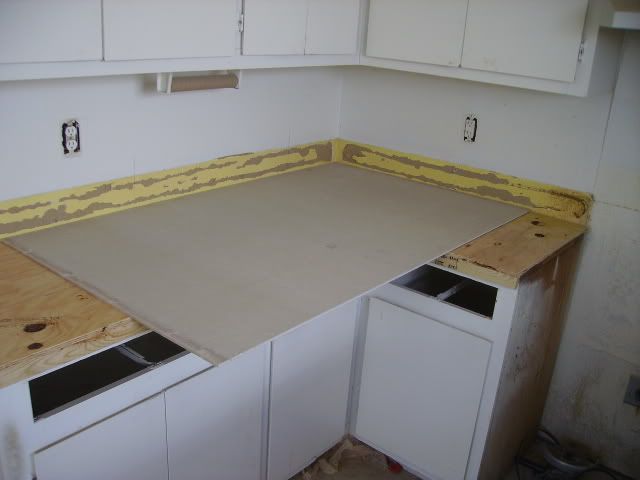 Cut the bigger pieces first, and use the cutoff to fill in smaller areas making sure my deck and backer seams do not fall in the same place 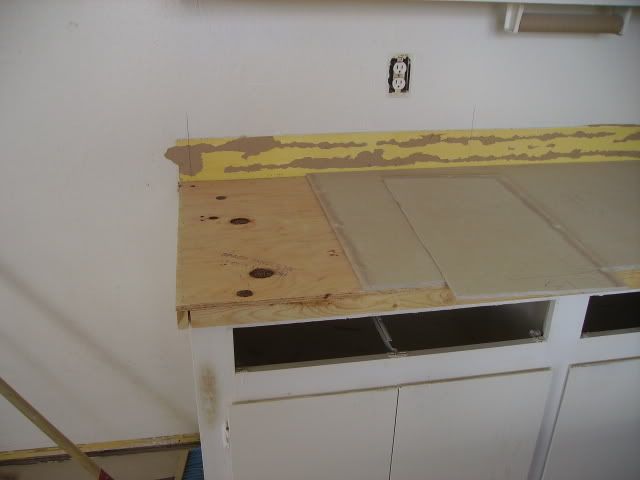 Test fit all the pieces, and make my Liquid Nail waves 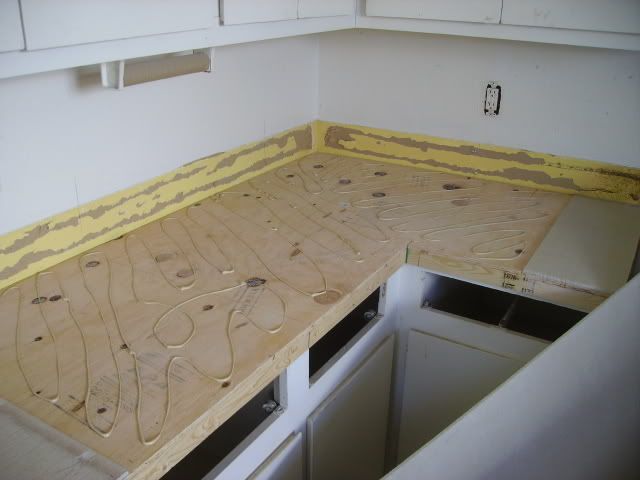 Nail as described above. OK, kitchen cabinets are done and ready for tile, so I did a really good cleanup, drained the compressor, put away the tools, and had a beer. Tomorrow (today, actually) I will be fixing the vanity in the bath and getting it ready for tile, and then finishing our mud on the sheetrock patch. Stay tuned! I hope this is helping a few of you out there and I am not wasting the hours it takes to snap and host the pictures and type the directions and descriptions. How am I doing so far? Any comments? |
|
|
|
[#41]
I'm fascinated with your tutorial but I'm a little behind in my reading. Maybe I will catch up this weekend. |
|
|
|
|
[#42]
Thanks. Not looking for recognition or anything, just don't want to waste the bandwidth if it isn't being helpful. Of course, we haven't gotten to the fun stuff yet, which is the actual installation process, so I'm hoping it will get better. I think once the tile begins going in the really interested parties and critics alike will join right in. |
||
|
|
|
[#43]
Wow, beautiful work. I usually do my own work at home but it is not my profession,you have given me some ideas for my new house (I'm moving) and your advise and tips will make the jobs I want to do look pro. I really like the tile job you did in the bath, absolutely beautiful.
|
|
|
|
[#44]
Huh? I haven't done any tile work in the bath yet! In fact, I haven't done any tile work in this unit anywhere yet! My owner, or one of my tenants? LOL, not many people have seen my work that post here... So what tile work, where (street is enough) and any idea when I did it? I love satisfied customers, but no one here on Arfcom has seen my tile unless you know me or are one of my employees. So fees up, who you be? Or do you mean the shower surround? If so, I disagree. It looks like shit and was done over a year ago and the tenants ruined it. That's probably my WORST example of tile. If it were up to me, I'd rip that crap out and do it again just because I don't want my name ever associated with that type of work. |
|
|
|
|
[#45]
tagalicious
|
|
|
|
[#46]
Thanks for your efforts well done!
I'll be using this thread as a reference when I move in a few months into whats surely to be a fixer upper. Looking forward to installation. |
|
|
|
[#47]
Excellent tutorial. It has definately given me more insight into the planning phase. Usually I just jump into my projects and fit things together as I go. Then I usually spend 90% of my time running around getting supplies, tools, or trying to figure out what to do next. Keep up the good work it is definately helpful. |
|
|
|
|
[#48]
Thanks, I'm going to retile my bathrooms when I get the time, so I'm looking forward to the tile part!
I've been reading a lot of "how to tile" web pages, and your level of detail and tips is some of the best I've seen. |
|
|
|
[#49]
bump
|
|
|
|
[#50]
tag
|
|
|
 Win a FREE Membership!
Sign up for the ARFCOM weekly newsletter and be entered to win a free ARFCOM membership. One new winner* is announced every week!
You will receive an email every Friday morning featuring the latest chatter from the hottest topics, breaking news surrounding legislation, as well as exclusive deals only available to ARFCOM email subscribers.

AR15.COM is the world's largest firearm community and is a gathering place for firearm enthusiasts of all types.
From hunters and military members, to competition shooters and general firearm enthusiasts, we welcome anyone who values and respects the way of the firearm.

Subscribe to our monthly Newsletter to receive firearm news, product discounts from your favorite Industry Partners, and more.
Copyright © 1996-2024 AR15.COM LLC. All Rights Reserved.
Any use of this content without express written consent is prohibited.
AR15.Com reserves the right to overwrite or replace any affiliate, commercial, or monetizable links, posted by users, with our own.


