|
Posted: 8/15/2008 1:00:26 PM EDT
Well I see 2-3 questions each week asking about this topic. I have to admit I was curious about this topic too, mainly because I knew that I was going to have to do it to the rifle that I was building. Well I just did it today and it was as easy. I took pictures along the way and used no fancy tools. I have access to a milling machine, but choose to use a drill press, because that is all you really need. I know that there is a great tutorial on how to do this at the top of the page, but I figured I would show how I did it and that I did not use half of a machine shop to do it. I hope that this will encourage those of you that know how to weld and have a welder to do it yourself and save some money for other goodies.
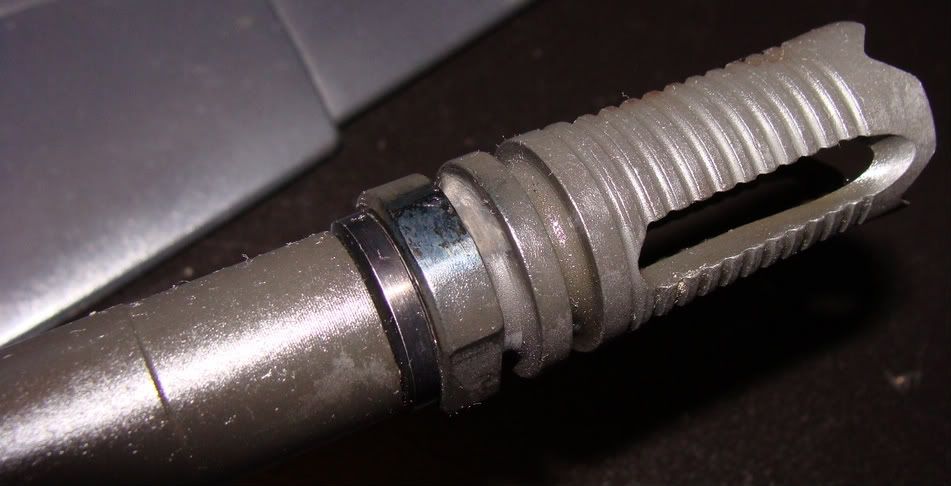
Here are a list of the tools I used: Center Punch Drill Press (and drill bit) MIG Welder (030 solid core wire with Argon/CO2 gas) Dremel tool with a grinding stone Aluminum tape (like you use on HVAC ducts) Start by marking and center punching the bottom center of your flash hider. 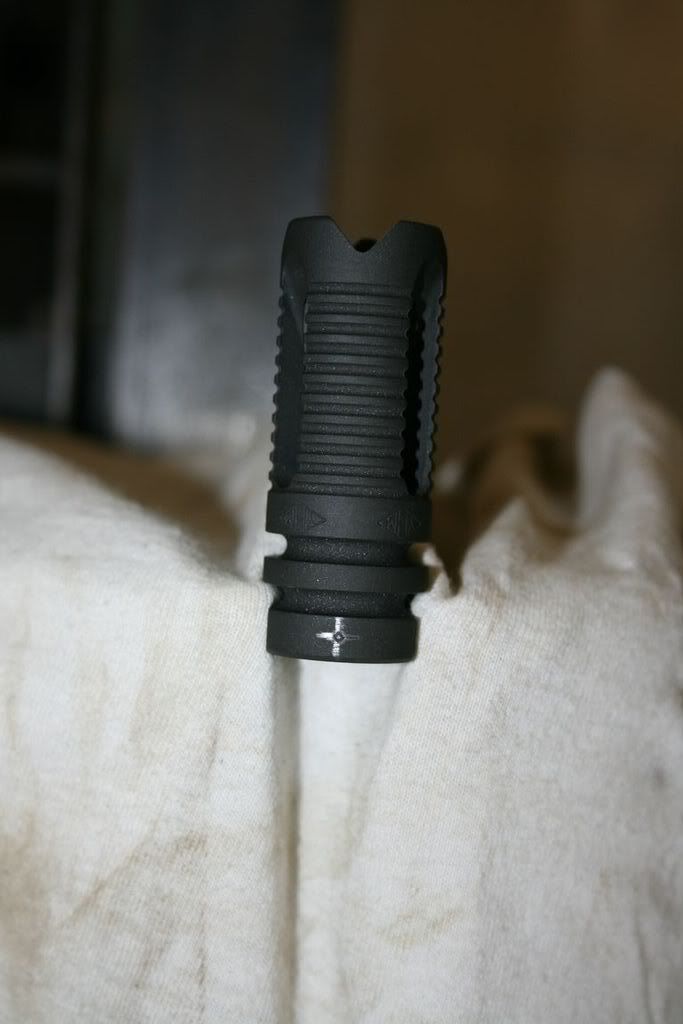 Next you have to drill a hole in the flash hider, use a drill press vice to hold it straight. 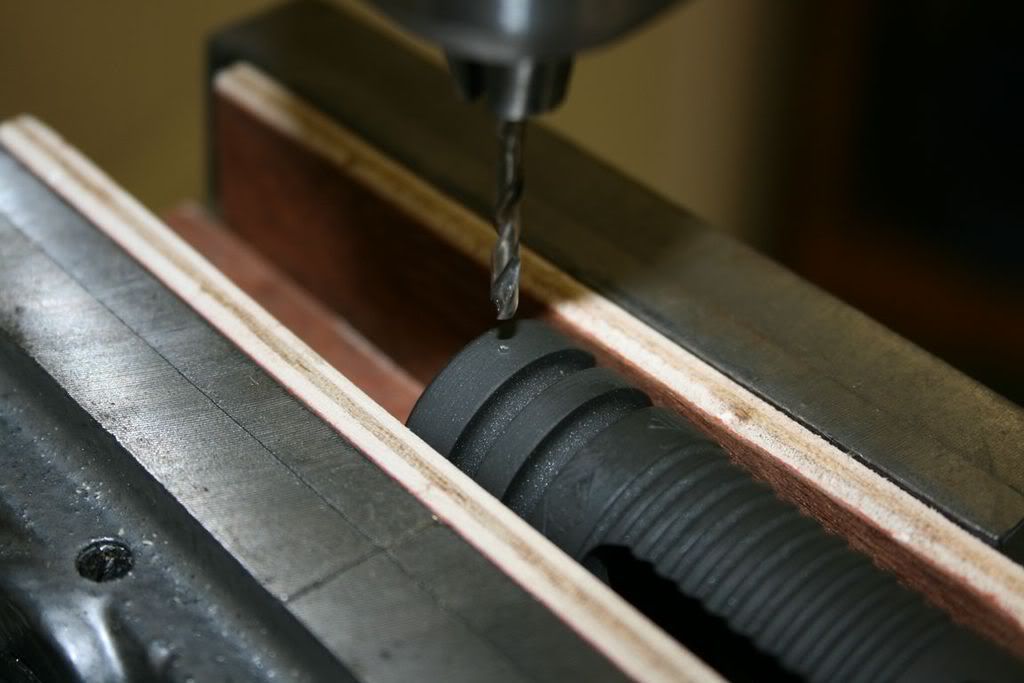 Drill the hole and be careful not to go so far as to hit the threads on the other side of the flash hider. 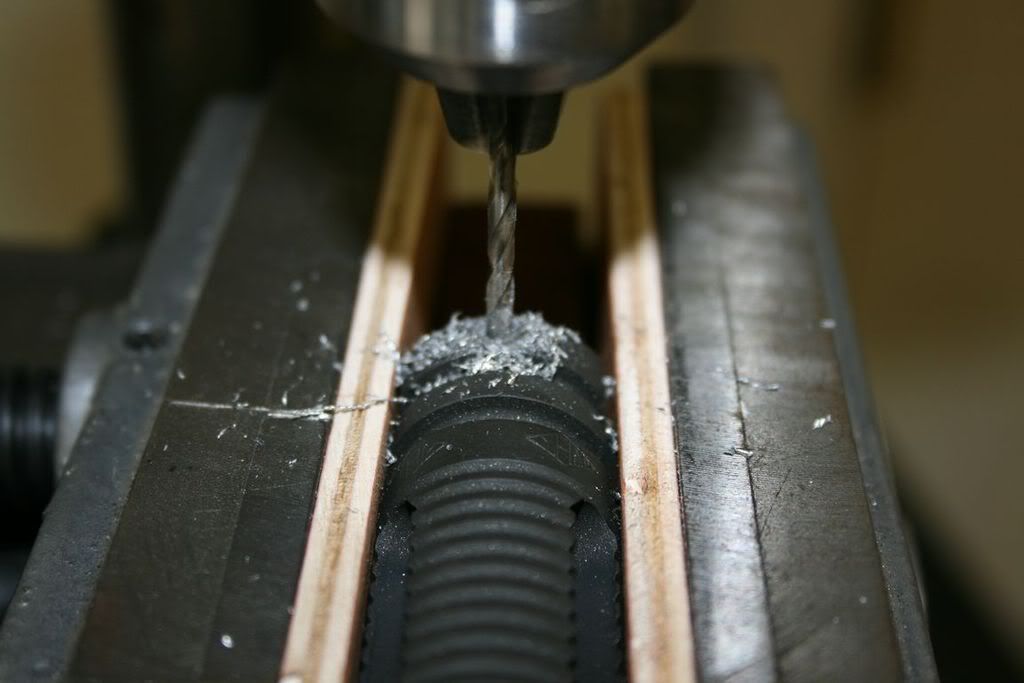 At this point you should have something that looks like this. 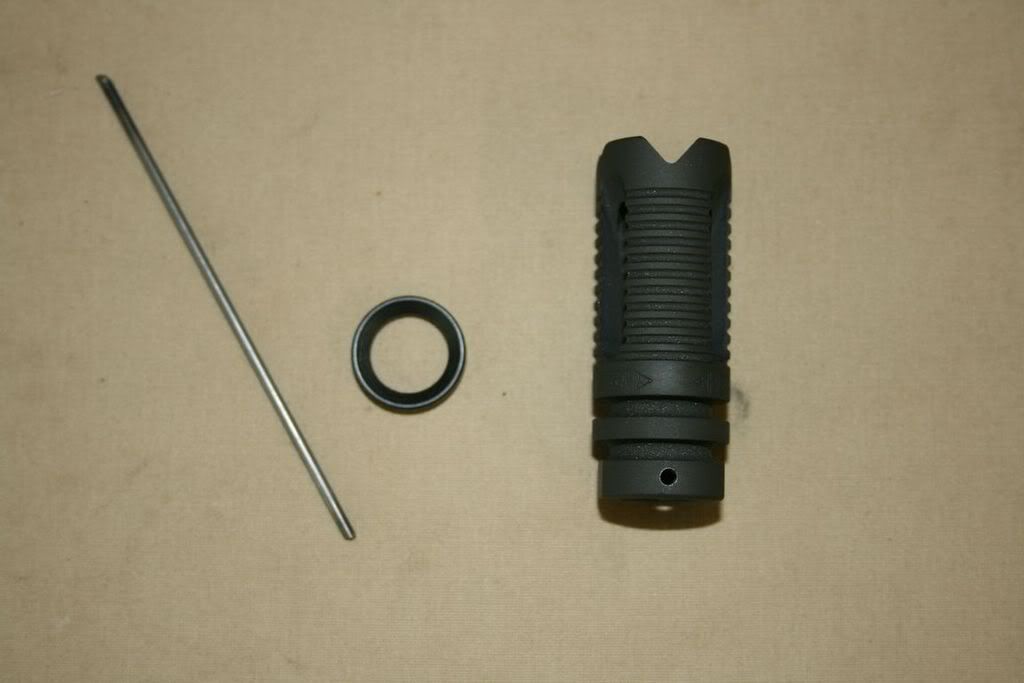 Now you will want to install the flash hider on your barrel and torque/index it to the correct spot. Once this is done it's time to drill through your hole you just drilled and into the barrel. You only need to go 1/16" deep into the barrel. Be very careful here or you could drill all the way through and ruin your barrel. I used the drill stop built into my drill press. 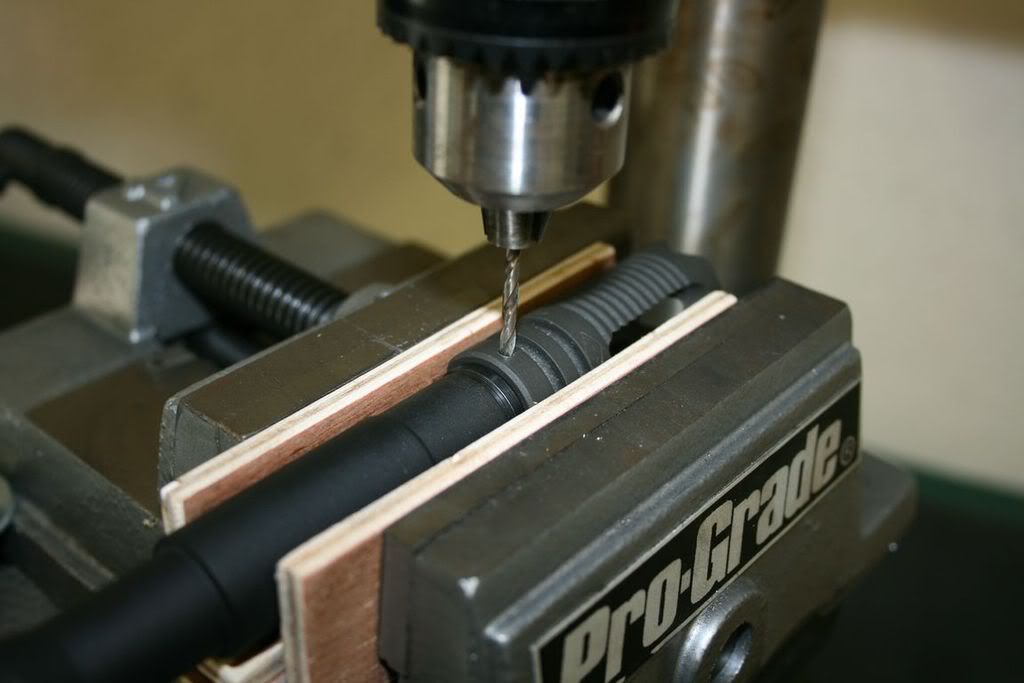 Now you should have something like this. You do not need to unscrew your flash hider, I did it only so you could see the shallow hole in the barrel. 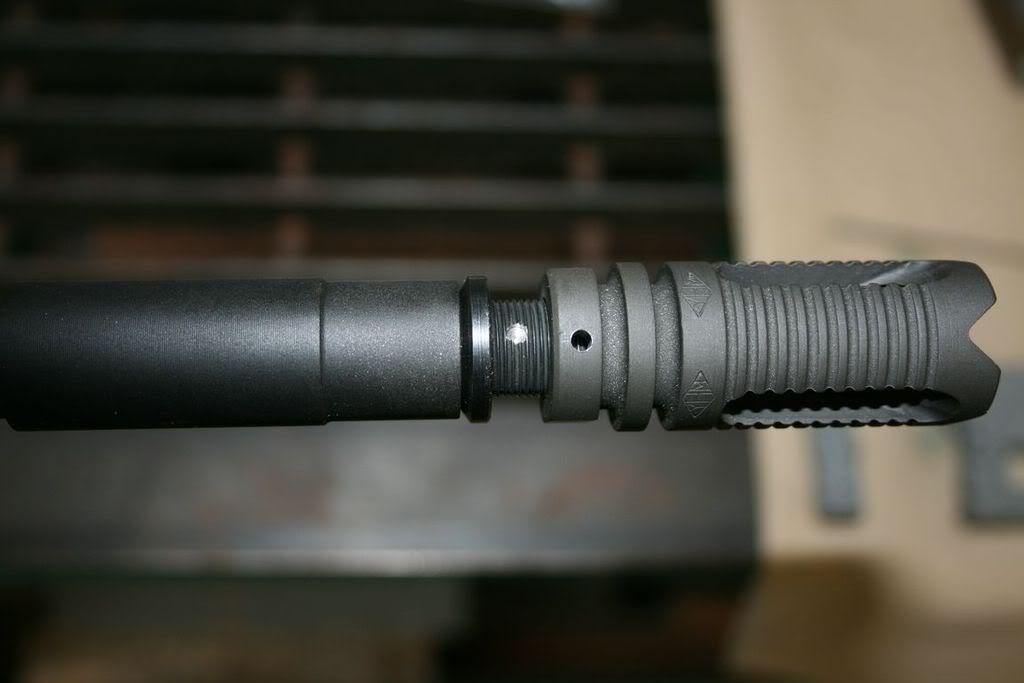 Now it's time to cut your pin to length. An easy way to mark it is to drop the pin in the hole and spin it while holding a razor blade against it to scribe a line. You will want to cut it 1/32" to 1/16" shorter than the line. 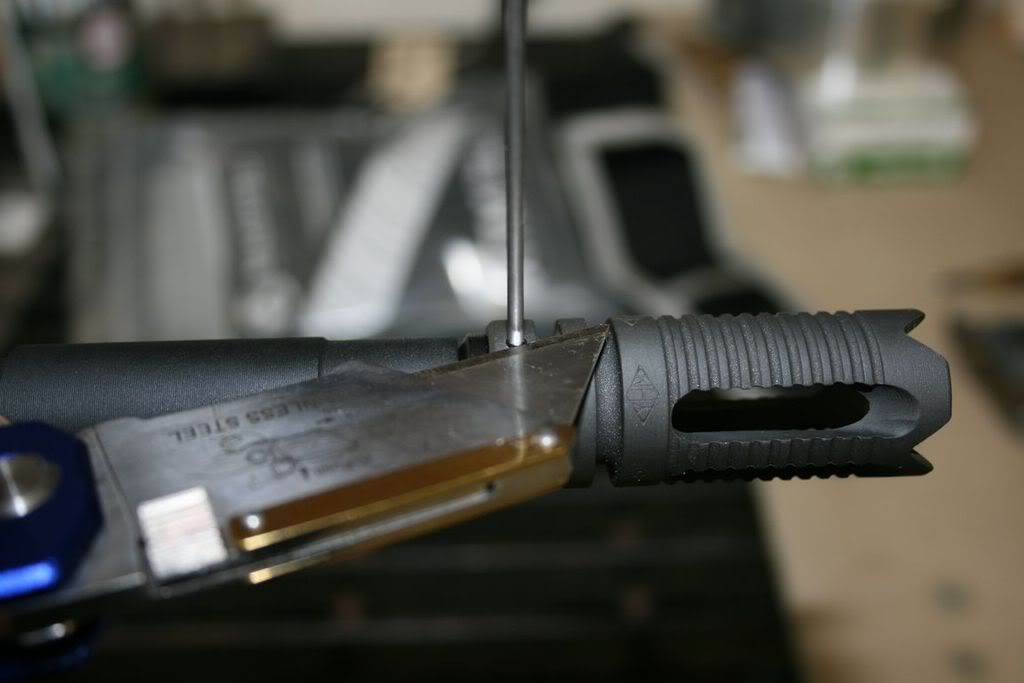 Now drop the pin in the hole and make sure that it is slightly below the surface. Cover all the surrounding area with aluminum tape so any welding splatter will not stick. I covered the rest of the upper with a wet rag. 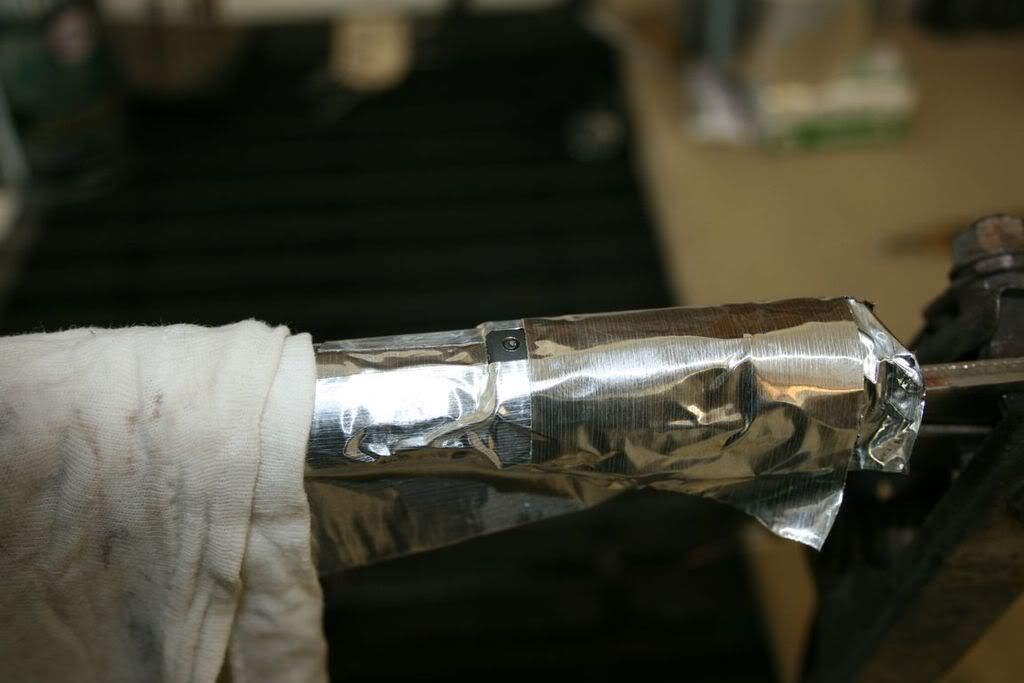 It's time to weld over it. All you need is a good tack. If you will look you will see a pair of needle nose vice grips with my welders ground clamp on them. I scratched the finish off of a tiny spot on the inside of my flash hider and clamped the needle nose there for my ground. 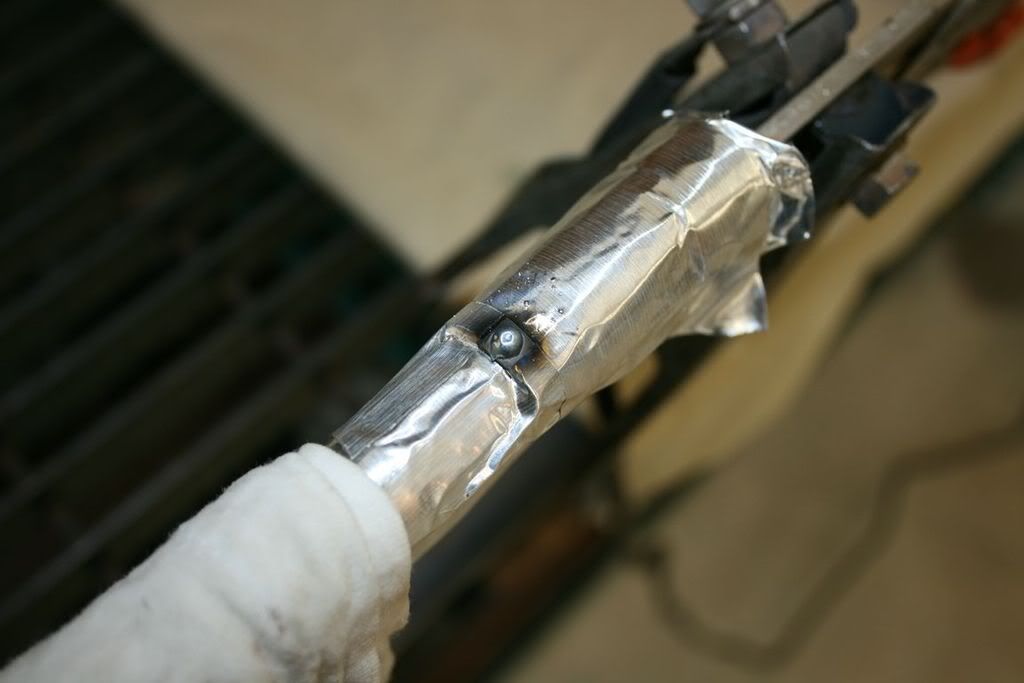 Now use a Dremel or a file and cut down the spot weld until it is flush with the surface of the flash hider. Don't worry if you file away some of the finish...we have to re-coat it anyway....just don't get carried away. 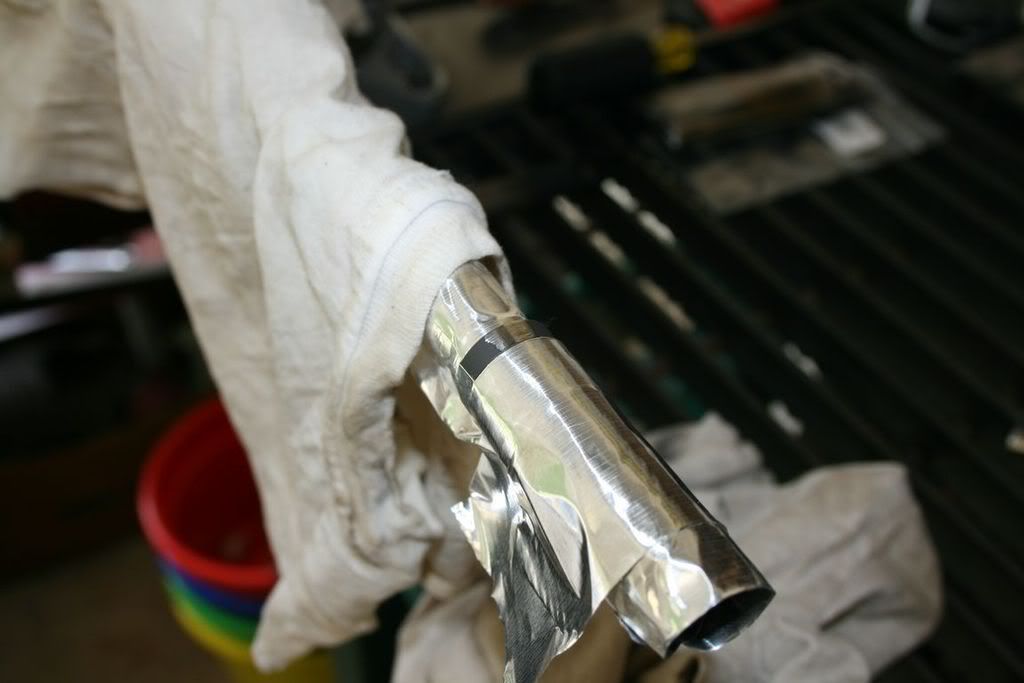 Here is the finished product. You can use whatever you want to cover the bare metal from grinding the weld off. I choose to just use some flat black BBQ grill paint. If it wears real bad or wipes off when I clean it....I will do some thing else. I taped off only the back ring and just down to the flats where the wrench goes. By doing this I only painted the bottom 1/3 of the back most ring. The rest of the flash hider still has the factory finish. 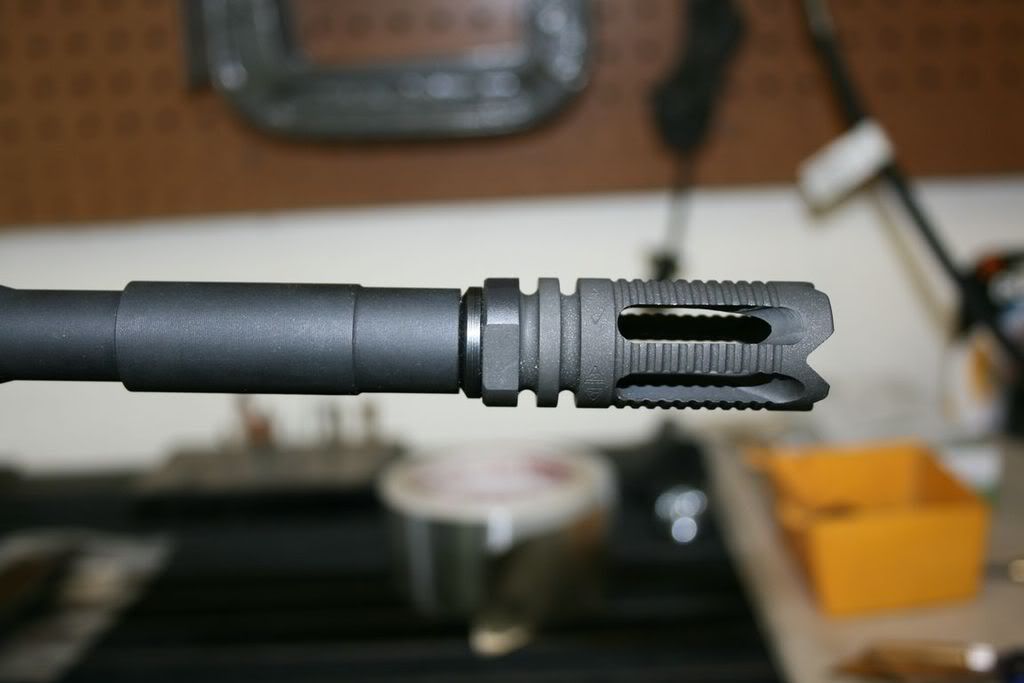 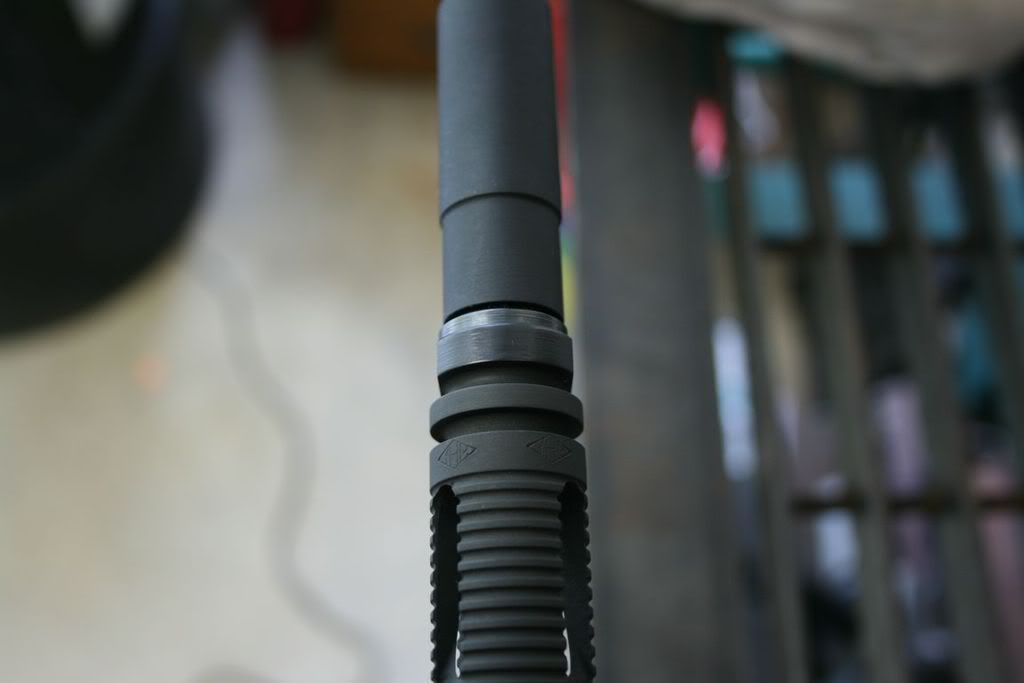
|
|
|
|
[#1]
Nicely done
|
|
|
|
[#2]
very nice ,and it will keep the BTAF off your back and save you a $200.00 SBR fee. sure would be nice to get them to repeal that STUPID law.
|
|
|
|
[#3]
What kind of welder???? 110? oxy acet. or no gas?
|
|
|
|
[#4]
I used a 110 volt MIG welder. It's a Lincoln SP135 that I bought at Lowe's 6-7 years ago. It is perfect for small projects at home. I used .030 solid core wire and Argon/CO2 for my shielding gas. I would not recommend fulxcore wire on a MIG welder for this application, only solid core wire and Argon/CO2 for the shielding gas. There are only two methods that I would recommend to do this. One is the way that I did it with a gas shielded MIG welder, the other would be a TIG welder. The TIG would be the better choice, but most people don't have them. |
|
|
|
|
[#5]
NICE
The only difference I've done is I tapped the hole for 6x32 threads and used a set screw. I figured that being able to snug the set screw into the barrel dimple would make sure there was zero play in the flash suppressor. Also, being somewhat anal I used a set screw on both sides of flash suppressor (180 degress apart). Unfortunately I had to have someone else weld it as I don't have the skills. PursuitSS |
|
|
|
[#6]
Wow, very nicely done mang!
|
|
|
|
[#7]
awsome post duckcmmndr!
|
|
|
|
[#8]
How do you know the dip in the barrel is deep enough to prevent turning the flash supressor off with a wrench? That little dip looks awfully shallow to me (could just be camera angle, though). If the BATFE can wrench your FS off, you're screwed.
I would have done this myself before now instead of having Bushmaster and ADCO do it, if I had known how deep was deep enough to prevent JBTs from torquing it off. Nice writeup! |
|
|
|
[#9]
The hole in the barrel is roughly 3/32 deep, that is not counting the thread depth. If you can wrench that off....you will ruin the flash hider and the threads on the end of the barrel. Trust me, it ain't coming off. It does not take much depth to secure it in place. Have you ever seen a nut that had a allen head set screw threaded through the side of the nut? If that set screw is tight, you won't be able to budge that nut and that is with surface pressure on the threads. The pin that I installed is sub-surface. You would have to turn with enough force to shear the pin and I can tell you from cutting it with my cutters that it takes a good deal of force. I am not worried the least little bit. |
|
|
|
|
[#10]
Well done with the pics!
Just curious ... why would one be required to permanently install a flashider? What would be a situation where it is deemed mandatory? I’ve heard of this being done, but never understood the point. |
|
|
|
[#11]
Ah, I see. I may give this a shot myself then. Thanks!
Unless you fill out a form to have a short-barreled rifle (SBR), get it approved with the feds (and local LEOs), and pay a $200 tax stamp, you have to have a barrel length of at least 16". Shorter than 16" and no SBR = stay in Club Fed. If you take a 14.5" barrel and stick a Phantom flash suppressor on it and permanently attach it, it counts as barrel length and makes it 16"+. The BATFE says drilling, pinning, and welding over like the OP did above is approved for "permanent attachment." |
|
|
|
|
[#12]
Looks awesome.
|
|
|
|
[#13]
By the way, what did you use for the pin? It looks like some kind of steel wire, or something. I am seriously considering doing this myself, as I have a pretty nice drill press w/vise and my brother has a TIG welder.
Would JB Weld work instead of the welder, or would that be tempting fate/JBTs? |
|
|
|
[#14]
a job well done
|
|
|
|
[#15]
 |
|
|
|
[#16]
I wouldent trust JB weld, although if it were acceptable i'd probably do it to save $$$. OP i was also wondering what you used for the pin... |
|
|
|
|
[#17]
The wire I used was a piece of oxy/acetylene filler rod that I had laying around. It was a 3/32 mild steel rod that has a melting point of over 2500° F and has about 65,000 PSI tensile strength. Any small diameter mild steel rod will work fine. It's also a NO on the JB Weld....it would work fine I have no doubt, but the ATF approves welding, so you should stick with that. Go for it and do it yourself, it was really easy. Just take your time and it will turn out great. |
|
|
|
|
[#18]
when I can get the funds up to send off for a 14.5 that I agreed to buy here on ARFCOM I will be pinning an AAC blackout mount to it
|
|
|
|
[#19]
I was considering doing something like this, but using silver solder instead of welding. I was also thinking about drilling and tapping the FH and using a setscrew (which I happen to have a few of, sitting around) into the drilled recess on the barrel. Brownells sells stuff to blacken silver solder. I was wondering if that would be acceptable to the powers that be. |
|
|
|
|
[#20]
How would you propose I perm. attach a FH when the hole is ALREADY drilled into my barrel threads? I had to take it off to do some work and now I need to put a new FH on. Again, the hole is already drilled into the threads and I need to re-attach a FH.
|
|
|
|
[#21]
Assuming the threads still work, and you can thread the new one on, why can't you just drill/pin/weld in a different spot (say on the side or on top instead)? I think most people only pin at the bottom because when you reblue it, you never get it looking 100% factory, so they try to hide the spot on bottom. |
|
|
|
|
[#22]
I would just move to a different spot and drill a new hole. You could use a caliper to measure from the flange on the barrel to the center of the hole then tighten your new flash hider in place and use the caliper to scribe a line on the new flash hider....but that would only get you close and not exact. Your best bet is to just move over to one of the sides and drill a new hole, you might even be able to still fit the new hole to the left/right of the existing hole on the bottom. |
|
|
|
|
[#23]
You can't use JB Weld, the minimum would be 1100 degree silver. I've done two with 1100 degree silver solder and a propane torch, on the first one, the parkerizing on the barrel discolored because I got it too hot, so I had to repark the barrel. The second came out fine, since I was more careful with the torch. Don't use the silver solder you find at Home Depot or Lowes, those are 700 degrees max, and don't meet the BATFE requirements. Once soldered, the solder grinds down well, and takes parkerizing well. When I reparked the first barrel, you could not tell where the pin went in - it looked just like the rest of the FH.
|
|
|
|
[#24]
.....so where do i get the 1100 degree silver solder? |
|
|
|
|
[#25]
Good job with the tutorial. I just did my first thanks to this!
|
|
|
|
[#26]
Good job on the tutorial. This is excellent stuff. I vote this post should be pinned. (Pardon the pun)
|
|
|
|
[#27]
Thanks guys....I wanted to show that the average person could do this. There is a good tutorial on here already, I did show a few tips that help you along the way. Thanks again for the complements, I am glad that it is helping people have the confidence to tackle this chore themselves. |
||
|
|
|
[#28]
I just got mine done today, thanks for the help.
|
|
|
|
[#29]
First off,to the OP: Very well done! I'm gonna do that as soon as BCM gets their 14.5" back in stock. Now,why wouldn't the 700 degree solder work? Isn't it perm attached? I mean,you can't take it off if it's pinned,right? I thought perm att. meant that you can't just unscrew the FH. To take it off you would still need to heat it up. I'm just asking beacuse I'm looking for alternate methods to do mine. I have access to all the tools the OP mentioned at the shop,but still wondering what the ATF definition of permanent is. |
||
|
|
|
[#30]
groups.msn.com/TheMarylandAR15ShootersSite/howtoattachamuzzlebrake.msnw |
|||
|
|
|
[#31]
Thanks Branspop,but I wanted to know the definition of perm att. I think I'd rather do it the way the OP did it. Less discoloration and plus it looks very nice! I thought JB weld would work or maybe even Loc-Tite,because those FH's aren't going to come off with that stuff! ETA: spelling |
||||
|
|
|
[#32]
Can we get this thread tacked as it has lots of good info in it?
|
|
|
|
[#33]
I am most likely going to be tackling this task within the next couple of days. I have all the tools, but my Hobart 220v is currently on flux. Is there any particular reason why not to use flux? I wish I was on gas, but just haven't gotten around to it. I know it's uglier and a PITA, but in my opinion, it should work fine, no? Just as long as everything is taped off from splatter? Or is it a heat thing?
|
|
|
|
[#34]
I think Flux will work ok, I have not welded with flux core wire in a long time.
Here is what I would do. I would try on scrap first. Get a 1/4" thick piece of steel and drill the same size hole that you are planning to in your FH....then cut your pin so it sits just below the surface and try to put a good tack on top of it. I would even go as far as to grind the tack flush just to see if you got good penetration around the pin. You may have to turn your heat up a tad since all we are doing is a good tack. Just practice untill you have the heat setting right and feel comfortable doing it on your FH. |
|
|
|
[#35]
Yea, I can melt through 1/4" angle on a medium setting
Thanks ~ Trevor |
|
|
|
[#36]
This is so good I have to bump it.
|
|
|
|
[#37]
Nicely done! Good write up and clear pic's.

|
|
|
|
[#38]
WOW! . . . great job!
So, when are you going to start taking orders to do this for folks that don't have that kind of equipment and how much will it cost us?? 
|
|
|
|
[#39]
Quoted:
This is so good I have to bump it. Quoted:
Nicely done! Good write up and clear pic's. Thanks guys....I am glad that it helped ya out. |
|
|
|
[#40]
Quoted:
WOW! . . . great job! So, when are you going to start taking orders to do this for folks that don't have that kind of equipment and how much will it cost us?? Trust me....I have considered doing just that. It would be nice to make a little extra money on the side to help fund this damn EBR disease that I have contracted. |
|
|
|
[#41]
Let us know . . . with that kind of quality, I'm sure you will get plenty of work!
|
|
|
|
[#42]
I followed the directions here, worked freekin awesome.
|
|
|
|
[#43]
Quoted:
I followed the directions here, worked freekin awesome. http://i200.photobucket.com/albums/aa232/brdvictim/AR15s/DSC01449.jpg Very good. I am so glad that the time I took creating the post has helped folks do this themselves. Yours turned out great. Nice job on grinding the weld down. Looks like you put some "cold blue" on it to cover the shinny spot. Nice job, makes ya feel good that you did it yourself. |
|
|
|
[#44]
Quoted:
Correct on the cold blue. And it does feel good. I used a big bench grinder then a polishing wheel on the other side to clean it up.
Quoted:
I followed the directions here, worked freekin awesome. http://i200.photobucket.com/albums/aa232/brdvictim/AR15s/DSC01449.jpg Very good. I am so glad that the time I took creating the post has helped folks do this themselves. Yours turned out great. Nice job on grinding the weld down. Looks like you put some "cold blue" on it to cover the shinny spot. Nice job, makes ya feel good that you did it yourself. |
|
|
|
[#45]
Very good post.. Thanks for sharing. Going to have to save this information!
Very clean job. What did you use to clean it up. Finish looks flawless. |
|
|
|
[#46]
Quoted:
Very good post.. Thanks for sharing. Going to have to save this information! Very clean job. What did you use to clean it up. Finish looks flawless. I used a sanding drum on a dremel to clean up the weld and sprayed it with flat black high temp paint like you use on a BBQ grill. I only painted the bottom half of the back ring. The paint has held up great for a year now, if it starts to wear I will spray it with Norrell's Moly Resin. |
|
|
|
[#47]
I want (have) to do this to a gun I am building up. I have a small (80 amp) 110 mig welder I bought a couple of years ago. It does not utilize an argon shielding gas. Do you think it would work? I bought it a couple of years ago for a project that never happened and it has sat in the cellar since. I know you do not recommend flux core wire but if I am careful do you think I could do this one flash hider?....Thanks....<><....:)
|
|
|
|
[#48]
Quoted:
I want (have) to do this to a gun I am building up. I have a small (80 amp) 110 mig welder I bought a couple of years ago. It does not utilize and argon shielding gas. Do you think it would work? I bought it a couple of years ago for a project that never happened and it has sat in the cellar since. I know you do not recommend flux core wire but if I am careful do you think I could do this one flash hider?....Thanks....<><....:) A flux core welder will work, but the heat/wire speed needs to be perfect. The simple thing to do is to take some scrap plate and practice doing spots. Once the welder is set and you are happy with your spots drill a hole in the scrap plate, cut a pin, drop the pin in the hole and spot over it. Grind the weld down and check for good penetration, if all looks good then your set. |
|
|
 Win a FREE Membership!
Sign up for the ARFCOM weekly newsletter and be entered to win a free ARFCOM membership. One new winner* is announced every week!
You will receive an email every Friday morning featuring the latest chatter from the hottest topics, breaking news surrounding legislation, as well as exclusive deals only available to ARFCOM email subscribers.

AR15.COM is the world's largest firearm community and is a gathering place for firearm enthusiasts of all types.
From hunters and military members, to competition shooters and general firearm enthusiasts, we welcome anyone who values and respects the way of the firearm.

Subscribe to our monthly Newsletter to receive firearm news, product discounts from your favorite Industry Partners, and more.
Copyright © 1996-2024 AR15.COM LLC. All Rights Reserved.
Any use of this content without express written consent is prohibited.
AR15.Com reserves the right to overwrite or replace any affiliate, commercial, or monetizable links, posted by users, with our own.


