|
[#1]
Originally Posted By bradpierson26:
I'd love to see this Seriously? Legs would look something like this: 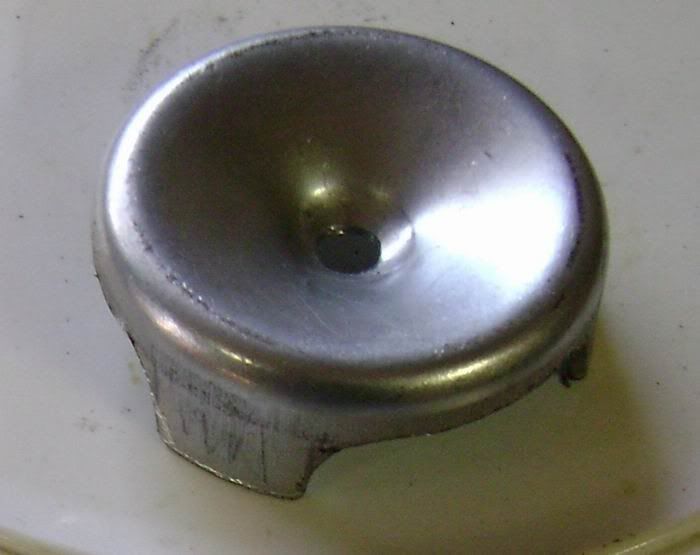
And holes in spacer would look like...well, they'd look like holes in a tube. |
|
|
|
USA
|
[#2]
There are some good examples of the FP legs in the $100 thread as well as well documented builds on silencertalk.
|
|
|
|
[#3]
Considering you've already got a stainless tube, I would see no problem reducing the freeze plug walls to the minimum required to keep them straight.
|
|
|
|
|
[#4]
Originally Posted By BigWaylon:
Seriously? Legs would look something like this: http://i55.photobucket.com/albums/g143/Tazdev67/DSC00202.jpg And holes in spacer would look like...well, they'd look like holes in a tube. Originally Posted By BigWaylon:
Originally Posted By bradpierson26:
I'd love to see this Seriously? Legs would look something like this: http://i55.photobucket.com/albums/g143/Tazdev67/DSC00202.jpg And holes in spacer would look like...well, they'd look like holes in a tube. Does anybody know what the weight savings would be per freezeplug with this kind of mod? |
|
|
|
|
[#5]
Originally Posted By InfiniteGrim:
Considering you've already got a stainless tube, I would see no problem reducing the freeze plug walls to the minimum required to keep them straight. I think I will take it apart and work on it tonight! |
|
|
|
|
[#6]
Originally Posted By BigWaylon:
Seriously? Legs would look something like this: http://i55.photobucket.com/albums/g143/Tazdev67/DSC00202.jpg And holes in spacer would look like...well, they'd look like holes in a tube. Originally Posted By BigWaylon:
Originally Posted By bradpierson26:
I'd love to see this Seriously? Legs would look something like this: http://i55.photobucket.com/albums/g143/Tazdev67/DSC00202.jpg And holes in spacer would look like...well, they'd look like holes in a tube. lol, I guess I should have been more articulate. I'd like to see it but I'd also like to see hard numbers on actual ounces (or grams) being saved by said mods. |
|
|
|
|
[#7]
Originally Posted By bradpierson26:
lol, I guess I should have been more articulate. I'd like to see it but I'd also like to see hard numbers on actual ounces (or grams) being saved by said mods. Originally Posted By bradpierson26:
Originally Posted By BigWaylon:
Originally Posted By bradpierson26:
I'd love to see this Seriously? Legs would look something like this: http://i55.photobucket.com/albums/g143/Tazdev67/DSC00202.jpg And holes in spacer would look like...well, they'd look like holes in a tube. lol, I guess I should have been more articulate. I'd like to see it but I'd also like to see hard numbers on actual ounces (or grams) being saved by said mods. I will do some mods and take weight readings before and after. I will try to post it by this weekend if I get time to do the mods. |
|
|
|
|
[#8]
Don't "knock the grams".....They add up fast when you are taking them off of each baffle. It doesn't take many "GRAMS" before you are talking OUNCES on the overall weight.
|
|
|
|
|
[#9]
FYI: Formed freeze plugs are wound .68oz each (with a .30 cal hole) I bet you can get them to .5oz each... probably even less
|
|
|
|
|
[Last Edit: Overton-AR]
[#10]
Originally Posted By Smithy:
<a href="http://smg.photobucket.com/user/ryan1105/media/can2_zpsich1akqm.jpg.html" target="_blank">http://img.photobucket.com/albums/v305/ryan1105/can2_zpsich1akqm.jpg</a> Smithy, What is the overall weight of the rifle and suppressor..?? Mine is 7 pounds 7 ounces...as it sits in the pic below, optic included but no mag. As your sits now, I would bet that your are probably UNDER 8 pounds and they is excellent for a suppressed rifle. Good job on a nice build. 9" AAC 300BLK (changed URX 3 for URX4) 
|
|
|
|
CT, USA
|
[#11]
My latest f1 is for a DSR (dedicated suppressed rifle) 100%titanium all G5 except for tube and spacers which are G9.
Direct thread mount and reflex type so it goes back over the barrel about 2.5" 1.5' dia and 9.25 oal weight 16oz Also made a mini blast mitigator/ barrel extension for when i don't want to run the can. Sound reduction is on par with AAC m4/SPR as in very quiet. Finish is anodized bronze Rifle is FDE Cerakote. I had some fun learning to use my anodizer with the baffles and spacers. 


|
|
|
|
[#12]
Originally Posted By JohnnyO223:
My latest f1 is for a DSR (dedicated suppressed rifle) 100%titanium all G5 except for tube and spacers which are G9. Direct thread mount and reflex type so it goes back over the barrel about 2.5" 1.5' dia and 9.25 oal weight 16oz Also made a mini blast mitigator/ barrel extension for when i don't want to run the can. Sound reduction is on par with AAC m4/SPR as in very quiet. Finish is anodized bronze Rifle is FDE Cerakote. I had some fun learning to use my anodizer with the baffles and spacers. <a href="http://s186.photobucket.com/user/johnnyo223/media/2015-03/626F2A4B-1E6E-45CC-ABFA-BE10FB6DAC82.jpg.html" target="_blank">http://i186.photobucket.com/albums/x255/johnnyo223/2015-03/626F2A4B-1E6E-45CC-ABFA-BE10FB6DAC82.jpg</a> <a href="http://s186.photobucket.com/user/johnnyo223/media/2015-03/01DBD9E9-99CB-4629-ABE9-F594E44A184D.jpg.html" target="_blank">http://i186.photobucket.com/albums/x255/johnnyo223/2015-03/01DBD9E9-99CB-4629-ABE9-F594E44A184D.jpg</a> <a href="http://s186.photobucket.com/user/johnnyo223/media/2015-03/B5773282-7990-4269-B7E2-75B3BAA268E6.jpg.html" target="_blank">http://i186.photobucket.com/albums/x255/johnnyo223/2015-03/B5773282-7990-4269-B7E2-75B3BAA268E6.jpg</a> <a href="http://s186.photobucket.com/user/johnnyo223/media/2015-03/729FA40B-DB7C-48E8-9271-FEEBF57E5D2B.jpg.html" target="_blank">http://i186.photobucket.com/albums/x255/johnnyo223/2015-03/729FA40B-DB7C-48E8-9271-FEEBF57E5D2B.jpg</a> <a href="http://s186.photobucket.com/user/johnnyo223/media/2015-03/C5201863-BD36-480D-8BDF-F51CEC392563.jpg.html" target="_blank">http://i186.photobucket.com/albums/x255/johnnyo223/2015-03/C5201863-BD36-480D-8BDF-F51CEC392563.jpg</a> <a href="http://s186.photobucket.com/user/johnnyo223/media/2015-03/F8766CEE-B1FF-437E-9EF1-53EC11A69D59.jpg.html" target="_blank">http://i186.photobucket.com/albums/x255/johnnyo223/2015-03/F8766CEE-B1FF-437E-9EF1-53EC11A69D59.jpg</a> <a href="http://s186.photobucket.com/user/johnnyo223/media/2015-03/5BB684CE-E531-4669-890B-C89C17E575E3.jpg.html" target="_blank">http://i186.photobucket.com/albums/x255/johnnyo223/2015-03/5BB684CE-E531-4669-890B-C89C17E575E3.jpg</a> <a href="http://s186.photobucket.com/user/johnnyo223/media/2015-03/0A6369AE-9A03-4BAC-BDF3-0D0E8978FB5D.jpg.html" target="_blank">http://i186.photobucket.com/albums/x255/johnnyo223/2015-03/0A6369AE-9A03-4BAC-BDF3-0D0E8978FB5D.jpg</a> <a href="http://s186.photobucket.com/user/johnnyo223/media/2015-03/D4ACAB83-3C32-4632-9D8D-9971698C06A8.jpg.html" target="_blank">http://i186.photobucket.com/albums/x255/johnnyo223/2015-03/D4ACAB83-3C32-4632-9D8D-9971698C06A8.jpg</a> <a href="http://s186.photobucket.com/user/johnnyo223/media/2015-03/1AD294F0-2E8D-4F08-8F2E-41BC665E695D.jpg.html" target="_blank">http://i186.photobucket.com/albums/x255/johnnyo223/2015-03/1AD294F0-2E8D-4F08-8F2E-41BC665E695D.jpg</a> Excellent job!!! |
|
|
|
|
[#13]
HOLY COW.....JohnnyO.....that is a VERY IMPRESSIVE piece of hardware.

|
|
|
|
|
[#14]
Originally Posted By TheArizonaCowboy:
Excellent job!!! Originally Posted By TheArizonaCowboy:
Originally Posted By JohnnyO223:
My latest f1 is for a DSR (dedicated suppressed rifle) 100%titanium all G5 except for tube and spacers which are G9. Direct thread mount and reflex type so it goes back over the barrel about 2.5" 1.5' dia and 9.25 oal weight 16oz Also made a mini blast mitigator/ barrel extension for when i don't want to run the can. Sound reduction is on par with AAC m4/SPR as in very quiet. Finish is anodized bronze Rifle is FDE Cerakote. I had some fun learning to use my anodizer with the baffles and spacers. <a href="http://s186.photobucket.com/user/johnnyo223/media/2015-03/626F2A4B-1E6E-45CC-ABFA-BE10FB6DAC82.jpg.html" target="_blank">http://i186.photobucket.com/albums/x255/johnnyo223/2015-03/626F2A4B-1E6E-45CC-ABFA-BE10FB6DAC82.jpg</a> <a href="http://s186.photobucket.com/user/johnnyo223/media/2015-03/01DBD9E9-99CB-4629-ABE9-F594E44A184D.jpg.html" target="_blank">http://i186.photobucket.com/albums/x255/johnnyo223/2015-03/01DBD9E9-99CB-4629-ABE9-F594E44A184D.jpg</a> <a href="http://s186.photobucket.com/user/johnnyo223/media/2015-03/B5773282-7990-4269-B7E2-75B3BAA268E6.jpg.html" target="_blank">http://i186.photobucket.com/albums/x255/johnnyo223/2015-03/B5773282-7990-4269-B7E2-75B3BAA268E6.jpg</a> <a href="http://s186.photobucket.com/user/johnnyo223/media/2015-03/729FA40B-DB7C-48E8-9271-FEEBF57E5D2B.jpg.html" target="_blank">http://i186.photobucket.com/albums/x255/johnnyo223/2015-03/729FA40B-DB7C-48E8-9271-FEEBF57E5D2B.jpg</a> <a href="http://s186.photobucket.com/user/johnnyo223/media/2015-03/C5201863-BD36-480D-8BDF-F51CEC392563.jpg.html" target="_blank">http://i186.photobucket.com/albums/x255/johnnyo223/2015-03/C5201863-BD36-480D-8BDF-F51CEC392563.jpg</a> <a href="http://s186.photobucket.com/user/johnnyo223/media/2015-03/F8766CEE-B1FF-437E-9EF1-53EC11A69D59.jpg.html" target="_blank">http://i186.photobucket.com/albums/x255/johnnyo223/2015-03/F8766CEE-B1FF-437E-9EF1-53EC11A69D59.jpg</a> <a href="http://s186.photobucket.com/user/johnnyo223/media/2015-03/5BB684CE-E531-4669-890B-C89C17E575E3.jpg.html" target="_blank">http://i186.photobucket.com/albums/x255/johnnyo223/2015-03/5BB684CE-E531-4669-890B-C89C17E575E3.jpg</a> <a href="http://s186.photobucket.com/user/johnnyo223/media/2015-03/0A6369AE-9A03-4BAC-BDF3-0D0E8978FB5D.jpg.html" target="_blank">http://i186.photobucket.com/albums/x255/johnnyo223/2015-03/0A6369AE-9A03-4BAC-BDF3-0D0E8978FB5D.jpg</a> <a href="http://s186.photobucket.com/user/johnnyo223/media/2015-03/D4ACAB83-3C32-4632-9D8D-9971698C06A8.jpg.html" target="_blank">http://i186.photobucket.com/albums/x255/johnnyo223/2015-03/D4ACAB83-3C32-4632-9D8D-9971698C06A8.jpg</a> <a href="http://s186.photobucket.com/user/johnnyo223/media/2015-03/1AD294F0-2E8D-4F08-8F2E-41BC665E695D.jpg.html" target="_blank">http://i186.photobucket.com/albums/x255/johnnyo223/2015-03/1AD294F0-2E8D-4F08-8F2E-41BC665E695D.jpg</a> Excellent job!!! ya, that's epic |
|
|
|
|
[#16]
Originally Posted By JohnnyO223:
My latest f1 is for a DSR (dedicated suppressed rifle) 100%titanium all G5 except for tube and spacers which are G9. Direct thread mount and reflex type so it goes back over the barrel about 2.5" 1.5' dia and 9.25 oal weight 16oz Also made a mini blast mitigator/ barrel extension for when i don't want to run the can. Sound reduction is on par with AAC m4/SPR as in very quiet. Finish is anodized bronze Rifle is FDE Cerakote. I had some fun learning to use my anodizer with the baffles and spacers. <a href="http://s186.photobucket.com/user/johnnyo223/media/2015-03/626F2A4B-1E6E-45CC-ABFA-BE10FB6DAC82.jpg.html" target="_blank">http://i186.photobucket.com/albums/x255/johnnyo223/2015-03/626F2A4B-1E6E-45CC-ABFA-BE10FB6DAC82.jpg</a> <a href="http://s186.photobucket.com/user/johnnyo223/media/2015-03/01DBD9E9-99CB-4629-ABE9-F594E44A184D.jpg.html" target="_blank">http://i186.photobucket.com/albums/x255/johnnyo223/2015-03/01DBD9E9-99CB-4629-ABE9-F594E44A184D.jpg</a> <a href="http://s186.photobucket.com/user/johnnyo223/media/2015-03/B5773282-7990-4269-B7E2-75B3BAA268E6.jpg.html" target="_blank">http://i186.photobucket.com/albums/x255/johnnyo223/2015-03/B5773282-7990-4269-B7E2-75B3BAA268E6.jpg</a> <a href="http://s186.photobucket.com/user/johnnyo223/media/2015-03/729FA40B-DB7C-48E8-9271-FEEBF57E5D2B.jpg.html" target="_blank">http://i186.photobucket.com/albums/x255/johnnyo223/2015-03/729FA40B-DB7C-48E8-9271-FEEBF57E5D2B.jpg</a> <a href="http://s186.photobucket.com/user/johnnyo223/media/2015-03/C5201863-BD36-480D-8BDF-F51CEC392563.jpg.html" target="_blank">http://i186.photobucket.com/albums/x255/johnnyo223/2015-03/C5201863-BD36-480D-8BDF-F51CEC392563.jpg</a> <a href="http://s186.photobucket.com/user/johnnyo223/media/2015-03/F8766CEE-B1FF-437E-9EF1-53EC11A69D59.jpg.html" target="_blank">http://i186.photobucket.com/albums/x255/johnnyo223/2015-03/F8766CEE-B1FF-437E-9EF1-53EC11A69D59.jpg</a> <a href="http://s186.photobucket.com/user/johnnyo223/media/2015-03/5BB684CE-E531-4669-890B-C89C17E575E3.jpg.html" target="_blank">http://i186.photobucket.com/albums/x255/johnnyo223/2015-03/5BB684CE-E531-4669-890B-C89C17E575E3.jpg</a> <a href="http://s186.photobucket.com/user/johnnyo223/media/2015-03/0A6369AE-9A03-4BAC-BDF3-0D0E8978FB5D.jpg.html" target="_blank">http://i186.photobucket.com/albums/x255/johnnyo223/2015-03/0A6369AE-9A03-4BAC-BDF3-0D0E8978FB5D.jpg</a> <a href="http://s186.photobucket.com/user/johnnyo223/media/2015-03/D4ACAB83-3C32-4632-9D8D-9971698C06A8.jpg.html" target="_blank">http://i186.photobucket.com/albums/x255/johnnyo223/2015-03/D4ACAB83-3C32-4632-9D8D-9971698C06A8.jpg</a> <a href="http://s186.photobucket.com/user/johnnyo223/media/2015-03/1AD294F0-2E8D-4F08-8F2E-41BC665E695D.jpg.html" target="_blank">http://i186.photobucket.com/albums/x255/johnnyo223/2015-03/1AD294F0-2E8D-4F08-8F2E-41BC665E695D.jpg</a> Thats awesome! Congrats! |
|
|
|
|
[#17]
Originally Posted By Smithy:
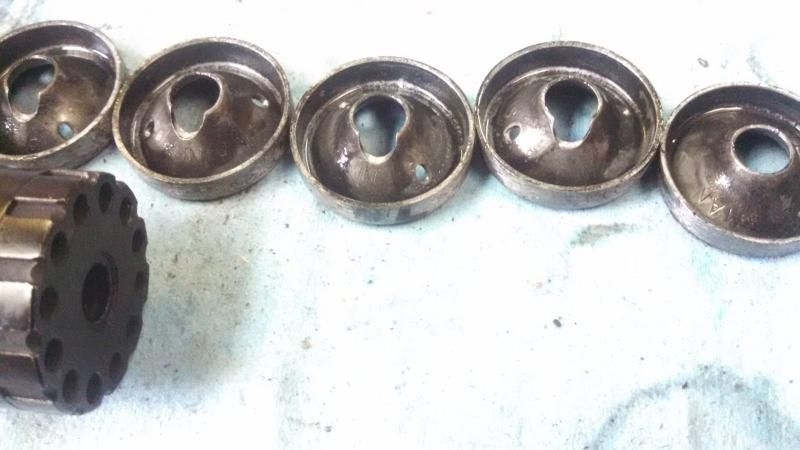
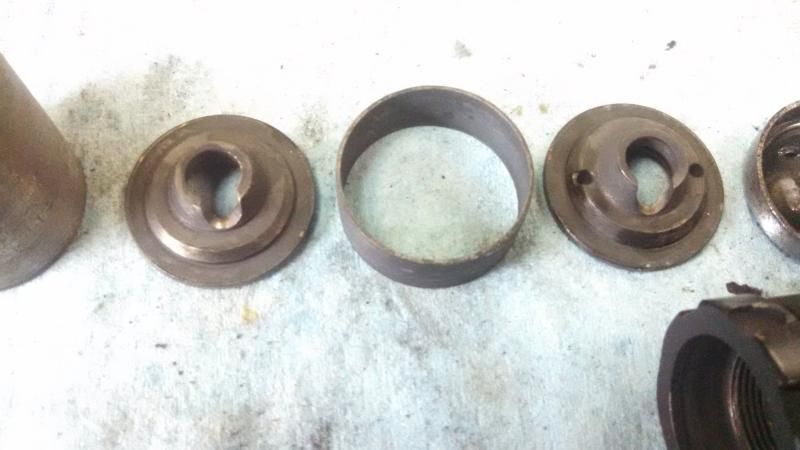
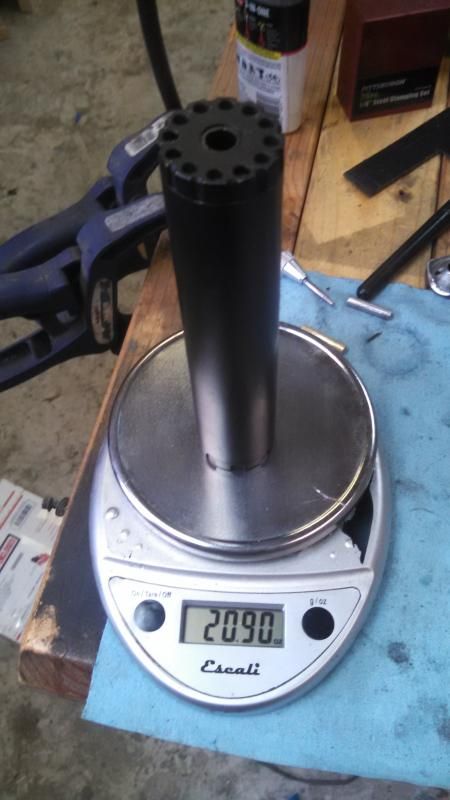
OK, bear with me. I "legged" all the FP baffles except for the last one (8 total). each was roughly .65 - .7 ounces before and it took them down to .55 ounces. I also ground 2 large holes in the Ti blast spacer but it took off maybe a hundreth of an ounce.  . I ddn't take any out of the griffin muzzle adapter and I don't think I will for now. . I ddn't take any out of the griffin muzzle adapter and I don't think I will for now.
Weight of can before mods 21.8 ounces and weight of can after mods 20.9 ounces. It almost took an ounce off. Probably not worth the hassle for most people. In the end I think It will be worth it for me because I will be sending my barrel in to have it turned down and hopefully lose 4 or 5 ounces. Total weight of rifle with can installed (no mag inserted) is 7 lbs 8 oz. Not bad. I will post pics of some of the baffles and other things when I get them uploaded. I took it out and put 5 rounds through it. 1st round had a little bit of FRP, very little but it was there, the next 3 where pretty quiet and the last one had a noticeable crack downrange. I was shooting at a target about 40 yards away. Could it be that the 220 grain subs coming out of my barrel are just under the sound barrier and that last one actually broke it causing a sonic boom? It was very odd.
I also drilled and tapped a 6-32 Allen head set screw for the end that screws onto the griffin flashcomp. I will not be rocksetting the griffin adapter. So the set screw will help keep the adapter on the can. I think I may rockset this screw. What do you guys think? <a href="http://smg.photobucket.com/user/ryan1105/media/Mobile%20Uploads/IMG_20150304_141514_447_zpsfbnhd6hs.jpg.html" target="_blank">http://img.photobucket.com/albums/v305/ryan1105/Mobile%20Uploads/IMG_20150304_141514_447_zpsfbnhd6hs.jpg</a> <a href="http://smg.photobucket.com/user/ryan1105/media/Mobile%20Uploads/IMG_20150304_141521_119_zpsklr1xpq3.jpg.html" target="_blank">http://img.photobucket.com/albums/v305/ryan1105/Mobile%20Uploads/IMG_20150304_141521_119_zpsklr1xpq3.jpg</a> <a href="http://smg.photobucket.com/user/ryan1105/media/Mobile%20Uploads/IMG_20150304_141529_179_zpsxlhgxilm.jpg.html" target="_blank">http://img.photobucket.com/albums/v305/ryan1105/Mobile%20Uploads/IMG_20150304_141529_179_zpsxlhgxilm.jpg</a> <a href="http://smg.photobucket.com/user/ryan1105/media/Mobile%20Uploads/IMG_20150304_141538_919_zpsjsu89vcr.jpg.html" target="_blank">http://img.photobucket.com/albums/v305/ryan1105/Mobile%20Uploads/IMG_20150304_141538_919_zpsjsu89vcr.jpg</a> <a href="http://smg.photobucket.com/user/ryan1105/media/Mobile%20Uploads/IMG_20150304_141619_700_zpsfhehmgkp.jpg.html" target="_blank">http://img.photobucket.com/albums/v305/ryan1105/Mobile%20Uploads/IMG_20150304_141619_700_zpsfhehmgkp.jpg</a> <a href="http://smg.photobucket.com/user/ryan1105/media/Mobile%20Uploads/IMG_20150304_141600_685_zpsxmbe9ltc.jpg.html" target="_blank">http://img.photobucket.com/albums/v305/ryan1105/Mobile%20Uploads/IMG_20150304_141600_685_zpsxmbe9ltc.jpg</a> <a href="http://smg.photobucket.com/user/ryan1105/media/Mobile%20Uploads/IMG_20150304_144302_787_zpsmwen4qm5.jpg.html" target="_blank">http://img.photobucket.com/albums/v305/ryan1105/Mobile%20Uploads/IMG_20150304_144302_787_zpsmwen4qm5.jpg</a> <a href="http://smg.photobucket.com/user/ryan1105/media/Mobile%20Uploads/IMG_20150304_145613_944_zpstutl4chm.jpg.html" target="_blank">http://img.photobucket.com/albums/v305/ryan1105/Mobile%20Uploads/IMG_20150304_145613_944_zpstutl4chm.jpg</a> Every ounce you can shave off is an ounce in the right direction. Good job. |
|
|
|
|
[Last Edit: Overton-AR]
[#18]
JohnnyO -
In all of your Titanium anodizing did you come across anything that got close to BLACK..?? The second baffle from the left (first deep cone from left) looks like a "blackish purple", but its hard to tell in a photo.
|
|
|
|
CT, USA
|
[#19]
Originally Posted By Overton-AR:
JohnnyO - In all of your Titanium anodizing did you come across anything that got close to BLACK..?? The second baffle from the left (first deep cone from left) looks like a "blackish purple", but its hard to tell in a photo. Not really black but you can get close by media blasting and right between purple and blue (30-40 volts) should do it. The blasted surface really nocks the colors down. If you want I can try it and snap a pic? Just so you know I just finished the anodizer so I'm still experimenting, I'm far from an expert on the subject. |
|
|
VA, USA
|
[#20]
Originally Posted By JohnnyO223:
Not really black but you can get close by media blasting and right between purple and blue (30-40 volts) should do it. The blasted surface really nocks the colors down. If you want I can try it and snap a pic? Just so you know I just finished the anodizer so I'm still experimenting, I'm far from an expert on the subject. Originally Posted By JohnnyO223:
Originally Posted By Overton-AR:
JohnnyO - In all of your Titanium anodizing did you come across anything that got close to BLACK..?? The second baffle from the left (first deep cone from left) looks like a "blackish purple", but its hard to tell in a photo. Not really black but you can get close by media blasting and right between purple and blue (30-40 volts) should do it. The blasted surface really nocks the colors down. If you want I can try it and snap a pic? Just so you know I just finished the anodizer so I'm still experimenting, I'm far from an expert on the subject. You make me want to spend a fortune on machinery I don't know how to use. Now go forth and clone a Saker 7.62 and report back with performance, plans, and costs. |
|
|
|
[#21]
Originally Posted By JohnnyO223:
Not really black but you can get close by media blasting and right between purple and blue (30-40 volts) should do it. The blasted surface really nocks the colors down. If you want I can try it and snap a pic? Just so you know I just finished the anodizer so I'm still experimenting, I'm far from an expert on the subject. Originally Posted By JohnnyO223:
Originally Posted By Overton-AR:
JohnnyO - In all of your Titanium anodizing did you come across anything that got close to BLACK..?? The second baffle from the left (first deep cone from left) looks like a "blackish purple", but its hard to tell in a photo. Not really black but you can get close by media blasting and right between purple and blue (30-40 volts) should do it. The blasted surface really nocks the colors down. If you want I can try it and snap a pic? Just so you know I just finished the anodizer so I'm still experimenting, I'm far from an expert on the subject. I have found that blasting and then boiling in vinegar will turn them a dark grey color but I havn't found a way to turn Ti black yet. I have another question. I have a carbidizer that I use to carbidize lock faces on knives that i make and also on titanium knife edges. The carbides are said to be around 80 HRC. I wonder if carbidizing around the baffle holes will decrease wear and increase the longevity of the baffles. |
|
|
|
|
[Last Edit: Doc_Hurley]
[#22]
Originally Posted By JohnnyO223:
My latest f1 is for a DSR (dedicated suppressed rifle) 100%titanium all G5 except for tube and spacers which are G9. Direct thread mount and reflex type so it goes back over the barrel about 2.5" 1.5' dia and 9.25 oal weight 16oz Also made a mini blast mitigator/ barrel extension for when i don't want to run the can. Sound reduction is on par with AAC m4/SPR as in very quiet. Finish is anodized bronze Rifle is FDE Cerakote. I had some fun learning to use my anodizer with the baffles and spacers. SNIP 
|
|
|
|
FL, USA
|
[#23]
Here is my Form 1 build. I am almost finished with it, just needs holes drilled in the baffles and the endcap done. Tube is titanium, Endcap threaded part is titanium, blast baffle shield and first baffle is stainless, the rest are K-style titanium. Muzzle brake is stainless. Weight should end up being right around 16 ounces when finished up.
The endcap/blast baffle on this one is stainless. Ended up being too heavy to my liking so it was trashed and a two piece titanium/stainless version is on the lathe. 
|
|
|
|
[#24]
Flashooter -
I am no baffle expert, but shouldn't there be pathways, or cuts allowing the gas to travel and bounce into the back chamber formed by the K baffle..?? If not, that is just unused volume and make for a much louder suppressor. I have not done K Baffles yet, but yours look very nice. I just think they need the angled holes cut to allow gas through. Do some research and see what you find out. Your machining skills look very nice.....well beyond mine. 

|
|
|
|
|
[#25]
Originally Posted By JohnnyO223:
My latest f1 is for a DSR (dedicated suppressed rifle) 100%titanium all G5 except for tube and spacers which are G9. Direct thread mount and reflex type so it goes back over the barrel about 2.5" 1.5' dia and 9.25 oal weight 16oz Also made a mini blast mitigator/ barrel extension for when i don't want to run the can. Sound reduction is on par with AAC m4/SPR as in very quiet. Finish is anodized bronze Rifle is FDE Cerakote. I had some fun learning to use my anodizer with the baffles and spacers. <a href="http://s186.photobucket.com/user/johnnyo223/media/2015-03/626F2A4B-1E6E-45CC-ABFA-BE10FB6DAC82.jpg.html" target="_blank">http://i186.photobucket.com/albums/x255/johnnyo223/2015-03/626F2A4B-1E6E-45CC-ABFA-BE10FB6DAC82.jpg</a> <a href="http://s186.photobucket.com/user/johnnyo223/media/2015-03/01DBD9E9-99CB-4629-ABE9-F594E44A184D.jpg.html" target="_blank">http://i186.photobucket.com/albums/x255/johnnyo223/2015-03/01DBD9E9-99CB-4629-ABE9-F594E44A184D.jpg</a> <a href="http://s186.photobucket.com/user/johnnyo223/media/2015-03/B5773282-7990-4269-B7E2-75B3BAA268E6.jpg.html" target="_blank">http://i186.photobucket.com/albums/x255/johnnyo223/2015-03/B5773282-7990-4269-B7E2-75B3BAA268E6.jpg</a> <a href="http://s186.photobucket.com/user/johnnyo223/media/2015-03/729FA40B-DB7C-48E8-9271-FEEBF57E5D2B.jpg.html" target="_blank">http://i186.photobucket.com/albums/x255/johnnyo223/2015-03/729FA40B-DB7C-48E8-9271-FEEBF57E5D2B.jpg</a> <a href="http://s186.photobucket.com/user/johnnyo223/media/2015-03/C5201863-BD36-480D-8BDF-F51CEC392563.jpg.html" target="_blank">http://i186.photobucket.com/albums/x255/johnnyo223/2015-03/C5201863-BD36-480D-8BDF-F51CEC392563.jpg</a> <a href="http://s186.photobucket.com/user/johnnyo223/media/2015-03/F8766CEE-B1FF-437E-9EF1-53EC11A69D59.jpg.html" target="_blank">http://i186.photobucket.com/albums/x255/johnnyo223/2015-03/F8766CEE-B1FF-437E-9EF1-53EC11A69D59.jpg</a> <a href="http://s186.photobucket.com/user/johnnyo223/media/2015-03/5BB684CE-E531-4669-890B-C89C17E575E3.jpg.html" target="_blank">http://i186.photobucket.com/albums/x255/johnnyo223/2015-03/5BB684CE-E531-4669-890B-C89C17E575E3.jpg</a> <a href="http://s186.photobucket.com/user/johnnyo223/media/2015-03/0A6369AE-9A03-4BAC-BDF3-0D0E8978FB5D.jpg.html" target="_blank">http://i186.photobucket.com/albums/x255/johnnyo223/2015-03/0A6369AE-9A03-4BAC-BDF3-0D0E8978FB5D.jpg</a> <a href="http://s186.photobucket.com/user/johnnyo223/media/2015-03/D4ACAB83-3C32-4632-9D8D-9971698C06A8.jpg.html" target="_blank">http://i186.photobucket.com/albums/x255/johnnyo223/2015-03/D4ACAB83-3C32-4632-9D8D-9971698C06A8.jpg</a> <a href="http://s186.photobucket.com/user/johnnyo223/media/2015-03/1AD294F0-2E8D-4F08-8F2E-41BC665E695D.jpg.html" target="_blank">http://i186.photobucket.com/albums/x255/johnnyo223/2015-03/1AD294F0-2E8D-4F08-8F2E-41BC665E695D.jpg</a> The design in the center of your tube, can that be done on a lathe or did you do it with a mill? |
|
|
|
FL, USA
|
[#26]
Originally Posted By Overton-AR:
Flashooter - I am no baffle expert, but shouldn't there be pathways, or cuts allowing the gas to travel and bounce into the back chamber formed by the K baffle..?? If not, that is just unused volume and make for a much louder suppressor. I have not done K Baffles yet, but yours look very nice. I just think they need the angled holes cut to allow gas through. Do some research and see what you find out. Your machining skills look very nice.....well beyond mine.
<a href="http://smg.photobucket.com/user/yfz450air/media/30xan88_zpshloh16h7.jpg.html" target="_blank">http://img.photobucket.com/albums/v510/yfz450air/30xan88_zpshloh16h7.jpg</a> yep the baffles arent totally done yet, just have to get some time on the big bridgeport so they can be finished!! |
|
|
CT, USA
|
[#27]
Originally Posted By grn_zx6r:
The design in the center of your tube, can that be done on a lathe or did you do it with a mill? Originally Posted By grn_zx6r:
Originally Posted By JohnnyO223:
My latest f1 is for a DSR (dedicated suppressed rifle) 100%titanium all G5 except for tube and spacers which are G9. Direct thread mount and reflex type so it goes back over the barrel about 2.5" 1.5' dia and 9.25 oal weight 16oz Also made a mini blast mitigator/ barrel extension for when i don't want to run the can. Sound reduction is on par with AAC m4/SPR as in very quiet. Finish is anodized bronze Rifle is FDE Cerakote. I had some fun learning to use my anodizer with the baffles and spacers. <a href="http://s186.photobucket.com/user/johnnyo223/media/2015-03/626F2A4B-1E6E-45CC-ABFA-BE10FB6DAC82.jpg.html" target="_blank">http://i186.photobucket.com/albums/x255/johnnyo223/2015-03/626F2A4B-1E6E-45CC-ABFA-BE10FB6DAC82.jpg</a> <a href="http://s186.photobucket.com/user/johnnyo223/media/2015-03/01DBD9E9-99CB-4629-ABE9-F594E44A184D.jpg.html" target="_blank">http://i186.photobucket.com/albums/x255/johnnyo223/2015-03/01DBD9E9-99CB-4629-ABE9-F594E44A184D.jpg</a> <a href="http://s186.photobucket.com/user/johnnyo223/media/2015-03/B5773282-7990-4269-B7E2-75B3BAA268E6.jpg.html" target="_blank">http://i186.photobucket.com/albums/x255/johnnyo223/2015-03/B5773282-7990-4269-B7E2-75B3BAA268E6.jpg</a> <a href="http://s186.photobucket.com/user/johnnyo223/media/2015-03/729FA40B-DB7C-48E8-9271-FEEBF57E5D2B.jpg.html" target="_blank">http://i186.photobucket.com/albums/x255/johnnyo223/2015-03/729FA40B-DB7C-48E8-9271-FEEBF57E5D2B.jpg</a> <a href="http://s186.photobucket.com/user/johnnyo223/media/2015-03/C5201863-BD36-480D-8BDF-F51CEC392563.jpg.html" target="_blank">http://i186.photobucket.com/albums/x255/johnnyo223/2015-03/C5201863-BD36-480D-8BDF-F51CEC392563.jpg</a> <a href="http://s186.photobucket.com/user/johnnyo223/media/2015-03/F8766CEE-B1FF-437E-9EF1-53EC11A69D59.jpg.html" target="_blank">http://i186.photobucket.com/albums/x255/johnnyo223/2015-03/F8766CEE-B1FF-437E-9EF1-53EC11A69D59.jpg</a> <a href="http://s186.photobucket.com/user/johnnyo223/media/2015-03/5BB684CE-E531-4669-890B-C89C17E575E3.jpg.html" target="_blank">http://i186.photobucket.com/albums/x255/johnnyo223/2015-03/5BB684CE-E531-4669-890B-C89C17E575E3.jpg</a> <a href="http://s186.photobucket.com/user/johnnyo223/media/2015-03/0A6369AE-9A03-4BAC-BDF3-0D0E8978FB5D.jpg.html" target="_blank">http://i186.photobucket.com/albums/x255/johnnyo223/2015-03/0A6369AE-9A03-4BAC-BDF3-0D0E8978FB5D.jpg</a> <a href="http://s186.photobucket.com/user/johnnyo223/media/2015-03/D4ACAB83-3C32-4632-9D8D-9971698C06A8.jpg.html" target="_blank">http://i186.photobucket.com/albums/x255/johnnyo223/2015-03/D4ACAB83-3C32-4632-9D8D-9971698C06A8.jpg</a> <a href="http://s186.photobucket.com/user/johnnyo223/media/2015-03/1AD294F0-2E8D-4F08-8F2E-41BC665E695D.jpg.html" target="_blank">http://i186.photobucket.com/albums/x255/johnnyo223/2015-03/1AD294F0-2E8D-4F08-8F2E-41BC665E695D.jpg</a> The design in the center of your tube, can that be done on a lathe or did you do it with a mill? Mill and rotary indexer |
|
|
|
[#28]
Hey guys, since most of you in this thread are using titanium tubes, I thought I would ask this here. I read through almost all pages of the 144pg thread and didn't get any direct answers:
Has anyone successfully used steel letter stamps to engrave their titanium tube? I don't currently have a dremel, but I would be willing to get one if that was the only way, but $10 steel letter stamps would be better on the budget. If you have used stamps, would anyone be willing to snap a close-up pic of a letter or word (not the whole engraving, obviously), so I can see how it looks? Thanks in advance! |
|
|
|
NC, USA
|
[#29]
Originally Posted By Smithy:
OK, bear with me. I "legged" all the FP baffles except for the last one (8 total). each was roughly .65 - .7 ounces before and it took them down to .55 ounces. I also ground 2 large holes in the Ti blast spacer but it took off maybe a hundreth of an ounce. .
I was thinking about drilling the blast chamber and spacers into swiss cheese. For the weight savings and extra turbulence. Does anyone see an issue with this? It will be for .22 only. |
|
|
|
[#30]
Originally Posted By 230GRAIN:
I was thinking about drilling the blast chamber and spacers into swiss cheese. For the weight savings and extra turbulence. Does anyone see an issue with this? It will be for .22 only. Originally Posted By 230GRAIN:
Originally Posted By Smithy:
OK, bear with me. I "legged" all the FP baffles except for the last one (8 total). each was roughly .65 - .7 ounces before and it took them down to .55 ounces. I also ground 2 large holes in the Ti blast spacer but it took off maybe a hundreth of an ounce. .
I was thinking about drilling the blast chamber and spacers into swiss cheese. For the weight savings and extra turbulence. Does anyone see an issue with this? It will be for .22 only. Thoughts on this concept for full power .308? |
|
|
|
|
[Last Edit: Mjollnir]
[#31]
Originally Posted By bradpierson26:
Thoughts on this concept for full power .308? Originally Posted By bradpierson26:
Originally Posted By 230GRAIN:
Originally Posted By Smithy:
OK, bear with me. I "legged" all the FP baffles except for the last one (8 total). each was roughly .65 - .7 ounces before and it took them down to .55 ounces. I also ground 2 large holes in the Ti blast spacer but it took off maybe a hundreth of an ounce. .
I was thinking about drilling the blast chamber and spacers into swiss cheese. For the weight savings and extra turbulence. Does anyone see an issue with this? It will be for .22 only. Thoughts on this concept for full power .308? It's always an experiment when venturing into modifications. So just be careful and thoughtful with what you are doing. The main job of the spacers is to separate the baffles and for VSRs, keep them from tipping/turning in the tube. The more material you take out the weaker the support will be between the baffles. Then, factor in the temperature rising if you do a mag dump on a semi auto rifle. |
|
|
|
PA, USA
|
[#32]
Originally Posted By Soonershooter12:
Hey guys, since most of you in this thread are using titanium tubes, I thought I would ask this here. I read through almost all pages of the 144pg thread and didn't get any direct answers: Has anyone successfully used steel letter stamps to engrave their titanium tube? I don't currently have a dremel, but I would be willing to get one if that was the only way, but $10 steel letter stamps would be better on the budget. If you have used stamps, would anyone be willing to snap a close-up pic of a letter or word (not the whole engraving, obviously), so I can see how it looks? Thanks in advance! Here is a practice piece I was playing with. It's Ti-64 (grade 5) annealed 2"OD x 1.625ID (.187 wall). When stamping thinner wall (.065" +/- .010"), you might want to slide in a solid plug to prevent the ID from possibly closing. 
|
|
|
|
[Last Edit: Shawnson]
[#33]
Originally Posted By Lilpooh:
Originally Posted By Soonershooter12:
Hey guys, since most of you in this thread are using titanium tubes, I thought I would ask this here. I read through almost all pages of the 144pg thread and didn't get any direct answers: Has anyone successfully used steel letter stamps to engrave their titanium tube? I don't currently have a dremel, but I would be willing to get one if that was the only way, but $10 steel letter stamps would be better on the budget. If you have used stamps, would anyone be willing to snap a close-up pic of a letter or word (not the whole engraving, obviously), so I can see how it looks? Thanks in advance! Here is a practice piece I was playing with. It's Ti-64 (grade 5) annealed 2"OD x 1.625ID (.187 wall). When stamping thinner wall (.065" +/- .010"), you might want to slide in a solid plug to prevent the ID from possibly closing. <a href="http://s598.photobucket.com/user/lilpooh6l/media/Copy2oftruck024.jpg.html" target="_blank">http://i598.photobucket.com/albums/tt62/lilpooh6l/Copy2oftruck024.jpg</a> Sounds like a very expensive radiator.
|
|
|
|
PA, USA
|
[#34]
Oops, sorry!! Damn fat fingers!

|
|
|
|
[#35]
Originally Posted By Lilpooh:
Oops, sorry!! Damn fat fingers! <a href="http://s598.photobucket.com/user/lilpooh6l/media/9A8F9636-3BCC-4B47-9F7F-F858CBB23E3F.jpg.html" target="_blank">http://i598.photobucket.com/albums/tt62/lilpooh6l/9A8F9636-3BCC-4B47-9F7F-F858CBB23E3F.jpg</a> Thanks for the info! Considering I won't have a test piece I guess I will just bite the bullet and get a rotary tool and some engraving bits. I don't want to risk messing up my ti tube. |
|
|
|
PA, USA
|
[#36]
Originally Posted By Soonershooter12:
Thanks for the info! Considering I won't have a test piece I guess I will just bite the bullet and get a rotary tool and some engraving bits. I don't want to risk messing up my ti tube. Originally Posted By Soonershooter12:
Originally Posted By Lilpooh:
Oops, sorry!! Damn fat fingers! <a href="http://s598.photobucket.com/user/lilpooh6l/media/9A8F9636-3BCC-4B47-9F7F-F858CBB23E3F.jpg.html" target="_blank">http://i598.photobucket.com/albums/tt62/lilpooh6l/9A8F9636-3BCC-4B47-9F7F-F858CBB23E3F.jpg</a> Thanks for the info! Considering I won't have a test piece I guess I will just bite the bullet and get a rotary tool and some engraving bits. I don't want to risk messing up my ti tube. I did some Google-fu on hand engraving Ti jewelry, they seem to be using a diamond tipped. I'm gonna try to get to Home Depot this weekend for the Dremal and diamond bit. http://m.homedepot.com/p/Dremel-120-Volt-Corded-Electric-Engraver-Tool-290-01/100394725?MERCH=REC-_-mobileweb_pip_rr-1-_-203362676-_-100394725-_-N http://m.homedepot.com/p/Dremel-Diamond-Point-for-290-9929/203362676 |
|
|
|
[#37]
Originally Posted By Soonershooter12:
Thanks for the info! Considering I won't have a test piece I guess I will just bite the bullet and get a rotary tool and some engraving bits. I don't want to risk messing up my ti tube. Tar Heel State Firearms will do it for $30 if you prefer that route. |
|
|
|
TX, USA
|
[#38]
SD tac now offers engraving (he hand delivers to the guy who does them) when u buy a tube from them.
25$ fee + 2$ sdta handling fee |
|
|
|
[#39]
Originally Posted By kramden: SD tac now offers engraving (he hand delivers to the guy who does them) when u buy a tube from them. 25$ fee + 2$ sdta handling fee |
|
|
|
|
[#40]
Originally Posted By JohnnyO223:
My latest f1 is for a DSR (dedicated suppressed rifle) 100%titanium all G5 except for tube and spacers which are G9. Direct thread mount and reflex type so it goes back over the barrel about 2.5" 1.5' dia and 9.25 oal weight 16oz Also made a mini blast mitigator/ barrel extension for when i don't want to run the can. Sound reduction is on par with AAC m4/SPR as in very quiet. Finish is anodized bronze Rifle is FDE Cerakote. I had some fun learning to use my anodizer with the baffles and spacers. <a href="http://s186.photobucket.com/user/johnnyo223/media/2015-03/626F2A4B-1E6E-45CC-ABFA-BE10FB6DAC82.jpg.html" target="_blank">http://i186.photobucket.com/albums/x255/johnnyo223/2015-03/626F2A4B-1E6E-45CC-ABFA-BE10FB6DAC82.jpg</a> <a href="http://s186.photobucket.com/user/johnnyo223/media/2015-03/01DBD9E9-99CB-4629-ABE9-F594E44A184D.jpg.html" target="_blank">http://i186.photobucket.com/albums/x255/johnnyo223/2015-03/01DBD9E9-99CB-4629-ABE9-F594E44A184D.jpg</a> <a href="http://s186.photobucket.com/user/johnnyo223/media/2015-03/B5773282-7990-4269-B7E2-75B3BAA268E6.jpg.html" target="_blank">http://i186.photobucket.com/albums/x255/johnnyo223/2015-03/B5773282-7990-4269-B7E2-75B3BAA268E6.jpg</a> <a href="http://s186.photobucket.com/user/johnnyo223/media/2015-03/729FA40B-DB7C-48E8-9271-FEEBF57E5D2B.jpg.html" target="_blank">http://i186.photobucket.com/albums/x255/johnnyo223/2015-03/729FA40B-DB7C-48E8-9271-FEEBF57E5D2B.jpg</a> <a href="http://s186.photobucket.com/user/johnnyo223/media/2015-03/C5201863-BD36-480D-8BDF-F51CEC392563.jpg.html" target="_blank">http://i186.photobucket.com/albums/x255/johnnyo223/2015-03/C5201863-BD36-480D-8BDF-F51CEC392563.jpg</a> <a href="http://s186.photobucket.com/user/johnnyo223/media/2015-03/F8766CEE-B1FF-437E-9EF1-53EC11A69D59.jpg.html" target="_blank">http://i186.photobucket.com/albums/x255/johnnyo223/2015-03/F8766CEE-B1FF-437E-9EF1-53EC11A69D59.jpg</a> <a href="http://s186.photobucket.com/user/johnnyo223/media/2015-03/5BB684CE-E531-4669-890B-C89C17E575E3.jpg.html" target="_blank">http://i186.photobucket.com/albums/x255/johnnyo223/2015-03/5BB684CE-E531-4669-890B-C89C17E575E3.jpg</a> <a href="http://s186.photobucket.com/user/johnnyo223/media/2015-03/0A6369AE-9A03-4BAC-BDF3-0D0E8978FB5D.jpg.html" target="_blank">http://i186.photobucket.com/albums/x255/johnnyo223/2015-03/0A6369AE-9A03-4BAC-BDF3-0D0E8978FB5D.jpg</a> <a href="http://s186.photobucket.com/user/johnnyo223/media/2015-03/D4ACAB83-3C32-4632-9D8D-9971698C06A8.jpg.html" target="_blank">http://i186.photobucket.com/albums/x255/johnnyo223/2015-03/D4ACAB83-3C32-4632-9D8D-9971698C06A8.jpg</a> <a href="http://s186.photobucket.com/user/johnnyo223/media/2015-03/1AD294F0-2E8D-4F08-8F2E-41BC665E695D.jpg.html" target="_blank">http://i186.photobucket.com/albums/x255/johnnyo223/2015-03/1AD294F0-2E8D-4F08-8F2E-41BC665E695D.jpg</a> Johnny- you've got skillz my man. Could you go into detail on how you made your reflex mount? I'm trying make a poor mans ops 12 model. |
|
|
|
SC, USA
|
[#41]
Is there an active form 1 shotgun suppressor thread?
all I can find is this and its archived: http://www.ar15.com/forums/t_6_20/427137_.html I just bought a mossberg 500/new haven 600AT for 200 that I either want do a silencer, because why not? Or if too difficult/expensive I'll go the SBS route and chop the barrel at the end of the tube. Seems like the consensus is to port the barrel and use a tube to cover. No need for baffles. Ive also seen some people use brillo pads/steel wool/screen material to fill the space between the barrel and the tube. Would aluminum work? I would try to keep the weight/cost down since it already has a 28" barrel. |
|
|
|
[#42]
Originally Posted By upjeeper:
dangit! i just paid twice that... Originally Posted By upjeeper:
Originally Posted By kramden:
SD tac now offers engraving (he hand delivers to the guy who does them) when u buy a tube from them. 25$ fee + 2$ sdta handling fee yea me too |
|
|
|
|
[#43]
you guys with aluminum baffles for .22, are you painting them or anodizing?
I made some nice k-baffles that I will either paint or anodize. Not sure what is the better alternative thanks |
|
|
|
|
[#44]
Well I went ahead and jumped into the VHT Header paint today. I decided to go black instead of leaving it Ti silver. I hope it turns out good. Its on the first stage cure at 250F right now.
|
|
|
|
PA, USA
|
[#45]
I ordered the Ti-64 material for making the end caps. I just gotta keep an eye on eBay for more Ti material to make the forward baffles. I haven't decided yet if I'm gonna use separate Ti tubing for spacers or just make the baffles with skirts as spacers.
Overton-AR, how did the paint job come out? |
|
|
CT, USA
|
[#46]
Originally Posted By Zakk101abn:
Johnny- you've got skillz my man. Could you go into detail on how you made your reflex mount? I'm trying make a poor mans ops 12 model. Originally Posted By Zakk101abn:
Originally Posted By JohnnyO223:
My latest f1 is for a DSR (dedicated suppressed rifle) 100%titanium all G5 except for tube and spacers which are G9. Direct thread mount and reflex type so it goes back over the barrel about 2.5" 1.5' dia and 9.25 oal weight 16oz Also made a mini blast mitigator/ barrel extension for when i don't want to run the can. Sound reduction is on par with AAC m4/SPR as in very quiet. Finish is anodized bronze Rifle is FDE Cerakote. I had some fun learning to use my anodizer with the baffles and spacers. <a href="http://s186.photobucket.com/user/johnnyo223/media/2015-03/626F2A4B-1E6E-45CC-ABFA-BE10FB6DAC82.jpg.html" target="_blank">http://i186.photobucket.com/albums/x255/johnnyo223/2015-03/626F2A4B-1E6E-45CC-ABFA-BE10FB6DAC82.jpg</a> <a href="http://s186.photobucket.com/user/johnnyo223/media/2015-03/01DBD9E9-99CB-4629-ABE9-F594E44A184D.jpg.html" target="_blank">http://i186.photobucket.com/albums/x255/johnnyo223/2015-03/01DBD9E9-99CB-4629-ABE9-F594E44A184D.jpg</a> <a href="http://s186.photobucket.com/user/johnnyo223/media/2015-03/B5773282-7990-4269-B7E2-75B3BAA268E6.jpg.html" target="_blank">http://i186.photobucket.com/albums/x255/johnnyo223/2015-03/B5773282-7990-4269-B7E2-75B3BAA268E6.jpg</a> <a href="http://s186.photobucket.com/user/johnnyo223/media/2015-03/729FA40B-DB7C-48E8-9271-FEEBF57E5D2B.jpg.html" target="_blank">http://i186.photobucket.com/albums/x255/johnnyo223/2015-03/729FA40B-DB7C-48E8-9271-FEEBF57E5D2B.jpg</a> <a href="http://s186.photobucket.com/user/johnnyo223/media/2015-03/C5201863-BD36-480D-8BDF-F51CEC392563.jpg.html" target="_blank">http://i186.photobucket.com/albums/x255/johnnyo223/2015-03/C5201863-BD36-480D-8BDF-F51CEC392563.jpg</a> <a href="http://s186.photobucket.com/user/johnnyo223/media/2015-03/F8766CEE-B1FF-437E-9EF1-53EC11A69D59.jpg.html" target="_blank">http://i186.photobucket.com/albums/x255/johnnyo223/2015-03/F8766CEE-B1FF-437E-9EF1-53EC11A69D59.jpg</a> <a href="http://s186.photobucket.com/user/johnnyo223/media/2015-03/5BB684CE-E531-4669-890B-C89C17E575E3.jpg.html" target="_blank">http://i186.photobucket.com/albums/x255/johnnyo223/2015-03/5BB684CE-E531-4669-890B-C89C17E575E3.jpg</a> <a href="http://s186.photobucket.com/user/johnnyo223/media/2015-03/0A6369AE-9A03-4BAC-BDF3-0D0E8978FB5D.jpg.html" target="_blank">http://i186.photobucket.com/albums/x255/johnnyo223/2015-03/0A6369AE-9A03-4BAC-BDF3-0D0E8978FB5D.jpg</a> <a href="http://s186.photobucket.com/user/johnnyo223/media/2015-03/D4ACAB83-3C32-4632-9D8D-9971698C06A8.jpg.html" target="_blank">http://i186.photobucket.com/albums/x255/johnnyo223/2015-03/D4ACAB83-3C32-4632-9D8D-9971698C06A8.jpg</a> <a href="http://s186.photobucket.com/user/johnnyo223/media/2015-03/1AD294F0-2E8D-4F08-8F2E-41BC665E695D.jpg.html" target="_blank">http://i186.photobucket.com/albums/x255/johnnyo223/2015-03/1AD294F0-2E8D-4F08-8F2E-41BC665E695D.jpg</a> Johnny- you've got skillz my man. Could you go into detail on how you made your reflex mount? I'm trying make a poor mans ops 12 model. I think you can figure it out by looking at it. it is two pieces 

|
|
|
|
[#47]
Originally Posted By Lilpooh:
Overton-AR, how did the paint job come out? It turned out like crap.....I am NOT a painter. I am going to get it done in air dry cerakote. |
|
|
|
PA, USA
|
[#48]
Originally Posted By Overton-AR:
It turned out like crap.....I am NOT a painter. I am going to get it done in air dry cerakote. Originally Posted By Overton-AR:
Originally Posted By Lilpooh:
Overton-AR, how did the paint job come out? It turned out like crap.....I am NOT a painter. I am going to get it done in air dry cerakote. That sucks, what do you think went wrong? Prep, heavy coat? |
|
|
|
[Last Edit: Overton-AR]
[#49]
Originally Posted By Lilpooh:
That sucks, what do you think went wrong? Prep, heavy coat? Originally Posted By Lilpooh:
Originally Posted By Overton-AR:
Originally Posted By Lilpooh:
Overton-AR, how did the paint job come out? It turned out like crap.....I am NOT a painter. I am going to get it done in air dry cerakote. That sucks, what do you think went wrong? Prep, heavy coat? I failed at reading the last part of the instructions. After an hour to air dry, I jumped right in and did all 3 heat and cool cycles to cure it. I didn't realize that you are supposed to let it air dry for a WEEK before you start the heat curing steps. It looked fine but its fragile as heck. Just bumping it on anything and the paint scratches and or chips. Its my fault.....maybe I'll remove it and try again. |
|
|
|
|
[#50]
Originally Posted By Overton-AR:
I failed at reading the last part of the instructions. After an hour to air dry, I jumped right in and did all 3 heat and cool cycles to cure it. I didn't realize that you are supposed to let it air dry for a WEEK before you start the heat curing steps. It looked fine but its fragile as heck. Just bumping it on anything and the paint scratches and or chips. Its my fault.....maybe I'll remove it and try again. Originally Posted By Overton-AR:
Originally Posted By Lilpooh:
Originally Posted By Overton-AR:
Originally Posted By Lilpooh:
Overton-AR, how did the paint job come out? It turned out like crap.....I am NOT a painter. I am going to get it done in air dry cerakote. That sucks, what do you think went wrong? Prep, heavy coat? I failed at reading the last part of the instructions. After an hour to air dry, I jumped right in and did all 3 heat and cool cycles to cure it. I didn't realize that you are supposed to let it air dry for a WEEK before you start the heat curing steps. It looked fine but its fragile as heck. Just bumping it on anything and the paint scratches and or chips. Its my fault.....maybe I'll remove it and try again. What kind of paint did you use? That header paint I used turned out good. Let is hang in front of a heater for 24hrs then did the heat/cool cycles in the oven. |
|
|
|
 Win a FREE Membership!
Sign up for the ARFCOM weekly newsletter and be entered to win a free ARFCOM membership. One new winner* is announced every week!
You will receive an email every Friday morning featuring the latest chatter from the hottest topics, breaking news surrounding legislation, as well as exclusive deals only available to ARFCOM email subscribers.

AR15.COM is the world's largest firearm community and is a gathering place for firearm enthusiasts of all types.
From hunters and military members, to competition shooters and general firearm enthusiasts, we welcome anyone who values and respects the way of the firearm.

Subscribe to our monthly Newsletter to receive firearm news, product discounts from your favorite Industry Partners, and more.
Copyright © 1996-2024 AR15.COM LLC. All Rights Reserved.
Any use of this content without express written consent is prohibited.
AR15.Com reserves the right to overwrite or replace any affiliate, commercial, or monetizable links, posted by users, with our own.