|
Posted: 3/15/2004 6:50:21 PM EDT
Changing your own AR15 barrel for dummies
This web page will demonstrate just how easy it is to re-barrel your AR-15 upper. This whole process, start to finish, on my very first build, took less than 30 minutes…. And that was taking notes and pictures! If you can tighten a single nut, then you can change your barrel, and build your own uppers, in minutes. I cannot get over how simple this is. Ok, lets cover the necessary tools. What you need: 1. A quality upper receiver action block. I went with the Bushmaster model (~$40): www.bushmaster.com/shopping/gunsmith/om-003.asp  2. A quality armorer’s wrench. Based on what I read about all the choices, I chose the DPMS model (~$35): www.dpmsinc.com/10Expand.asp?ProductCode=TL-MW  3. A small punch to knock out the gas tube roll pin. I used a 1/16” drill bit because I did not have a punch that small. 4. A set of snap ring pliers. I had a set laying around, but you can get these at any hardware store. 5. Molybdenum-Disulfide grease (per the TM) This is for the upper receiver threads. This is found at any auto parts store or hardware store for cheap. If you JUST CANT seem to find it, you can look in this thread to mail order it: MOLY GREASE THREAD 6. A vise. Pretty much any size will do, but must be firmly mounted to a bench of some sort. That’s it for tools! Now here are the step-by-step instructions: 1. First thing is first. Remove the upper from the rifle. Remove the bolt/carrier/charging handle from the upper. 2. Remove the hand-guards from the upper. (This assumes you have typical carbine/rifle guards) You do this by pulling on the delta ring toward the receiver, while using your other hand to slip of the upper and lower guard. It’s a little tricky at first, but you will get the hang of it with practice.  3. Next, we need to knock out the roll pin that holds the gas tube into the front sight assembly. Use a 1/16” punch. I didn't have one that small, so I just used a really small drill bit to knock it out. It can be tapped out from either direction. Here is a close-up of the roll pin to knock out:  4. Once that is knocked out, you can remove the gas tube. Pull the tube from the front sight base into the upper receiver, until the tube can clear the front sight, then pull it forward to remove it. Sometimes they can be stubborn, and you might have to LIGHTLY grab the tube with a pair of pliers and tap the pliers rearward with a light hammer. Don’t crush the gas tube. If for any reason you damage it, they are cheap. Replace with a new one. Note the gas port on the tube faces down, and note the hole for the roll pin:  5. Now, we are ready to slap on the action block. It only goes on one way, so you cannot screw it up. Clamp the upper/block into the vise as shown:  6. Take your armorer’s wrench out, push it onto the barrel nut, and unscrew the nut. There is spring pressure here, so you must push in towards the receiver whille you turn. It uses standard threads. Righty-tighty, Lefty-loosey. Once it breaks free, it should unscrew fairly easily. Take off the delta ring assembly as shown:  7. Now, your barrel will just pull straight from the receiver. Remove the barrel. 8. At this point, we need to remove the delta ring, spring, and snap-ring that holds it all together. Grab your snap ring pliers, and slide off the snap ring, spring, and delta ring as shown:  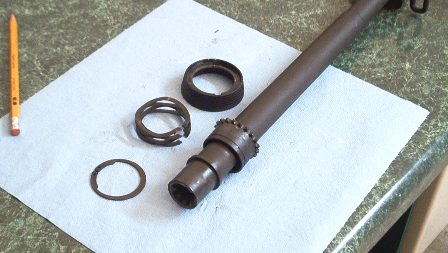 9. Halfway there! Now, we need to clean the surfaces of the new barrel, and the threaded area of the upper receiver, to make sure they are free of grit and particles that might keep them from going together smoothly. I like to use gunscrubber, or brake parts cleaner for this. Then, per the TM, apply a little moly grease to the threads of the upper receiver:  10. If necessary, assemble the delta ring assembly on the new barrel. Now, slide the new barrel into the receiver. There is a locator stub on the barrel that fits in a notch in the upper receiver. If there is any play here, line up your front sight so that it is the straightest with the rear sights. Sometimes, it *may* necessary to file this notch open in one direction, if your front sight will not line up straight. Here is a link that describes this procedure, if necessary. I dont recommend cutting anything at first; assemble your barrel, and only perform this procedure if your sights require a lot of windage adjustment in one direction to zero it. 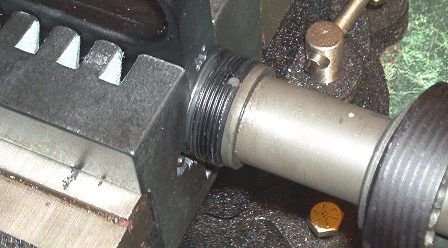 11. Thread on the barrel nut. Be careful not to cross-thread it, so just go easy at first. Some people like to take a short piece of gas tube or 3/16" bar and insert into the receiver, to hold the spring/snap ring from spinning as you tighten the barrel nut. Then use your armorers tool to get the barrel nut snug (not fully tight). Inspect the barrel nut lugs, and continue to tighten the nut until the lugs line up with the gas tube hole in the receiver. Once that is done, you need to make sure that the hole in the spring and the snap ring is aligned so you can insert the gas tube. Insert the gas tube through the barrel nut, delta ring, and into the receiver. Then insert the other end into the front sight block:  12. Now, you can remove the upper from the vise. Tap the roll pin back into the front sight block to hold the gas tube in place. Install the handguards. 13. Sight the upper in and go shooting! Email any comments or suggestions to: [email protected] Common Q&A: Q1. Can I use a barrel vise instead of an action block? A1. Yes, but a barrel vise will often allow the barrel to spin while torquing, and is not as simple or effective as an action block. Spend the $38. Q2. What about the toquing three times, to 80ft/lbs like the TM says? A2. While using a torque wrench is never a bad idea, it is not required. Snug it up, a few times if it feel rough, then line up eith next gas tube hole.... sometime this will take a lot of force, sometimes just a little. If you arent sure, or nervous, go to the local part store and borrow a torque wrench for ft. pounds. Q3. What about checking the headspace after I assemble? A3. While checking your headspace is never a bad idea, it isn't required for this operation. The headspace of an AR is set by the bolt's fit into the barrel extension. As long as you are using a good quality bolt and barrel, that was headspaced by the manufacturer, you are good to go. If you are assembling very old/used barrel/bolt, then you might want to consider checking headspace. Changing the barrel has no bearing on headspace, because the barrel's seating in the upper receiver makes no difference, it is all in the bolt and barrel extension. Instructions on how to install a free float tube: www.ar15.com/forums/topic.html?b=3&f=4&t=201469 |
|
|
|
[#1]
Thanks FAL!
|
|
|
|
[#2]
I think I'll go build myself an upper now, just to try it out. That's a handy little deal. Much appreciated.
|
|
|
|
[#3]
Thanks for the info, it came at a great time. I have been looking for instructions for about 3 weeks. Thanks again.
|
|
|
|
[#4]
Nice article but...about half the photo's aren't showing up.
You seem to have some picture problems, nor could I find a url for the photos themselves. I should be able to right click on the image and select "Show picture", or as an alternative "Properties" which would reveal the url for the photo. |
|
|
|
[#5]
This needs a tack.
|
|
|
|
[#6]
Wow, this makes things a lot easier. So far its the clearest thing directions i've seen. Please dont delete this site in the near future.
|
|
|
|
[#7]
Hella cool!
What about headspacing? |
|
|
|
[#8]
There is no adjustment on an AR upper to account for headspacing. So... there is little you could do about a headspacing issue if there ever was such a thing. Now, some people will argue with this, and it never hurts to get the gauges and check it.... but as long as you are not using a barrel/bolt combination that are extremely worn out, I would not worry with it.
But, if you want to get the gauges, it sure cant hurt anything. |
|
|
|
[#9]
Very nice, but why won't the pictures print? I want to print this to Adobe, but the pictures aren't pulled in.
I figured changing barrels wasn't that hard, but I'd never seen a good explanation. Thanks! Do free float tubes work the same way? Jim |
|
|
|
[#10]
Thanks FALARAK!
I often wondered why something like this wasn't tac'ed up on this site a long time ago? I would half-way recommend the DPMS "Panther Claw" for an action block over the BM unit or DPMS's similar unit. The reason is the "Claw" can be used with any AR upper. The BM or similar units only work on A1-A4/M4 Mil-spec style uppers. [url]http://www.dpmsinc.com/10Expand.asp?ProductCode=TL-PRC[/url] - it can be had for around $35 - I said I "half-way recommend" it because I have not received mine yet so I can't say how well it's made\how well it works? I have copied your page and converted it into a .PDF format. If it's OK with you, I would be willing to e-mail it to anybody who wants it? Let me know if that's OK with you before I do. Thanks again |
|
|
|
[#11]
Nice job [b]FALARAK[/b]!
One tip you might add is that a 3" x 3/16" tube or rod can be inserted into the gas tube hole in the upper, and through the gap in the snap ring, weld spring and delta ring. Do this before you put it in the block, and when you tighten the barrel nut, the gaps stay lined up for the tube. Just a suggestion. C_M |
|
|
|
[#12]
You left out instructions on how to make the front sight straight up. Otherwise there's gonna be a lot of ARs with canted front sights and a lot of rear windage needed.
|
|
|
|
[#13]
Gimme details then, and I will add it! Seriously, the nub on the barrel was TIGHT in the slot on the receiver, so there was no change for play or movement, for the front sight to be canted. That is, unless it was put on crooked. If that was the case, you'd have to file the notch open in the receiver? |
|
|
|
|
[#14]
I haven't messed with the barrel and gas tube, I was really curious exactly how that worked, your photo's cleared that up for me, thanks for posting the information!
|
|
|
|
[#15]
|
|
|
|
[#16]
Thanks.
How do I take a barrel extension off? |
|
|
|
[#17]
With a really big breaker bar. Reinstalling it again, however, is another matter entirely. [:D]
|
|
|
|
[#18]
Is the barrel nut under tension when you are screwing it on due to the delta ring and screw pushing against it? Real question is, is it difficult to keep the barrel wrench on, when tightening up.
|
|
|
|
[#19]
Might want to watermark your photos so they are not used by others, if that is a concern to you
|
|
|
|
[#20]
Yes.
Yes. The delta ring has a spring which places tension against the handguard when they are installed. When you hold the barrel wrench up to the barrel nut, you have to hold tension toward the upper receiver while you are tightening or loosening the barrel nut. It's not that difficult, but failing to do so is what causes the damage seen on some barrel nuts. It's really a LOT easier than this sounds... just push in, and turn! |
||
|
|
|
[#21]
Excellent, I saved it to my computer for later reference and printed off a copy of the page.
Thanks FALARAK |
|
|
|
[#22]
This has probably been addressed before, but I haven't seen it... All the posts on this subject say to use a receiver action block to hold the receiver. Why not use the barrel vise instead??? What am I missing? Thanks!
|
|
|
|
[#23]
Nice layout!
I like a guy that uses Grade 8 bolts to secure his vice to the bench. |
|
|
|
[#24]
Quoted: This has probably been addressed before, but I haven't seen it... All the posts on this subject say to use a receiver action block to hold the receiver. Why not use the barrel vise instead??? What am I missing? Thanks! When you're cranking down on the barrel nut, you're applying torgue against the upper receiver. If you use barrel blocks, the receiver will try and turn and all of that force gets applied to the small, steel barrel pin and the slot in the aluminum receiver. Neither are designed to withstand upwards of 80 ft-lbs. and you often end up damaging the barrel and/or receiver. |
|
|
|
[#25]
Not to mention - A barrel vise will often allow the barrel to "spin" in the vise blocks and scar the hell out of the barrel. I have seen more than a few of these. A receiver action block it the only way to fly. For $~40, why not? |
||
|
|
|
[#26]
Thanks for the info guys. I'll be putting an upper together as soon as I get my new limited run 16" Bushmaster barrel that was promoted on this site recently.
|
|
|
|
[#27]
The only thing you really didn't mention is how to properly torque the barrel...
Here is an extremely useful manual for anybody working on ARs... [url]http://quarterbore.com/library/pdf_files/tm9-1005-319-23.pdf[/url] For info on torquing the barrel, see page #154 in the linked pdf.... Please note, I am not trying to steal from the great job you did and you are more then welcome to add this pdf file to your site or link to the file on my server... just trying to add a little more detail! |
|
|
|
[#28]
Quoted: The only thing you really didn't mention is how to properly torque the barrel... Here is an extremely useful manual for anybody working on ARs... [url]http://quarterbore.com/library/pdf_files/tm9-1005-319-23.pdf[/url] For info on torquing the barrel, see page #154 in the linked pdf.... Please note, I am not trying to steal from the great job you did and you are more then welcome to add this pdf file to your site or link to the file on my server... just trying to add a little more detail! |
|
|
|
[#29]
I think this one needs a tack on it!
|
|
|
|
[#30]
Excellent post, FALARAK. Great pictures.
|
|
|
|
[#31]
Quoted: The only thing you really didn't mention is how to properly torque the barrel... Unfortunately, Quarterbore, you have totally missed the entire point of this thread. And that point is that the tools and procedures outlined in the military TMs suck and are prone to causing problems. The method outlined by FALARAK, me, and others here is specifically offered as an alternative to the military torque wrench procedure. So we don't want to "add a little more detail" in the form of the crappy military method. It's those exact "details" that usually causes the problems. Try to keep up. [rolleyes] Quoted: [b]Help, help! A Torque Nazi! a Torque Nazi! I hear H.E. coming now![/b] [:)] The price or freedom (from Torque Nazis) is eternal vigilance. [:D] Hey, Carbine_Man - didn't you use this method a few months back to totally resurrect and fix what looked like a hopelessly ruined barrel and upper receiver? You oughta tell the story here for those who missed it.... |
|
|
|
[#32]
Sorry, I am guessing I need to look at the older posts as we had a new baby and I just haven't been on-line as much. As for torquing the barrel, anybody doing gun work should have a torque wrench and I have never damaged a gun by measuring the force I apply.
Now, if a person was to really push the issue to get proper alignment of the barrel nut to allow the gas tube to pass to the upper receiver, well then I will bet the torque wrench might just be a good idea. Yea, the manual is no simple read and if people prefer 10-20 photos to do the job all the more power to them. If anybody wants more detail, the manual is free and available as linked... _______________________________________________ Edit: I found one of your old threads, H.E. and I appreciate and agree with what you are saying. While I prefer to use a torque wrench and I do the on & off system of torquing I agree that it is likely overkill. Still, it isn't anymore difficult then to go to the first gas tube notch as you are describing... Cheers! |
|
|
|
[#33]
[size=6]THANKS![/size=6] |
|
|
|
[#34]
Quoted: Thanks. How do I take a barrel extension off? [?] |
|
|
|
[#35]
Quoted: Quoted: Thanks. How do I take a barrel extension off? [?] |
|
|
|
[#36]
I will be doing this for the first time soon - but...
How does this vary if I want to free-float the barrel with a tube or rail system? Great post, BTW!! Thanks for taking the time to do this FALARAK, and props, H_E!! Tony |
|
|
|
[#37]
Big Thanks.
|
|
|
|
[#38]
Very nice. This is an excellent example of "how to". The pictures are worth a thousand words.
|
|
|
|
[#39]
Dont forget the grease needed on the threads.
I chose vavoline durablend moly fortified lithium grease available at any autozone outlet. 2.99 for a tube that will last a lifetime. |
|
|
|
[#40]
Uhhh.... I guess you missed that part of the original post:
|
||
|
|
|
[#41]
I vote for a tack. Does anyone know if the standard block will accommodate the DPMS Tri- Rail? Thanks
|
|
|
|
[#42]
ANY special considerations when working on Dissipators, or is it just a different location for the roll pin/ gas tube?
|
|
|
|
[#43]
A dissy is no difference than a 20" rifle. The FSB and gas tube are the same as a rifle length AR, with an enlarged gas port.... and would make no difference on re-barrelling.... that I can see. |
|
|
|
|
[#44]
I stand corrected. IF your dissipator is a 20 rifle cut down to 16" with an enlarged gas port, then the above is true. If you have a current style factory dissipator... like the following: www.bushmaster.com/shopping/barrel-assemblies/abbl-16dm4a.asp then you just knock the roll pin out in a different location under the handguards, and remove the carbine gas tube.... same method applies. |
||
|
|
|
[#45]
AMAZING!
Awesome Write up! Thanks a million! |
|
|
|
[#46]
AHHH NO HEADSPACING!! Don't you know the upper will blow up killing everyone with in a 100yd radius. There will total Anarchy as the Nuke plants go through a meltdown as a result of the dustcover flying through the cement barrier.
OK J/K GREAT POST!!!!!! It should help out many with their 1st build. Answered a lot of questions I had back when I was a newbie. Good job! |
|
|
|
[#47]
Quoted: AHHH NO HEADSPACING!! Don't you know the upper will blow up killing everyone with in a 100yd radius. There will total Anarchy as the Nuke plants go through a meltdown as a result of the dustcover flying through the cement barrier. I sure hope Tweak isn't reading this thread... [bounce] |
|
|
|
[#48]
Gee, that was easy! Thanks FALARAK and Homo_Erectus (and many other contributors)! I had built two lowers, but was intimidated about the upper. I finally did my first tonight, and it went together very easily. Now I have to get out and range test it.
I bought a used A2 upper receiver on EE, and Jarrod (Bushmaster) provided the excellent 20" HBAR barrel assembly kit. Lining up the holes for the gas tube took a little time, but I finally got the hang of it. It's easier than I was trying to make it. The gas tube isn't precisely straight, but it's not binding anywhere, nor is there any obvious rubbing on the gas key. I think I got it! |
|
|
|
[#49]
Started work on my dissy this morning, and I can't get the gas tube to come out! I removed the roll pin just fine, but the tube is really stuck. I tried lightly gripping the tube with pliers and lightly tapping the pliers with a brass hammer- nothing. I'm starting to think I am going to need to destroy this old gas tube to get it out...any helpful ideas out there?
|
|
|
|
[#50]
Quoted: Started work on my dissy this morning, and I can't get the gas tube to come out! I removed the roll pin just fine, but the tube is really stuck. I tried lightly gripping the tube with pliers and lightly tapping the pliers with a brass hammer- nothing. I'm starting to think I am going to need to destroy this old gas tube to get it out...any helpful ideas out there? Your choices are pretty limited trying to get a fragile, thin-walled tube out of the hole it's stuck in without damaging it. There's a [url=http://www.bushmaster.com/shopping/gunsmith/mbc-01.asp]gas tube wrench[/url] that works great for $30, but it may not be worth it just to change one barrel. When I was starting out I used to just crush the gas tube with a pair of Vise-Grips right behind the front sight base and tap on the pliers with a hammer to get the gas tube out. Of course, now I use the wrench and try to save the gas tube, and it's paid for itself many times over. BTW - if you do crush the gas tube, a 2-3" stub of what's left over makes a dandy barrel nut alignment tool. [:D] |
|
|
 Win a FREE Membership!
Sign up for the ARFCOM weekly newsletter and be entered to win a free ARFCOM membership. One new winner* is announced every week!
You will receive an email every Friday morning featuring the latest chatter from the hottest topics, breaking news surrounding legislation, as well as exclusive deals only available to ARFCOM email subscribers.

AR15.COM is the world's largest firearm community and is a gathering place for firearm enthusiasts of all types.
From hunters and military members, to competition shooters and general firearm enthusiasts, we welcome anyone who values and respects the way of the firearm.

Subscribe to our monthly Newsletter to receive firearm news, product discounts from your favorite Industry Partners, and more.
Copyright © 1996-2024 AR15.COM LLC. All Rights Reserved.
Any use of this content without express written consent is prohibited.
AR15.Com reserves the right to overwrite or replace any affiliate, commercial, or monetizable links, posted by users, with our own.


