|
Posted: 10/31/2014 12:32:10 AM EDT
[Last Edit: esstac-]
So this will be a continuing evolution of multiple Form 1 suppressors, once you get past the first eform1 they tend to be very addicting
I do not have a mill or lather or the know how to run one but I can adapt and get it done without. Please follow safe practices if you use any of this info. And make sure you follow all laws and regs. We will be using SDtactical tubes and adapters as well as Stainless tubes from apogee and a Muzzle brake from Harrison gear(the not so 100$) All suppressors are being made for .308 but some will be used solely on 556, I hate uni-taskers. The first 5-6 suppressors will be for 300AAC and 556, .22 and some pistol cans will follow in a month or two. This is the layout I will be following, Infinitegrim drew this up based on my input. 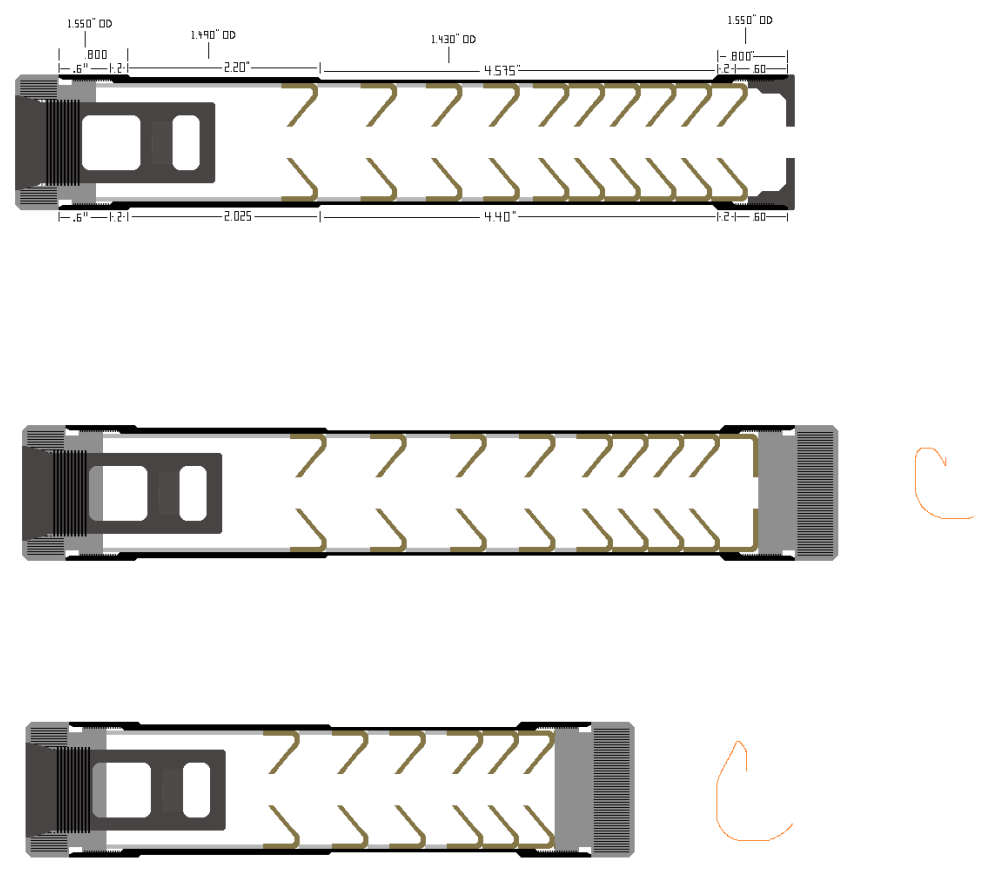
First you will need to pick a tube. SDtac is the top black steel($31 for 8.375"), Apogee Stainless tube($42 8.375") in the center and the Harrisongear muzzle brake($220 steel 30cal) at the bottom 
The Harrison gear muzzle brake only needs a tube and some way to hold the tube in place, it is a muzzle brake that lends itself well to secondary uses. It is solid steel and pretty heavy, and similar to a monocore, and you can get it in 1/2x28or 5/8x24 threading or blank for your own threading. My brake is 30cal with 5/8x24 threading. More on this brake in a later post. SDtactical offers end caps(adapters) in threaded(your choice in threads) or for a Griffin muzzle brake(his own house version also). I choose to go with Griffin muzzle brakes and Flash comps. I am building 2 dedicated 300AAC cans for 2 of my guns but going with the Griffin brake will add some extra baffling Griffin Muzzle Brake in 308 

Griffin Flash Comp in 556 
Brakes threaded into the SDtac adapters, 556 flash comp on the left, 308 comp on the right. Flash comps have one chamber/baffle, comps 2 
Brakes Threaded into SDtac adapters 
All endcap/adapters will get O-rings. I purchased my O-rings from theoringstore.com and they were Model s70124. They are a bit thicker then the O-ring that comes on a Maglite but fit perfectly for me. O-rings, the black o-ring is a maglite 
All Freeze plugs are Sealed Power 381-3179, the Doorman type may work but they are slightly bigger and lower quality. You can find these freeze plugs at your local autoparts store but they may have to add them. Should be .40-.80 cents each 
I also used onlinemetals.com for spacer material for the blast chamber and spacers for baffles. The typical process I have seen to form baffles is using a vice/press and a bearing to form the cone. I knew there had to be something better and I found a 45deg cone on some automotive 3 jaw pullers I have for my Jeep, it is the center piece on the threaded shaft and obtained from 3 jaw puller The 45deg cone, the ring on the cone was from working on my jeep, I used a new cone from one of the other pullers in the set 
Back side of the 45deg cone, its threaded for the puller 
I Found that while the 45deg cone did a good job it was not to my liking and not close enough for me to the 60deg that I believe is preferred for baffles. So I scoured the internet for something better and found this it has a 60deg cone and was pretty cheap so I took a gamble 60deg with 45deg 
So I think that is it for parts and hardware that I needed to complete a suppressor, I did leave out the centering tool for the freeze plugs(20$) and I had also bought several drill bits (cheap off ebay)to include a .370 bit for final sizing of my holes, it is roughly .06" bigger then .308 that I believe is a good plus sizing on your hole. Now that everything is on hand my first order of business is forming some baffles. I will not be showing the actual drilling and pressing, if needed I can snag pics of that in process. Step one, drilling the 1/8" center, drilled all the way through. This not only locates your center but gives the Cones a place to rest when forming to remain center. 
Step two, the freeze plug to be formed is placed cup side down onto a socket(7/8" was almost a perfect fit, tape finished it) 
Now the next step I had originally done just a 45 but knowing a 60deg is preferred I wanted to do the 60. However I quickly learned doing the 60deg would open up the 1/8" hole to fast and not get enough cone and end up with to big of a hole. So I stepped it with the 45 then 60. Just using the 45 deg cone requires more drilling as it does not open the hole up much(.22" or so) 45deg only(final .370 drilled hole), 45 then 60deg(.35 hole not final drilled), 60deg only(.4 hole) 
60deg only(.4 hole), 45 then 60deg(.35 hole not final drilled), 45deg only(final .370 drilled hole) 
Step three, Form the 45deg. Using the press(or a vice) you force the cone into the freeze plug, if using a press be careful if you use to much force you can start drawing the plug into the socket. I go just till the sides of the cone touch the freeze plug 
Step four, Form the 60deg. Same as with the 45deg but this time the 60deg cone is going to open up the hole quickly so you need to check it a few times with calipers(the hole) to make sure you do not go past your final size, you can get it to the final size but I prefer to final ream it in my drill press so I will stop a bit short. 
Step Five, for me its the final ream(no pic) or if you formed it till you achieved your proper hole size just admire your work. Center plug 
Step six, spacers and the blast chamber. I need to snag more pics so for now just one. I used a 1.375" x .065 thickness steel tube for the blast chamber, the inside of the suppressor tube is 1.35ish so obviously it will not fit so I used my belt sander and reduced the outside of the blast chamber piece down to 1.35" test fitting as I went until it fit how I liked, ended with .05 thickness. On this specific suppressor Aluminum spacer for the baffler were used and I just clipped out a section and tweaked them to shape. I used a tubing cutter to cut everything, From Lowes And also to final fit everything I used my belt sander. Next step, is assembly, and I will post more on this later to include my baffle layout and spacer sizing and such. I need to snag more pics. I will also be posting video reviews of all 3 types(6"tube, 8.375" tube, Harrison brake) on both 300aac supers/subs and 556 fired side by side. I will be showing complete breakdowns up all 3 sizes to include post and pre firing of the internals. So much more to come over the next few days/week or two. ==================================================================================================== 9mm pistol can 6" SDtac titanium tube Aluminum SDtac endcap(I shortened it .3" and hogged it out a bit) Aluminum SDtac Liberty/gemtech booster adapter endcap 8x Freeze plugs (Sealed Power 381-3179) 8x Aluminum spacers (7x .25" 1 .4"ish) Liberty Booster, gemtech LID works also click me for pic click me for pic click me for pic click me for pic click me for pic Videos Mystic and Form1 6inch on Glock 17, 137g cast subs Glock 19, shitty phone camera Glock 19 V 300aac subs angle 1 Glock 19 V 300aac subs angle 2 glock 17 unsuppressed V suppressed glock 19 glock 19 v 300aac subs ==================================================================================================== Freeze plug forming and tools pics. This is not a how to but rather a how I did it. Take this info and run with it, i used crap I had laying around. If you are not mechanically inclined then get a friend who is and buy him a beer. Seriously, these FP are .40-.80$ ea so don't fret over it and just do it, if you screw up I am not going to tell daddy on you. This is the 90deg and 60deg tool used. The 90deg is off of a harbor freight pulling tool(it unscrews and the set I bought had 3 tools for 20$) the 60deg is a "dead center" for a lathe and bought from grizzly.com(harbor freight has them also) 90deg and 60deg tool This is how I am now forming the FPs. Instead of sitting the FP around a socket I am sitting the FP ontop of a piece of tubing, in my case its scrap spacer material. the FP and spacer then are put inside a piece of tubing that has the same ID as your suppressor tube, in the pic I have 2 sockets and they are only used to get the right length as my tube is quite long, you only need about 1.5" worth of tubing. By forming the FP ontop of a spacer instead of resting around a socket it lets the FP "form" the cone deeper and in doing so it draws a bit of the side wall down into the cone. ghetto jig I start with a center drilled (1/8") FP and the 90deg cone. This step is not meant to open the hole fo the FP to final size but to get the bulk of the cone/forming started cutaway view of the 90deg Next you use the 60deg to form a deeper cone and open up the hole to final size, or just short of final size and then ream your final size with a drill bit. cutaway view of the 60deg Now some other random FP forming pics I have posted in this thread. Use these pics to get you going or give you ideas. the old way with FP sitting on a socket, does not allow for as deep of a cone old way getting squished in the press FP cutaway with a .370" hole FP cutaway with a .370" hole 2 FP center drilled, with SDtac center drill guide Old formed FP dones over a socket V the new way sitting ontop of a spacer. LOOK AT THEM CONES MAN!! Old formed FP next to the new way Old formed FP next to the new way ==================================================================================================================== Lots of videos of shooting stuff with pics These two videos are of the 6" Steel SDtac can with aluminum endcaps and FPs, each video is 210rnds fired through a 11.5" 556 upper and a bumpfire stock. This is way more pounding then what most people are going to do and was done purposly to beat the shit out of it. I had expected the FPs to fold over on themselves and just disintegrate, they did not and just erroded a bit. Not to shabby for a can that got as hot as it did Torture test of the 6" SDtac/FP can, making that bitch RED! Round 2 with the SDtac 6" nah, it didn't get hot 6" blast baffle before taking close to 700 rounds of bumpfired 556 Take a minute and look at the next set of pictures, and remember it has had over 1k of mixed 556(16") and 300AAC through it before dumping 700rnds of 556 through a 11.5" barrel witha bump stock. Now remember them videos and the picture of the can itself red hot, what do you think the baffles looked like when that can was red? and this is all the damage that a .40$ FP took? That FP next to the damaged one has took ALLOT of rounds itself of both 300aac and 556, it however was not subjected to multiple(210rnd) mags dumps with a bumpfire stock and it shows no signs of giving up. Blast baffle after its 700 round torture Blast baffles from 6" and 8" cans blast baffles from 8" and 6" cans backsdie 11.5" SBR with bump stock 6" sdtac guts new SDtac guts after close to 1k of 556 through a 16" and many 300aac subs and supers(before the 700rnd bump torture) 6" and 8" SDtac cans shooting 300AAC subs 8"SDtac can shooting a mag of subs then a mag of supers in 300aac 8" SDtac can shooting subs and supers in 300aac, plus FIRE BITCHES! 8" SDtac can with old style FPs V Mystik 1 2 3 4 And full pics of the guts of my 8". This can is pushing 2k at this point but mainly 300AAC subs/supers. ALLOT of powder coated cast bullet, notice any leading? blast FP whole shabang |
|
|
|
|
[#1]
How long do you think one of these cans would last on a .300wsm?
|
|
|
|
|
[#2]
Very cool project. These would be great for someone who wants a cheap effective alternative to a brand name can for an HD rifle.
|
|
|
|
NC, USA
|
[#3]
Originally Posted By d16man:
Wonder if it would be better to drill the vent holes prior to the forming of the cone? I did it this way but I undersized them, they expand in the forming process, my 1.8mm holes became oblong, 1.8x2.4mm and can be finished to 2.4mm |
|
|
NC, USA
|
[#4]
Originally Posted By JoeCoastie:
From what I have read those vent/dater holes are for drainage and was spec'd by the .mil for aquatic use. Of course, this is all speculation AFAIK. Originally Posted By JoeCoastie:
Originally Posted By c5hardtop:
Originally Posted By Conqueror:
Cone baffles do not need the dater hole for sound performance, only K baffles. If you want to improve their efficiency you could half-cut the tip of the cone, but that can negatively affect your POI shift if not done well. Straight cones are highly effective even without the steps. I would recommend more baffles and fewer spacers in each can. A lot of people overdo the space between the cones. Find a cutaway pic of the Saker or M4-2000, you will see that after the blast baffle, the cones get progressively closer together and are quite tightly packed. The M4-2000 is one of the best performing cans, 60deg cones, from the cut away it appears to have 3 2-3mm vent holes per cone. That is why I did mine that way. The Surefire can has similar number and size also with a tight stack. That is AAC's stance but it could very be a way to hide a design feature, but the M4-2000 and the Surefire both appear to have 2-4 2-3mm holes and they are among the best forming 5.56 cans. AAC's SDN-6 30cal can is basically a expanded version. Things like clipping the cones are pretty common. |
|
|
|
[#5]
Originally Posted By esstac-:
I was just thinking about doing this Took a few more pics of the baffle process since I was lacking some. Centering tool + 1/8" drill bit, drilling the pilot http://www.esstac.com/pictures/form1/center%20drill%20pree.JPG Squishing the 45deg cone into the freeze plug http://www.esstac.com/pictures/form1/45deg%20squishing.JPG Squishing the 60deg cone into the already 45degred freeze plug, this step needs to be checked so you do not go past the size you want the hole http://www.esstac.com/pictures/form1/60deg%20squishing.JPG Drilling a Dater/vent/drain hole. I am using a 1/8" centering bit, its stubby and has almost no deflection so drilling on a angle is easy. This one I am unsure what the best setup is, drill or no? one hole in blast? 3 holes in the blast? one hole in every baffle? so you will have to decide. I did one in every baffle and a couple in the blast chamber, figured more turbulence inside couldn't hurt to much right? http://www.esstac.com/pictures/form1/dater.JPG http://www.esstac.com/pictures/form1/dater2.JPG Originally Posted By esstac-:
Originally Posted By hihobrian:
I drilled and tapped a 3/16x3/8"long stainless set screw Into my tube and adapter. Indexed and fully threaded to allow me to unthread the suppressor when recessed under the handgaurd. Pm me for pictures if you want but its not complicated to figure out. Just dont drill too deep. I was just thinking about doing this Took a few more pics of the baffle process since I was lacking some. Centering tool + 1/8" drill bit, drilling the pilot http://www.esstac.com/pictures/form1/center%20drill%20pree.JPG Squishing the 45deg cone into the freeze plug http://www.esstac.com/pictures/form1/45deg%20squishing.JPG Squishing the 60deg cone into the already 45degred freeze plug, this step needs to be checked so you do not go past the size you want the hole http://www.esstac.com/pictures/form1/60deg%20squishing.JPG Drilling a Dater/vent/drain hole. I am using a 1/8" centering bit, its stubby and has almost no deflection so drilling on a angle is easy. This one I am unsure what the best setup is, drill or no? one hole in blast? 3 holes in the blast? one hole in every baffle? so you will have to decide. I did one in every baffle and a couple in the blast chamber, figured more turbulence inside couldn't hurt to much right? http://www.esstac.com/pictures/form1/dater.JPG http://www.esstac.com/pictures/form1/dater2.JPG |
|
|
|
|
[Last Edit: InfiniteGrim]
[#6]
In a perfect world you want to be finishing the hole.
Using the cone forming process to expand the hole is bad for two reasons. First it wont be consistent. Second you dont get a sharp/clean hole. Not sure how to describe this but you want the hole's edges to be sharp. The one of the left in the following picture, which was finished with a drill bit that is .370" (View the full size in a new tab) 
|
|
|
|
|
[#7]
I'm ready to give the atf my money...
But I'm still a tad confused as to what is needed to finish these. I understand to baffle material, a tube, and end caps. Not sure what freeze plugs are for, or if I need to invest in a drill press as well, or what/if punches are needed to form the baffle. I read the OP, where it's basically saying "I found xx tool here, get that" , but I don't know exactly what to do with it 
I need something to preoccupy my mind while I wait painfully for my AAC cans still in jail |
|
|
|
|
[#8]
Originally Posted By ARmory04:
I'm ready to give the atf my money... But I'm still a tad confused as to what is needed to finish these. I understand to baffle material, a tube, and end caps. Not sure what freeze plugs are for, or if I need to invest in a drill press as well, or what/if punches are needed to form the baffle. I read the OP, where it's basically saying "I found xx tool here, get that" , but I don't know exactly what to do with it
I need something to preoccupy my mind while I wait painfully for my AAC cans still in jail This thread goes hand in hand with the prepper's discount thread, and all other maglight flashlight suppressor builds. The freeze plugs are the baffles, |
|
|
|
|
[#9]
I'm behind on my reading, can we make one of these in say .45 or 7.62 (for 300blk) cal but use a wipe to make it more effective with subcal like .22? or are wipes stil taboo? My Thompson can uses wipes as do a few others, not sure on the legality behind a F1 can. at ones time I thought individual baffels/wipes were ruled suppressors...
|
|
|
|
|
[Last Edit: esstac-]
[#10]
Took the 6" out today, will post some videos in a bit. For now is some pics of before and after for this can.
Used on a 16" 556 and a 10.5" 300BLK. Fired through the 6" 300BLK 120 rnds 249g cast and powder coated subs 1000fps 120 rnds 147g fmj pulled, supers, 2000 fps or so 30 125g Nosler bthp, supers, not sure on fps 556 30 rnds 55g fmj 30 rnds 69g nosler 60 rnds 77g nosler bumpfired 4 mags worth just for giggles. One mag was subs, was a hoot! New baffle stack 


Fired with above round count, the blue is tape from the socket I used to smack them out. 


|
|
|
|
WA, USA
|
[#11]
Originally Posted By esstac-:
Took the 6" out today, will post some videos in a bit. For now is some pics of before and after for this can. Used on a 16" 556 and a 10.5" 300BLK. Fired through the 6" 300BLK 120 rnds 249g cast and powder coated subs 1000fps 120 rnds 147g fmj pulled, supers, 2000 fps or so 30 125g Nosler bthp, supers, not sure on fps 556 30 rnds 55g fmj 30 rnds 69g nosler 60 rnds 77g nosler bumpfired 4 mags worth just for giggles. One mag was subs, was a hoot! New baffle stack http://www.esstac.com/pictures/form1/blast%20baffle%20new.JPG http://www.esstac.com/pictures/form1/blast%20baffle%20new%202.JPG http://www.esstac.com/pictures/form1/first%20three%20baffles%20new.JPG http://www.esstac.com/pictures/form1/baffle%20set%20new%206%20inch.JPG Fired with above round count, the blue is tape from the socket I used to smack them out. http://www.esstac.com/pictures/form1/blast%20baffle%20fired.JPG http://www.esstac.com/pictures/form1/blast%20baffle%20fired%202.JPG http://www.esstac.com/pictures/form1/first%203%20baffles%20fired.JPG http://www.esstac.com/pictures/form1/baffle%20stack%20fired.JPG http://www.esstac.com/pictures/form1/blast%20chamber.JPG http://www.esstac.com/pictures/form1/end%20cap%20baffle.JPG So how does it sound?!?
|
|
|
LA, USA
|
[#12]
Do you notice any wear? How was the preformance? I ordered a 6in and 8in tube to build two 30 cal cans. The 6in will live on the blackout with a mix of subs and supers....
James |
|
|
|
[#13]
4 crappy ipad vids, and in the dark. I will have 6" and the 8" side by side in a few days.
125g nosler 300BLK 147g FMJ 300BLK 249g Cast Subs 300BLK 249g Cast Subs Take 2 300BLK |
|
|
|
|
[#14]
Originally Posted By Iwantfullauto:
Do you notice any wear? How was the preformance? I ordered a 6in and 8in tube to build two 30 cal cans. The 6in will live on the blackout with a mix of subs and supers.... James For me, 8" on the blackout if you are going to run allot of subs, the suppression is better. The 2 6" tubes I did for 556 but form1ed them for 30cal so I could swap them around. If its just supers and 556 then the 6" seems to be perfect. I will have a video of the 6" and 8" being fired in a day or two, side by side with 2 shooters with 300 subs. I cannot detect any wear, granted I did not shoot a ton but I did do several mag dumps quickly to get it hot to see if it would degrade anything, I am extremely happy with it. I am also running them with Griffin comps/flash comps I am happy with the performance, I was a bit surprised however on how much flash I did get especially on the first round. It was not bright but noticeable and you can see it in the videos. 556 did have more fyi. |
|
|
|
|
[Last Edit: Assaultdog03516]
[#15]
Have you taken before and after measurements of the inner diameter? I'm curious if the pressure has deformed the baffles.
|
|
|
|
|
[#16]
Originally Posted By mizzarley:
So how does it sound?!?
Subs were great, my wife did not care for the added weight of the suppressor(its her SBR I ran the 147s without muffs for a few rounds and I would call that hearing safe but probably not a good thing to do for long. Knocking the Blast off the supers and 556 was something my wife enjoyed to. |
|
|
|
|
[Last Edit: esstac-]
[#17]
Originally Posted By Assaultdog03516:
Have you taken before and after measurements of the inner diameter? I'm curious if the pressure has deformed the baffles. I did not check the Tube itself, I did check the Blast chamber insert. Before firing it was 1.345 and after tonight it is 1.345. I am assuming it is what will be taking the biggest pounding getting hit by the comps and it did not change. It slid out like it went in, the baffle stack I had to knock out lightly but that was do to the fouling inside the can, without cleaning they all slid back in like new. Blast chamber insert is .05" thick Blast chamber insert. I took this pic as the waffles pattern from the 556 flash comp was cool looking, 556 was shot after all the 300BLK and shot in a short timeframe. Now that I look at this pic more, it does look like some peening is happening(in the waffled area), I cannot see or feel it in hand, and TBH I do not know if it is a bad thing as it would be hardening the insert but repetitive? 
Griffin Comp adapter, at about the 6th thread from the bottom is where the threading ends on the comp and the first chamber starts. 
|
|
|
|
NC, USA
|
[#18]
Nice. I think the FPs will be fine I clipped the baffles of freeze plug cones and hardened steel valve retailers yesterday and they they took about the same effort (with a diamond rotary bit).
|
|
|
|
[Last Edit: pdm]
[#19]
Great thread!
The baffles really seem to be holding up well. This has me suprised, especially when you mentioned mag dumps. Heat and pressure are the enemy here and those baffles look great after firing. Have you measured the ID of the 1st baffle to see if there was any measurable erosion? Also, the O-rings. What're your thoughts on using them? I've been planning on a mix of Ti Valve stem guides and Freeze plugs. The one issue that had me hesitant with the FPs was that their OD was a bit bigger that the tube's ID. My reasoniong is that I shoot quite a bit of corrosive ammo and I want the ability to be able to easily disassemble the can and clean the baffles. With the Inconel baffles on the commercial cans it's not big of an issue but I do think it'll be a problem with the mild-steel FP baffles. I worked out a jig last night in my head to accurately reduce the OD of the freeze plugs. If it works and I can reduce their OD to a few .001"s under then I'll most likely replace some of the Ti baffles and SS spacers with the FP baffles. I can get a 2:1 baffle increase by using the FPs. Great work. |
|
|
|
OR, USA
|
[#20]
Nice! Do you have a 308 to try it on next, or are you stopping at 300 Blackout and 5.56 supers as your max with the aluminum end caps? Two weeks down, and no stamp as of yet on my end, but I am doing this! I think I will go with the 8" tube, and no spacers just FP's, and a blast chamber. I have a AR 308 with a 18" barrel that is nasty with 125's. I am curious if this would hold up to it as long as it is not rapid fire.
|
|
|
|
[Last Edit: InfiniteGrim]
[#21]
Originally Posted By esstac-:
4 crappy ipad vids, and in the dark. I will have 6" and the 8" side by side in a few days. 125g nosler 300BLK 147g FMJ 300BLK 249g Cast Subs 300BLK 249g Cast Subs Take 2 300BLK Shitty videos are shitty 
Add me to your trust, and send them over here |
|
|
|
|
[#22]
Originally Posted By xacex:
Nice! Do you have a 308 to try it on next, or are you stopping at 300 Blackout and 5.56 supers as your max with the aluminum end caps? Two weeks down, and no stamp as of yet on my end, but I am doing this! I think I will go with the 8" tube, and no spacers just FP's, and a blast chamber. I have a AR 308 with a 18" barrel that is nasty with 125's. I am curious if this would hold up to it as long as it is not rapid fire. I'm gonna do the same for my 300blk, just a massive stack of FP baffles and a blast chamber... |
|
|
|
USA
|
[#23]
Originally Posted By c5hardtop:
The M4-2000 is one of the best performing cans, 60deg cones, from the cut away it appears to have 3 2-3mm vent holes per cone. That is why I did mine that way. The Surefire can has similar number and size also with a tight stack. Originally Posted By c5hardtop:
Originally Posted By Conqueror:
Cone baffles do not need the dater hole for sound performance, only K baffles. If you want to improve their efficiency you could half-cut the tip of the cone, but that can negatively affect your POI shift if not done well. Straight cones are highly effective even without the steps. I would recommend more baffles and fewer spacers in each can. A lot of people overdo the space between the cones. Find a cutaway pic of the Saker or M4-2000, you will see that after the blast baffle, the cones get progressively closer together and are quite tightly packed. The M4-2000 is one of the best performing cans, 60deg cones, from the cut away it appears to have 3 2-3mm vent holes per cone. That is why I did mine that way. The Surefire can has similar number and size also with a tight stack. Not sure which cutaway photo you're viewing, but most of the baffles do not have those holes to my knowledge. Additionally, on cans like the Cyclone, none of the baffles have the holes as far as I know. The 60deg cone is the key part. Surefire doesn't use cone baffles so they may have a reason for their holes besides drainage (ie, to reduce back pressure, which is why the new SOCOM blast baffle has the holes). |
|
|
NC, USA
|
[Last Edit: c5hardtop]
[#24]
Originally Posted By Conqueror:
Not sure which cutaway photo you're viewing, but most of the baffles do not have those holes to my knowledge. Additionally, on cans like the Cyclone, none of the baffles have the holes as far as I know. The 60deg cone is the key part. Surefire doesn't use cone baffles so they may have a reason for their holes besides drainage (ie, to reduce back pressure, which is why the new SOCOM blast baffle has the holes). Originally Posted By Conqueror:
Originally Posted By c5hardtop:
Originally Posted By Conqueror:
Cone baffles do not need the dater hole for sound performance, only K baffles. If you want to improve their efficiency you could half-cut the tip of the cone, but that can negatively affect your POI shift if not done well. Straight cones are highly effective even without the steps. I would recommend more baffles and fewer spacers in each can. A lot of people overdo the space between the cones. Find a cutaway pic of the Saker or M4-2000, you will see that after the blast baffle, the cones get progressively closer together and are quite tightly packed. The M4-2000 is one of the best performing cans, 60deg cones, from the cut away it appears to have 3 2-3mm vent holes per cone. That is why I did mine that way. The Surefire can has similar number and size also with a tight stack. Not sure which cutaway photo you're viewing, but most of the baffles do not have those holes to my knowledge. Additionally, on cans like the Cyclone, none of the baffles have the holes as far as I know. The 60deg cone is the key part. Surefire doesn't use cone baffles so they may have a reason for their holes besides drainage (ie, to reduce back pressure, which is why the new SOCOM blast baffle has the holes). Here is a cutway of the M4-2000 and Surefire Can. Because of the tight 60deg cone stack on the M4-2000 it is harder to see the holes as the baffles block them on the cutaway, but you can see where the cut happend to hit the holes on one of the baffles, so there is a at least 2 holes per baffle, if you look at the last baffle it appears to be 2 holes on just that one half, so likely 4 holes per baffle, they appear to be in 2.4-3mm range. Surefire can looks like 3-4 per baffle also. AAC's SDN-6 is basically a 30cal M4-2000. 

|
|
|
|
[#25]
When I finally get my act and materials together, I am doing the m4 2000 baffle stack. No spacers except in the blast chamber.
|
|
|
|
OR, USA
|
[Last Edit: xacex]
[#26]
If you smoke blow some down the bore till it comes out of your can. It will get rid of your first round pop. If you don't smoke a shot of canned air (Co2) from the breach will do the same thing. Get the oxygen out of the can and the first round pop and flash will go away with your subsonic rounds.
|
|
|
|
[#27]
As far as the Dater holes I think for mine i'm going to only put two, directly across from eachother, and then alternate them in a criss cross pattern as I stack the baffles in...
|
|
|
|
|
[#28]
Originally Posted By c5hardtop:
Here is a cutway of the M4-2000 and Surefire Can. Because of the tight 60deg cone stack on the M4-2000 it is harder to see the holes as the baffles block them on the cutaway, but you can see where the cut happend to hit the holes on one of the baffles, so there is a at least 2 holes per baffle, if you look at the last baffle it appears to be 2 holes on just that one half, so likely 4 holes per baffle, they appear to be in 2.4-3mm range. Surefire can looks like 3-4 per baffle also. AAC's SDN-6 is basically a 30cal M4-2000. http://i62.tinypic.com/vifh50.jpg http://i61.tinypic.com/2d934zl.jpg Originally Posted By c5hardtop:
Originally Posted By Conqueror:
Originally Posted By c5hardtop:
Originally Posted By Conqueror:
Cone baffles do not need the dater hole for sound performance, only K baffles. If you want to improve their efficiency you could half-cut the tip of the cone, but that can negatively affect your POI shift if not done well. Straight cones are highly effective even without the steps. I would recommend more baffles and fewer spacers in each can. A lot of people overdo the space between the cones. Find a cutaway pic of the Saker or M4-2000, you will see that after the blast baffle, the cones get progressively closer together and are quite tightly packed. The M4-2000 is one of the best performing cans, 60deg cones, from the cut away it appears to have 3 2-3mm vent holes per cone. That is why I did mine that way. The Surefire can has similar number and size also with a tight stack. Not sure which cutaway photo you're viewing, but most of the baffles do not have those holes to my knowledge. Additionally, on cans like the Cyclone, none of the baffles have the holes as far as I know. The 60deg cone is the key part. Surefire doesn't use cone baffles so they may have a reason for their holes besides drainage (ie, to reduce back pressure, which is why the new SOCOM blast baffle has the holes). Here is a cutway of the M4-2000 and Surefire Can. Because of the tight 60deg cone stack on the M4-2000 it is harder to see the holes as the baffles block them on the cutaway, but you can see where the cut happend to hit the holes on one of the baffles, so there is a at least 2 holes per baffle, if you look at the last baffle it appears to be 2 holes on just that one half, so likely 4 holes per baffle, they appear to be in 2.4-3mm range. Surefire can looks like 3-4 per baffle also. AAC's SDN-6 is basically a 30cal M4-2000. http://i62.tinypic.com/vifh50.jpg http://i61.tinypic.com/2d934zl.jpg I wonder if all the baffles have them or just some. 
|
|
|
|
|
[Last Edit: esstac-]
[#29]
Originally Posted By pdm:
Great thread! The baffles really seem to be holding up well. This has me suprised, especially when you mentioned mag dumps. Heat and pressure are the enemy here and those baffles look great after firing. Have you measured the ID of the 1st baffle to see if there was any measurable erosion? Also, the O-rings. What're your thoughts on using them? I've been planning on a mix of Ti Valve stem guides and Freeze plugs. The one issue that had me hesitant with the FPs was that their OD was a bit bigger that the tube's ID. My reasoniong is that I shoot quite a bit of corrosive ammo and I want the ability to be able to easily disassemble the can and clean the baffles. With the Inconel baffles on the commercial cans it's not big of an issue but I do think it'll be a problem with the mild-steel FP baffles. I worked out a jig last night in my head to accurately reduce the OD of the freeze plugs. If it works and I can reduce their OD to a few .001"s under then I'll most likely replace some of the Ti baffles and SS spacers with the FP baffles. I can get a 2:1 baffle increase by using the FPs. Great work. For the o-rings, my reason for them is to add some resistance to the end caps incase they start to unscrew. It adds allot of resistance the the last 1.5-2 turns on the caps and is cheap insurance. 10 o-rings cost $1.20 with $5 shipping. I had a few baffles that I squished to much and they started drawing into the socket, not much but enough that it opened up the outside diameter just enough that they would not slide in. New the proper freeze plugs are a perfect fit to me, they slide in without needing to be forced in. For the ones that needed a bit of material removed: I wrapped tape on my .370 drill bit(about .25 thickness) and put it about .25" away from where the drill bit would sit inside my cordless drill, I then put the freeve plug on the drill bit and chucked it up(cone facing away from the drill motor) when I tightened the chuck I pushed the drill bit into the chuck tightly so it would hold the freeze plug tight. I then spun the motor and held a file on the outside of the freeze plug, it does not take much and I test fit it to the tube as I went without removing it from the cordless drill. Not sure if I explained this well, so I will snag a picture in a bit of what I mean. This Freeze plug has been turned down with the above method, I even beveled the end a touch 
Poor mans Lathe 
Spun it and took just a C-hair off 
|
|
|
|
|
[#30]
Originally Posted By xacex:
Nice! Do you have a 308 to try it on next, or are you stopping at 300 Blackout and 5.56 supers as your max with the aluminum end caps? Two weeks down, and no stamp as of yet on my end, but I am doing this! I think I will go with the 8" tube, and no spacers just FP's, and a blast chamber. I have a AR 308 with a 18" barrel that is nasty with 125's. I am curious if this would hold up to it as long as it is not rapid fire. Only two .308's I own are a FAL and a MAS(only dropped once) While I did not have plans to run this on my FAL I have been thinking of getting an end cap cut for it, I believe it has 9/16 LH threading so kinda oddball. If I can find someone local that has a .308 I will put it on and abuse it a bit if nothing else. |
|
|
|
|
[#31]
For those looking for the .370 drill bit....search instead for a 9.4mm. That is common size used by golfsmiths to drill the hozels on irons.
|
|
|
|
NC, USA
|
[Last Edit: wcoats]
[#32]
Nice thread. I like that are are pictures and explination onf the build. Glad to see that the freeze plugs held up to 5.56 and 300blk supers. I have a From 1 aproved for a .22 can and thinking about using an aluminum C-cell tube. Anyone done this yet? What's the ID of the C-cell tube and what freze plugs work wel for it(buying th efreze plugs form SD tactical seem overpriced, and they are just listed as C-cell size). Also Is anyone selling a 6" aluminum C-cell tube?
Also very interested to see how well the monocore Harrison Gear comp performs as a spressor. Where are you planning on doing that build? |
|
|
|
[#33]
Originally Posted By d16man:
For those looking for the .370 drill bit....search instead for a 9.4mm. That is common size used by golfsmiths to drill the hozels on irons. Originally Posted By d16man:
For those looking for the .370 drill bit....search instead for a 9.4mm. That is common size used by golfsmiths to drill the hozels on irons. Good addition. This is the one I purchased, although he raised the price(I paid $6.36 shipped) Originally Posted By wcoats:
Nice thread. I like that are are pictures and explination onf the build. Glad to see that the freeze plugs held up to 5.56 and 300blk supers. I have a From 1 aproved for a .22 can and thinking about using an aluminum C-cell tube. Anyone done this yet? What's the ID of the C-cell tube and what freze plugs work wel for it(buying th efreze plugs form SD tactical seem overpriced, and they are just listed as C-cell size). Also Is anyone selling a 6" aluminum C-cell tube? Also very interested to see how well the monocore Harrison Gear comp performs as a spressor. Where are you planning on doing that build? I will be doing it here also(Harrison) as well as a .22 and some pistol cans in the future. My plan is to have enough pictures and enough info of how I did it so others can see, there is allot of builds of this nature posted here and elsewhere just not as much info as I would have liked and since I have several friends doing this I wanted the info out for them also. |
|
|
|
USA
|
[#34]
Originally Posted By c5hardtop:
Here is a cutway of the M4-2000 and Surefire Can. Because of the tight 60deg cone stack on the M4-2000 it is harder to see the holes as the baffles block them on the cutaway, but you can see where the cut happend to hit the holes on one of the baffles, so there is a at least 2 holes per baffle, if you look at the last baffle it appears to be 2 holes on just that one half, so likely 4 holes per baffle, they appear to be in 2.4-3mm range. Surefire can looks like 3-4 per baffle also. AAC's SDN-6 is basically a 30cal M4-2000. http://i62.tinypic.com/vifh50.jpg http://i61.tinypic.com/2d934zl.jpg Originally Posted By c5hardtop:
Originally Posted By Conqueror:
Originally Posted By c5hardtop:
Originally Posted By Conqueror:
Cone baffles do not need the dater hole for sound performance, only K baffles. If you want to improve their efficiency you could half-cut the tip of the cone, but that can negatively affect your POI shift if not done well. Straight cones are highly effective even without the steps. I would recommend more baffles and fewer spacers in each can. A lot of people overdo the space between the cones. Find a cutaway pic of the Saker or M4-2000, you will see that after the blast baffle, the cones get progressively closer together and are quite tightly packed. The M4-2000 is one of the best performing cans, 60deg cones, from the cut away it appears to have 3 2-3mm vent holes per cone. That is why I did mine that way. The Surefire can has similar number and size also with a tight stack. Not sure which cutaway photo you're viewing, but most of the baffles do not have those holes to my knowledge. Additionally, on cans like the Cyclone, none of the baffles have the holes as far as I know. The 60deg cone is the key part. Surefire doesn't use cone baffles so they may have a reason for their holes besides drainage (ie, to reduce back pressure, which is why the new SOCOM blast baffle has the holes). Here is a cutway of the M4-2000 and Surefire Can. Because of the tight 60deg cone stack on the M4-2000 it is harder to see the holes as the baffles block them on the cutaway, but you can see where the cut happend to hit the holes on one of the baffles, so there is a at least 2 holes per baffle, if you look at the last baffle it appears to be 2 holes on just that one half, so likely 4 holes per baffle, they appear to be in 2.4-3mm range. Surefire can looks like 3-4 per baffle also. AAC's SDN-6 is basically a 30cal M4-2000. http://i62.tinypic.com/vifh50.jpg http://i61.tinypic.com/2d934zl.jpg 1. Seeing holes in a single baffle does not mean they all have holes. Most advanced silencers have subtle changes in baffle geometry or design as they go farther down the can. 2. That silencer is cut right down the middle, you cannot assume that there are any more holes than the ones you see intersected by the cut. 3. Many other photos show baffles with no holes at all (like the one above, which is from Kevin Brittingham's collection) 4. Again, many cone baffle silencers do not have the holes (ie the Cyclone, which is class-leading performance-wise). I'm not trying to start a fight with you, just trying to save you the time and aggravation of adding a needless feature. Some baffle venting is actually harmful to performance. |
|
|
NC, USA
|
[#35]
Originally Posted By d16man:
For those looking for the .370 drill bit....search instead for a 9.4mm. That is common size used by golfsmiths to drill the hozels on irons. Every standard 29 piece set would have a 23/64 (.359) and 3/8 (.375) both of which would be suitable, really no reason to go out of your way to get specifically to .370". It's going be really difficult for most people to get a hole drilled directly center after forming, typically you would need a drill press, vice table, and more difficult, a way to get that perfected centered. I don't think it is a good idea, drilling out the cone will create a sharp edge on the cone. We are already dealing with non-ideal material (a low carbon steel), and further weakening it by streaching it out thinning it, then creating the edge at the area that will take the brunt of the blast. |
|
|
|
[#36]
For all the dater hols I did in the 6", This was done to test the theory of holes or no holes. When my next 6" form1 comes back I will be doing it identical minus the dater holes and doing a side by side comparison of them.
77g nosler through a 16" with 6" suppressor, nothing to compare it to in the video...... 77g |
|
|
|
|
[#37]
Originally Posted By esstac-:
For the ones that needed a bit of material removed: I wrapped tape on my .370 drill bit(about .25 thickness) and put it about .25" away from where the drill bit would sit inside my cordless drill, I then put the freeve plug on the drill bit and chucked it up(cone facing away from the drill motor) when I tightened the chuck I pushed the drill bit into the chuck tightly so it would hold the freeze plug tight. I then spun the motor and held a file on the outside of the freeze plug, it does not take much and I test fit it to the tube as I went without removing it from the cordless drill. Not sure if I explained this well, so I will snag a picture in a bit of what I mean. |
|
|
|
|
[#38]
Originally Posted By GHPorter:
Between your text and your pictures, you got the point across. Seeing your pictures, I wonder if a 1/4" drill with an adjustable stop like one from this set at Lowes would be more secure than the tape. Either way, that's quite a simple way to get the job done. Originally Posted By GHPorter:
Originally Posted By esstac-:
For the ones that needed a bit of material removed: I wrapped tape on my .370 drill bit(about .25 thickness) and put it about .25" away from where the drill bit would sit inside my cordless drill, I then put the freeve plug on the drill bit and chucked it up(cone facing away from the drill motor) when I tightened the chuck I pushed the drill bit into the chuck tightly so it would hold the freeze plug tight. I then spun the motor and held a file on the outside of the freeze plug, it does not take much and I test fit it to the tube as I went without removing it from the cordless drill. Not sure if I explained this well, so I will snag a picture in a bit of what I mean. That will get the job done as well, I did with what I had on hand. I do have some drill stops but nothing that was sized to fit the .370" bit/hole size |
|
|
|
NC, USA
|
[#39]
Originally Posted By Conqueror:
1. Seeing holes in a single baffle does not mean they all have holes. Most advanced silencers have subtle changes in baffle geometry or design as they go farther down the can. 2. That silencer is cut right down the middle, you cannot assume that there are any more holes than the ones you see intersected by the cut. 3. Many other photos show baffles with no holes at all (like the one above, which is from Kevin Brittingham's collection) 4. Again, many cone baffle silencers do not have the holes (ie the Cyclone, which is class-leading performance-wise). I'm not trying to start a fight with you, just trying to save you the time and aggravation of adding a needless feature. Some baffle venting is actually harmful to performance. Originally Posted By Conqueror:
Originally Posted By c5hardtop:
Originally Posted By Conqueror:
Originally Posted By c5hardtop:
Originally Posted By Conqueror:
Cone baffles do not need the dater hole for sound performance, only K baffles. If you want to improve their efficiency you could half-cut the tip of the cone, but that can negatively affect your POI shift if not done well. Straight cones are highly effective even without the steps. I would recommend more baffles and fewer spacers in each can. A lot of people overdo the space between the cones. Find a cutaway pic of the Saker or M4-2000, you will see that after the blast baffle, the cones get progressively closer together and are quite tightly packed. The M4-2000 is one of the best performing cans, 60deg cones, from the cut away it appears to have 3 2-3mm vent holes per cone. That is why I did mine that way. The Surefire can has similar number and size also with a tight stack. Not sure which cutaway photo you're viewing, but most of the baffles do not have those holes to my knowledge. Additionally, on cans like the Cyclone, none of the baffles have the holes as far as I know. The 60deg cone is the key part. Surefire doesn't use cone baffles so they may have a reason for their holes besides drainage (ie, to reduce back pressure, which is why the new SOCOM blast baffle has the holes). Here is a cutway of the M4-2000 and Surefire Can. Because of the tight 60deg cone stack on the M4-2000 it is harder to see the holes as the baffles block them on the cutaway, but you can see where the cut happend to hit the holes on one of the baffles, so there is a at least 2 holes per baffle, if you look at the last baffle it appears to be 2 holes on just that one half, so likely 4 holes per baffle, they appear to be in 2.4-3mm range. Surefire can looks like 3-4 per baffle also. AAC's SDN-6 is basically a 30cal M4-2000. http://i62.tinypic.com/vifh50.jpg http://i61.tinypic.com/2d934zl.jpg 1. Seeing holes in a single baffle does not mean they all have holes. Most advanced silencers have subtle changes in baffle geometry or design as they go farther down the can. 2. That silencer is cut right down the middle, you cannot assume that there are any more holes than the ones you see intersected by the cut. 3. Many other photos show baffles with no holes at all (like the one above, which is from Kevin Brittingham's collection) 4. Again, many cone baffle silencers do not have the holes (ie the Cyclone, which is class-leading performance-wise). I'm not trying to start a fight with you, just trying to save you the time and aggravation of adding a needless feature. Some baffle venting is actually harmful to performance. #1 AAC says it has holes in each baffle it is not a matter of opinion, the Surefire obvious has a lot of hole because they are visible in the cut away. #2 Yeah it kind of does, unless they both only put holes in one side of the suppressor for some really crazy reason and the person that cut them in half just happened to get lucky and cut at exactly the right spot, and then after both of those happened the person doing it decided not to mention that the two halves were vastly different. Those are two of the best performing designs, they use tight stacks and venting. Most modern tight stack designs have ports, venting or clipped baffles to disrupt airflow and equalize pressures. Its pretty reasonable for someone building a form 1 can that basically has permission to build one can, and not to conduct R&D to just copy the top performing cans #3 that is the old design with the big chambers not the good modern one. Not sure what the point of that argument was, the tight vented stack performed much better which is why AAC updated it. |
|
|
|
[Last Edit: InfiniteGrim]
[#40]
For Turning down the tube...
the 8.375" Tube will be 10oz, the 6" will be 6.7oz 
|
|
|
|
|
[#41]
The apogee titanium tube is still a pretty beefy 13oz by my calculations. There's quite a bit of fat to trim, but that puts your tube cost at $200, which is more than I'd like to be in for a form 1.
|
|
|
|
|
[#42]
Originally Posted By ronnl001:
The apogee titanium tube is still a pretty beefy 13oz by my calculations. There's quite a bit of fat to trim, but that puts your tube cost at $200, which is more than I'd like to be in for a form 1. Not sure why they went so thick on the walls. |
|
|
|
|
[#43]
Can someone post a link to apogee? All I can find is electronics and hair care products.
Thanks!
|
|
|
|
|
[#44]
Apogee products.com
|
|
|
|
|
[Last Edit: Miles_Urbanus]
[#45]
Originally Posted By coug91:
Can someone post a link to apogee? All I can find is electronics and hair care products. Thanks! Originally Posted By coug91:
Can someone post a link to apogee? All I can find is electronics and hair care products. Thanks! http://apogeeproducts.com/ Originally Posted By ronnl001:
The apogee titanium tube is still a pretty beefy 13oz by my calculations. There's quite a bit of fat to trim, but that puts your tube cost at $200, which is more than I'd like to be in for a form 1. TITANIUM TUBE (MODEL TIT) $110.00 |
|
|
|
|
[Last Edit: civic96hb]
[#46]
Are there any spacers you could buy already fitted as opposed to sanding and cutting like the OP?
Also OP, just making sure, this can is a .308 for your 5.56, correct? |
|
|
|
|
[#47]
What do you all think of using a brake hone to open the ID of the tube to 1.375"?
I'm talking about using the hone to open the ID up by 0.025" leaving a wall thickness of 0.0875" (1.550"-1.375"/2=0.0875"). Is this a bad idea? Should I be overly concerned about the hone getting off center or for that small of a removal, should things be OK? I'm trying to avoid taking this to my local machine shop as they have a $75 minimum charge. |
|
|
|
NC, USA
|
[Last Edit: c5hardtop]
[#48]
Originally Posted By civic96hb:
Are there any spacers you could buy already fitted as opposed to sanding and cutting like the OP? Also OP, just making sure, this can is a .308 for your 5.56, correct? The spacers don't have to be structural to the blast chamber they are just used to hold the baffles in place. I played around with 1" Ti over the weekend, cut out a section lengthwise pressed it together it would reduce to .94" so you could do this to 1.375 Ti tubing, drilled holes in one little section in a piece and cut it lengthwise just one slit and it expanded to 1.07", so you could expand 1.25" Ti tube this way. Something like this 
|
|
|
NC, USA
|
[#49]
Originally Posted By blwngazkit:
What do you all think of using a brake hone to open the ID of the tube to 1.375"? I'm talking about using the hone to open the ID up by 0.025" leaving a wall thickness of 0.0875" (1.550"-1.375"/2=0.0875"). Is this a bad idea? Should I be overly concerned about the hone getting off center or for that small of a removal, should things be OK? I'm trying to avoid taking this to my local machine shop as they have a $75 minimum charge. I am doing a test run first but I have a machinist that is going to accept mail order work from us. You mail in your tube with MO or cash and a return shipping label. Turning down the Tube will be $15, Opening the ID will be $25. For the most Ideal setup you would turn down the center OD to 1.475 and Open the ID to 1.375, which would require both services. |
|
|
|
[#50]
Originally Posted By c5hardtop: I am doing a test run first but I have a machinist that is going to accept mail order work from us. You mail in your tube with MO or cash and a return shipping label. Turning down the Tube will be $15, Opening the ID will be $25. For the most Ideal setup you would turn down the center OD to 1.475 and Open the ID to 1.375, which would require both services. Originally Posted By c5hardtop: Originally Posted By blwngazkit: What do you all think of using a brake hone to open the ID of the tube to 1.375"? I'm talking about using the hone to open the ID up by 0.025" leaving a wall thickness of 0.0875" (1.550"-1.375"/2=0.0875"). Is this a bad idea? Should I be overly concerned about the hone getting off center or for that small of a removal, should things be OK? I'm trying to avoid taking this to my local machine shop as they have a $75 minimum charge. I am doing a test run first but I have a machinist that is going to accept mail order work from us. You mail in your tube with MO or cash and a return shipping label. Turning down the Tube will be $15, Opening the ID will be $25. For the most Ideal setup you would turn down the center OD to 1.475 and Open the ID to 1.375, which would require both services. So I gather you don't think the honing is a good idea? |
|
|
|
 Win a FREE Membership!
Sign up for the ARFCOM weekly newsletter and be entered to win a free ARFCOM membership. One new winner* is announced every week!
You will receive an email every Friday morning featuring the latest chatter from the hottest topics, breaking news surrounding legislation, as well as exclusive deals only available to ARFCOM email subscribers.

AR15.COM is the world's largest firearm community and is a gathering place for firearm enthusiasts of all types.
From hunters and military members, to competition shooters and general firearm enthusiasts, we welcome anyone who values and respects the way of the firearm.

Subscribe to our monthly Newsletter to receive firearm news, product discounts from your favorite Industry Partners, and more.
Copyright © 1996-2024 AR15.COM LLC. All Rights Reserved.
Any use of this content without express written consent is prohibited.
AR15.Com reserves the right to overwrite or replace any affiliate, commercial, or monetizable links, posted by users, with our own.


