AZ, USA
|
Posted: 3/25/2024 3:50:21 AM EDT
Since the 8.5" Dragn12 SBS was a successs, its time to build a short one. This one is at 7 inches.
I plan to document the process, changes made, new componets, with some pictures and some dimensions. I still don't have a lathe or mill set up so I am paying a machine shop to do some of the work. I hope to have my mill up and running some time this summer. Lathe to follow shortly after. The work that needs to be done is not difficult. I hold my tollerances to the tight side but there is a little wiggle room. This is a new barrel so it was never in a firearm. A used barrel would net the same results. So the obvious is first up. Where to cut the barrel. I cut off the original gas ports taking the split ring grooves with it. Thats makes the barrel about 7 1/16 inches long. Then faced the barrel muzzle in the lathe just enough to clean it up. My brother has a small lathe for doing pool cues so I set up the barrel, clamping at the largest diameter (receiver diameter of 1.260) in his 6 jaw chuck. Used a known good live center in the tail stock picking up the ID of the barrel. This to keep all the barrel changes true to the bore of the barrel if possible. The barrel was not concentric. Run out more than .005 so if you do this mod, be aware you might be faced with this issue. I'll solve this as I go. The barrel will be made to accept Benelli Mobil Chokes, as the VR80 comes with, but I will tighten up the choke bore in the barrel for a better fit. This is custom not production. This barrel will also get 7/8-32 external threads at the muzzle for the JK Armament adapter for the 195 series suppressors. I want to make a muzzle brake to fit those threads as well. What needs to be changed? Next post. NOTE: All dimensions are SAE decimal, not mm. |
|
|
|
[#1]
Topic Moved
|
|
|
AZ, USA
|
[#2]
The barrel has 4 diameters after cutting it off.
1.004 is the first dimension and the final OD of the barrel. Its about 1.9 inches long before turning the rest of the barrel. That diameter will extend from the muzzle to the slide stop near the chamber, about 5.150 inches long. Part of the original barrel is 1.044. That will be turned to match the 1.004 diameter so its that diameter all the way to the slide stop, the 1.142 diameter. This is because the ID of the piston (1.008) will be using most of the barrels length right up to the slide stop. Not a lot of clearance once the barrel gets hot but the piston gets hot as well. The slide stop is roughly 1.142 diameter and roughly 1.100 in length. The slide actually stops on the largest diameter 1.260 which seems consistant, where it enters the upper receiver. I have not found two barrels the same at this point in diameter or length of this slide stop detail. I'm blueprinting these barrels so they have known dimensions. The slide is the part with the two ears to drive the bolt carrier. I goes over the OD of the slide stop and stops on the receiver diameter of 1.260. The part of the barrel that fits in the upper receiver. |
|
|
AZ, USA
|
[Last Edit: Namsag]
[#3]
I shortened the slide stop from 1.500 inches to 1.400 on the muzzle side. I then set the slide up in the lathe using the chamber side ID on an arbor to keep it true to its center.
Then I bored the muzzle side ID to 1.180 diameter deep enough to accept a bushing with 1.181 OD for a light to medium press fit. The bushing has a 1.181 diameter, that is .300 long, that presses into the slide stop. When assembled, it creates two stops for the slide. The OD of the stop contacts the receiver diameter and the bushing (the other end) stops on the face of the slide stop. Much better than the original design using only the OD of the slide. The bushing was made from the heavy load piston, leaving the shoulder of the piston at its original diameter but reducing the shoulder thickness from .150 to .100. The OD of the piston is turned to a press fit in the slide. 1.181 diameter. Trying not to confuse, the bushing length is .400 total with .300 of it in the slide. Makes with a nice interface and keeps it all nicely aligned. Final length of slide is at 1.500, as the original but now with a guide bushing. Note: The stroke on this guns gas system is .933. Pretty much pre-determined by the length of the slides drive posts operating the bolt carrier. Here is where we start. The large diameter at the receiver is the slide stop.  7" barrel with gas system showing location on the barrel.  This is the gas slide with the modification to the bore and the flanged guide bushing. The slide, shortened .100, to allow for the .100 thick flange on the guide bushing. 1.500 final length.  Barrel at 1.004 diameter. This shows the split ring groove/gas ports I cut from the barrel showing the location of this detail to be machined on the barrel. 
|
|
|
AZ, USA
|
[Last Edit: Namsag]
[#4]
03/27/24 Quick update: Decided to give a shot to keeping the original handguard. I cut about 6 1/8 inches out of the middle.
I turned an arbor to locate each half on the lathe, one at a time. Turned the cut face. This to make sure the two parts butt together nice and square. There is very little clearance between the handguard and the moving parts of the gas system. This was to make sure there was equal clearance all around. I also wanted to keep the original retainer in the muzzle end to keep the handguard secure without using the biscuit I used on the 8.5 inch version. It will end up a flattop so that V in the middle will not be there. The triangular holes will be blended.   
|
|
|
|
[Last Edit: cherenkov]
[#5]
Nice project. I love the SBS VR80s.
I did one and have been experimenting with various barrels and lengths using existing gas system (but opening up ports) I have it running great at 10.5", good at 9" and only running hot loads at 8" but 8" is with no choke Is it difficult to thread internally for chokes as the barrel is chromed? A modified choke makes a big difference in reliability on an SBS for aiding lighter loads. Do you have some specific drawing dimensions?, I have a Spare VR80 I would love to do a gas system that is shorter |
|
|
|
|
[#6]
Very cool. Thanks for the build thread.
|
|
|
|
|
[#7]
Have you thought of threading the barrel for Saiga chokes? There are a number of brakes and suppressors that can use it. That is an external threading of M22 x 0.75, I believe.
|
|
|
|
|
[#8]
Originally Posted By Grimjaw5: Have you thought of threading the barrel for Saiga chokes? There are a number of brakes and suppressors that can use it. That is an external threading of M22 x 0.75, I believe. I have done that at 12.5" and 10.5" and it works well and will allow the gun to work with bulk Federal ammo which is nice. I use a Saiga modified shoke, but don't like the look of the unit - I would prefer an internal choke and add the wide fake muzzle fat device over the muzzle. Sort of how Derya Arms Factory Shorty 9.5" unit looks but in 10.5" I have a few old Polychokes as well I am considering adding to the shorter ones, but I think once you go shorter than 10" its really pushing the limit of the existing gas system - I love how the OP did the barrel conversion - very clever. Here is mine, I have two spare barrels and picked up another VR80 an auction for under $300 from Rock Island's scratch & dent sale. 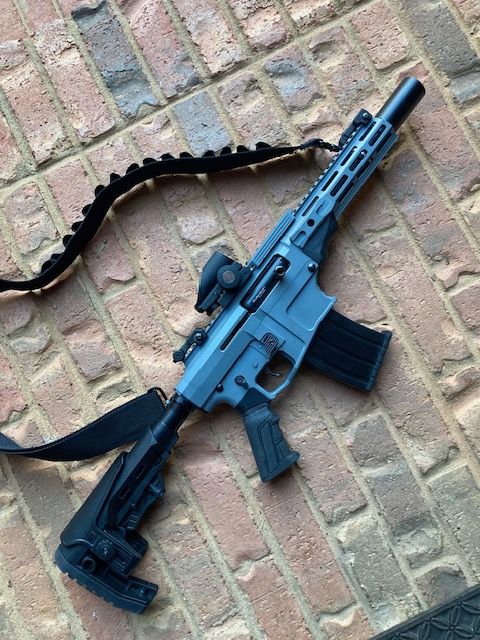 |
|
|
|
|
[Last Edit: Namsag]
[#9]
Option one. To thread internally, you have to use a carbide choke reamer. High speed reamers won't survive the chrome washed barrels.
Once reamed, you can cut the threads with a guided choke tap as the chrome has been removed in the reaming process. This info is with using the Beretta Mobile choke system which came on the VR80. Second option is to bore the barrel on the lathe to the diameter desired and then use the guided choke tap. At this time I'm going with .003 over the choke outside diameter. This is tighter/closer that the factsory diameter which is loose IMO. That seems to be where I'm headed with this one. I have the threading dies for the 22 x.75 mm used on the Saiga/Vepr's but this one gets the .875 X 32 external threads for the JK Armament suppressor adapter. Pacific Tool and Gauge makes the reamer and the tap used for the Beretta Mobil Choke system. The carbide reamer is pushing $500 to your door vs $220 for the high speed steel version. (non chrome barrel) The barrel tap is the same price. Both have guide bushings. I think the reamer bushing is .725 diameter, not sure on the tap bushing diameter. Beretta Mobil Choke Reamer  Beretta Mobil Choke Tap  |
|
|
|
|
[Last Edit: Namsag]
[#10]
This pic to give some reference to the VR80 barrel and its gas system location.
The green tape shows where the 7" cut line is and its reference to the factory gas system. You can see that the gas system gets cut completely off at 7", ports and split ring groove. It has to be re-created closer to the chamber. I also marked a point at 8 inches. Do not cut your barrel here (8 inches) unless you are willing to give up your gun cycling with any ammo. At 7" to 10" you must move the gas port/split ring detail. In this case, about 2.7 inches closer to the chamber. Reference image.  This is my 8.5 inch gun barrel. This to show you about where you will end up with the gas system. I threaded the OD of the barrel 1"-20 for my custom external choke adapter. Final cut to the barrel was at the left face of the round nut at the muzzle.  This is the 8.5" barrel after its OD has been turned and gas port/split ring detail machined. No gas ports yet. Barrel turned so the piston can travel the distance required, all the way to the next shoulder. Gas ports will be drilled at 52.5 degrees. There will be 4 instead of 3, at a reduced diameter of course. 
|
|
|
|
|
[#11]
Nice work!!! Thanks for sharing the information. I'd be interested to see how it works and what port sizes you will be using -
I've never seen any information or videos where people disassemble the Derya Arms MK12 short guns to see how the factory did it on their short gas versions- Its probably very similar to your work. Keep up the great work. |
|
|
|
|
[#12]
That’s pretty awesome. And since I bought a couple of them when Rural King had them on sale I now have an idea what to do with the spare
|
|
|
|
|
[#13]
While I was in the process of doing the 8.5 inch, I saw the Derya arms short barreled version, but no details. That was conformation I was going down the right path.
There is no black art here, just physics. I've decided to move the gas system a little closer than originally thought on this one. Dwell time is reliability so every bit of barrel length after the ports is important on a semi auto. Maximize is the word. I've have modified several parts, removed a part, and added to the reliability of the system. One part I did not alter. Gas system still functions the same, and I believe more reliably. I wanted short, really short. I also didn't want to deal with the original gas ports as I did on the 8.5" as they were not eliminated but blocked by the muzzle device. I don't like enlarging gas ports which allows more wad contamination and carbon fouling. Thus, 4 smaller ports on this one. Its a project for sure and part of this was to challange myself and part to give some insight to others as to what works and what not to do. Going to a highly rated (by review) gunsmith today to see if he can do what I want done. Too many are just armorers and not gunsmiths. I might be better off just going to a machine shop who still has manual machines and talented machinists, not just people pushing buttons on CNC's. |
|
|
|
|
[#14]
Originally Posted By Namsag: While I was in the process of doing the 8.5 inch, I saw the Derya arms short barreled version, but no details. That was conformation I was going down the right path. There is no black art here, just physics. I've decided to move the gas system a little closer than originally thought on this one. Dwell time is reliability so every bit of barrel length after the ports is important on a semi auto. Maximize is the word. I've have modified several parts, removed a part, and added to the reliability of the system. One part I did not alter. Gas system still functions the same, and I believe more reliably. I wanted short, really short. I also didn't want to deal with the original gas ports as I did on the 8.5" as they were not eliminated but blocked by the muzzle device. I don't like enlarging gas ports which allows more wad contamination and carbon fouling. Thus, 4 smaller ports on this one. Its a project for sure and part of this was to challange myself and part to give some insight to others as to what works and what not to do. Going to a highly rated (by review) gunsmith today to see if he can do what I want done. Too many are just armorers and not gunsmiths. I might be better off just going to a machine shop who still has manual machines and talented machinists, not just people pushing buttons on CNC's. 4 ports! Why didn't I think of that?! - I did open mine up a little and yes there is more carbon etc. |
|
|
|
|
[#15]
Well I went to the rated gunsmith Saturday hoping to get some work done on a barrel and another item.
They didn't have any machines at all, not even a drill press that I could see. Gunsmith said we're not a full service gunsmith shop. Just as I expected so the level of dissapointment was minor. I found another shop says they can do about anything. Call them Monday.... |
|
|
|
|
[#16]
Originally Posted By Namsag: Well I went to the rated gunsmith Saturday hoping to get some work done on a barrel and another item. They didn't have any machines at all, not even a drill press that I could see. Gunsmith said we're not a full service gunsmith shop. Just as I expected so the level of dissapointment was minor. I found another shop says they can do about anything. Call them Monday.... Yes actual hands-on machining gunsmithing is becoming a less common art. In regards to your cutting at 7" vs 8 or longer (as the factory gas port area there at 7-8" allows excessive bleeding off) - had you considered placing some ring around it to seal it off? similar to the half-round locking rings ? I can see where that it becomes far cleaner project going to 7" This is really impressive - looking forward to more. |
|
|
|
WV, USA
|
[#17]
Wow! Amazing work.
|
|
|
|
[Last Edit: Namsag]
[#18]
On the 8.5 inch barreled gun, (Dragn12) the old gas system and split ring grooves are still present. I needed to stop any gas from escaping before the projectile left the barrel.
Planning ahead, I turned both the external choke adapter and the plain muzzle device with shoulders that would effectively prevent the gas from escaping thru the old ports. The shoulder on each the choke adapter and the muzzle device has two functions They both are handguard retainers. And they both have close fitting shoulders, to the barrel, that extend further into the handguard and they close off the old gas ports. All of this required some forethought and some close machining to seal off those ports. About .001 of an inch clearance to seal the ports. The Dragn12 was a fun project and a learning experience. I was quite excited for that first day out with it. I did single shots to check out the whole gun, its feel, how it points, its recoil, and if it would eject the spent round. I had a huge smile on the face that took awhile to go away. I had set the pop up sights by eye for 25 to 35 yards. Used 7.5 shot, 3 dram load with 1 1/8 oz of shot. Pretty much a standard Trap load or bird shot load. It was dead on with a pretty tight, round shot pattern on a pattern plate with a Cylinder bore choke. (4'X8' greased 1/4 inch steel plate) I was a bit surprised at how tight the pattern was. This 7" will be different. Off to a gunsmith tomorrow to discuss some special barrel work on a 10" 1100 Remington. Definately a challenge still adhearing to my gas port theorys. The now modified choke adapter. Needs bead blasted yet.    The plain muzzle device    |
|
|
|
|
[#19]
Update:
I lost access to the home owned machine shop I was using. The owner has decided to retire completely. A very talented machinist at a more than reasonable rate for his services. Had another lined up, had delivered some work to them to get a quote. After a week plus, I called and they said they couldn't get to my job but recommended another shop a couple miles away. Went to that shop, they took on my work with cost unknown for me. Getting the barrel work completed, made a change to the piston/slide items to shorten the gas system a bit more. This will be as short as I think I can go to keep the function reliable. I did go to four gas ports of a smaller size to help reduce carbon/debri out of the system. I did order the Benelli/Beretta Mobil choke tap from Pacific Tool and Gauge. Will take some time as they have to make the tap. This won't hold up the process as the choke is not needed for function testing. I hope to have the barrel and other componnents in two or three weeks. I will update with pictures and with evaluation of the work. Stay tuned. |
|
|
|
|
[#20]
Originally Posted By Namsag: Update: I lost access to the home owned machine shop I was using. The owner has decided to retire completely. A very talented machinist at a more than reasonable rate for his services. Had another lined up, had delivered some work to them to get a quote. After a week plus, I called and they said they couldn't get to my job but recommended another shop a couple miles away. Went to that shop, they took on my work with cost unknown for me. Getting the barrel work completed, made a change to the piston/slide items to shorten the gas system a bit more. This will be as short as I think I can go to keep the function reliable. I did go to four gas ports of a smaller size to help reduce carbon/debri out of the system. I did order the Benelli/Beretta Mobil choke tap from Pacific Tool and Gauge. Will take some time as they have to make the tap. This won't hold up the process as the choke is not needed for function testing. I hope to have the barrel and other componnents in two or three weeks. I will update with pictures and with evaluation of the work. Stay tuned. Thanks for the update |
|
|
|
|
[#21]
Update 05/14/2024
Stopped by the machine shop today and one of the crutical parts for this 7" was complete. Looks very nice , excellent machining. Credit Arizona Quality Machining in Phoenix, Arizona. This is a new part. A combination piston/slide conponnent. I've pretty much eliminated the full slide and only part of the cylinder with the drive dog ears remains. A total change to the system but retaining the piston element for functions sake. Didn't want to delve into changing the piston, at this time, and how it's tollerances effect its performance. The piston remains as the original design with exception of the mentioned changes. The dog eared drive cylinder will press on to this piston (piston short end) and become one. May even add two fuse tig welds to further secure. This is a compression item only so no linear forces trying to pull it apart. The configuration of the 8.5 inch gun was four pieces with corresponding tollerances for each piece. Now it's two pieces. Big change big improvement. The pictures earlier in this post show all the pieces. This current configuration is as short as I think you can go with this gas system. That's why the change, nets the most dwell time. The remaining barrel work should be complete this week. if no issues pop up. Testing for function, performance, and tuning is right around the corner. Been eatin at me wondering if I made the right choice on the extra gas port and smaller sizes. Here are some pics. New piston and standard compression gas cylinder  Drive dog end (press fit end)  Identical piston configuration, now one piece.  As it will be configured, same as in the stock VR80. Press fit end exposed. 
|
|
|
|
|
[#22]
Update: 05/16/2024
Went to the machine shop to check out and pick up the completed parts for this 7" VR80. The next 3 pics were taken at the shop on a surface plate. I was excited to say the least. Very pleased with the components. These parts were tolleranced well and they came out very nice. All they had were the parts they were working on, they did not have the gun to check anything to. We did a quick assembly of the parts to check the actual fit, how they would slide, if they covered the designed distance. We found a slight issue and it was resolved within a few minutes. It does look impressive assembled knowing what it started out as. I added in the suppressor adapter in the last picture as it will probably stay on this gun. Action closed side shot showing just how short this is.  I wanted to show the 7/8-32 thread and it's length. Room for a keeper nut at the back to keep on whatever handguard I end up with.  Shown with the JK Armament JK 195 Series suppressor mount seated on the barrel.  |
|
|
|
|
[#23]
Very nice work!
|
|
|
|
|
[#24]
It is looking great. Like the look of the carry handle in the background. Sort of Atchission like!
|
|
|
|
|
[Last Edit: Namsag]
[#25]
What does the barrel look like? Actually very nice. Numbers were good, the fit was good with the adjoining components.
The first pic shows all the components except the suppressor adapter. The original design has 7 components Has a gas cylinder/retainer cap, 2 split rings, the gas cylinder, the gas piston, the slide extension, and the slide. I eliminated one of those altogether and combined two of the others. The slide extension is gone. I combined the gas piston and the slide, they are now as one. Took some real thought. I thought about this thing coming apart if I didn't do it right. Nothing catistropic mind you but a setback I didn't want to encounter. The piston is a redesign as per the earlier pictures. The piston slide is identical to the original design. The other end of the piston slide combo is the press fit side. It mates to the slide with a solid press fit. The piece has one inside diameter so it is very well supported on the barrels surface. These changes were made to allow the shortest possible gas system for this firearm that I thought would actually function. Finished barrel and now 5 components.  Action open.  Action closed  A camparison pic of what the gas system looked like before and what it looks like now  What does it look like at this point. Still retains the much hated factory buttstock. (Not me) I added the AR15 style carry handle to, well I dunno ????  Still wondering about this handguard idea. Its not finished yet. It will be pic rail to the front raised area and be a about 1/2 an inch shorter than whats pictured.  I said at the beginning I wanted to suppress this one. I've done all the necessary work to get that accompolished. The suppressor shown is just two segments, comes with five. I'd say barely hearing safe if hearing safe at all. But I liked the look at this point. It's a JK Armament 195 Versa X. The shorter of the two 195 series suppressors they have available. The front of the propossed handguard has been removed as it is that 1/2 inch too long, hits the suppressor, as the suppressor is all the way back and seated, but I think you'll get the idea.  I think it's getting there. The look is different, especially for a 12 gauge. Being an AR format shotgun has become pretty normal already. I'm sure there are those who die for their Benelli M4's and a lot of those conventional designed famous shotguns. And they are famous, relaible weapon platforms used by our military and others around the world. They are excellent weapons. I have a Panzer M4 clone and it is a well made piece from Panzer Arms in Turkey. Gaining positive feedback on their quality. The RIA VR80, made by Derya Arms in Turkey, has garnered my attention as a great SBS project firearm. Takes some real work to get it there as you can see. But this is just my take on it. It has 4 gas ports that equal the volume of the 3 on the factory gun. We'll see how that works. A couple more pics to end this update.   |
|
|
|
|
[#26]
It is looking amazing - I really need to read up on the JK Armament Suppressor - Its not excessively large like other shotgun suppressors and looks the part on your VR80.
Does it get close to hearing safe with such a short barrel or other shotguns? I have a few other SBS, and think it could be handy to move around different shotguns Keep up the great work - this is highly entertaining! |
|
|
|
|
[#27]
@Cherenkov
As I have shown in the pics with the suppressor, a very short can. Its just 2 segments. It was pictured that way to emphasize how short this VR80 is. I would not shoot it as shown without hearing protection. Is it hearing safe, I would say its at the very limit for some individuals and not at all for most. I really can't say since I've not put a round thru this gun yet myself. I never fired a round thru it even before the project. This was a used purchase. I went over the gun looking for a candidate for this project. Everything was in good condition for function and safety. It has a few cosmetic issues that I will eventually address along with it's final configuration, not set in stone yet. |
|
|
|
|
[Last Edit: Namsag]
[#28]
Update: 05/18/2024
Well it had to happen. I had to remove the factory buttstock package. Not really because its not appealing, but because it's 4 inches longer that what I changed it out to. Also important to note is that the newly installed stock in a great deal friendlier to the shoulder. Self preservation at hand. Now we have the Adaptive Tactical buttstock. This has to be the softest shooting buttstock available for the 12 gauge round. Lots of recoil absorptsion in that buttpad. This is range friendly for a box or more of shells. I also changed out the factory recoil buffer. It is nothing but an interface for the bolt carrier and the action spring. Thats all it does. So for everyone who is following along, I can recommend the following product to help with felt recoil and 12 ga shooting fatigue. The Kynshot RB5022 Hydrolic Recoil Buffer. Once you get this in that buffer and adjusted properly, it works. it works pretty good. I say adjust, well that means that you might have to take a turn or two out of the buffer tube to gaurentee lock back on the empty mag. I would say that if you cycle the gun EMPTY with an empty mag in it, it should lock open with ease.  Another change made was removing the factory commercial buffer tube and installing a good quality Mil-Spec buffer tube. I say quality? Nice and smooth inside for reduced noise and I like rolled threads but cut threads are fine. Last change was to add the factory front sight on to the handguard. Really short sight radius but 200 yard radius really not neeted :) So here it is today  With handguard and front sight. Handguard is NOT cut to length yet.  Handguard is 9.5 inches long in this pic and will be cut to just under 6 inches.  I know there is a large group of VR80 owners out there that complain of a hot handguard. Yes, if you put a lot of rounds down range is a short amount of time your going to experience this somewhat uncomfortable scenario. On my 8.5 inch gun, this is not an issue. The gas ports are so far back that the gasses exit in front of the receiver, behind where the hand is on the handguard. In this pic you can see where the gas will exit. The final two M-Lok holes on top of the handguard. Your hand won't be in that location. There is no issues with getting a hot hand with the 8.5 and I don't expect any with this one as the gas ports are even further back. This pic is with system fully open so you can see that the gas exit is just under the last rib. We might encounter more blowback with the can on board. 
|
|
|
|
|
[#29]
I have used that same stock on my shotguns and it is very effective at reducing felt recoil.
|
|
|
|
TX, USA
|
[#30]
Very cool project!!
 |
|
|
|
[Last Edit: Namsag]
[#31]
Thanks to all. Always open for comments of any kind.
This has been one of the most involved SBS's I've done to date. Also one of the most fun pushing what I think is the envelope of operation. Anything longer than this is easier. I like em all. The shorter the better if there is a challange involved.☺ |
|
|
|
CO, USA
|
[#32]
if you were an SOT i would suggest converting to open bolt slammy go fast. buuuuuuut
looks good! i too have felt your pain trying to find/talk to machinists for custom work |
|
|
|
[Last Edit: Namsag]
[#33]
@SaltyD
I have had that very thought in the grey matter for quite awhile now. I'm just not sure at this point that I want to deal with the ATF on a regular basis. Yes I would say I am fortunate to find a shop willing to do this kind of work. Two young guys from the Aerospace industry. I think they are enthusiast's as well. |
|
|
|
|
[#34]
Looks awesome!
keep the pics coming. |
|
|
|
|
[Last Edit: Namsag]
[#35]
More changes being made, the handguard was cut to length today. It has about 1/4 inch visible clearance to the suppressor. It's closer as it enters the front of the handguard.
The handguard is pretty much secured but I think I will change the worked over bisquit as I missed the dimension needed. Cut the bisquit exactly in half. Too short by a 1/16 of an inch. Doesn't look as it should so redoing is in order. While working on this today, I realized what a compact upper this actually is, as a 12 ga, even with the 2 segment suppressor fixed. It is actually ready for testing at this point. Next is to go over the gun completely, clean it thoroughly, lube it up, and off to the range. Thoroughly cleaning the gun is a necessary step to evaluate it after returning from the range. Looking for any pieces of metal anywhere, premature wearing of componnents, just anything. All part of the fun. I suspect I may have to open the ports slighty. My thinking was ambitious to keep the gas volume the same albiet higher pressure with ports that close to the chamber. I will be starting with some 1oz loads to begin with. 1145 fps low speed trap loads. Some 1200 fps loads, some slugs at that load and velocity. 1250 fps 1 oz loads before moving into 1 1/8 oz loads at the same velocities. Will take some 1300 fps 1 1/8 oz loads, fast trap loads. Also some 1350 fps 1 1/3 oz slugs. I'm looking for the lightest load it will run as it is. There will be no suppressor fixed. No choke. Just a 7" cylinder bore barrel. All this effort will be to find what load will function this short of a semi auto with a 2 3/4 dwell time barrel. That's barrel length after the gas ports. I like the looks at this point. Here are a few pics of the 19" upper. (with the short suppresser)   How it looks compared to the factory 20" barrel I started with.  
|
|
|
|
|
[#36]
Originally Posted By Namsag: More changes being made, the handguard was cut to length today. It has about 1/4 inch visible clearance to the suppressor. It's closer as it enters the front of the handguard. The handguard is pretty much secured but I think I will change the worked over bisquit as I missed the dimension needed. Cut the bisquit exactly in half. Too short by a 1/16 of an inch. Doesn't look as it should so redoing is in order. While working on this today, I realized what a compact upper this actually is, as a 12 ga, even with the 2 segment suppressor fixed. It is actually ready for testing at this point. Next is to go over the gun completely, clean it thoroughly, lube it up, and off to the range. Thoroughly cleaning the gun is a necessary step to evaluate it after returning from the range. Looking for any pieces of metal anywhere, premature wearing of componnents, just anything. All part of the fun. I suspect I may have to open the ports slighty. My thinking was ambitious to keep the gas volume the same albiet higher pressure with ports that close to the chamber. I will be starting with some 1oz loads to begin with. 1145 fps low speed trap loads. Some 1200 fps loads, some slugs at that load and velocity. 1250 fps 1 oz loads before moving into 1 1/8 oz loads at the same velocities. Will take some 1300 fps 1 1/8 oz loads, fast trap loads. Also some 1350 fps 1 1/3 oz slugs. I'm looking for the lightest load it will run as it is. There will be no suppressor fixed. No choke. Just a 7" cylinder bore barrel. All this effort will be to find what load will function this short of a semi auto with a 2 3/4 dwell time barrel. That's barrel length after the gas ports. I like the looks at this point. Here are a few pics of the 19" upper. (with the short suppresser) https://i.imgur.com/61s2zIP.jpg https://i.imgur.com/QGZvsoQ.jpg How it looks compared to the factory 20" barrel I started with. https://i.imgur.com/8jkymSd.jpg https://i.imgur.com/r2dhnGW.jpg 
|
|
|
|
|
[#37]
Originally Posted By GunDisaster: Very cool project!! And excellent research with educational picture presentation.  |
|
|
|
|
[Last Edit: Namsag]
[#38]
Here is the configuration I will be using for all of the function testing. Since I don't have a thread protector or muzzle device.
I'm using the short JK suppressor adapter. Adds 1/4 inch to the barrel length. I should know where I'm at after 25 or 30 rounds. We'll see how it goes. Test day coming very soon. Stay tuned. 
|
|
|
|
 Win a FREE Membership!
Sign up for the ARFCOM weekly newsletter and be entered to win a free ARFCOM membership. One new winner* is announced every week!
You will receive an email every Friday morning featuring the latest chatter from the hottest topics, breaking news surrounding legislation, as well as exclusive deals only available to ARFCOM email subscribers.

AR15.COM is the world's largest firearm community and is a gathering place for firearm enthusiasts of all types.
From hunters and military members, to competition shooters and general firearm enthusiasts, we welcome anyone who values and respects the way of the firearm.

Subscribe to our monthly Newsletter to receive firearm news, product discounts from your favorite Industry Partners, and more.
Copyright © 1996-2024 AR15.COM LLC. All Rights Reserved.
Any use of this content without express written consent is prohibited.
AR15.Com reserves the right to overwrite or replace any affiliate, commercial, or monetizable links, posted by users, with our own.


