|
[#1]
Just ordered some spray paint from Rapco. I'll post pics during the process and I will make sure the pics make the truck look better than it does in person!
 |
|
|
|
|
[#2]
Without reading through eleven pages, I'm going to post this:
I work on Fort Drum as a Mechanic (5823) and have a pretty fair expertise on these vehicles. I cannot get you parts or materials, nor have any "kicking around" I do know the folks over at the turn in yard and could possibly go look at or assist a Team Member that buys something here. Would I have one? yea, it would be neat/fun, but after a while the novelty wears off and unless you're really a need or use for one, well it's just a toy. 
|
|
|
|
|
[#3]
Originally Posted By EagleArmsHBAR: Tell you guys what, yall make a tripe down here, help me work on my HMMWV, help me drink a keg of Lone Star Light, and then go back to Ohio. Oh, and bring me lots of spare parts for free! How does that sound? While you are here we can all drive out to the adventure park and break stuff!  Originally Posted By EagleArmsHBAR: Originally Posted By hkx3: Thats what a Uhaul trailer is for. 100 bucks and the world (or at least our corner of it) is accessible Tell you guys what, yall make a tripe down here, help me work on my HMMWV, help me drink a keg of Lone Star Light, and then go back to Ohio. Oh, and bring me lots of spare parts for free! How does that sound? While you are here we can all drive out to the adventure park and break stuff! |
|
|
|
OH, USA
|
[#4]
Originally Posted By fp1201:
Without reading through eleven pages, I'm going to post this: I work on Fort Drum as a Mechanic (5823) and have a pretty fair expertise on these vehicles. I cannot get you parts or materials, nor have any "kicking around" I do know the folks over at the turn in yard and could possibly go look at or assist a Team Member that buys something here. Would I have one? yea, it would be neat/fun, but after a while the novelty wears off and unless you're really a need or use for one, well it's just a toy. Why the hell else would I have one? Did you ever just want something because...? You are one of the guys I meet here and there. "Salty" and "Hardened" to the point that everything sucks. Meanwhile, Im smoking a cigar and listening to this thing creak and rattle its way around my area. |
|
|
|
[#5]
Originally Posted By m35ben: If here is close enough I can come help you. Originally Posted By m35ben: Originally Posted By EagleArmsHBAR: Originally Posted By hkx3: Thats what a Uhaul trailer is for. 100 bucks and the world (or at least our corner of it) is accessible Tell you guys what, yall make a tripe down here, help me work on my HMMWV, help me drink a keg of Lone Star Light, and then go back to Ohio. Oh, and bring me lots of spare parts for free! How does that sound? While you are here we can all drive out to the adventure park and break stuff! |
|
|
|
|
[Last Edit: Ryan_Ruck]
[#6]
Originally Posted By fp1201:
Without reading through eleven pages, I'm going to post this: I work on Fort Drum as a Mechanic (5823) and have a pretty fair expertise on these vehicles. I cannot get you parts or materials, nor have any "kicking around" I do know the folks over at the turn in yard and could possibly go look at or assist a Team Member that buys something here. Would I have one? yea, it would be neat/fun, but after a while the novelty wears off and unless you're really a need or use for one, well it's just a toy. Howdy! Hope you don't mind if I hit you up every now and then with a technical question via PM if I run into something. Got one thing I've been wondering about kicking around in my head at the moment... Actually, two things now that I think about it. I look at my truck a bit like I look at my firearms. I own most of them because they are fun but, if the need arises, they can do more than punch holes in paper. They can do anything from put food on my table to save my life. In a similar vein my truck could be a fun toy I kick around with on the weekend or, since I live near the Ohio River and am close with law enforcement in my area, could be a tool I volunteer to help with flood rescue or assist the community with transportation if there is extreme snow, or if (God forbid) I lost my job and my take home vehicle it could certainly be used to get me to a new job (this is the first personal vehicle I've owned in over 10 years). In short, a lot more stuff than just being a toy while still able to be enjoyable! |
|
|
|
|
[#7]
Anyone know how many mpg we can expect in town with the three speed?
Posted Via AR15.Com Mobile |
|
|
|
|
[#8]
Originally Posted By EagleArmsHBAR: Are you in west Texas? Originally Posted By EagleArmsHBAR: Originally Posted By m35ben: Originally Posted By EagleArmsHBAR: Originally Posted By hkx3: Thats what a Uhaul trailer is for. 100 bucks and the world (or at least our corner of it) is accessible Tell you guys what, yall make a tripe down here, help me work on my HMMWV, help me drink a keg of Lone Star Light, and then go back to Ohio. Oh, and bring me lots of spare parts for free! How does that sound? While you are here we can all drive out to the adventure park and break stuff! |
|
|
|
|
[#9]
Originally Posted By m35ben:
South west DFW. How far out are you? Originally Posted By m35ben:
Originally Posted By EagleArmsHBAR:
Originally Posted By m35ben:
Originally Posted By EagleArmsHBAR:
Originally Posted By hkx3:
Thats what a Uhaul trailer is for. 100 bucks and the world (or at least our corner of it) is accessible Tell you guys what, yall make a tripe down here, help me work on my HMMWV, help me drink a keg of Lone Star Light, and then go back to Ohio. Oh, and bring me lots of spare parts for free! How does that sound? While you are here we can all drive out to the adventure park and break stuff!
Only about a five hour drive one way. Posted Via AR15.Com Mobile |
|
|
|
TN, USA
|
[#10]
Originally Posted By EagleArmsHBAR:
Anyone know how many mpg we can expect in town with the three speed? Posted Via AR15.Com Mobile I've own a H1 for 13yrs, I wish I had a dollar for everyone who asked me that question |
|
|
|
[#11]
Originally Posted By EagleArmsHBAR: Only about a five hour drive one way. Posted Via AR15.Com Mobile Originally Posted By EagleArmsHBAR: Originally Posted By m35ben: Originally Posted By EagleArmsHBAR: Originally Posted By m35ben: If here is close enough I can come help you. Only about a five hour drive one way. Posted Via AR15.Com Mobile |
|
|
|
|
[#12]
Originally Posted By m35ben: So Marfa? Yeah the only way I could do that would be during vacation. Originally Posted By m35ben: Originally Posted By EagleArmsHBAR: Originally Posted By m35ben: Originally Posted By EagleArmsHBAR: Originally Posted By m35ben: If here is close enough I can come help you. Only about a five hour drive one way. Posted Via AR15.Com Mobile |
|
|
|
|
[#13]
Originally Posted By EagleArmsHBAR: You have to be going quite fast to get from Fort Worth to Marfa in five hours. Originally Posted By EagleArmsHBAR: Originally Posted By m35ben: Originally Posted By EagleArmsHBAR: Originally Posted By m35ben: Originally Posted By EagleArmsHBAR: Are you in west Texas? Only about a five hour drive one way. Posted Via AR15.Com Mobile I would have to shave 2 and a half hours on that drive. |
|
|
|
|
[#14]
I went for a 20 minute ride tonight and all seemed fine until I got home and noticed my radiator is leaking on the driver side.
Anyone know the regular operating temp for these? |
|
|
|
|
[Last Edit: Ryan_Ruck]
[#15]
Been busy the last couple days!
Installed all my LED lighting. Looks phenomenal! Since the marker lights bolt to fiberglass and plastic, I went ahead and used stainless steel fasteners for those. Just an FYI to anyone unaware, steel fasteners into the aluminum body isn't optimal because of galvanic corrosion (in which the aluminum loses out) but is often necessary. Stainless steel into aluminum is worse so don't do it! Put tons of dielectric grease into every Packard connector. Installed the upgraded turn signal controller with self canceling turn signals. The clicking it makes whenever you turn the wheel is a little annoying but it's a small price to pay for the driving convenience. I'm sure I'll get used to it. Installed my push button master light switch. Found out it was sold to me not working correctly. I bought it 2 months ago in used condition from Those Military Guys off eBay and got in touch with them, explaining the delay and what it is doing. Waiting to see if I hear anything back from them. The switch would react to button presses but wouldn't turn any of the lights on, kept the BO driving light on at what looked like half power all the time, and my brake lights were stuck on. Put the 3 lever back in and everything works fine. Before I installed it I disconnected the batteries. Then before I reconnected the batteries I connected a ground wire direct to the alternator. So, I know I didn't fry it. Installed the keyed ignition switch I decided to pick up. Got the heater core bypassed. Today I did a lot of work on the doors/tops. First I replaced a missing soft top fastener. Bought a bag of them off eBay and riveted it in (with aluminum rivets!). The next issue with the roof was that the bow rails were barely held in place. It was missing some screws and, with the ones that still had screws, the wellnuts were in sorry shape. Pulled out the old wellnuts on all of them and replaced them with aluminum 1/4-20 rivnuts. The bow rails and bows are now firmly in place! With that done, I realigned all of the doors. Had to replace a couple missing screws and a missing nut. Also "re-formed" the doors to get a better seal to the top. Everything now seals up really well! Not air tight, since that would be fighting a losing battle, but enough that I am really pleased with it. Driver's door still needs a little tweaking. Tomorrow the doors are getting a scrub down with OxyClean and the windows are getting cleaned with Meguiar's PlastX. Once they're all cleaned up, going to put some Teflon lube on the zippers. Still need to restitch part of the driver's door window and hunt down a limiting strap hook for the front passenger's side door. Here's a shot of everything lined up: 
Put up my new rear curtain that I got from Equipment Parts Sales. Nate was extremely helpful. After I bought the top from him he followed up with me and let me know to get in touch with him directly if there was anything else I was looking for because not everything he has is listed on the site. Let him know I wouldn't mind picking up a new rear curtain to replace the one I had. On Friday afternoon he emailed me and let me know he found a green one! He even made sure it went out same day! Ended up being $100 shipped but it NOS and looks great! Installing the rear curtain was a little daunting at first because you actually have to cut parts of it out with the 3 point belts in place. Here's a pic, notice you can actually see through the rear window! Pay no attention to all the junk in the bed, everything is kind of in a state of organized chaos at the moment.

Also got my deep fording snorkel and pre-cleaner installed. I'm not sure that Kascar sent me the right 90 degree rubber elbow that connects the snorkel to the air cleaner assembly. It sits way down inside the air induction box instead of coming out like the installation diagram indicates and each side is equal length unlike pictures I've seen of the part. I've almost got a sneaking suspicion it is a standard plumbing 4.5" 90 degree elbow. Need to take a trip to the hardware store and look... Not going to be happy if I paid $30 for a plumbing part I can get at Home Depot but, it seems to work though getting to the hose clamp screws was a pain. Anyway, the Turbo III pre-cleaner is really nice! 
I had refinished the snorkel since it came to me from eBay pretty beat up. As you can see, the Krylon Deep Forrest Green is a bit darker than the 383 Green. Finished up the day replacing the antenna mounts that had been removed (going to install my reverse lights on them, may mount actual antennas eventually) and getting my cargo extension cover installed. The new style cover looks really good! 

Really need to get that white top taken care of! Soon... Tomorrow the weather will finally be warm enough to break out the pressure washer and get the interior scrubbed out. Going to be a big task! Got my order of Lizard Skin Sound Insulation and Ceramic Insulation. Ended up getting 4 gallons of each since a gallon covers roughly 25 sq ft to correct thickness. We'll see if that will be enough. Ordered the application kit to go with it as well. Not sure when exactly I'll get around to spraying that in but hopefully I'll feel like tackling that soon. Also got my 2 gallons of tintable Monstaliner I ordered. Got the OD Green so it will be a close match for the truck. Hoping the 2 gallons will be enough to do the interior but may have to pick up a third. A gallon is supposed to cover 60 sq ft 2 coats thick. |
|
|
|
IN, USA
|
[#16]
Looking better with every post!
I'm getting antsy waiting for Govplanet to send my EUC. I had to make a correction to my form last week, which means mine probably got put back in the bottom of the pile. |
|
|
|
[#17]
Originally Posted By Hoosier_In_Cornfield: Looking better with every post! I'm getting antsy waiting for Govplanet to send my EUC. I had to make a correction to my form last week, which means mine probably got put back in the bottom of the pile. |
|
|
|
IN, USA
|
[#18]
Its towards the top of page 10 of this thread. I'm the one with the missing wheels on the right side. It just went through the rebuild in 2010 and I won it for 7K. Some assembly required
|
|
|
OH, USA
|
[#19]
Originally Posted By EagleArmsHBAR:
I went for a 20 minute ride tonight and all seemed fine until I got home and noticed my radiator is leaking on the driver side. Anyone know the regular operating temp for these? On a cold day, 45-50mph, mine runs 190-210 Fan locks at 210+ and cools down about 10 degrees or so, then repeats this cycle over and over. The drip is likely the front lower radiator hose. Both of mine leak(ed) there. I removed the hose, used non-curing adhesive sealant, and reclamped it. To avoid draining the system, you can try a double worm clamp, and that may work. That long metal coolant tube that runs beside the differential is a problem area on these. I eventually gave up on my 1995 and bought a new one. |
|
|
|
[#20]
|
|
|
|
|
[Last Edit: Ryan_Ruck]
[#21]
Saw that article last night on Steel Soldiers. Prayers for the troops involved. Noticed that missing hub and figured it was what caused the crash. Also noticed how little protection the pillars offered but not surprised by it. Rarely are the factory pillars in soft topped vehicles suitable for great rollover protection. That's always been one thing the nanny staters have tried to kill the Wrangler over. Certainly makes a case for adding a roll cage. In happier news I had a productive, if tiring, day yesterday. On a whim I decided to forego cleaning the truck. Instead, I removed my old brushguard and "bumper". Installed my frame extensions for getting the winch mounted up (later) and got my Ibis Tek bumper installed! I still need to get my winch mounting plate modified for the 10" bolt pattern on my winch. I can just bolt the plate in between the bumper and the extensions when it's done though. The bumper is great but does stick out quite a bit with those frame extensions. Looking at pics online, on the ECV trucks the "snout" takes up that space. If you don't run a winch, you can bolt it direct to the frame instead since it includes some extra brackets. The extra space is kind of handy though... You can sit facing backwards on the flat part of the bumper between the bumper and the tires and use the hood as a table/desk! Very glad I got an impact driver. Makes dealing with these rusty bolts far easier. 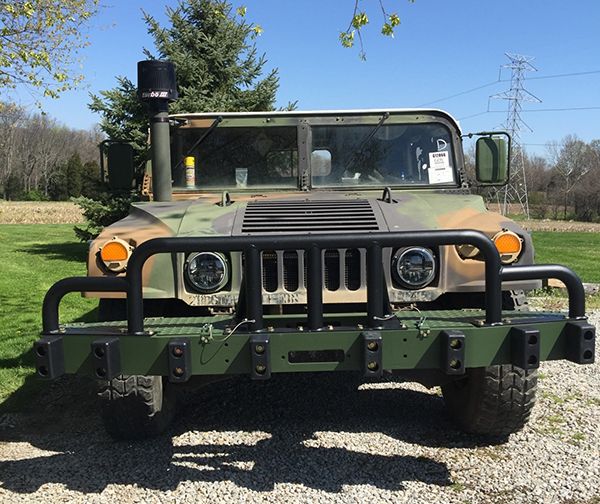
Going to actually clean up the truck today and possibly get the new seats installed. Maybe work on the rear bumper tomorrow-Sunday. |
|
|
|
IN, USA
|
[#22]
Hmm..... Find a way to hang some seats on the front and drive people around Safari Style! Lookin Good man. You have been putting some serious wrench time on your baby. I'm loving the updates.
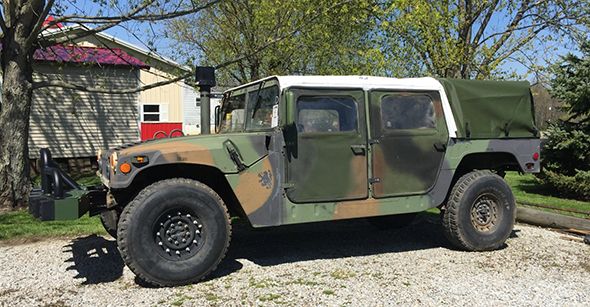
Have you thought about what you are going to do paint wise? respray the whole truck or leave it as it is? I'm still up in the air about this topic. I suppose I'll just have to wait and see how my truck looks when it arrives. A part of me doesn't want to change a thing because I like the factory camo look, but I have seen some resprayed all green and they look just as good. |
|
|
TN, USA
|
[#23]
if you had this it wouldn't have happen.
http://breggin-enterprises.stores.yahoo.net/lospnutkit.html |
|
|
|
[#24]
Originally Posted By JohnyRotten: if you had this it wouldn't have happen. http://breggin-enterprises.stores.yahoo.net/lospnutkit.html |
|
|
|
|
[Last Edit: Ryan_Ruck]
[#25]
Originally Posted By Hoosier_In_Cornfield:
Hmm..... Find a way to hang some seats on the front and drive people around Safari Style! Lookin Good man. You have been putting some serious wrench time on your baby. I'm loving the updates. Have you thought about what you are going to do paint wise? respray the whole truck or leave it as it is? I'm still up in the air about this topic. I suppose I'll just have to wait and see how my truck looks when it arrives. A part of me doesn't want to change a thing because I like the factory camo look, but I have seen some resprayed all green and they look just as good. Thanks! I took the week off just so I could get all of this work done. Want to get as much done before the oppressive Ohio heat and humidity shows up. We only get about 2 weeks between winter and summer where it's nice and it seems like we're in it now! Add the seats to the front and could do some "urban" safaris!  I think it looks a little "front heavy" now but it should look a little more balanced out once I get the rear bumper and tire carrier on. I think it looks a little "front heavy" now but it should look a little more balanced out once I get the rear bumper and tire carrier on.
As for paint, I decided I'm going to totally respray the truck with Sherwin-Wiliams CARC but I'm going to keep it Woodland pattern. I like it too! TB43-0209 has the pattern and how it should be laid out on the truck. I figure if Pvt. Snuffy can paint a truck and it looks decent, I can too.
Also going to spray the top and doors with Behr. Hopefully they'll last a little longer and the latex will seal them up. Not sure if I'm going to spray the cargo extension too since it is brand new but I probably will. The lions/griffins on the side are also going to stay. Today I spent the last 9 hours tearing everything out of the interior of the truck and washing it. Not that there was a lot in the truck to begin with but there was a lot of old radio wiring and the old insulation and driver's seat were a pain to get out. So much river mud and sand in so many places. I am so beat from hosing and scrubbing. 
I should have taken a "before" picture so you all could compare it to an "after" pic but I got too enthusiastic. I'm not even done though. As I mentioned, the truck had some of the original interior foam floor insulation but it's pretty rough and was missing some pieces. With the Lizard Skin and Monstaliner though, I don't know I'm going to bother replacing it. It traps too much dirt and water and makes it too hard to hose the truck out. One thing that surprised me is that I didn't have any "auxiliary drain holes" added but that would also explain all the mud in every crevice. Ended up adding a couple of my own. Definitely one of the nice things about having an aluminum body, drill a hole and no need to worry about rust! I know some folks have found some cool stuff (like ammo!) when cleaning out their trucks but most all I seemed to find was old pens/pencils, rusty nuts and bolts, and food wrappers. Oh, and did I mention plenty of mud, pebbles, and sand? I did find one cool thing though: 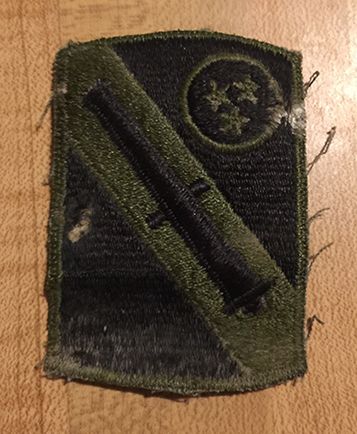
Oh, something important I thought I'd mention to everyone here. Per Jwade on Steel Soldiers, there is currently a delay in getting Florida titles. So if you opted to get one, like I did, there could be a wait. He told me when I asked via PM that he may hear something next week on how long the delay is expected to be but no guarantee. No wait on the SF97s though. |
|
|
|
|
[#26]
Originally Posted By Ryan_Ruck:
Oh, something important I thought I'd mention to everyone here. Per Jwade on Steel Soldiers, there is currently a delay in getting Florida titles. So if you opted to get one, like I did, there could be a wait. He told me when I asked via PM that he may hear something next week on how long the delay is expected to be but no guarantee. No wait on the SF97s though. Well that might explain why I don't have mine yet. I decided to go this route about 2 months ago and ordered one from them after the sale - I'm still waiting...... |
|
|
|
|
[Last Edit: Ryan_Ruck]
[#27]
Originally Posted By Lawman734:
Well that might explain why I don't have mine yet. I decided to go this route about 2 months ago and ordered one from them after the sale - I'm still waiting...... Originally Posted By Lawman734:
Originally Posted By Ryan_Ruck:
Oh, something important I thought I'd mention to everyone here. Per Jwade on Steel Soldiers, there is currently a delay in getting Florida titles. So if you opted to get one, like I did, there could be a wait. He told me when I asked via PM that he may hear something next week on how long the delay is expected to be but no guarantee. No wait on the SF97s though. Well that might explain why I don't have mine yet. I decided to go this route about 2 months ago and ordered one from them after the sale - I'm still waiting...... More info here. |
|
|
|
|
[#28]
Originally Posted By Ryan_Ruck: Looking very good Lawman! Saw that a couple weeks ago! Amazing performance out of an 8 ton truck offroad! The suspension system is pretty interesting too. Really wish they would have spent more time going into that. I now want a Banks powered 6.5 in my truck... 6.2L CUCV with Sidewinder kit... My only concern is long term reliability with it, but supposedly Banks did the research and came up with 10lbs of boost being safe for the stock engine. And, they have been making the same kit for 30+ years... About $2k for the basic kit sans exhaust from Summit, plus costs to custom fit it and exhaust to the HMMWV. I do wonder if a 6.5's turbo system can be installed on a 6.2 though. Going to have to compare engine setups between my truck when I get it and a friend's 6.5 powered Chevy dump truck. I suppose at some point though you start getting into territory where it just makes more sense to change the whole engine to a 6.5 and of course if you're at that point, besides cost, why not go to a better engine all together?  Originally Posted By Ryan_Ruck: Looking very good Lawman! Originally Posted By MDStroup: This might be of some interest to some people in this thread. https://youtu.be/uMsrjeny5pE Saw that a couple weeks ago! Amazing performance out of an 8 ton truck offroad! The suspension system is pretty interesting too. Really wish they would have spent more time going into that. I now want a Banks powered 6.5 in my truck... 6.2L CUCV with Sidewinder kit... My only concern is long term reliability with it, but supposedly Banks did the research and came up with 10lbs of boost being safe for the stock engine. And, they have been making the same kit for 30+ years... About $2k for the basic kit sans exhaust from Summit, plus costs to custom fit it and exhaust to the HMMWV. I do wonder if a 6.5's turbo system can be installed on a 6.2 though. Going to have to compare engine setups between my truck when I get it and a friend's 6.5 powered Chevy dump truck. I suppose at some point though you start getting into territory where it just makes more sense to change the whole engine to a 6.5 and of course if you're at that point, besides cost, why not go to a better engine all together? |
|
|
|
TN, USA
|
[#29]
Originally Posted By EagleArmsHBAR:
Any personal experience with that? Originally Posted By EagleArmsHBAR:
Originally Posted By JohnyRotten:
if you had this it wouldn't have happen. http://breggin-enterprises.stores.yahoo.net/lospnutkit.html No, I've bought several things in the past from Blue Hummer..there good people. after looking at that Vee again this morning, there doesn't appear to be a hub in the photo, so I'm thinking it had a ball joint failure.. |
|
|
|
[#30]
Originally Posted By Ryan_Ruck:
In happier news I had a productive, if tiring, day yesterday. On a whim I decided to forego cleaning the truck. Instead, I removed my old brushguard and "bumper". Installed my frame extensions for getting the winch mounted up (later) and got my Ibis Tek bumper installed! I still need to get my winch mounting plate modified for the 10" bolt pattern on my winch. I can just bolt the plate in between the bumper and the extensions when it's done though. The bumper is great but does stick out quite a bit with those frame extensions. Looking at pics online, on the ECV trucks the "snout" takes up that space. If you don't run a winch, you can bolt it direct to the frame instead since it includes some extra brackets. The extra space is kind of handy though... You can sit facing backwards on the flat part of the bumper between the bumper and the tires and use the hood as a table/desk! I have been looking to upgrade my front bumper as well, but the Ibis Tek ones stick out too far for me and I wouldn't be able to park in the garage. There is a guy on the g503 forums that occasionally gets the Milsys Group one which would still allow me to park in the garage and be beefy enough to act like a real bumper. Yours looks nice and can't wait to see pics of it complete with the rear bumper installed. |
|
|
|
OH, USA
|
[#31]
Would any of you guys want my Luverne grille guard? It is the heaviest of all the OE/ MIL Guards. Mine is the "slatted" version.
I took it off yesterday, and dont plan on it going back on. No rust issues, no bends. I am however missing one of the quick release pins, and I have been using a non-QD pin that works fine. Its heavy...Id want to meet up |
|
|
|
[#32]
Originally Posted By jake-cutter:
I have been looking to upgrade my front bumper as well, but the Ibis Tek ones stick out too far for me and I wouldn't be able to park in the garage. There is a guy on the g503 forums that occasionally gets the Milsys Group one which would still allow me to park in the garage and be beefy enough to act like a real bumper. Yours looks nice and can't wait to see pics of it complete with the rear bumper installed. That's a good looking bumper! Looks like the one on the Banks HMMWV video a while back in the thread. Was wondering who made that. I was thinking of doing the rear bumper today but I think it's going to have to wait for another day. I'm going to work on getting some small odds and ends done like installing new rear tail light buckets and my Ibis Tek light bar. I'm worn out from all the work this week and I'm going to take it easy since I've got to go back to work tomorrow. 
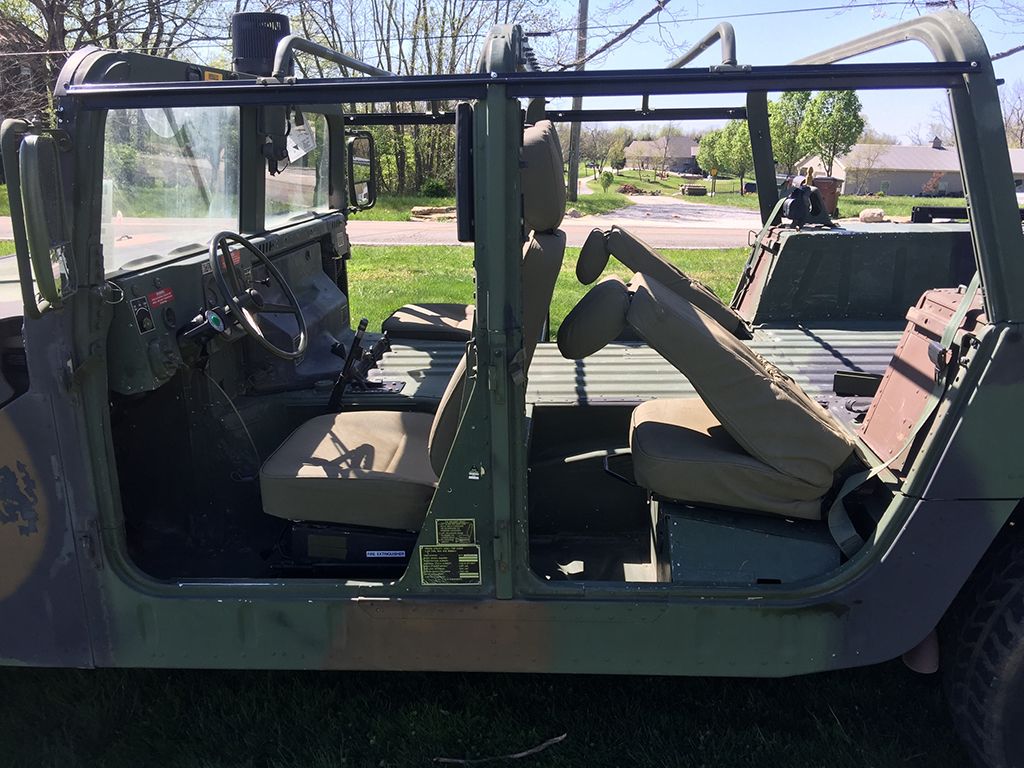
Yesterday was a very productive day. Finished cleaning out the interior and it's about 95% clean. There's still a couple tight spots I need to hit with a wire wheel before I do the Lizard Skin though. More importantly, however, I got all of my MRAP seats installed! Honestly, this is what HMMWV seating was meant to be. They fit great and feel great, especially for military seats. I expected the most trouble from the driver's seat but, surprisingly, it was the easiest! The bolt hole pattern on the seat lined right up with the bolt hole pattern on the existing slide assembly/box. So yeah, it now has two front/rear slide assemblies but installation was super easy using that. Just had to enlarge the bolt holes to the 3/8" Grade 8 bolts I used. If you wanted to mount it to just the up/down adjustment assembly, you would have to go with some sort of adapter. Ain't nobody got time fo' dat. Fasteners for all seats are 3/8"x1.5" Grade 8 bolts with a combination of 2" fender washers (to help distribute the load over the fiberglass and thin aluminum covers) and Grade 8 washers, lock washers, and nuts on the bottom. The heads of the 3/8" bolts fit into the slide rail perfectly and don't allow for any rotation during installation. On the other 3 passenger seats, standard 3/8" washers had to be used between the seat rails and the covers. On the front passenger it is for the slide assembly to clear the upwards angle in the rear of the cover and I ended up using 4 on the back two bolts. On the rear covers it is for the slide assembly to clear some rivets and just 2 washers were used on each bolt. Unlike the driver's seat that bolted right up, the other 3 seats besides the driver's required fitting and drilling of all the holes. I recommend using one seat as a fitment guide to see where the best position for the seat is, making marks where that seat's slide assembly rails sit, and then taking one of the slide assemblies off of another seat to use as a template to mark the holes and drill. On the rear covers there are braces that run front to rear so if you have problems clearing those fully enough for the fender washers/Grade 8 washers like I did, you'll have to trim the washers to fit or leave them off. I wouldn't be too worried about leaving them off unless you were using 5 point belts tied to the seat in which case I would want much stronger mounting surfaces than the covers in there anyway. In an accident, the belts that are mounted to the body are going to be taking the brunt of the force with very little to the seat. The front seats will recline quite far so long as you slide the seats all the way forward. That's not a huge deal though. I'm 6' tall and still have plenty of knee room in the driver's and front passenger seat. The rear seats will recline decently if slid forward as well but are limited by the rear fenders. All seats except the driver's seat fold forward just fine but the rears need the headrest tucked if the front seats are in the upright position. Now what you've all been waiting for... Pics! Cleaned out! 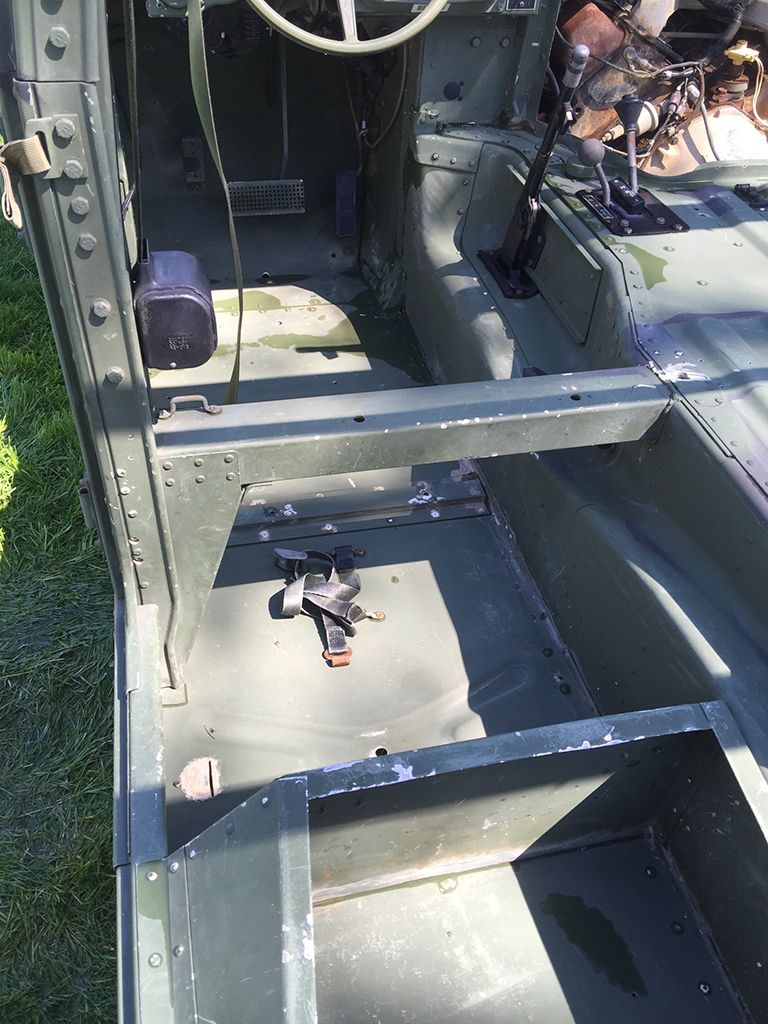
First seat done! 
Front passenger seat 
All 4 seats in! 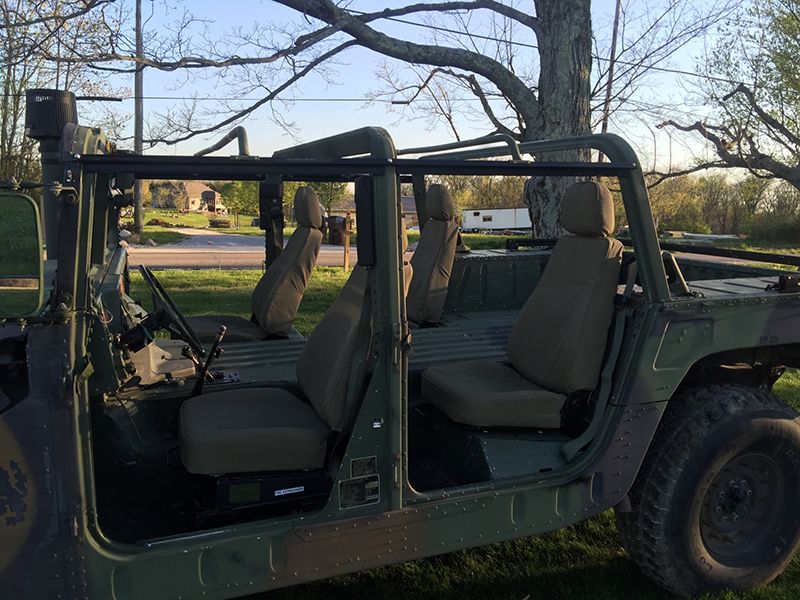
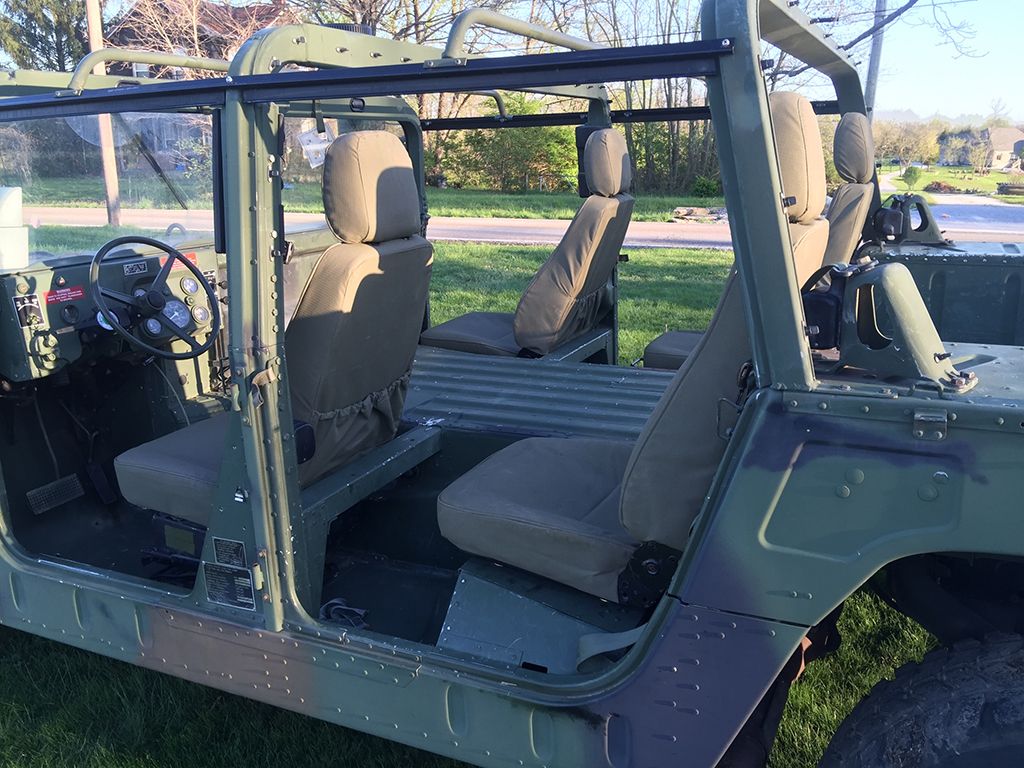
Reclining and folding: 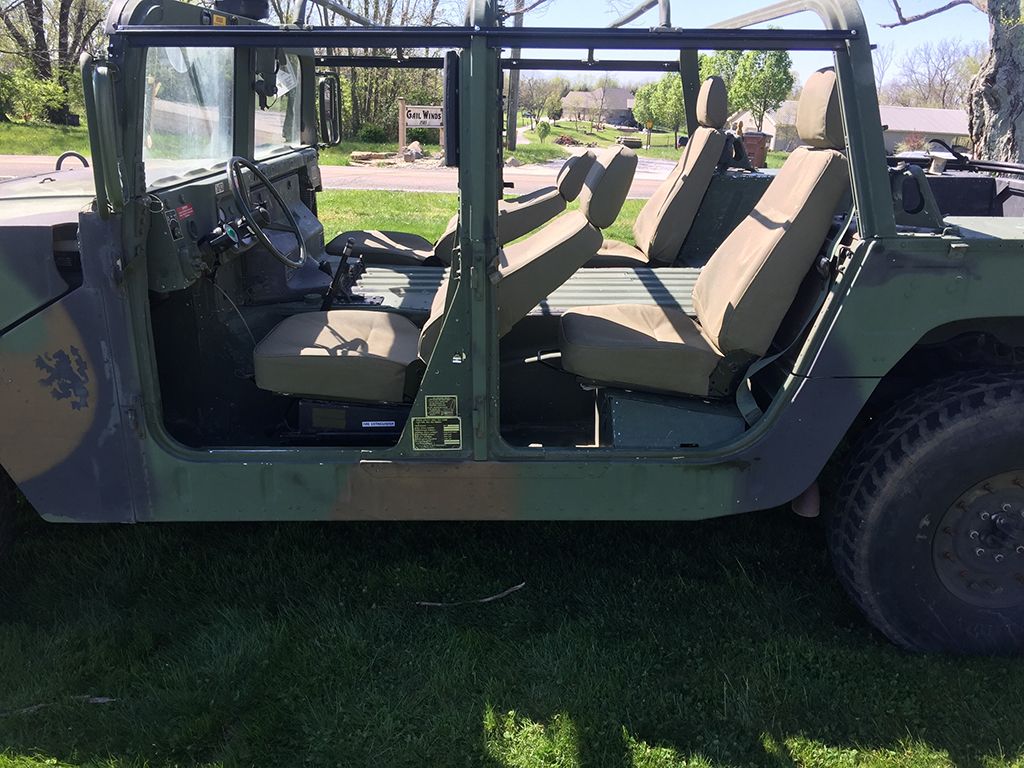
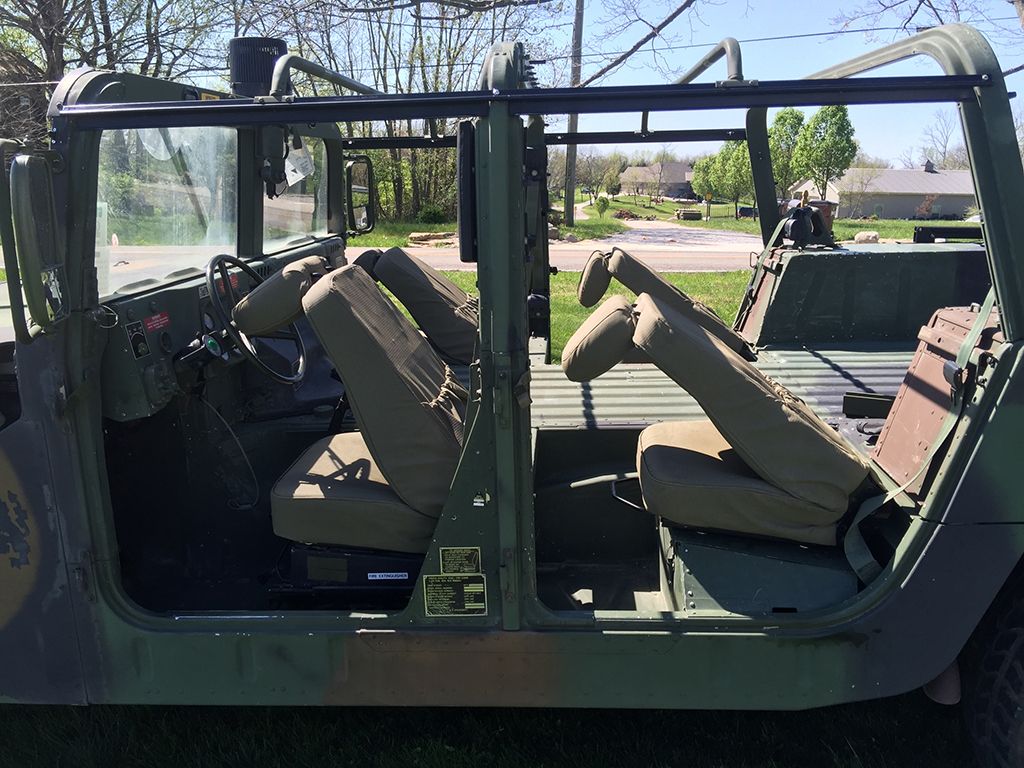
After the seats were done I may or may not have gone on a short drive and the truck may or may not have driven well with speeds topping at 58 before I ran out of straight road.
The truck definitely needs some form of sound insulation whether its the factory foam or something else. It's pretty loud with the bare metal floors but not deafening, at least no worse than riding a motorcycle in my opinion. |
|
|
|
|
[Last Edit: EagleArmsHBAR]
[#33]
Originally Posted By Ryan_Ruck: Snip.  It looks to me like the input seal is toast and hopefully there is no resulting damage to the hub or half shaft. Then I decided I would jack up the vehicle and test out my new old stock HMMWW jack I bought. After the ack put enough pressure on the vehicle to make it realy tight, this happened:  The weld broke and I had to get another jack out to relieve enough pressure to lower the HMMWV jack by hand. This was pretty scary becuase I had to put several 2X6s under the other jack to allow it to reach the frame (about 21 inches up). I got it out though. Also it appears to be a pain in the ass to remove the passenger floor insulation. I got frustrated and cut it out, but it looks like I am going to have to go in a remove the heater blower to do this? Only productive thing that happened yesterday was that I got enough paint removed to read the unit markings:   1/278 CAV HHT 44 Anyone know what HHT 44 means? |
|
|
|
|
[Last Edit: Ryan_Ruck]
[#34]
Originally Posted By EagleArmsHBAR:
Awesome write up, as usual and it is really looking nice! My day was not as fun as yours. I got under the vehicle again and looked around; I hadn't done so since I had my night ride a few days ago (that is the night I discovered the radiator lower hoses leaking). This is what I found yesterday, in addition to dry rotted half shaft boots: <a href="http://s247.photobucket.com/user/dab969/media/image_zpsdwzxyfbt.jpeg.html" target="_blank">http://i247.photobucket.com/albums/gg141/dab969/image_zpsdwzxyfbt.jpeg</a> It looks to me like the input seal is toast and hopefully there is no resulting damage to the hub or half shaft. Then I decided I would jack up the vehicle and test out my new old stock HMMWW jack I bought. After the ack put enough pressure on the vehicle to make it realy tight, this happened: <a href="http://s247.photobucket.com/user/dab969/media/image_zpswdwmmatj.jpeg.html" target="_blank">http://i247.photobucket.com/albums/gg141/dab969/image_zpswdwmmatj.jpeg</a> The weld broke and I had to get another jack out to relieve enough pressure to lower the HMMWV jack by hand. This was pretty scary becuase I had to put several 2X6s under the other jack to allow it to reach the frame (about 21 inches up). I got it out though. Also it appears to be a pain in the ass to remove the passenger floor insulation. I got frustrated and cut it out, but it looks like I am going to have to go in a remove the heater blower to do this? Only productive thing that happened yesterday was that I got enough paint removed to read the unit markings: <a href="http://s247.photobucket.com/user/dab969/media/image_zpsvepksbfc.jpeg.html" target="_blank">http://i247.photobucket.com/albums/gg141/dab969/image_zpsvepksbfc.jpeg</a> <a href="http://s247.photobucket.com/user/dab969/media/image_zpsa0ppmki9.jpeg.html" target="_blank">http://i247.photobucket.com/albums/gg141/dab969/image_zpsa0ppmki9.jpeg</a> 1/278 CAV HHT 44 Yesterday may have been fun but today, not so much. It never fails... Two steps forward, one step back... 
Before I get to that though I'll mention I cut my front passenger side insulation out as well. I figured I'm not spraying Lizard Skin way up under the dash so it could stay. Plus it looked like a pain in the ass to take out. I can't speak to the condition of the shaft input seal but, if it's just your boots that are dry rotted but the joints are okay, you can rebuild the shafts with new boots. ETA: According to Wikipedia's page on the 278th, that should be: 1st Squadron (Cobra) HHT/1st Squadron/278th ACR, Henderson ("Headhunters") Detachment 1, HHT 1/278 ACR, Selmer The # 44 should be the truck number. Mine was B 42. Now for today's adventure... Went out to move the truck, turn the key to run, no wait light/clunk/voltage drop. Try cranking and it just turns over. 
I disconnected the battery, waited about 60 seconds, and then reconnected it. Thankfully the wait light came on and it started up. Moved the truck to where I wanted it. Went ahead and disconnected the battery again to take a look at the cannon plugs on the PCB. Both plugs looks good. No corrosion or dry rot. Plug in the engine compartment still had dielectric grease even. Went ahead and hit both sides of both plugs with DeoxIt and worked them in and out a few times. Sprayed the glow plug controller plugs too. After that I seem to consistently get the wait light as normal first but, if I try to cycle the plugs again the wait light goes off after a second whereas before if I cycled them a second time, I remember it staying on the full length of time. If I wait a little bit, the wait light comes on as normal again though. I don't know if it's because it is now a lot warmer out (mid-upper 70s) and that is how it is supposed to act when it is warmer or if there is an issue still. I went ahead and bought a used KDS Smart Start box and new TSU even though I really didn't want to spend the money on it but, I just don't trust this PCB any more (it's a green label KDS) to not leave me stranded somewhere. Once that gets here I'll be putting it in as well as the aux grounding harness (I'm waiting on the 8ga lugs) and new glow plugs. 
|
|
|
|
KY, USA
|
[#35]
Looks great, looks like fun!
Were these a shoe-in for on-road use, I'd be after one. Spent a little time in armored ones, they rode like cadillacs compared to the international maxxpro. |
|
|
|
[#36]
Ryan,
So are you going to put 2 coats of Lizard Skin Sound deadener, then 2 coats of the Lizard Skin Ceramic coating, and then 2 coats of Monsterliner? What did all of that cost? |
|
|
|
|
[Last Edit: EagleArmsHBAR]
[#37]
I just dropped a bunch of cash on new floor and tunnel insulation to replace the ragged out stuff and also ordered half shaft boots and geared hub seal kits. Is there anything tricky about removal of the half shafts (bolts must be heated, don't use a air impact gun, etc)?
|
|
|
|
|
[#38]
Originally Posted By jake-cutter:
Ryan, So are you going to put 2 coats of Lizard Skin Sound deadener, then 2 coats of the Lizard Skin Ceramic coating, and then 2 coats of Monsterliner? What did all of that cost? Originally Posted By jake-cutter:
Ryan, So are you going to put 2 coats of Lizard Skin Sound deadener, then 2 coats of the Lizard Skin Ceramic coating, and then 2 coats of Monsterliner? What did all of that cost? Yep, that's what I'm going for. From the application videos I've watched, 2 coats of Lizard Skin is actually a full recommended coat of 40 mil thickness (as thin as a dime). I originally picked up 2 gallons of each of the sound deadener and ceramic coating based on bedliner I've put in friend's vehicles but after reading about it further and doing some rough math based off of their claims of 25 sq ft per gallon, I knew it wouldn't be enough so I picked up 2 more of each. Doing the math I figured since the truck is roughly 7' wide and 9-10' long in the tub interior (depending on where you measure), that may be enough taking into account the curved and vertical surfaces. We'll see... The plan is to start with the Sound Control, since it is supposed to be applied before the Ceramic Insulation, and see how far that gets me. If it isn't enough I'll order some more and pick up where I left off with the Sound Control. If it was a hard top I would have needed a bit more since they recommend applying it to the underside of the roof for maximum sound deadening/heat insulation. They say you can do the underside of the vehicle with it as well but since I'm not doing a frame-off, I'm not going that far. It's a lot easier to strip out and clean the interior than the underside! Monstaliner says a gallon of their stuff covers 60 sq ft, 2 coats thick for proper 40 mil thickness. So far, cost on the material and the application equipment (the Lizard Skin spray gun kit was $80, 4" bedliner rollers for the Monstaliner were $5 each) is about $1,000. Total Lizard Skin was about $600. Monstaliner was about $300. And the rest for application. Cheaper than rough quotes I was given for LineX and Rhino Liner alone which were about $1,100-1,500. I probably could have saved a bit going with bedliner like Herculiner which I've used before and have found to be satisfactory but, the Monstaliner is pretty well regarded and they have a ton of color options to choose from and OD Green was a natural choice for me. Just an FYI, the Monstaliner needs a 2 gallon pail to mix the liner, colorant, and catalyst so you can just clean out the empty Lizard Skin 2 gallon bucket out with soap and water and reuse it for the Monstaliner! Originally Posted By EagleArmsHBAR:
I just dropped a bunch of cashiering new floor and tunnel insulation to replace the ragged out stuff and also ordered half shaft boots and geared hub seal kits. Is there anything tricky about removal of the half shafts (bolts must be heated, don't use a air impact gun, etc)? No first hand experience on the removal but when I was thinking I might need to swap them, I was just going to undo the bolts with a ratchet (or cheater bar if needed). I would put some blue Loctite on the bolts when you reinstall them though for insurance. |
|
|
|
|
[Last Edit: EagleArmsHBAR]
[#39]
Originally Posted By Ryan_Ruck: That's a good looking bumper! Looks like the one on the Banks HMMWV video a while back in the thread. Was wondering who made that. I was thinking of doing the rear bumper today but I think it's going to have to wait for another day. I'm going to work on getting some small odds and ends done like installing new rear tail light buckets and my Ibis Tek light bar. I'm worn out from all the work this week and I'm going to take it easy since I've got to go back to work tomorrow. http://i217.photobucket.com/albums/cc40/ryaneruck/board/vacation_sunday_feeling_sm_zpsvcj5loll.jpg Yesterday was a very productive day. Finished cleaning out the interior and it's about 95% clean. There's still a couple tight spots I need to hit with a wire wheel before I do the Lizard Skin though. More importantly, however, I got all of my MRAP seats installed! Honestly, this is what HMMWV seating was meant to be. They fit great and feel great, especially for military seats. I expected the most trouble from the driver's seat but, surprisingly, it was the easiest! The bolt hole pattern on the seat lined right up with the bolt hole pattern on the existing slide assembly/box. So yeah, it now has two front/rear slide assemblies but installation was super easy using that. Just had to enlarge the bolt holes to the 3/8" Grade 8 bolts I used. If you wanted to mount it to just the up/down adjustment assembly, you would have to go with some sort of adapter. Ain't nobody got time fo' dat. Fasteners for all seats are 3/8"x1.5" Grade 8 bolts with a combination of 2" fender washers (to help distribute the load over the fiberglass and thin aluminum covers) and Grade 8 washers, lock washers, and nuts on the bottom. The heads of the 3/8" bolts fit into the slide rail perfectly and don't allow for any rotation during installation. On the other 3 passenger seats, standard 3/8" washers had to be used between the seat rails and the covers. On the front passenger it is for the slide assembly to clear the upwards angle in the rear of the cover and I ended up using 4 on the back two bolts. On the rear covers it is for the slide assembly to clear some rivets and just 2 washers were used on each bolt. Unlike the driver's seat that bolted right up, the other 3 seats besides the driver's required fitting and drilling of all the holes. I recommend using one seat as a fitment guide to see where the best position for the seat is, making marks where that seat's slide assembly rails sit, and then taking one of the slide assemblies off of another seat to use as a template to mark the holes and drill. On the rear covers there are braces that run front to rear so if you have problems clearing those fully enough for the fender washers/Grade 8 washers like I did, you'll have to trim the washers to fit or leave them off. I wouldn't be too worried about leaving them off unless you were using 5 point belts tied to the seat in which case I would want much stronger mounting surfaces than the covers in there anyway. In an accident, the belts that are mounted to the body are going to be taking the brunt of the force with very little to the seat. The front seats will recline quite far so long as you slide the seats all the way forward. That's not a huge deal though. I'm 6' tall and still have plenty of knee room in the driver's and front passenger seat. The rear seats will recline decently if slid forward as well but are limited by the rear fenders. All seats except the driver's seat fold forward just fine but the rears need the headrest tucked if the front seats are in the upright position. Now what you've all been waiting for... Pics! Cleaned out! http://i217.photobucket.com/albums/cc40/ryaneruck/HMMWV/IMG_1010_zpsfcvchkyq.jpg http://i217.photobucket.com/albums/cc40/ryaneruck/HMMWV/IMG_1011_zpsx06daut1.jpg First seat done! http://i217.photobucket.com/albums/cc40/ryaneruck/HMMWV/IMG_1012_zpsgew9ohkl.jpg http://i217.photobucket.com/albums/cc40/ryaneruck/HMMWV/IMG_1013_zpscst33muf.jpg Front passenger seat http://i217.photobucket.com/albums/cc40/ryaneruck/HMMWV/IMG_1015_zpszbqynql8.jpg All 4 seats in! http://i217.photobucket.com/albums/cc40/ryaneruck/HMMWV/IMG_1017_zpsmxzfaczr.jpg http://i217.photobucket.com/albums/cc40/ryaneruck/HMMWV/IMG_1018_zpsvjbuklir.jpg Reclining and folding: http://i217.photobucket.com/albums/cc40/ryaneruck/HMMWV/IMG_1019_zpsx0x8nstx.jpg http://i217.photobucket.com/albums/cc40/ryaneruck/HMMWV/IMG_1020_zpsrcymobl2.jpg http://i217.photobucket.com/albums/cc40/ryaneruck/HMMWV/IMG_1022_zpsdztzeabd.jpg After the seats were done I may or may not have gone on a short drive and the truck may or may not have driven well with speeds topping at 58 before I ran out of straight road. The truck definitely needs some form of sound insulation whether its the factory foam or something else. It's pretty loud with the bare metal floors but not deafening, at least no worse than riding a motorcycle in my opinion. Originally Posted By Ryan_Ruck: Originally Posted By jake-cutter: I have been looking to upgrade my front bumper as well, but the Ibis Tek ones stick out too far for me and I wouldn't be able to park in the garage. There is a guy on the g503 forums that occasionally gets the Milsys Group one which would still allow me to park in the garage and be beefy enough to act like a real bumper. Yours looks nice and can't wait to see pics of it complete with the rear bumper installed. That's a good looking bumper! Looks like the one on the Banks HMMWV video a while back in the thread. Was wondering who made that. I was thinking of doing the rear bumper today but I think it's going to have to wait for another day. I'm going to work on getting some small odds and ends done like installing new rear tail light buckets and my Ibis Tek light bar. I'm worn out from all the work this week and I'm going to take it easy since I've got to go back to work tomorrow. http://i217.photobucket.com/albums/cc40/ryaneruck/board/vacation_sunday_feeling_sm_zpsvcj5loll.jpg Yesterday was a very productive day. Finished cleaning out the interior and it's about 95% clean. There's still a couple tight spots I need to hit with a wire wheel before I do the Lizard Skin though. More importantly, however, I got all of my MRAP seats installed! Honestly, this is what HMMWV seating was meant to be. They fit great and feel great, especially for military seats. I expected the most trouble from the driver's seat but, surprisingly, it was the easiest! The bolt hole pattern on the seat lined right up with the bolt hole pattern on the existing slide assembly/box. So yeah, it now has two front/rear slide assemblies but installation was super easy using that. Just had to enlarge the bolt holes to the 3/8" Grade 8 bolts I used. If you wanted to mount it to just the up/down adjustment assembly, you would have to go with some sort of adapter. Ain't nobody got time fo' dat. Fasteners for all seats are 3/8"x1.5" Grade 8 bolts with a combination of 2" fender washers (to help distribute the load over the fiberglass and thin aluminum covers) and Grade 8 washers, lock washers, and nuts on the bottom. The heads of the 3/8" bolts fit into the slide rail perfectly and don't allow for any rotation during installation. On the other 3 passenger seats, standard 3/8" washers had to be used between the seat rails and the covers. On the front passenger it is for the slide assembly to clear the upwards angle in the rear of the cover and I ended up using 4 on the back two bolts. On the rear covers it is for the slide assembly to clear some rivets and just 2 washers were used on each bolt. Unlike the driver's seat that bolted right up, the other 3 seats besides the driver's required fitting and drilling of all the holes. I recommend using one seat as a fitment guide to see where the best position for the seat is, making marks where that seat's slide assembly rails sit, and then taking one of the slide assemblies off of another seat to use as a template to mark the holes and drill. On the rear covers there are braces that run front to rear so if you have problems clearing those fully enough for the fender washers/Grade 8 washers like I did, you'll have to trim the washers to fit or leave them off. I wouldn't be too worried about leaving them off unless you were using 5 point belts tied to the seat in which case I would want much stronger mounting surfaces than the covers in there anyway. In an accident, the belts that are mounted to the body are going to be taking the brunt of the force with very little to the seat. The front seats will recline quite far so long as you slide the seats all the way forward. That's not a huge deal though. I'm 6' tall and still have plenty of knee room in the driver's and front passenger seat. The rear seats will recline decently if slid forward as well but are limited by the rear fenders. All seats except the driver's seat fold forward just fine but the rears need the headrest tucked if the front seats are in the upright position. Now what you've all been waiting for... Pics! Cleaned out! http://i217.photobucket.com/albums/cc40/ryaneruck/HMMWV/IMG_1010_zpsfcvchkyq.jpg http://i217.photobucket.com/albums/cc40/ryaneruck/HMMWV/IMG_1011_zpsx06daut1.jpg First seat done! http://i217.photobucket.com/albums/cc40/ryaneruck/HMMWV/IMG_1012_zpsgew9ohkl.jpg http://i217.photobucket.com/albums/cc40/ryaneruck/HMMWV/IMG_1013_zpscst33muf.jpg Front passenger seat http://i217.photobucket.com/albums/cc40/ryaneruck/HMMWV/IMG_1015_zpszbqynql8.jpg All 4 seats in! http://i217.photobucket.com/albums/cc40/ryaneruck/HMMWV/IMG_1017_zpsmxzfaczr.jpg http://i217.photobucket.com/albums/cc40/ryaneruck/HMMWV/IMG_1018_zpsvjbuklir.jpg Reclining and folding: http://i217.photobucket.com/albums/cc40/ryaneruck/HMMWV/IMG_1019_zpsx0x8nstx.jpg http://i217.photobucket.com/albums/cc40/ryaneruck/HMMWV/IMG_1020_zpsrcymobl2.jpg http://i217.photobucket.com/albums/cc40/ryaneruck/HMMWV/IMG_1022_zpsdztzeabd.jpg After the seats were done I may or may not have gone on a short drive and the truck may or may not have driven well with speeds topping at 58 before I ran out of straight road. The truck definitely needs some form of sound insulation whether its the factory foam or something else. It's pretty loud with the bare metal floors but not deafening, at least no worse than riding a motorcycle in my opinion.
|
|
|
|
WI, USA
|
[#40]
Originally Posted By EagleArmsHBAR:
Anyone know what HHT 44 means? Headquarters and Headquarters Troop. Basically, the leadership and administrative element of a Cavalry squadron. |
|
|
|
[#41]
Originally Posted By Ryan_Ruck:
I originally picked up 2 gallons of each of the sound deadener and ceramic coating based on bedliner I've put in friend's vehicles but after reading about it further and doing some rough math based off of their claims of 25 sq ft per gallon, I knew it wouldn't be enough so I picked up 2 more of each. Doing the math I figured since the truck is roughly 7' wide and 9-10' long in the tub interior (depending on where you measure), that may be enough taking into account the curved and vertical surfaces. We'll see... The plan is to start with the Sound Control, since it is supposed to be applied before the Ceramic Insulation, and see how far that gets me. If it isn't enough I'll order some more and pick up where I left off with the Sound Control. If it was a hard top I would have needed a bit more since they recommend applying it to the underside of the roof for maximum sound deadening/heat insulation. Please take lots of pics when you apply it. I am interested in going this route. But I will most likely be spraying a slantback. |
|
|
|
|
[#42]
Originally Posted By EagleArmsHBAR:
Front seats ordered. Thank goodness I am getting a partial refund on the truck (due to the leaks) or I would be out of cash. Instead I'm still within my (extended) budget. Originally Posted By EagleArmsHBAR:
Front seats ordered. Thank goodness I am getting a partial refund on the truck (due to the leaks) or I would be out of cash. Instead I'm still within my (extended) budget. Glad to hear they're making good on the Iron Clad Guarantee! You get the seats I did? Originally Posted By jake-cutter:
Please take lots of pics when you apply it. I am interested in going this route. But I will most likely be spraying a slantback. I most definitely will! I may have to take some video/audio with the bare metal floor and some after everything is laid down for a comparison. |
|
|
|
|
[Last Edit: EagleArmsHBAR]
[#43]
Originally Posted By Ryan_Ruck: Glad to hear they're making good on the Iron Clad Guarantee! You get the seats I did? Originally Posted By Ryan_Ruck: Originally Posted By EagleArmsHBAR: Front seats ordered. Thank goodness I am getting a partial refund on the truck (due to the leaks) or I would be out of cash. Instead I'm still within my (extended) budget. Glad to hear they're making good on the Iron Clad Guarantee! You get the seats I did? |
|
|
|
|
[Last Edit: EagleArmsHBAR]
[#44]
Anyone have instructions on how to remove the original driver seat and install the A2 seat mount? I've got the driver seat out, but am unsure of how much unriveting I need to do on the standard seat base. Is there an easy way to remove the rivets without using a grinder?
|
|
|
|
|
[#45]
Originally Posted By EagleArmsHBAR:
Anyone have instructions on how to remove the original driver seat and install the A2 seat mount? I've got the driver seat out, but am unsure of how much unriveting I need to do on the standard seat base. Is there an easy way to remove the rivets without using a grinder? I think the MWO for the commanders seat has info on the drivers seat. You can find the MWO on the g503 forum or at this LINK I know from reading a post by Retiredwarhorses and others it takes some work as all of the old rivets must be drilled out and then the new ones put in along with some braces. Also something about the holes in the bracket for the seat being hard to line up. I was glad mine was done as it looks like a hassle to change out. |
|
|
|
|
[Last Edit: Ryan_Ruck]
[#46]
Originally Posted By EagleArmsHBAR:
Anyone have instructions on how to remove the original driver seat and install the A2 seat mount? I've got the driver seat out, but am unsure of how much unriveting I need to do on the standard seat base. Is there an easy way to remove the rivets without using a grinder? I don't know how much it will help but, I'll pull my driver's seat this weekend and snap some pics of the setup. Maybe it will help shed some light on how things should look when you're done. If I was thinking, I would have done that when I had the seat out initially. Just a recommendation... I would put anti-sieze on any seat frame to floor bolts you have since they're exposed to so much crud and water. Mine were hex bolts and I had to use a good bit of PB Blaster to get them out. Put anti-sieze on them when I put them back in to make things easier when I pull everything again to start the interior coatings. Small update on my truck... Got my new Smart Start box installed yesterday as well as my new Diesel Rx glow plugs and started installing the auxiliary grounding harness. Would have finished but got rained out. Truck definitely seems to start faster than it did before. Thankfully I didn't run into any swollen plugs. I'll post a pic of the pulled plugs later so maybe someone can tell me how you think they look since diesel ownership is new to me and I'm not exactly sure how they should look. Did confirm yesterday something I suspected when I took my truck out for a spin, I've got an exhaust leak. I'll have to check it out more closely and see what I'm dealing with. Not terribly worried about it though. |
|
|
|
|
[#48]
Originally Posted By EagleArmsHBAR:
I decided to paint my truck and ordered a case and a half of 383 Green, three cans of 383 Brown and three cans of 911 Black CARC substitute spraypaint from Rapco. The guy on the phone with them told me I'd need more than what I ordered in black and brown, but I didn't believe him. I was wrong. I need to order another 4-5 cans of black and 3 of Brown. I spent about 12 total hours prepping the truck (vacuum, removal of floor insulation, vacuum, pressure wash, soap, pressure wash again, vacuum and taping the data plates) and about five hours of painting today. I am very sore and didn't think it would be so time consuming. It ended up looking a lot better than it did, but I need to do so additional touch-up since I ran out of black and brown. For what its worth I still have a case of 383 Green cans. Pro tip: buy one of those sawzaw spray paint can shaker attachments on ebay and also a trigger spray paint attachment before starting. It made it a lot easier than it would have been. Prep Pics: <a href="http://s247.photobucket.com/user/dab969/media/Mobile%20Uploads/image_zpswzfrjccs.jpeg.html" target="_blank">http://i247.photobucket.com/albums/gg141/dab969/Mobile%20Uploads/image_zpswzfrjccs.jpeg</a> <a href="http://s247.photobucket.com/user/dab969/media/Mobile%20Uploads/image_zpssxfslsei.jpeg.html" target="_blank">http://i247.photobucket.com/albums/gg141/dab969/Mobile%20Uploads/image_zpssxfslsei.jpeg</a> Crappy pic of where it stands now (Three Coats)... <a href="http://s247.photobucket.com/user/dab969/media/Mobile%20Uploads/image_zpsmguyw8hu.jpeg.html" target="_blank">http://i247.photobucket.com/albums/gg141/dab969/Mobile%20Uploads/image_zpsmguyw8hu.jpeg</a> I also got my new 24 bolt wheels and Baja tires I purchased from Rallequip.com for $950 delivered balanced at a local tire shop today, but I haven't installed them yet. I need to first replace the half shaft boots and change the differential and hub oil. I am planning on attempting that tomorrow. I am tired at them moment and enjoying some cold beer. Holy cow bro! You jumped in feet first and it looks great! 
Prep is always the suck part of painting. Did you recoat the truck in green and then redo the camo pattern or are you just respraying each color individually on the existing pattern? I'm guessing the latter... I'm planning on respraying green and then redoing the camo pattern. You going to re-stencil the markings like tire pressure? Just to make sure I understand, Rallequip didn't balance the tires prior to delivery? They just install the tires/runflats on the rim and ship? I'm enjoying some beer right now too, some Clown Shoes White Tail Unidragon. |
|
|
|
|
[Last Edit: EagleArmsHBAR]
[#49]
Originally Posted By Ryan_Ruck: Holy cow bro! You jumped in feet first and it looks great! Prep is always the suck part of painting. Did you recoat the truck in green and then redo the camo pattern or are you just respraying each color individually on the existing pattern? I'm guessing the latter... I'm planning on respraying green and then redoing the camo pattern. You going to re-stencil the markings like tire pressure? Just to make sure I understand, Rallequip didn't balance the tires prior to delivery? They just install the tires/runflats on the rim and ship? I'm enjoying some beer right now too, some Clown Shoes White Tail Unidragon. Originally Posted By Ryan_Ruck: Originally Posted By EagleArmsHBAR: I decided to paint my truck and ordered a case and a half of 383 Green, three cans of 383 Brown and three cans of 911 Black CARC substitute spraypaint from Rapco. The guy on the phone with them told me I'd need more than what I ordered in black and brown, but I didn't believe him. I was wrong. I need to order another 4-5 cans of black and 3 of Brown. I spent about 12 total hours prepping the truck (vacuum, removal of floor insulation, vacuum, pressure wash, soap, pressure wash again, vacuum and taping the data plates) and about five hours of painting today. I am very sore and didn't think it would be so time consuming. It ended up looking a lot better than it did, but I need to do so additional touch-up since I ran out of black and brown. For what its worth I still have a case of 383 Green cans. Pro tip: buy one of those sawzaw spray paint can shaker attachments on ebay and also a trigger spray paint attachment before starting. It made it a lot easier than it would have been. Prep Pics: <a href="http://s247.photobucket.com/user/dab969/media/Mobile%20Uploads/image_zpswzfrjccs.jpeg.html" target="_blank">http://i247.photobucket.com/albums/gg141/dab969/Mobile%20Uploads/image_zpswzfrjccs.jpeg</a> <a href="http://s247.photobucket.com/user/dab969/media/Mobile%20Uploads/image_zpssxfslsei.jpeg.html" target="_blank">http://i247.photobucket.com/albums/gg141/dab969/Mobile%20Uploads/image_zpssxfslsei.jpeg</a> Crappy pic of where it stands now (Three Coats)... <a href="http://s247.photobucket.com/user/dab969/media/Mobile%20Uploads/image_zpsmguyw8hu.jpeg.html" target="_blank">http://i247.photobucket.com/albums/gg141/dab969/Mobile%20Uploads/image_zpsmguyw8hu.jpeg</a> I also got my new 24 bolt wheels and Baja tires I purchased from Rallequip.com for $950 delivered balanced at a local tire shop today, but I haven't installed them yet. I need to first replace the half shaft boots and change the differential and hub oil. I am planning on attempting that tomorrow. I am tired at them moment and enjoying some cold beer. Holy cow bro! You jumped in feet first and it looks great! Prep is always the suck part of painting. Did you recoat the truck in green and then redo the camo pattern or are you just respraying each color individually on the existing pattern? I'm guessing the latter... I'm planning on respraying green and then redoing the camo pattern. You going to re-stencil the markings like tire pressure? Just to make sure I understand, Rallequip didn't balance the tires prior to delivery? They just install the tires/runflats on the rim and ship? I'm enjoying some beer right now too, some Clown Shoes White Tail Unidragon. I repainted the truck one color at a time over the existing colors. I should have just repainted it green and redid the camo pattern, but I was lazy. I haven't decided on the tire markings yet. I really dont want to mess with them and I think they are dumb. Here is a tip for anyone considering removing their soft top. It slides out from left to right or right to left from the retainer on the windshield. Don't remove all the screws on the retainer and the rip it off the windshield, destroying the seal, like I did. |
|
|
|
|
[#50]
Originally Posted By EagleArmsHBAR:
Rallequip claims the tires are removed from trucks and already balanced, as evident from the wheel weights on each wheel/tire combo. They dont mess with the tires, they just sell removed tires on wheels. The local tire shop balanced them for me and said they were off balance. Discount tire wanted $20 per tire and they refused to touch them since they are "two piece wheels", but a local place didn't have an issue with it. Originally Posted By EagleArmsHBAR:
Rallequip claims the tires are removed from trucks and already balanced, as evident from the wheel weights on each wheel/tire combo. They dont mess with the tires, they just sell removed tires on wheels. The local tire shop balanced them for me and said they were off balance. Discount tire wanted $20 per tire and they refused to touch them since they are "two piece wheels", but a local place didn't have an issue with it. Interesting... Guess I'll take mine to get balanced when I buy them to be on the safe side. Originally Posted By EagleArmsHBAR:
I repained the truck one color at a time over the existing colors. I should have just repainted it green and redid the camo pattern, but I was lazy. I haven't decided on the tire markings yet. I really dont want to mess with them and I think they are dumb. With zero experience doing it, I don't know that there is a right or wrong way. Your way looks pretty good so far to be honest! Redoing the camo pattern will certainly mean more work but I'm not sure how much better the end result will be and if it will be worth it. LOL at the part in red. |
|
|
|
 Win a FREE Membership!
Sign up for the ARFCOM weekly newsletter and be entered to win a free ARFCOM membership. One new winner* is announced every week!
You will receive an email every Friday morning featuring the latest chatter from the hottest topics, breaking news surrounding legislation, as well as exclusive deals only available to ARFCOM email subscribers.

AR15.COM is the world's largest firearm community and is a gathering place for firearm enthusiasts of all types.
From hunters and military members, to competition shooters and general firearm enthusiasts, we welcome anyone who values and respects the way of the firearm.

Subscribe to our monthly Newsletter to receive firearm news, product discounts from your favorite Industry Partners, and more.
Copyright © 1996-2024 AR15.COM LLC. All Rights Reserved.
Any use of this content without express written consent is prohibited.
AR15.Com reserves the right to overwrite or replace any affiliate, commercial, or monetizable links, posted by users, with our own.


