|
Posted: 8/29/2004 12:16:08 PM EDT
I am limited with tools. I have a dremel with the good cutting wheels and basic tools. How should I go about taking this muzzle device off?

|
|
|
|
[#1]
you have to grind down to the pins and twist the brake off if its not also held on by locktite. just take your time, i got my minni y off this way

|
|
|
|
[#2]
Grind down to the pins? Just to them or all the way down to the threads? What did youuse to grind them? Please clarify. I want to take my mini Y-comp off too. I was even contemplating just cutting out the side holes to make the brake less noisy.
I've heard of a person who cut the brake off just infront of the muzzle, then cutting slots on each side down to the threads (but not touching them), then taking a screw driver and popping it apart like a coconut. Cutting done with a dremil metal grinding disk. |
|
|
|
[#3]
IIRC, if it is a 14.5 in barrel and or a post ban barrel, it will not have threads, the break will be pressed on, then drilled and pinned. Unless the 14.5in barrel is part of a Registered SBR.
|
|
|
|
[#4]
The spot in the pic is where the pin is welded over. Grind here (use your Dremel if that is all you've got) and you should be able to free the pin, then screw the brake off.
|
|
|
|
[#5]
Unless I'm mistaken, that brake isn't long enough to make a 14.5" barrel over 16", so I'd bet that is a 16" barrel. Under that discolored, welded area is either a roll pin or setscrew. You need to grind that area down until you can see what it is. From there you should be able to figure out how to get the rest of the roll pin/setscrew out. From there, I'd bet that brake threads off.
|
|
|
|
[#6]
Personally, I'd try to drill out the weld, just use a punch to make a start for the drill bit then drill alittle, check it and drill alittle bit more until you get to where ya' want to be. Go slow, take your time. It's easy to take metal off but very hard to put it back once it's gone.
|
|
|
|
[#7]
I used this technique to remove the brake on my AR10 carbine, It worked but it was hard on the drill bits, The pin is made out of very hard steel! |
|
|
|
|
[#8]
Dremel or file the top until you get through the weld and can see whetther it has a pin or a set screw under the weld. If it's a pin, dremel or file the metal around the pin until you've exposed enough of it to grab it with a set of pliers then pull it out. If it's a set screw, try cutting a slot in the top and screwing it out with a regular screw driver. If that doesn't work, remove metal around the screw as above and use a twisting motion with the pliers to unscrew it.
|
|
|
|
[#9]
I figured I won't be shooting again until after the ban sunsets, so I went ahead and tackled it. It was extremely easy. The dremel ground away the weld very easily, Below the weld was a small pin that more or less fell out. The old brake just screwed off and the new flash hider screwed right on. Man that was easy. Now I just have to keep the upper away from the lower. So off to my parents house for storage.

|
|
|
|
[#10]
I'm a little late to this thread, but it looks like there is a crush washer there, which would be a good clue that the barrel is threaded, and the brake isn't just pressed on.
|
|
|
|
[#11]
ometimes, IIRC, a washer is needed to bring a barrel under 14.5in and a brake out past the 16in min limit, IIRC, but I could be wrong about everything also, BUT dang, I know I have read this somewhere..... |
|
|
|
|
[#12]
Figures I'd get that wrong.
 It looks like a crush washer though. Seems like you'd use a peel washer, or flat washer for a press on brake. |
|
|
|
[#13]
 + + + + = = |
|
|
|
|
[#14]
My postban Bushamster 14.5 inch barrel with mini-y-comp is threaded under the comp. I had KKF remove the mini-y and replace it with a permanently attached 4 pronged Phantom.
As far as keeping the parts seperated, there is no need. Just don't assemble the two halves to make an illegal "AW." If you don't push the pins in to mate the two, you are fine. This has been covered ad naseum! No need to stash either half at your mom's house. HS1 |
|
|
|
[#15]
Can I use the above instructions to remove a mini-Y comp from a post ban Bushmaster? Will a phantom or suppressor thread on easily?
|
|
|
|
[#16]
I'm going to do the above to get rid og my mini y-comp. What a mistake that was to get it..... The good news is, is that I have a 14.5" so after I swap my compensator for a flash suppressor, I will have a 16" barrel instead of a 17.5" one. The bad news is, is that I have to permanently attach the new suppressor on to meet the 16" requirement and I'm not sure how to do that. I was was thinking of drilling and tapping a hole for a set screw then solder over it.
|
|
|
|
[#17]
the main requirement is that the threads are 1/2x28 TPI RH. If that is the case, yes.
|
|
|
|
[#18]
You will probably find that the solder will not adhere to the steel enough to make it permanent. I tired this on an AK brake I put on, the solder would not stay in. In the end I had to spot weld over the pin with a brazing rod, and grind down the weld to smooth it out, then reblue the weld. |
|
|
|
|
[#19]
Seeing this thread has just baout gave me the nerve to take the ol Dremel to my Mini y Comp.
|
|
|
|
[#20]
How are the postban bushmaster mini y comps put on? has anyone taken theirs off yet and has some first hand knowledge? I have a CAR15 bushy M4 wana be. Thanks.
|
|
|
|
[#21]
Thanks Dr. I was actually thinking of having the solder so that I could give the appearance of a welded pin...but I guess that won't work. Maybe that Alumaloy stuff....
 ? But I'm sure I can find someone with a mig welder to just zap it. ? But I'm sure I can find someone with a mig welder to just zap it.I am so going to do this to get rid of my Y-comp. I was actually accepting that it was on there for good, or even just cutting out the directional holes in the sides to make one long slit (or even cutting it all the way through to make a duck bill comp). But now that I know I can just get rid of it I will. As an spinoff, I wonder if this is a way for others to get their hands on 14.5" barrels from Bushmaster, by buying all their surplus pinned y-comp barrels... |
|
|
|
[#22]
I took the dremel to my fake A2 comp. I got the pin out...but haven't managed to twist the comp off yet. Seems pretty tight and I'm chicken about tearing it up (of course I say that after I took the dremel to it haha). Anybody have any tips for someone without a barrel vise to really secure the thing? Maybe I just need another set of hands. --Josh |
|
|
|
|
[#23]
I took a metal probe and scraped out a lot of "black junk" from the hole before I was able to just unscrew the brake.
|
|
|
|
[#24]
If I install a phantom with loctite and JB weld would that be good enough to be permanent? i doubt it would ever come apart again.
|
|
|
|
[#25]
Legally, no. You must use an ATF-approved method. Pin & weld does the least damage to the barrel. -Troy |
|
|
|
|
[#26]
When you pin and weld, how do you keep the finish from being discolored? do you have to reblue the FH? and what if you have to grind down a weld then there will be a noticeable mark on the FH.
|
|
|
|
[#27]
Yes, you'll need to refinish the FS. Trust me, this beats the silver solder method, which requires heating the FS and the barrel to over 1100F. Welding on the FS keeps the heat and discoloration away from the barrel and on a replacable part. Yes, you'll have to Dremel or file off the excess weld and refinish, and yes, you will probably be able to visually detect the weld. This is a combat rifle, not a Picasso.
-Troy |
|
|
|
[#28]
tagged for later
|
|
|
|
[#29]
.
|
|
|
|
[#30]
How do you line up the Phantom FS? After messing (but usable) the barrel , I can't line the slots and the closed bottom at 6'o clock. I try forcing it to turn and nothing. The crush washer is at the same position as the old one.
Any help please.... *Belay my last, Fixed. |
|
|
|
[#31]
I plan on removing the mini y comp from my bushmaster m4 barrel to save some money when I have it pinned on after the ban dies. My questions are: What should I use to cut down to the pins? I have a dremel should I use the regualr carbon fiber looking cutoff wheels? And is my comp screwed on and pinned? I dont want to waste my time if it is pressed on and screw something up.
|
|
|
|
[#32]
SS,
I just finished taking the Y comp of with a Dremel that I borrowed. I f*&ed up a little but the barrel is still usable (learning experience). I was using the Reinforced Cut-off Wheels (426). As for the Comp, it will be pinned and the barrel is threaded. I am still working on how to line the Phantom up with the closed bottom at 6'o clock. *(Update)I DID IT!! At last it gave up. All i needed was a bigger wrench. From 1 o'clock to 6 o'clock. Nomore problems. Good luck and if you messed up, take it as a learning experience and like another poster said: "It is a rifle, not a Picasso" |
|
|
|
[#33]
Tag (for later) Thanks guys
|
|
|
|
[#34]
I got the Mini Y Comp off my postban bushie. Unfortunately, I had a REALLY hard time finding the ping after I used a polishing wheel to remove the finish. So I ground down a little with a bench grinder (very light on a fine grit wheel). After that I never was able to make out the pin again. I now know the pin is 2mm wide after you get past the weld spot (where it appears to be larger). Might be helpful for the rest of you that plan on doing this.
So, that left me with method #2, crack it apart. It took me about 2 hours from start to finish since I was moving soo slow. I made a few mistakes that I would change, but nothing that hurt the barrel. Take the barrel and clamp it in a vice horizontally using some soft wood as a pad. You will want the ports in the side facing up (etheir the left or right, doesn't matter yet). I used some 3"x1"x1" (3 inches long) pieces of soft wood. Didnt leave a mark, and even if it had it would have been under the handguards. Next, take some tape (I used electricians) and wrap the barrel with a thick layer behind the crush washer. This is a MUST to protect the barrel. Next, don't bother splitting the brake down the entire sides. Just take a dremel and cut the brake about 2mm forward of the end of the first port in the brake (the one closest to the barrel). Make a cut no deeper then 2.5mm along the entire stub of the brake. If you go any deeper then 3mm over the threaded area you may hit the threads. This is fairly close, so you should probably cut around 2-2.5mm to be safe. Also the threads only run for the first 1cm of the brake, afterwards there is a 5mm section with no threads that is hollow. Now, after making these 2-2-5mm cuts down each side (not the top or bottom of the brake) take a flash light and look inside the front of the brake. You are looking for a gap, and then the front of the actual barrel. Once you've idenified this, start cutting through the entire front section of the brake creating a split in it down to the barrel. Once your at the barrel, stop. Once you get through the front of the brake stub, and have the 2-2.5mm slots cut down the sides then get out a good chisel, hammer, and a anvil. I used a small chisel from a pnumatic hammer set for chipping concrete that started at around 2mm wide and opened up to 7mm. It took alot of pounding on it to spread. I actually hit it for a while, went back over the area lightly with the dremel and tried again. Each time removing a little more metal. In the pictures of the half of the stub below you can see around the threads a dark area showing where I did not cut, but was split by the force of the chisel.  this is the eisiest picture to see just how deep I cut into each side and where. The front of the stub is cut all the way through, until it reaches the barrel. The rear portion over the thread fans out, being its thickest near the start of the threads.  Sorry for my shitty ruler, lol. EDIT: A good SOLID steel chisel is a good idea. I broke a nice flat head screw driver in half trying to use it as a crowbar. I then found this chisel and decided to use it as a wedge to spread the brake with force from a hammer. Don't bother trying to use the chisel like a crowbar, it will just be a waste of time unless your built like arnold, or have REALLY cut away the metal. I really wouldn't reccomend trying the latter, if you value your threads. |
|
|
|
[#35]
This is a Mini Y???? People here have been saying that they are slide-on types that are pinned. Are there are two different styles???? |
|
|
|
|
[#36]
Yup, mini y comp from a post ban bushmaster 14.5". I'm not sure where people are getting the idea they are pressed and pinned.. ? Bushmaster has a different model that has the same porting, but has a larger diameter and visible pinning, listed on their site. That could be the pressed and pinned on version, but I have never seen any of these in real life or pictures of actual production rifles. I'm not a great expert on this matter though. I do know mine was obviously threaded, but I ended up having to split the thing since the pins were impossible to properly locate after grinding down the weld.
The pictures above are of a halve of the stub that was left when I chopped down and split mine. |
|
|
|
[#37]
Anyone know how the BM AK brake is attatched? |
|
|
|
[#38]
Well, I couldn't find the pin either, so I decided to try splitting it. And I hosed myself.
Is this barrel junk now? It doesn't 'look' like I cut all the way into the crown, but man is it CLOSE: 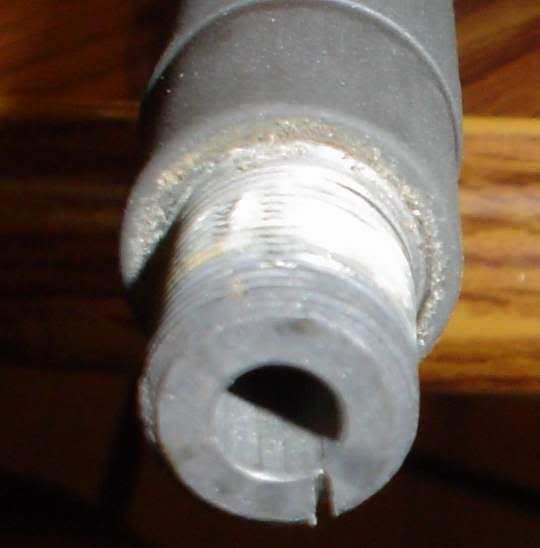 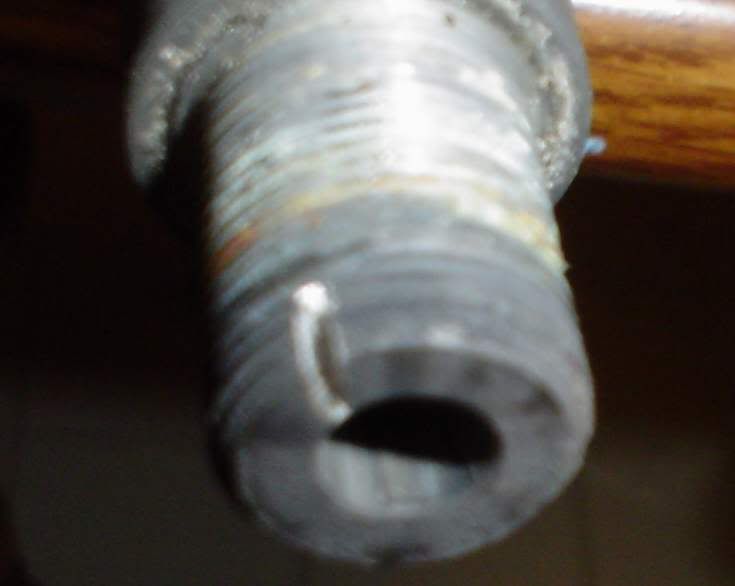 
|
|
|
|
[#39]
You could always have a 'smith recrown that for you if you feel the need. Personally, I would. That thin metal near the muzzle could do some funky things under the heat of muzzle blast.
|
|
|
|
[#40]
someone needs a new barrel
|
|
|
|
[#41]
Hrm, I was thinking cut off a portion of the threads, and recrown, but maybe not eh? :(
|
|
|
|
[#42]
Best bet is a lathe to do this gents.
JLM, How long is that barrel and how long/deep is the cut? |
|
|
|
[#43]
its a 14.5 and i'd say the size of the cut is about the thickness of a crush washer.
EDIT: I just measured it. Between 2-3 milimeters. |
|
|
|
[#44]
That's what I figured based on an estimate of the number of threads affected.
You could have a smith set back the shoulder of the barrel that amount then cut back the muzzle to removed the cut threads, or most of them. Depends on if you could still make the min OAL when the FS is attached. The smith could then continue the muzzle threads from where they end to the newly set back barrel shoulder. I'd definitely chase those threads tho they look gnarly. I'd screw a flash on it and go shoot it. If it's scrap you can't hurt it. If it's still good you saved a lot of work. The pressure at the muzzle is pretty light compared to the rest of the barrel and the FS acts as a reinforcement to the barrel steel. |
|
|
|
[#45]
That's the kicker right there. I guess I'll just have to try it and see. I emailed Steve at ADCO to see what he thinks as well. I might go let it rip this morning, and see if the accuracy is gone to hell (ie crown). Thanks again Tweak, you da man! |
|
|
|
|
[#46]
IIRC, the OAL with a Phantom PAFS is well over 16", long enough to take out that tiny nick. I'd have to check the dims tho.
Thanks JLM, glad to help. |
|
|
|
[#47]
Can you add a little length with a fat washer? Don't know for sure, so I figured I'd ask, for future reference.
|
|
|
|
[#48]
mongo,
I wondered that too. To me it seems like using a fatter washer would leave you less thread for the FS to screw onto. If that's an acceptable solution, it would seem equally true that you could just hack off the 3 mm's of the nicked area, and NOT bother setting the shoulder back on the barrel like Tweak suggested. I honestly don't know either way. I 'think' the Phantom actually gets you out to 16.1 most of the time, but I'm not certain about that. If that's the case I have .1 inch to play with. Kids and their dremel tools  I'd like to take this opportunity to thank Bill Klinton for making me go thru this 
|
|
|
|
[#49]
 I think you're alright with that barrel JLM, it ain't pretty but that's why we love 'em. If anybody asks, it's "custom". |
|
|
|
|
[#50]
Well, good news. I took it out and shot it this morning, and there doesn't seem to be any loss of accuracy whatsoever. I didn't have an extra hider laying around. Makes a nice FIREBALL now ;)
Steve at ADCO said he could cut it down slightly if I wanted, and fit a Phantom for less than 60 bucks. That would include a recrown. I may go that route because I was in the process of trying to sell this upper on the EE. Its only got like 30 rounds ran thru it so far. So, there we are......... |
|
|
 Win a FREE Membership!
Sign up for the ARFCOM weekly newsletter and be entered to win a free ARFCOM membership. One new winner* is announced every week!
You will receive an email every Friday morning featuring the latest chatter from the hottest topics, breaking news surrounding legislation, as well as exclusive deals only available to ARFCOM email subscribers.

AR15.COM is the world's largest firearm community and is a gathering place for firearm enthusiasts of all types.
From hunters and military members, to competition shooters and general firearm enthusiasts, we welcome anyone who values and respects the way of the firearm.

Subscribe to our monthly Newsletter to receive firearm news, product discounts from your favorite Industry Partners, and more.
Copyright © 1996-2024 AR15.COM LLC. All Rights Reserved.
Any use of this content without express written consent is prohibited.
AR15.Com reserves the right to overwrite or replace any affiliate, commercial, or monetizable links, posted by users, with our own.


