|
[#1]
The military REQUIRES that their rifles impact within the limits of the target provided in the milspec. The standard for same are set forth in the milspec.
LMT's email is disheartening. What sight radius and style of rear sight on your LMT upper? [ETA]dammit, knew that didn't sound right. I'm not taking benadryl anymore. That is too f*cked up posts in less than one day. .42 is the change in ELEVATION, not windage. I'm sticking to alcohol from now on. For the carbine length with an A2 rear the POI shift is .17 at 25 yards, or .68 MOA. That works out to almost 18 clicks to correct a 3" error at 25 yards. It would be .13 (1/8") at 25 yards for a 20" barrel. [/ETA] I like my irons to be as centered as possible (within 3 clicks in cool) bc it speeds up target aquisition. Windage has never been a problem with the shooting that I do. |
|
|
|
[#2]
Tweak, its a 16 inch upper with a carry handle. What do you suggest I do here? Nobody seems to think its a big deal.
Isn't it 1/8th of an inch per click at 25 METERS? Thanks man :) |
|
|
|
[#3]
Wait ;)
http://ar15.com/content/manuals/m4a1milspec.pdf Are you talking about 3.4.6?
12 clicks @100 yards, how many clicks does that translate to @ 25 yards? If I'm doing the math correctly, the max acceptable @25 yards would (6 inches @100 for 1/2 MOA clicks) or 1.5 inches at 25 yards? O wait, that would STILL be 12 clicks. In a no wind situation, clicks are clicks. Right? |
|
|
|
|
[#4]
corrected original post good catch JLM allergies are beating my azz.
FWIW, the 100 yard M4 target is 16" wide, the 100 yard M16 target is 11.6" wide. The spec for both the M16A2 and M4 the standard is 12 clicks +/- 5 when zeroed at 100, 11.6 and 11.77 respectively. For the M16A1 and A1 sighted carbines the standard is 6 clicks +/- 5 when zeroed at 100 yards, 5.8 and 5.84 respectively. If you're 3 inches off at 25 you'll be off 4 times that amount at 100. With a 12" error at 100 yards you'll need just over 17 clicks (sound familiar?) to correct the error. Both of my copies of the milspec (M16A2 and M4) show the rear sight should be within +/- 5 clicks of center. That 's from MIL-R-63997B(AR) FEB97 and MIL-C- 70599A(AR) JAN94 If the quoted M4A1 standard of 12 clicks is newer than the one for the M4 then more math is needed. [ETA] I forgot I had a copy of the M4A1 spec and it does indeed say that the rear sight should be +/- 12 clicks for ten shots into a 16" wide rectangular 100 yard target. I see no addendum, amendments or changes to that (MIL-C-71186(AR) JAN94 spec. That is very rare in the military. Perhaps this is the "looser accuracy requirement" for the M4 that some have bemoaned. However, if the 16" and 12 clicks are true, all my previous calcs that have been around for years are now in error and I'm not now in the mood to redo them. Oddly, the M4A1 spec is dated only 11 days from the M4 spec. For future viewers, there is more information here.[/ETA] |
|
|
|
[#5]
See, I got to thinking about that after I posted, and I looked carefully at that target in the link. If I am READING it right, you get 12 clicks to be WITHIN that 16 inch zone on the target, in which case you would still have 8 inches of windage that you would have to account for to reach zero. In other words you could be shooting 8 inches right at 12 clicks and that would be considered acceptable. Or 8 inches to the left at 12 clicks. |
|
|
|
|
[#6]
Correct
|
|
|
|
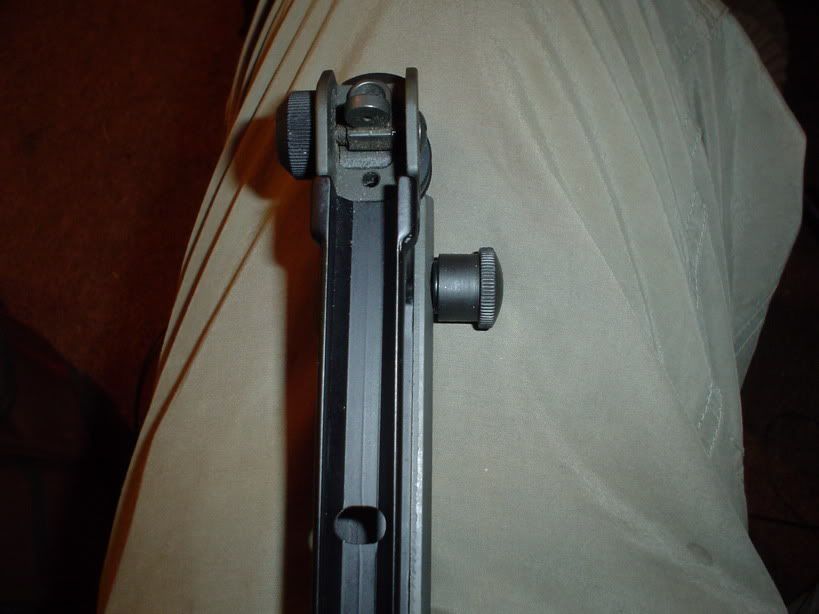
[#7]
Tweak, should my rear sight look like this:
|
|
|
|
[#8]
Yes.
Bob |
|
|
|
[#9]
Did LMT supply the carry handle?
How would you determine whether the "excess" windage offset was due to some FSB cant , vs. a stack up of tolerances in the flat top rail, carry handle base clamps, and aperture itself? Paladin |
|
|
|
[#10]
I think it looks like your rear sight it leaning towards the left (my right)........
|
|
|
|
[#11]
That's nasty but I've seen worse. Run the rear sight base up and see if the offset corrects itself. If so the threads on the rear sight base are probably incorrect. Paladin, You could determine that by switching in other known good parts. |
|
|
|
|
[#12]
Well well well, when I run up to max elevation two things happen: 1. no more side to side play 2. it straightens up the rear base sides relative to the channels on the carry handle. So, if its thread incorrectly, like it looks, what's the next step? |
|
|
|
|
[#13]
"Threaded incorrectly" isn't quite the right description, I typed that post in haste on my way out the door.
The top most, rear most thread on the RSB acts as a stop. It stops on the inside top most edge of the hole the RSB sits in. If that thread is mislocated the RSB will push back from the upper and rock to one side. |
|
|
|
[#14]
So I need a new RSB then?
|
|
|
|
[#15]
If you inspect the threads on the RSB and there is a gap between the last thread (upper most) and the bottom of the rectangular portion large enough that the abutted portion of the upper can slip in between the two then you need another RSB. If the web of the upper is skinny then a new RSB won't help.
|
|
|
|
[#16]
Thanks for all your help.
What's the easiest way to remove the RSB for inspection? |
|
|
|
[#17]
Disassembly is covered in the 23&P, you'll need a pin punch and nerves of steel.
|
|
|
|
[#18]
Time to break out the JB weld to build up the contact rail on the upper receiver, and then re-index the barrel to allow the rear sight to be centered zeroed.
It's that or you need to send the whole mess back to be corrected by the suppliers. |
|
|
|
[#19]
Are you thinking the flattop is perhaps not flat? I just a barrel replaced by BM because it wasn't indexed right, and required 16 clicks left to zero. They were more than happy to do it. It took that upper and the LMT upper out today to do a side by side comparison and got...... BM: so close I didn't even bother to dial in windage. Pretty much dead on LMT: 22 LEFT
I'm going to ask for a RMA, even thou they don't seem to think its a problem. |
||
|
|
|
[#20]
Are you thinking the flattop is perhaps not flat? No to build up the leading edge on the housing to take some of the rear sight cant out of the housing on the upper. Looks like either the upper housing sight slot was milled too far forward, or the front of the sight housing was milled to far back. As Tweak note, see worse, but doesn't mean that you have to live with it. By the way, did the upper and sights come as a unit, or was the sights added on later? |
|
|
|
|
[#21]
Dano, its' the carry handle off my BM upper. No windage issues on that upper now that I have a properly indexed barrel. I used the same handle on both uppers today at the range. BM was fine, LMT was not.
Are you talking about my carry handle here? Thanks..... |
|
|
|
|
[#22]
Apologies for the previous short post, again headed out the door at 1230.
I'll include this here even if you're going to send it back as this thread is now part of the FAQ and someone later on will need the info. Removing the RSB is simple and there are tricks that make it even easier. Reinstalling the RSB is a different matter and the right tool makes all the difference. Check with Brownells and order one or break out your Dremel and a busted punch and make one. The tool is the one to used to compress the elevation spring while you reinstall the retaining pin. It is a vital tool. That said, run the RSB up to a few clicks shy of it's highest point. Don't run it all the way up. Elevating the RSB takes tension off the elevation spring. Drive out the roll pin with the proper sized punch. I usually drive the pin out from left to right. That way the forward assist will hold the upper off your work surface so that the roll pin can come out without interference. I reinstall it from left to right so I don't have to worry about striking the forward assist hump with my hammer or punch. Don't fiddle about with driving out the pin or there is a chance you will catch the edge of the elevation spring. Once the pin punch starts into the roll pin hole DO NOT withdraw the pin punch or the edge of the elevation spring will block the roll pin hole. Drive the pin completely out of the upper. Rotate the upper to its normal orientation and catch the elevation spring. Sometimes you have to fish the spring out with a pin punch or dental pick. Rotate the elevation index to unscrew the RSB. There is a small ball bearing and spring in the front of the RSB. Make sure to catch the ball bearing as the bottom edge of the RSB clears the rear of the upper. Some folks will do this with the upper inside of a large plastic bag. I find it best to remove the spring from the RSB and set it and the ball bearing in a safe place. I use a magnetic parts tray. Unless necessary for repair, do not remove the elevation index or rotate it any farther than necessary to remove the RSB. The only thing retaining the elevation index in the upper is an equally small ball bearing and spring. If you rotate the elevation index after removing the RSB, you will have to re index it when you reinstall the RSB. Neither of these procedures are complex but it’s nice to avoid them if possible. Inspect your RSB. Most of you will be looking at the gap between the threads and the bottom of the flat, rectangular surface. This gap should not be large enough for the web of the upper (between the elevation index and the RSB) to fit. When you’re ready to reinstall the RSB replace the small spring and cover it with a dab of grease then stick the ball bearing to the grease. Reinstall the RSB in reverse. Make sure to start the RSB into the elevation index before turning the index. Rotate the elevation index until the “window” in the shaft of the RSB can be seen through the retaining pin hole. You should double check the fit by sliding the pin punch through the hole and verifying that the pin punch goes THROUGH the shaft of the RSB. Remove the pin punch and start the roll pin into the upper. Do not drive the roll pin in far enough for the end to enter the RSB. Drive the pin in just enough to stay in the upper. I usually drive the pin in from the left side. Insert the elevation spring into the RSB through the bottom of the upper. Make certain that the spring does not kink. Compress the spring with the special tool and completely drive in the roll pin. Make sure to center the roll pin in the upper and that the roll pin is UNDER the elevation spring. You do not want the roll pin going though the elevation spring. Rotate the RSB to its lowest position. The battlesight (8/3, 6/3) setting should align with the vertical index mark on the left side of the upper. The index mark is between the bottom of the RSB and the top of the elevation index. Some makers do not include this mark on their uppers. If the battlesight setting does not line up with the index mark rotate the elevation index so that it does. Insert and Allen wrench of the proper size through the top of the RSB. There is small hole forward of the aperture for this. Loosen the screw that locks the elevation index and the elevation wheel about three or four turns. Do not completely remove the screw, as it is a pain to reinstall. Rotate the index to align the battlesight setting with the index mark once the screw is loose enough to turn the index independent of the wheel. Retighten the screw. If there is any binding go to the nearest whole click and tighten the screw. Sometimes you have to wiggle the wheel (not the index) slightly in order for the screw to catch. Run the RSB through it full range of motion and check for binding. Take a look at the head of the lock screw as it comes into view and make sure you didn’t bugger it up and that is fully recessed into the index. |
|
|
|
[#23]
Tweak my man,
I got an interesting email from Bushmaster this morning:
Hrm, is this true? If I'm reading this correctly, they are saying that allthou the RSB will be twisted to the left slightly by design, the actually aperture itself will NOT be. Mine IS pointing left. |
|
|
|
|
[#24]
The large and small peep apertures are off set to correct for the flip when going between the two (same centering in the housing), but the overall sight its self aligns with the sides of the sight housing.
As for the slight twisting of the sight housing on the upper (or carry handle), again it's normal. On some rigs that I run standard sights, the twisted sight housing/peep doesn't bother me too much. But on rigs that I am going to run a hooded rear sight, any twist of the housing off sets down the hood and really gets on my last nerve. On these DCM type rigs, its best to just change the detent spring and ball out to a two-rod tracking system to hold the hosing rock solid and allow more precise repeatable adjustments. On combat rifles, you want the rear sight housing to be able to take a hit and still self-center/function. But, this still puts us back at the twisted rear sight in the upper housing socket on your rifle. On some uppers, the twist is very light, and on some others, quite twisted. As we have said before, we have seen worse than yours in regards to being twisted. Now if you wanted to take some of the twist out of the rear sight to housing, then the easy way is to just build up the guiding track of the upper with JB weld (the other side than the detent ball tracks). To go the next step in your questions, in regards to the bushy carry handle center zeroing on the bushy it came off of, but not the new LMT upper, then there maybe a difference between the mounting surfaces from the bushy upper/the LMT upper and the carry handle (handle canted over to one side on either the Bushmasters or the LMT). Now to make this really simple, had you purchased a LMT carry handle with the upper, then they would have confirmed that the sights were in line with the bore line. To go one-step father, had you bought one of their sighted carry handles, and the barrel needed to be re-index to center zero the rear sight, if sure that they would have done this without question. But since you are using a different brand of carry handle that may be slightly different spec than their own, they can only bore sight the front tower off the centerline of the flat top receiver. Final tweaking of the barrel to index the FSB to the "other than their own" carry handle will need to be done by you. As for your Bushmaster carry handle indexing with a Bushmaster rifle, it's there own parts and should do so. Again, the fact that Bushmaster handle does not rear sight center index to the LMT upper just means that each manufacture mills to slightly different specs (+/-) and although parts drop on, tweaking may be required for fine tuning. The real question is whether the LMT upper will center rear sight zero with a LMT carry handle, and the only way that you will find that out is to buy one of there carry handles to test. If the LMT upper with a LMT carry handle does take more than 13 clicks to off center to zero, then it's time to send them the upper back to have them correct the FSB index problem. Bluntly, the
|
|
|
|
|
[#25]
What Dano said.
Check the FAQ under "excess elevation" for more about carry handles and flattops. |
|
|
|
[#26]
I'll take a look at that, thanks :)
Indeed, I'm guessing that's what they did, because it was a stripped upper that I purchased. Allthou on the QC tag that was hanging off the front sight, they have to box for "REAR SIGHT FIT/FUNCTION" checked for some reason. Hard to say exactly what that means really. Did they put one of THEIR handles on it and bore sight it? I don't know one way or another. I do know that I finally talked them into issuing me a RMA number. As I myself look down the centerline of the flattop, its fairly clear to me that the FSP is canted to the left. You guys have been most helpful, thanks :) I think I'm going to invest in some barreling tools here in the near future, it sounds like they would be well worth the money. |
|
|
|
|
[#27]
tagged...
my M1S a3 carbine has to be turned 3 full turns RIGHT on the NM rear in order to zero at 25yds. :( |
|
|
|
[#28]
Tweak,
Good news. I'm getting a whole new upper from LMT. Supposedly it shipped out today. I was doing some reading over at TF, and found your post about reliability testing. So, the first thing I am going to do is load up 4 30 rounders, and dump them as fast as I can. If the gun doesn't run right, then it will go back AGAIN until they get it right. Thanks for your help again :) |
|
|
|
[#29]
You're welcome JLM, let us know how it fares.
|
|
|
|
[#30]
Tweak, I just thought of something: I should probably run your 'mag dump' test with an H Buffer, in order to get a valid 'result' right?
|
|
|
|
[#31]
If you're running a 14.5" yes.
|
|
|
|
[#32]
But not for the 16's eh?
|
|
|
|
[#33]
Not IME.
|
|
|
 Win a FREE Membership!
Sign up for the ARFCOM weekly newsletter and be entered to win a free ARFCOM membership. One new winner* is announced every week!
You will receive an email every Friday morning featuring the latest chatter from the hottest topics, breaking news surrounding legislation, as well as exclusive deals only available to ARFCOM email subscribers.

AR15.COM is the world's largest firearm community and is a gathering place for firearm enthusiasts of all types.
From hunters and military members, to competition shooters and general firearm enthusiasts, we welcome anyone who values and respects the way of the firearm.

Subscribe to our monthly Newsletter to receive firearm news, product discounts from your favorite Industry Partners, and more.
Copyright © 1996-2024 AR15.COM LLC. All Rights Reserved.
Any use of this content without express written consent is prohibited.
AR15.Com reserves the right to overwrite or replace any affiliate, commercial, or monetizable links, posted by users, with our own.


