


[ARCHIVED THREAD] - OK. I guess I'm building a guitar. NOW A GENERAL GUITAR BUILD THREAD. (Page 2 of 6)

|
That looks great. The black pick guard was a good choice. I started learning to play a month or so ago with a cheap squier strat. I find myself really wanting to build a guitar from one of those kits I’ve seen for sale. Seems like this sort of thing would be a fun project. |
|
It was a fun project, but kinda scary at times. I'd do it again in a heartbeat, though. You should go for it. Always afraid I was going to mess up and destroy the body, but then I got to thinking...it was only $35 on eBay...who cares? Never thought when I played back in the early 2000's that guitar parts would become commodities. I think I'm building a Tele next...lol. |
|
Quoted: I think I'm building a Tele next...lol. DO EET. I'm building (actually converting an existing tele I built years ago) to a baritone. Never built a baritone neck before, so I had to completely retool everything...my neck gauges were all wrong, my straight edge wasn't long enough...lol. |

|
OK. Debated about whether to do this, but doing it will definitely motivate me to practice more and get better. I recorded a song over the past two days. Basically, a proof of concept to test out how the guitar sounds and to see if I can get a decent recording setup on my laptop. It's only a minute or so long. I have my processor running into an old 4 track recorder that I use as a mixing board. Since my laptop doesn't have an external mic, I ordered a USB sound card off of eBay. So I can run out of the 4 track into the USB sound card's mic jack and into the computer. It's kinda Rube Goldberg, but it works very well. To start, I found a drum track on Youtube. You can find all kinds of them, any type of speed, any style, etc. I imported that into Audacity, then played a "bass" line with my Partscaster. I then used the "Change Pitch" tool to drop the guitar down one octave to a bass. That worked far better than I could have imagined. Then I added a rhythm track, and did what all amateur guitarists do...covered their inadequate playing with lots of phaser and tremolo...lol. Then, added a lead track, trying to cover my inadequate playing with lots of overdrive. I've played more in the last two days than I have in the past decade. I can't remember riffs and there are times where my hands simply won't do what I want them to do. Grrr! The guitar sounds pretty good! It's not set up yet, and the strings are 9's, which are kinda gross, and I can't get the sustain I want because my fingers are physically too weak to push the strings down tightly...lol. I've lost a LOT of dexterity, and I hope it will come back. But, I'm happy with the tone, especially on the neck pickup. It really seems like it's got some punch to it. So here it is. It sounds a little like Prince meets Boz Scaggs meets a 70s adult film musical composer. Be gentle! https://www.sndup.net/8vvy/firstprojectfinal.mp3 |
|
Quoted: OK. Debated about whether to do this, but doing it will definitely motivate me to practice more and get better. I recorded a song over the past two days. Basically, a proof of concept to test out how the guitar sounds and to see if I can get a decent recording setup on my laptop. It's only a minute or so long. I have my processor running into an old 4 track recorder that I use as a mixing board. Since my laptop doesn't have an external mic, I ordered a USB sound card off of eBay. So I can run out of the 4 track into the USB sound card's mic jack and into the computer. It's kinda Rube Goldberg, but it works very well. To start, I found a drum track on Youtube. You can find all kinds of them, any type of speed, any style, etc. I imported that into Audacity, then played a "bass" line with my Partscaster. I then used the "Change Pitch" tool to drop the guitar down one octave to a bass. That worked far better than I could have imagined. Then I added a rhythm track, and did what all amateur guitarists do...covered their inadequate playing with lots of phaser and tremolo...lol. Then, added a lead track, trying to cover my inadequate playing with lots of overdrive. I've played more in the last two days than I have in the past decade. I can't remember riffs and there are times where my hands simply won't do what I want them to do. Grrr! The guitar sounds pretty good! It's not set up yet, and the strings are 9's, which are kinda gross, and I can't get the sustain I want because my fingers are physically too weak to push the strings down tightly...lol. I've lost a LOT of dexterity, and I hope it will come back. But, I'm happy with the tone, especially on the neck pickup. It really seems like it's got some punch to it. So here it is. It sounds a little like Prince meets Boz Scaggs meets a 70s adult film musical composer. Be gentle! https://www.sndup.net/8vvy/firstprojectfinal.mp3 Sounds good. |
|
OK. Second attempt. Every instrument in this song except the drums is the Partscaster. Found a drum track on Youtube. Had to "customize" it a bit...add a ride cymbal here, a crash there, etc. Lots of cutting and pasting in Audacity. Finally got it the way I wanted it. Then, recorded the guitar playing the bass line and transposed it down one octave in Audacity. Added the rhythm guitar track. Then, I duplicated the guitar track, transposed up one octave, and added some reverb. Viola! Mandolin...ish....thing! Then, harmonized lead tracks. I left room for vocals. Gotta figure something out. I still need to adjust the mix a bit, but it's coming together. https://www.sndup.net/5m8c/proj2.mp3 |
|
Quoted: Did a whole can of polyurethane today. Went out every 1-1.5 hours and put another coat on. Finished up the last one just a while ago. https://i.imgur.com/wLXuevo.jpg Even without anything else being done, it still looks better than the Tru Oil. That's probably my fault though. All I know is, when I go to wet sand, I'm not going to burn through the finish.  Gonna let it dry for a day or two then wet sand. After that, I guess I'm gonna start drilling holes in it...  That's a really stunning look. Wow. I may have to build my own telecaster now. |
|
Quoted: Complete change of gears. Got to thinking about the LP blue finish. It would look just like a factory Strat. I can get a factory Strat by buying a factory Strat. But, I can make something that doesn't look like a factory Strat...or any other Strat, or any other electric guitar for that matter. So, I made grain filler out of wood filler and black paint, diluted it with a little water to make a thin paste, then filled the entire body of the guitar... https://i.postimg.cc/7hym4Dm5/IMG-20200716-191426466.jpg Then, sanded back to wood: https://i.postimg.cc/5y6NxdyM/IMG-20200716-201723040.jpg Then, hit it with the blue dye: https://i.postimg.cc/Jhktj3rV/IMG-20200717-094742439-HDR.jpg Distressed the grain a bit by sanding: https://i.postimg.cc/Yqd2YcRc/IMG-20200717-162012459.jpg And now, layering on the Tru Oil... https://i.postimg.cc/qgVD9cDZ/signal-attachment-2020-07-19-164143.jpg Added bonus...the Tru Oil is a bit yellow, so it's slowly turning the color turquoise. I'm OK with that...lol. If you get a brass wire brush wheel for your hand drill, you can use it to sand into the grain on ash, creating some texture. The more you use is, the deeper the grain grooves. Use it with the wheel rotating with the grain, not across it. The dark grain areas will sand away faster than the tighter grain. Wipe it with black stain (as you did), wipe it off, let it dry, then add the trans blue (or other contrasting color). You'll get the effect of the Fender "sand blasted" finish. |
| Absolutely gorgeous. My grandfather had an auto body shop, and my mom even worked there during HS but I guess its a gene that skipped me because I don't the patience for fine finishes, more of a barncaster kind of guy. I'll build engines but wetsanding primer is as far as I go with finishing lol. I still have this stack of studwood, nail holes and all, from a 1920's house in Corpus Christi that I plan to build a Tele out of. Its easily 200 year old wood based upon my research of what wood was harvested back then. Problem is its 1.5" thick so I need to back it with maybe 3/8" maple after its planed as you really need 1.75" for a proper Tele. |
|
Absolutely beautiful! |
|
After almost 3 months, I'd say I'm probably back to 70-80% of the skill level that I was when I stopped playing. I've been doing several "proof of concepts"...just throwing together song ideas in a 1-2 minute format to see how they work. This one is a melody that my buddy and I wrote in college, almost 30 years ago.. I don't even have a playable copy of it. I remembered the melody and re-created it. Haven't talked him in years...I'm trying to make contact with him to see if he'll put a keyboard track on it (I think that would put it over the top). Leaps and bounds better than my first efforts earlier this summer. The guitar sounds AWESOME. Literally every sound you hear except for the drums came from this guitar. I've started calling it the Muttcaster because it's got DNA of 3-4 different guitars in it... https://sndup.net/3x5k/proj4.mp3 Everything played through a Blackstar Fly 3 amplifier (powered by 6AA batteries), and recorded track-by-track with a cellphone. Seriously. Can't wait to finish my Telecaster. |
|
Okay, I'm one step closer to starting my Tele build. Pawnbrowsing turned up a like new plunge router today for $39: Attached File A sampling of the 200 year old pine I plan to turn into a plank and get 2-3 guitar bodies out of. Its seen a few hurricanes in the 100 years it was actually someone's home. Attached File |
|
Body blank ready to glue. Attached File Got a couple of these Gretsch dual coil (humbuckers) pickups nicely aged off Reverb for cheap. They come in the Electromatic series G5120 semi hollowbody and the G5425 Jet Club and are kind of a cross between a traditional Gibson humbucker and a Filtertron, and are humbucker sized. Attached File How about a sound sample of these pickups in Czech   Gretsch G5425 Jet Club (Honza Šobr) |
|
Centerline will be along glue joint, and there will not be a cap or back layer to stabilize it, but i think I can get a solid enough glue joint to attach neck and bridge to different plankssingle plank. i will be unable to use a 3 screw bridge for this reason. Parts list: Wilkinson tele compensated half bridge $25. Neck? Not sure. If body goes well i may invest more in a Warmoth neck. Wilkinson EZ Lok tuning machines $25. If i can find some cool open gear machines i may go with them. Pickguard of my own design and build. Controls: considering volume only, Les Paul type toggle, output jack on pickguard. Body: forearm and body cut. Three screw (or offset 4 screw) neck joint with beveled heel. PRS lower horn carve: Attached File Attached File ETA: Houston, we have liftoff... well, we have glue & clamps... Attached File |
|
edited...gonna try and get 1.5" out of the plank i have. 50's Tele's are only 1.5 so we'll see. Received pickups and they were in better shape than thwy looked, just mungy with a lot if DNA on them. Really nice chrome steel pickup rings. Attached File |
|
Quoted: One thing I would do different - get new, good tuning machines. Life is too short to be constantly re-tuning. The tuning machines came off the Harmony and they work surprisingly well. I only have to tune once in a great while. In fact, I'll say the thing stays in tune better than many other Stratocasters I've had. I was figuring on having to replace them, but they're GTG. Probably from when Harmony made guitars in Japan for a while. |
|
Got a $90 bandsaw off CLIST today to make the templates easier. They're rough and need some shaping/sanding. I jacked up the neck pocket but only by 1/16" so I'll add some material instead of re-cutting it. Attached File Attached File thinking about the S1 switch "cabronita especial" wiring harness. Anyone here have a cabronita especial? |
|
Quoted: How did you make your templates? Diagram from the Internet? Order plans? Other? Free! Page 28, post #542 has a download link for detailed blueprint in pdf format. It was $3.77 to print out as a blueprint to scale at OfficeDepot. $10 for the 2'x4"x1/2" mdf at the orange depot. https://www.tdpri.com/threads/d-size-tele-body-blueprint-files-here.74504/page-28 |
|
Quoted: Free! Page 28, post #542 has a download link for detailed blueprint in pdf format. It was $3.77 to print out as a blueprint to scale at OfficeDepot. $10 for the 2'x4"x1/2" mdf at the orange depot. https://www.tdpri.com/threads/d-size-tele-body-blueprint-files-here.74504/page-28 Quoted: Quoted: How did you make your templates? Diagram from the Internet? Order plans? Other? Free! Page 28, post #542 has a download link for detailed blueprint in pdf format. It was $3.77 to print out as a blueprint to scale at OfficeDepot. $10 for the 2'x4"x1/2" mdf at the orange depot. https://www.tdpri.com/threads/d-size-tele-body-blueprint-files-here.74504/page-28 With the proper software, you should be able to print it at home in patchwork, then splice it together. Adobe Illustrator and/or most publishing software will tile an oversize print image. But if you lack any of that, the $10 output is a bargain compared to the cost of an Adobe program. Edit. Dyslexic are I. Less than $4 for output. Definite bargain unless you're already Adobe equipped. |
|
Quoted: With the proper software, you should be able to print it at home in patchwork, then splice it together. Adobe Illustrator and/or most publishing software will tile an oversize print image. But if you lack any of that, the $10 output is a bargain compared to the cost of an Adobe program. Edit. Dyslexic are I. Less than $4 for output. Definite bargain unless you're already Adobe equipped. i tried the patchwork method on my laser printer and it does work well. best to put it up on a window and tape it together/fill in the lines. I couldn't find the exact blueprint for my control and pickup layout so i mixed and matched drawings to create mine. Free adobe reader will print to full scale. |
|
Quoted: i tried the patchwork method on my laser printer and it does work well. best to put it up on a window and tape it together/fill in the lines. I couldn't find the exact blueprint for my control and pickup layout so i mixed and matched drawings to create mine. Free adobe reader will print to full scale. I'm old school, and would make an inch grid on a piece of poster paper and scale it up like that. I tried the "tile print" thing, but it would either come out too big or way too big. |
|
[queue Rocky theme music] Oh yeah, I'm going to f'n town this weekend. Spindle Sander in hand. Attached File ETA: more parts inbound.. Wilkinson Half Tele Bridge with brass comp saddles Bourns No Load 500K tone pot (already have polyester film .022uf cap for it) CTS 500k volume Switchcraft Les Paul style 3-way toggle Switchcraft jack Curved Neck plate. Attached File Attached File (ifigured everyone knows what switches look like) |
|
Quoted: [queue Rocky theme music] Oh yeah, I'm going to f'n town this weekend. Spindle Sander in hand. https://www.AR15.Com/media/mediaFiles/300247/IMG_20201001_220747571_jpg-1616060.JPG That has some great potential! Congratulations. |
|
Made some progress and broke out the router today too. Figured out some important router lessons but nothing too bad it won't blend into to the aesthetic if this build. Attached File Attached File Attached File Attached File |
|
You can see the immense amount of chip out i had. The one in the back of upper bout will be blended into the body cut. Because of all the the chip out, I'm going to hand sand the round over instead of routing with 1/8" bit as is the tele spec. This keeps with my plan of making some deviations from tele specs in a few places. The nail hole in the neck pocket worries me a bit. On a whim I ordered a cheapish ebay rosewood tele neck . It'll be good fretwork practice. This wood was very difficult to route, for pine it was very hard, and even making shallow passes i was getting a good amount of kickback. Could be my Amazon router bits or my technique I guess also. My templat3pe had some flaws and i was able to make some slight deviations eyeballing as I went. One screw hole would've blended in a nail hole but got my template mounted wrong, now i have two screw holes that will be visible north of the pickups (arghhhh). The other four will be under the pickguard. Since this body was thinner (1 9/16") my control cavity left a pretty thin layer of wood in the bottom, was a nailbiter routing it, praying nothing broke loose. I used a 1" forstner bit and hand drill to remove as much material as possible before routing cavities but just went in dry on the neck pocket. Decided to do 26 gauge steel pickguard that will be hybrid of Cabronita and Deluxe (no upper switch) with jack mounted on the pickguard. It will begin below the pickups. I'll give it some patina and seal it. Will contrast nicely with the shiny bits. Thought about aging the bridge and pickups/rings but i think the contrast of old wood and chrome will look good and I can always etch them later. |
|
I think the chips and the nail holes are going to make it better. It will add character. You're making it out of barn wood, and barn wood has chips and nail holes. How are you planning on finishing it? Man, this makes me want to build another one. Don't know if I mentioned it, but I asked my Dad, who is an expert woodworker, to make me a Tele body. I already have the neck and some of the hardware. I told him to surprise me on the body. Make me something cool, but do it the way he wanted. Last update, he was looking for cherry and maple. He said he needed to build some jigs, because he wanted to use some bent wood in the designs. When he gets it done, I'll post it here. |
|
The wood was studwood salvaged from a 1920's home that was torn down in Corpus Christi. I was renting a house in the same area and drove by one day and saw the demolition, came back with my demo tools and pulled out as much good stuff as I could get my hands on. I also salvaged some tongue and groove floor and wallboard, which i used to make matching sets of benches for my family members. My sister was a forester before teaching and told me the wood is about 200 years old. The Corpus Christi thing has some personal significance which I won't go into. The donor house was built following the 1919 hurricane that the storm surge wiped out the entire area the house was built in. From my research it has been submerged by storm surge twice. Since it's studwood it 50's Tele thickness so I couldn't take it down too far, why I didn't want to take it to have it planed, just took it down carefully with the belt sander. Whatever the saltwater did for the wood, made it very difficult to work down with the belt sander, even with 80 grit. Attached File Going for this type of heel: Attached File ETA: I thought " OK. I guess I'm building a guitar" was a great name for a general electric guitar building thread 
|
|
Neck joint sorted out and body and arm cut done. Didn't leave as much meat on the bone as I should have for the outer two neck screw holes. I really cut it too close for a neck joint of this type and may regret it. Hoping the unusual hardness of this lumber keeps it from cracking when I tighten down the neck. Body cuts were shallower because frankly it was a PITA to make them any deeper and they make it more comfy than my traditional cut Tele where I stopped.. Attached File Attached File Attached File Attached File Attached File |
|
Quoted: That thing is looking AWESOME. Like the contour of the neck mount. What kind of finish are you planning on doing? Thanks! Just got back from Ace Hdw with Tung Oil and a 12" drill bit. I though Tung Oil would keep more of the natural character than anything else, plus I'll need it for finishing the neck. It was a nail biter drill one hole straight thru from the neck pocket to the bridge pickup cavity, then another from control cavity to bridge pickup cavity, but no problem other than the holes terminating a little low (Ah cain't do angles...).. The cavities are a little ugly bc they will be covered completely by the pickup and ring. Also working on pickguard template. Attached File Attached File |
|
I ran into the same problem (hole angle drilling) when I did the tremolo screws in the back of the Muttcaster. I worked around it by drilling with my Dremel instead of a drill. How did you drill the holes in your body? Also, is the pickguard going to be a semi Thinline style? The tone and volume will control both pickups simultaneously? I would like to have a double humbucker guitar. I thought about getting an Indio 66 and just doing improvements to it, but it's likely I could go the route you're going and end up saving money. Plus, it would be a lot more fun... I can't wait to see how your Telecaster is going to end up. I'm already buying parts for mine. I got a neck from eBay for $45. It looks really good for the price. Color is yellow vintage, finish is super glossy, yet the back of the neck is not grippy at all.     I also had been looking at one of those fancy bridge/switch cover setups.  I might have to replace the saddles if they don't work well, but it looks pretty awesome. Not crazy about the smallish pearloid knobs, so I'll probably replace those with standard chrome ones, unless I find something that goes with the vine pattern. Bridge does top-load, though, so Dad won't have to drill holes through the body. I can't post any pics of the body construction, because it's technically supposed to be a surprise. I'm sure it's going to be good. Dad once built an acoustic guitar from scratch...  And I mean, he did everything...laminated the fretboard, set the frets himself, carved the design on the headstock, etc. I need to take some pics of it the next time I go up there. So, a Telecaster body shouldn't be any big deal for him to make... |
|
I just took the bridge/pickups/control set apart that I ordered. This thing is actually nice. Pickups are advertised as Alnico V pickups. The volume and tone pots are huge. At least as big as the 500K pots I have in my Muttcaster. And, what appears to be a real 715p Orange Drop capacitor. I was figuring on having to upgrade some of the parts down the road, but this may be alright. 
|
|
I did the holes with a 12"Lx 1/4" drill bit. 3 pilot holes in the thin wood of the neck pocket before going in... My neck was $38.63 from ebay so I know I'm in good company here. About 10 days out. Attached File Got all the pots and switches over the weekend. The Bourns no-load tone pot is really cool, has a detent when you go from 9 to no-load. |
|
Quoted: I did the holes with a 12"Lx 1/4" drill bit. 3 pilot holes in the thin wood of the neck pocket before going in... My neck was $38.63 from ebay so I know I'm in good company here. About 10 days out. https://www.AR15.Com/media/mediaFiles/300247/s-l400__5__jpg-1620770.JPG Got all the pots and switches over the weekend. The Bourns no-load tone pot is really cool, has a detent when you go from 9 to no-load. If your neck ends up looking as good as mine, I think you'll be happy with it. Sounds like we might have gotten them from the same place. |
|
Word. Here's one I did with my uncle back around 2004. This was back before camera phones, so I didn't get many photos of the build in progress. The front and back panels are bookmatched. Neck is quarter sawn mahogany, rotated, and glued back together. The bracing on the inside we made from the blueprints for earl 1900 taylor guitars. The inside of the guitar is the most beautiful part. The sides, we soaked the wood in a kiddie pool and then heated a 4" metal pipe with a blow torch and bent the wet wood around it. Binding around the front and back of the body, up the neck and around the headstock. The pick guard and truss rod cover are cut from cocobolo. The one thing I remember from that stuff is the saw dust made you really itchy. Curly maple cap at the base of the neck and on the ass end of the body where a strap would mount. All the diamond inlays on the neck, I laid out and then cut out the diamond holes with a dremel. Inlay on the headstock is a B, for my uncle's last name. Bowman. He cut the b out of a sheet of the material using a hand held coping saw. Fingerboard is compound radiused. We tried a few different ones and settled on the one that fit my hands and playing style the best. Shape of the headstock, pick guard, and the accent at the end of the fret board, I free handed or traced some curves from some different shape cans laying around the ship. For the finish, we sanded, sprayed, sprayed, and then wet sanded and buffed. I spent a solid 5 days with little pieces of sandpaper setting on a stool wet sanding this thing. The label inside, we whipped up in MS paint, literally. On my grandma's computer and printer. This one is serial number 008 out of my uncle's garage workshop. The whole guitar took about 40 days with the 2 of us working on it all day. A lot of the time was spent waiting on glue or paint to dry. 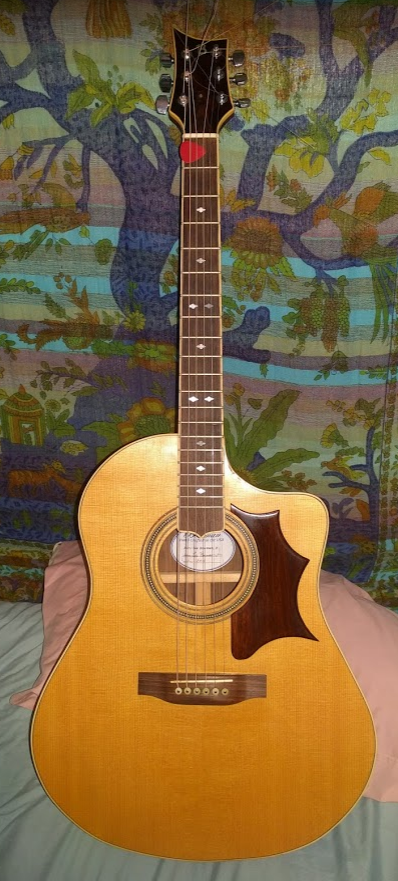 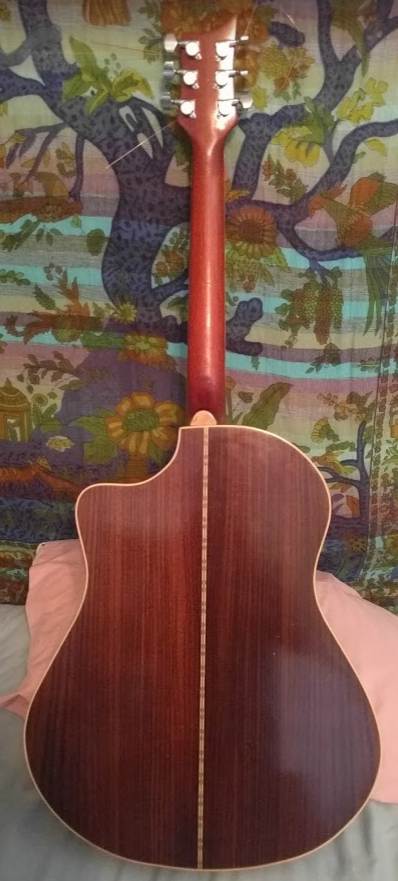 This one was actually my first electric guitar. I got it back when I was like 13 or 14. Pawn shop epiphone. It plays really fast with the maple fret board. In 10th grade (I reckon I was about 15), the electronics crapped out on it. It turned into a little project then. I ended up sanding it down and scrapping all the electronics. Took it to school and had a friend color it with colored pencils. I cobbled together some electronics from some old pickups and potentiometers. Soldered them together with junk speaker wire, and mounted everything with parts from my erector set and JB weld. This guitar stayed with me through highschool and into the "after high school party" phase. My room mate played it in his band. It even did some touring with him when he played the smaller stages at warped tour. Then one day out of the blue, a decade later, I ran into that friend who had colored this guitar. About 15yr after high school, we started dating and ended up getting married. So this guitar holds some special sentimental value. 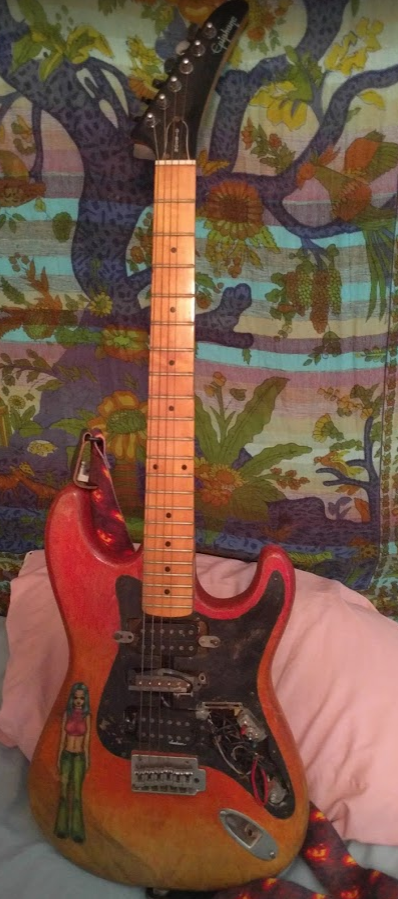
|
[ARCHIVED THREAD] - OK. I guess I'm building a guitar. NOW A GENERAL GUITAR BUILD THREAD. (Page 2 of 6)
Join the Community
Your next conversation starts here.
Create your free account to join discussions, share your experience, save topics, and connect with the AR15.COM community.
- Join discussions
- Follow topics and replies
- Connect with fellow enthusiasts
Already a member? Sign in
Stay informed by subscribing to our Newsletter