|
[#1]
First the dragon, and now THIS?
Oh man... I am in heaven! |
|
|
|
[#2]
Update 12/16
Ok, here is my mess up. You can see way too much "white" where I rubbed it off with sandpaper. It's just not the look I was going for this time.  IMG_20141215_071843_977 by guns762, on Flickr" /> IMG_20141215_071843_977 by guns762, on Flickr" />
Here it is after I went back and darkened up those areas just a bit. It's not quite this dark, as it was still wet, but darker than the previous photo.  IMG_20141215_084522_443 by guns762, on Flickr" /> IMG_20141215_084522_443 by guns762, on Flickr" />
This is after going back over the cracks again and darkening them up to enhance them just a bit. It looks lighter than the last photo, but it's just the way the camera picked up the light. This is now done, and I need to get started on the texture of the wall base next.  IMG_20141215_103144_874 by guns762, on Flickr" /> IMG_20141215_103144_874 by guns762, on Flickr" />
|
|
|
|
[#3]

Well that was fun.  I just pulled a coyote skin out of our 55gal tumbler that is about 1/3 full of corn meal. The tumbler barrel is on its side with a door/hatch. I had the door open and was getting ready to put the skin back in for another hr, when all of the sudden, the damn thing turned on. I just pulled a coyote skin out of our 55gal tumbler that is about 1/3 full of corn meal. The tumbler barrel is on its side with a door/hatch. I had the door open and was getting ready to put the skin back in for another hr, when all of the sudden, the damn thing turned on.The switch is on the bottom, and I wasn't any where near it....fuck, about 5 gal worth of corn meal just spilled all over the floor, as the hatch was still open. Luckily, it didn't tear the skin, as it was half in and half out when it started up.
fucking aliens. |
|
|
|
[#4]
Quoted: The switch is on the bottom, and I wasn't any where near it....fuck, about 5 gal worth of corn meal just spilled all over the floor, as the hatch was still open. Luckily, it didn't tear the skin, as it was half in and half out when it started up.
fucking aliens teenagers. FIFY. Can't wait to see that on YouTube from the hidden camera in your classroom.
|
|
|
|
[#5]
Quoted:
FIFY. Can't wait to see that on YouTube from the hidden camera in your classroom. Quoted:
Quoted: The switch is on the bottom, and I wasn't any where near it....fuck, about 5 gal worth of corn meal just spilled all over the floor, as the hatch was still open. Luckily, it didn't tear the skin, as it was half in and half out when it started up.
fucking aliens teenagers. FIFY. Can't wait to see that on YouTube from the hidden camera in your classroom. That would be funny as hell to watch. I wish there had been students there to see it and video it. At least I could have gotten help cleaning that mess up. |
|
|
|
[#6]
Quoted:
Well that was fun. get the custodian to replace the switch (see what I did there...) lots of switches arent really all that well sealed and when they get crud in them either fail to make contact or fail to switch off bet its full of corn meal
|
|
|
|
[#7]
Quoted:
get the custodian to replace the switch (see what I did there...) lots of switches arent really all that well sealed and when they get crud in them either fail to make contact or fail to switch off bet its full of corn meal
Quoted:
Quoted:
Well that was fun. get the custodian to replace the switch (see what I did there...) lots of switches arent really all that well sealed and when they get crud in them either fail to make contact or fail to switch off bet its full of corn meal
funny thing.....his brother donated the unit to us, as he decided he didn't need it. His brother is an amateur taxidermist. It was a very generous donation. |
|
|
|
[#8]
Quoted: funny thing.....his brother donated the unit to us, as he decided he didn't need it. His brother is an armature taxidermist. It was a very generous donation. I'd love to see some of his stuffed armatures.
|
|
|
|
[#9]
Quoted:
I'd love to see some of his stuffed armatures. Quoted:
Quoted: funny thing.....his brother donated the unit to us, as he decided he didn't need it. His brother is an armature taxidermist. It was a very generous donation. I'd love to see some of his stuffed armatures. LOL.....got to love auto correct sometimes. |
|
|
|
[#10]
Quoted:
LOL.....got to love auto correct sometimes. Quoted:
Quoted:
Quoted: funny thing.....his brother donated the unit to us, as he decided he didn't need it. His brother is an armature taxidermist. It was a very generous donation. I'd love to see some of his stuffed armatures. LOL.....got to love auto correct sometimes. Texting my girlfriend it often suggests striptease. |
|
|
|
[#11]
Quoted:
Well that was fun. I just pulled a coyote skin out of our 55gal tumbler that is about 1/3 full of corn meal. The tumbler barrel is on its side with a door/hatch. I had the door open and was getting ready to put the skin back in for another hr, when all of the sudden, the damn thing turned on.The switch is on the bottom, and I wasn't any where near it....fuck, about 5 gal worth of corn meal just spilled all over the floor, as the hatch was still open. Luckily, it didn't tear the skin, as it was half in and half out when it started up.
fucking aliens. Can never trust a yote! |
|
|
|
[#12]
Update 12/18
More rock texture today, but not much. It was just too busy to get much done. ETD : I have having a hell of a time coping url with my new tablet. 
This is just after applying the rock mix. It's wet and rough.  </a> </a>
IMG_20141218_083127_564 by guns762, on Flickr" /> After it dries a bit, I can go back and smooth out the texture to the more smooth feel that I want. I can also add cracks, and clean crisp edges in some area.  </a> </a>
IMG_20141218_084935_221 by guns762, on Flickr" /> 
IMG_20141218_123542_123 by guns762, on Flickr" /> |
|
|
|
[#13]
Update 1/5
I was way too lazy over the break, and my 10 month old GSD pup wanted too much of my time, so I never made it in to work on this project. Today I again started adding more texture to the base. I'm renewed in creating more details, so that's probably a good thing. I was trying to get more small protrusions. I like what is happening, but I think I need to work on not making them too much the same, or splitting them all the same. 
Tomorrow, I'll get more done.  </a> </a>
20150105_152821 by guns762, on Flickr" /> |
|
|
|
[#14]
Thread hijack here. I stumbled as I was splitting the belly skin on my wife's 10 point buck she shot on Sunday and split the hide all the way through the chest to the neck/chest intersection. I have been told this hide is no unusable for a mount. is this true it's an old buck and his face is all scared up I don't want to use another hide.
Eta going for a shoulder mount on this one |
|
|
|
[#15]
Quoted:
Thread hijack here. I stumbled as I was splitting the belly skin on my wife's 10 point buck she shot on Sunday and split the hide all the way through the chest to the neck/chest intersection. I have been told this hide is no unusable for a mount. is this true it's an old buck and his face is all scared up I don't want to use another hide. Eta going for a shoulder mount on this one Hide can still be used if you have a good taxidermist, just be aware that you'll have a visible seam they'll have to close. The guy I use gets stuff like that all the time. |
|
|
|
[#16]
Quoted:
Hide can still be used if you have a good taxidermist, just be aware that you'll have a visible seam they'll have to close. The guy I use gets stuff like that all the time. Quoted:
Quoted:
Thread hijack here. I stumbled as I was splitting the belly skin on my wife's 10 point buck she shot on Sunday and split the hide all the way through the chest to the neck/chest intersection. I have been told this hide is no unusable for a mount. is this true it's an old buck and his face is all scared up I don't want to use another hide. Eta going for a shoulder mount on this one Hide can still be used if you have a good taxidermist, just be aware that you'll have a visible seam they'll have to close. The guy I use gets stuff like that all the time. Yup, and if the taxidermist is worth anything, the seam is usually not visible. It depends a lot on the thickness of the cape hair. Early capes from Aug.-Sept will be more difficult to hide the seam. If the hair is cut along with the cape along the cut, it's more work. All the cape with cut hair will have to be removed, then sewn back together to keep it from showing. We get more spots on capes where the skinner accidentally runs the knife across a patch of hair, and cuts it. It all has to be removed, just like the burned hair from the bullet entrance/exit. I'll show how to do that later when I actually get started on the cape of this moose. |
|
|
|
[#17]
It's cut in a straight line down the center from the Inside. Nice clean cut, I just went on auto pilot. I skin 100-1 no mount vs mount. Ok thanks for the info, now I just have to find a good taxidermist.
|
|
|
|
[#18]
Quoted:
It's cut in a straight line down the center from the Inside. Nice clean cut, I just went on auto pilot. I skin 100-1 no mount vs mount. Ok thanks for the info, now I just have to find a good taxidermist. It really shouldn't be that bad. I've had students fix antelope and mule deer cut that way, but their hides and capes are pretty thick during hunting season. It was not visible on any of them, except one that was a pretty poor student. |
|
|
|
[#19]
Quoted:
It really shouldn't be that bad. I've had students fix antelope and mule deer cut that way, but their hides and capes are pretty thick during hunting season. It was not visible on any of them, except one that was a pretty poor student. Quoted:
Quoted:
It's cut in a straight line down the center from the Inside. Nice clean cut, I just went on auto pilot. I skin 100-1 no mount vs mount. Ok thanks for the info, now I just have to find a good taxidermist. It really shouldn't be that bad. I've had students fix antelope and mule deer cut that way, but their hides and capes are pretty thick during hunting season. It was not visible on any of them, except one that was a pretty poor student. I am considering doing the mount myself but not sure if I want to invest the time. I have never done it but I have tanned hides and skinned lots of animals and even fish for mounts. |
|
|
|
[#20]
Update 1/7
Finally got all the rock work done...at least for now. Later today, I'll get some paint on some of it. Getting closer to the actual "taxidermy" work.
 </a>20150107_083826 by guns762, on Flickr" /> </a>20150107_083826 by guns762, on Flickr" />

20150107_083814 by guns762, on Flickr" /> |
|
|
|
[#21]
I can't wait for the motion-sensor pivot servos
|
|
|
|
[#22]
Update 1/9
Finally, I'm finished with the rock painting. That was a lot of real-estate to paint. I can finally get started with the actual mount now. First up will be getting the horns mounted to the form. Not sure I'll have time to do that today, but for sure on Monday.
 20150109_082448 by guns762, on Flickr" /> 20150109_082448 by guns762, on Flickr" />
 20150109_082502 by guns762, on Flickr" /> 20150109_082502 by guns762, on Flickr" />
|
|
|
|
[#23]
You make some nice looking rocks. Crazy the amount of time can be put into those.
|
|
|
|
[#24]
Nice Art! Love this project! Looking forward to seeing the final result!

|
|
|
|
[#25]
Quoted:
You make some nice looking rocks. Crazy the amount of time can be put into those. Yeah, or you can just buy some premade.....LOL.... What fun would that be, though. |
|
|
|
[#26]
Continued Update 1/9
I got lucky and got the antlers mounted this afternoon. I'll post more tonight after I take my babe out for dinner. Here is how I started, drawing out part of the eye that I need to remove. This allows me to match up the skull orbital to the foam. If you don't do this, it's tough to get the right angle on the skull cap, and also the correct distance from the eyes to the horn burr. More later.  </a> </a>
20150109_092609 by guns762, on Flickr" /> |
|
|
|
[#27]
Back from dinner....
So, once I had the form cut, I started fitting the skull plate to it. 
20150109_095524 by guns762, on Flickr" /> Here you can see how the eye orbit matches the form, once enough is sliced off the bottom and front of the skull cap. 
20150109_095456 by guns762, on Flickr" /> Checking for fit from the front. 
20150109_095509 by guns762, on Flickr" /> |
|
|
|
[#28]
So once I'm sure of the correct fit of the skull cap, I drilled four holes; two in front, two in back.
 </a> </a>
20150109_102905 by guns762, on Flickr" /> Then I screwed the cap down to the form. I checked carefully on the sides to make sure the ends of the optical orbits line up with the form.  </a> </a>
20150109_103819 by guns762, on Flickr" /> With the skull cap secured, I added bondo around the cap to glue it down and keep it from coming loose.  </a> </a>
20150109_122550 by guns762, on Flickr" />  </a> </a>
20150109_104424 by guns762, on Flickr" /> |
|
|
|
[#29]
Looking good, I like the way the antlers look turned down at that angle. Almost looks like it'll turn into a feeding or drinking mount.
|
|
|
|
[#30]
Quoted:
Looking good, I like the way the antlers look turned down at that angle. Almost looks like it'll turn into a feeding or drinking mount. hopefully, something like that. |
|
|
|
[#31]
More coming today. It's final's week so I've been busy trying to get all my students portfolios turned in. I'm prepping for putting the cape on early next week.
|
|
|
|
[#32]
Quoted:
hopefully, something like that. Quoted:
Quoted: Looking good, I like the way the antlers look turned down at that angle. Almost looks like it'll turn into a feeding or drinking mount. hopefully, something like that. If you're going to make it a fountain, you need a Belgian Peeing Boy on top of those rocks.
|
|
|
|
[#33]
Update 1/14
I applied plaster to the skull cap to start smoothing out and blending the surface to the form.  20150113_092827 by guns762, on Flickr" /> 20150113_092827 by guns762, on Flickr" />
After some filing off of some of the rough edges, I reapplied more plaster and smoothed it out with wet fingers. Once that was dry, I filed it again rasp to get the contours even.  20150114_071257 by guns762, on Flickr" /> 20150114_071257 by guns762, on Flickr" />
With that all finished, I started working on the eye. The whole needs to be big enough for the glass eye to fit easily.  20150114_083736 by guns762, on Flickr" /> 20150114_083736 by guns762, on Flickr" />
It's important to be careful with the eyes, as they break rather easily if they are dropped. That sucks when they are a special size like these. These are just white tail eyes, but in a huge size. We normally have 32mm on hand, but these are 36mm.  20150114_083723 by guns762, on Flickr" /> 20150114_083723 by guns762, on Flickr" />
|
|
|
|
[#34]
Continued update 1/14
With the eye sockets all done, I opened up the mouth. This allows the lip skin to be pushed into the gap. It's more open at the corners where there will be more material. Notice the saw blade doing up, and not directly in. This gives the bottom jaw more strength, and keeps it from being pried open by the skin as it dries. Not that that has ever happened to me.  </a>20150114_073341 by guns762, on Flickr" /> </a>20150114_073341 by guns762, on Flickr" />
The nose is next. It needs to be opened up a bit and detailed for the skin to go over the insides of the nostrils. I used some close up pictures for referencs. As long as they are both the same, i'll be ok.  </a>20150114_082136 by guns762, on Flickr" /> </a>20150114_082136 by guns762, on Flickr" />
I started with a cut up under the nose, as I could see in the references.  </a>20150114_082335 by guns762, on Flickr" /> </a>20150114_082335 by guns762, on Flickr" />
I opened up the left side of it with the larger bit, then evened out the edges.  </a>20150114_082548 by guns762, on Flickr" /> </a>20150114_082548 by guns762, on Flickr" />
 </a>20150114_082925 by guns762, on Flickr" /> </a>20150114_082925 by guns762, on Flickr" />
Finally, I opened up the tear ducts with the saw blade, so I will be able to tuck them in.  20150114_084752 by guns762, on Flickr" /> 20150114_084752 by guns762, on Flickr" />
|
|
|
|
[#35]
MOAR!!!!
|
|
|
|
[#36]
These are the best threads on ARFCOM!
|
|
|
|
[#37]
I'm sorry to say that my schedule over this last week was all full, and I was not able to set aside time to work on the moose at all. The next week should allow me time to get this thing going again.
I offer reparations of some students projects in progress. A wolf rug; the finishing work on the mouth and nose was getting done today.  20150122_085233 by guns762, on Flickr" /> 20150122_085233 by guns762, on Flickr" />
A bobcat going together today. Hopefully it isn't a total failure.  20150122_083322 by guns762, on Flickr" /> 20150122_083322 by guns762, on Flickr" />
The ear of the bobcat. We already have a little slipping on the inside, which isn't totally unusual, but frustrating to fix.  20150122_084816 by guns762, on Flickr" /> 20150122_084816 by guns762, on Flickr" />
The bobcat form, with a new nose, and a few inches added to the length.  20150122_083331 by guns762, on Flickr" /> 20150122_083331 by guns762, on Flickr" />
|
|
|
|
[#38]
Mmm Wheat Thins and SoBe
|
|
|
|
[#39]
More bobcat.
The legs of this poor cat are really skinny, as he was left in a trap for quite some time. This was given to us by the G&F. We had to lengthen the legs a bit, and thin out the form a lot. The students are sewing up the paws and front legs right now, stuffing clay into the feet, and using extra foam and wire for more length. When they get all four legs sewn up, they will then sew up the belly. We used a rug cut on this one, as we expected to have some problems with the size, and how skinny this was. It's not very fun or quick sewing up each leg and the belly. So far, it seems to be going well, but slow. I told them, if this turns out any where close to the "Haaaayyyyyy!!" bobcat, they are both dead to me.  20150122_102851 by guns762, on Flickr" /> 20150122_102851 by guns762, on Flickr" />
The hide is wet when we put it on the form, so it stretches, and it's easier to sew around than fluffy hair. Right now, he looks like a drowned rat. His super skinny legs look worse with the large paws. I have to keep reminding the boys, it's going to look ok, when it drys out. Hopefully, I'm right.
 20150122_121041 by guns762, on Flickr" /> 20150122_121041 by guns762, on Flickr" />
|
|
|
|
[#40]
That bobcat looks pretty dead
|
|
|
|
[#41]
Quoted:
Holy smokes I want a rug like that! I wonder if I can pop a coyote and do that myself. |
|
|
|
[#42]
I am sure it will probably look a lot different when it is done, but right now,
this picture 
looks a lot like this guy. 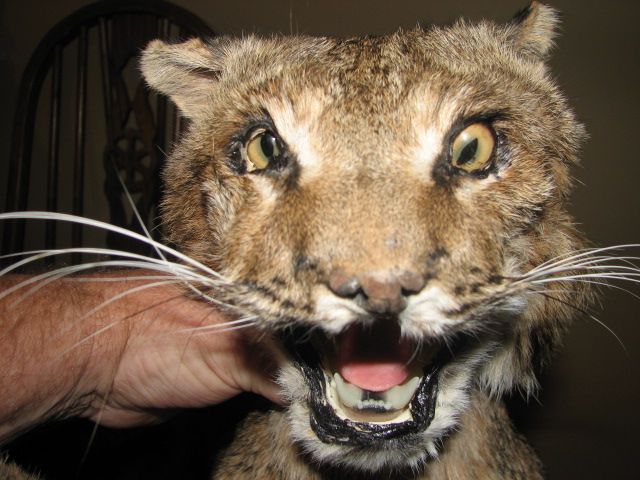
|
|
|
|
[#43]
Quoted:
I am sure it will probably look a lot different when it is done, but right now, this picture http://i286.photobucket.com/albums/ll109/osudds53/16342604275_34e8d3843c_b_zps39w1w6tn.jpg looks a lot like this guy. http://i286.photobucket.com/albums/ll109/osudds53/Picture%20003_zpsfae1xrk8.jpg  Yes it does. Yes it does.
|
|
|
|
[#44]
Quoted:
I am sure it will probably look a lot different when it is done, but right now, this picture http://i286.photobucket.com/albums/ll109/osudds53/16342604275_34e8d3843c_b_zps39w1w6tn.jpg looks a lot like this guy. http://i286.photobucket.com/albums/ll109/osudds53/Picture%20003_zpsfae1xrk8.jpg Hayyyy 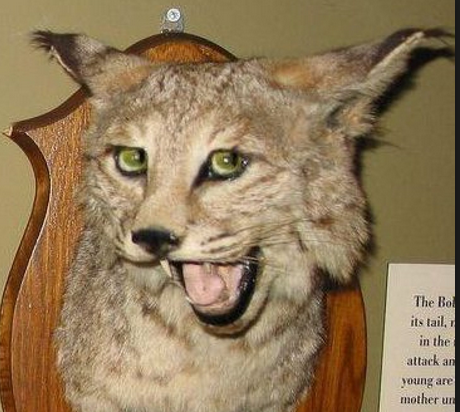
|
|
|
|
[#45]
Quoted:
Quoted:
I am sure it will probably look a lot different when it is done, but right now, this picture http://i286.photobucket.com/albums/ll109/osudds53/16342604275_34e8d3843c_b_zps39w1w6tn.jpg looks a lot like this guy. http://i286.photobucket.com/albums/ll109/osudds53/Picture%20003_zpsfae1xrk8.jpg Hayyyy http://i.gyazo.com/6b6057ca9e21738066310d443305e88d.png I told my students you posted the "Haaaaaayyy" picture, and the response was, "Bastards". |
|
|
|
[#46]
They didn't get it all sewn up today. Tomorrow they should finish, and start tucking the face, getting it blown out and ready for drying.
 </a>20150122_145540 by guns762, on Flickr" /> </a>20150122_145540 by guns762, on Flickr" />
|
|
|
|
[#47]
Quoted:
I told my students you posted the "Haaaaaayyy" picture, and the response was, "Bastards". Quoted:
Quoted:
Quoted:
I am sure it will probably look a lot different when it is done, but right now, this picture http://i286.photobucket.com/albums/ll109/osudds53/16342604275_34e8d3843c_b_zps39w1w6tn.jpg looks a lot like this guy. http://i286.photobucket.com/albums/ll109/osudds53/Picture%20003_zpsfae1xrk8.jpg Hayyyy http://i.gyazo.com/6b6057ca9e21738066310d443305e88d.png I told my students you posted the "Haaaaaayyy" picture, and the response was, "Bastards".
|
|
|
|
[#48]
They got it all blown out today and the face set. I know in the picture the eyes look off, but its the angle. They look pretty decent in person.
It was not a fun day, as the hair slipped on a few spots, and this poor cat did not fit the form well, as it was emaciated, from being left in a trap. It's probably why we were having problems with the hair slipping. The only serious problem area is not visible unless you dig through a bunch of surrounding hair. Once this dries, they will hit the details. The nose will obviously get painted.  </a> </a>
20150123_151648 by guns762, on Flickr" /> |
|
|
|
[#49]
All things considered, the bobcat's not looking too bad. I've seen worse-what I've seen from one local taxidermist is especially disappointing.
|
|
|
|
[#50]
Great job Pokey. Looking good.
|
|
|
 Win a FREE Membership!
Sign up for the ARFCOM weekly newsletter and be entered to win a free ARFCOM membership. One new winner* is announced every week!
You will receive an email every Friday morning featuring the latest chatter from the hottest topics, breaking news surrounding legislation, as well as exclusive deals only available to ARFCOM email subscribers.

AR15.COM is the world's largest firearm community and is a gathering place for firearm enthusiasts of all types.
From hunters and military members, to competition shooters and general firearm enthusiasts, we welcome anyone who values and respects the way of the firearm.

Subscribe to our monthly Newsletter to receive firearm news, product discounts from your favorite Industry Partners, and more.
Copyright © 1996-2024 AR15.COM LLC. All Rights Reserved.
Any use of this content without express written consent is prohibited.
AR15.Com reserves the right to overwrite or replace any affiliate, commercial, or monetizable links, posted by users, with our own.


