|
[#1]

|
|
|
|
[#2]
Quoted: You might consider selling that cast iron. Should bring a decent chunk of money. Quoted: Quoted: I have one of those big thick cast iron pits buried about 3' deep. It's about 1-1/2" thick and maybe 4' diameter. It'll outlast me by gYou enerations. The only complaint I have is digging it out once a year - lots of ashes! You might consider selling that cast iron. Should bring a decent chunk of money. No thanks. I use it regularly. As far as I know it's even pre-atomic. |
|
|
|
[#3]
Quoted: Been a work in progress over many years. https://www.ar15.com/media/mediaFiles/1292/20200906_144204-2420365.jpg https://www.ar15.com/media/mediaFiles/1292/20210725_210305-2420370.jpg https://www.ar15.com/media/mediaFiles/1292/20210725_205518-2420378.jpg It started many years ago as this.... my boys were little then and we had a blast. Each year we added to it. We go out and find rocks and bring them back. It's hard work. https://www.ar15.com/media/mediaFiles/1292/2010-09-05_01-17-25_391-2420447.jpg https://www.ar15.com/media/mediaFiles/1292/IMG_20130607_191047_363-2420450.jpg https://www.ar15.com/media/mediaFiles/1292/IMG_20140613_193802_671-2420452.jpg |
|
|
|
[#4]
I have the Solo Stove Bonfire. It's great in the warmer months, it's extremely efficient and produces little smoke, but it also produces little heat. You have to be directly above it to really warm up, in which case you'll end up in the burn unit.
|
|
|
|
[#5]
|
|
|
|
[#6]
Nice! But why is there a moat around it? Say, is this that "Fire Island" I've heard about?   |
|
|
|
[#7]
Tagscribed for later
|
|
|
|
[#8]
Firepit is in the back, but I only use it to burn larger tree limbs and stuff.
Swedish torch is SOOOO much better. I have several "stumps" set of to the side, some pre-cut.  
|
|
|
|
[#9]
|
|
|
|
[#10]
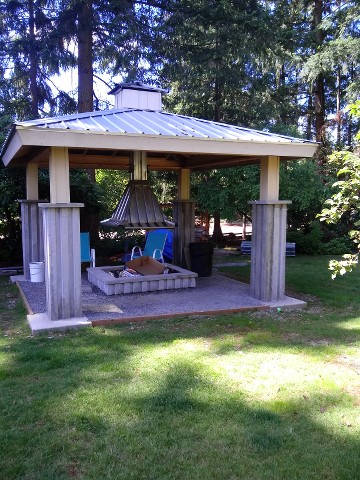
I use mine year round , the roof makes a huge difference. I would build a different roof and skip the hood and flue if I was going to do it over.
|
|
|
|
[#11]
Quoted: Been a work in progress over many years. https://www.ar15.com/media/mediaFiles/1292/20200906_144204-2420365.jpg https://www.ar15.com/media/mediaFiles/1292/20210725_210305-2420370.jpg https://www.ar15.com/media/mediaFiles/1292/20210725_205518-2420378.jpg It started many years ago as this.... my boys were little then and we had a blast. Each year we added to it. We go out and find rocks and bring them back. It's hard work. https://www.ar15.com/media/mediaFiles/1292/2010-09-05_01-17-25_391-2420447.jpg https://www.ar15.com/media/mediaFiles/1292/IMG_20130607_191047_363-2420450.jpg https://www.ar15.com/media/mediaFiles/1292/IMG_20140613_193802_671-2420452.jpg Me seriously jelly Guns Love WY |
|
|
|
[#12]
|
|
|
|
[#13]
@NWRed
What would you do different? I have a brick patio with brick firepit in the middle, under a big oak tree. If the tree dies I will have to build a roof over it. |
|
|
|
[#14]
I built a propane fire pit insert out of an old gas fireplace. Instant on, instant off and no smoke or ash ftmfw.
|
|
|
|
[#15]
Quoted: Anybody got pics, or layout plans for the BFL fire pit at the former ARF headquarters in upstate NY? I had them, but can't find them. It was a simple-but-cool design. https://www.ar15.com/forums/General/-ARCHIVED-THREAD-I-wish-I-was-able-to-go-to-Arfcom-s-Brick-and-Mortar-Store--F-YOU-CUOMO-/5-2266813/?page=1 |
|
|
|
[#16]

|
|
|
|
[#17]
Quoted: @NWRed What would you do different? I have a brick patio with brick firepit in the middle, under a big oak tree. If the tree dies I will have to build a roof over it. @trails-end Just a simple shed roof, or 2 opposing shed roofs ( double shed roof) with a 12"+- step in between to allow the smoke to escape on its own and skip building the hood and chimney. If the fire is burning hot the smoke goes up the chimney. If it's windy at all smoke blows sideways under the hood. Wasted money and time on the hood. |
|
|
|
[#18]
Quoted: https://www.ar15.com/media/mediaFiles/228370/4E1821CD-46EE-4545-94D0-00B4FC9D44DD_jpe-2420329.JPG Kit from Menards. Temporarily set up. I just brought home my materials from Menards today for mine.  I'm doing my own variation of their design (note the 4 rows vs the 3) and this:  I Perfected The DIY Smokeless Fire Pit That Works My variation is to put the whole setup on top of these pavers they sell, which have some channels in them, to better let air into the center of the burn pit which will have porous lava rock on the bottom to also help with airflow into the bottom of it. I'd be working on it now but it's way too fucking hot outside. |
|
|
|
[#19]
Quoted: I just brought home my materials from Menards today for mine. I'm doing my own variation of their design (note the 4 rows vs the 3) and this: My variation is to put the whole setup on top of these pavers they sell, which have some channels in them, to better let air into the center of the burn pit which will have porous lava rock on the bottom to also help with airflow into the bottom of it. I'd be working on it now but it's way too fucking hot outside. I have lava rock on the bottom of mine; pain in the butt to clear out the ashes. I'm planning to bend / weld up some rebar to hold some expanded metal as the fire basket and let it sit over bare dirt. |
|
|
|
[#20]
Quoted: I have lava rock on the bottom of mine; pain in the butt to clear out the ashes. I'm planning to bend / weld up some rebar to hold some expanded metal as the fire basket and let it sit over bare dirt. Quoted: Quoted: I just brought home my materials from Menards today for mine. I'm doing my own variation of their design (note the 4 rows vs the 3) and this: My variation is to put the whole setup on top of these pavers they sell, which have some channels in them, to better let air into the center of the burn pit which will have porous lava rock on the bottom to also help with airflow into the bottom of it. I'd be working on it now but it's way too fucking hot outside. I have lava rock on the bottom of mine; pain in the butt to clear out the ashes. I'm planning to bend / weld up some rebar to hold some expanded metal as the fire basket and let it sit over bare dirt. I was considering something like that but was hoping to go with something that wouldn't need constant replacement. Was hoping that between the pavers with grooves for the base and vent holes I'm going to leave at the bottom I could just hose out the ashes but didn't have any idea how it would work out. |
|
|
|
[#21]
Quoted: I was considering something like that but was hoping to go with something that wouldn't need constant replacement. Was hoping that between the pavers with grooves for the base and vent holes I'm going to leave at the bottom I could just hose out the ashes but didn't have any idea how it would work out. I poured a concrete slab in the bottom of mine. Super easy to clean with a square shovel. The firepit at the last house was just landscape blocks in the dirt and I always ended up with about as much dirt as ashes when I scraped it out
|
|
|
|
[#23]
|
|
|
|
[#24]
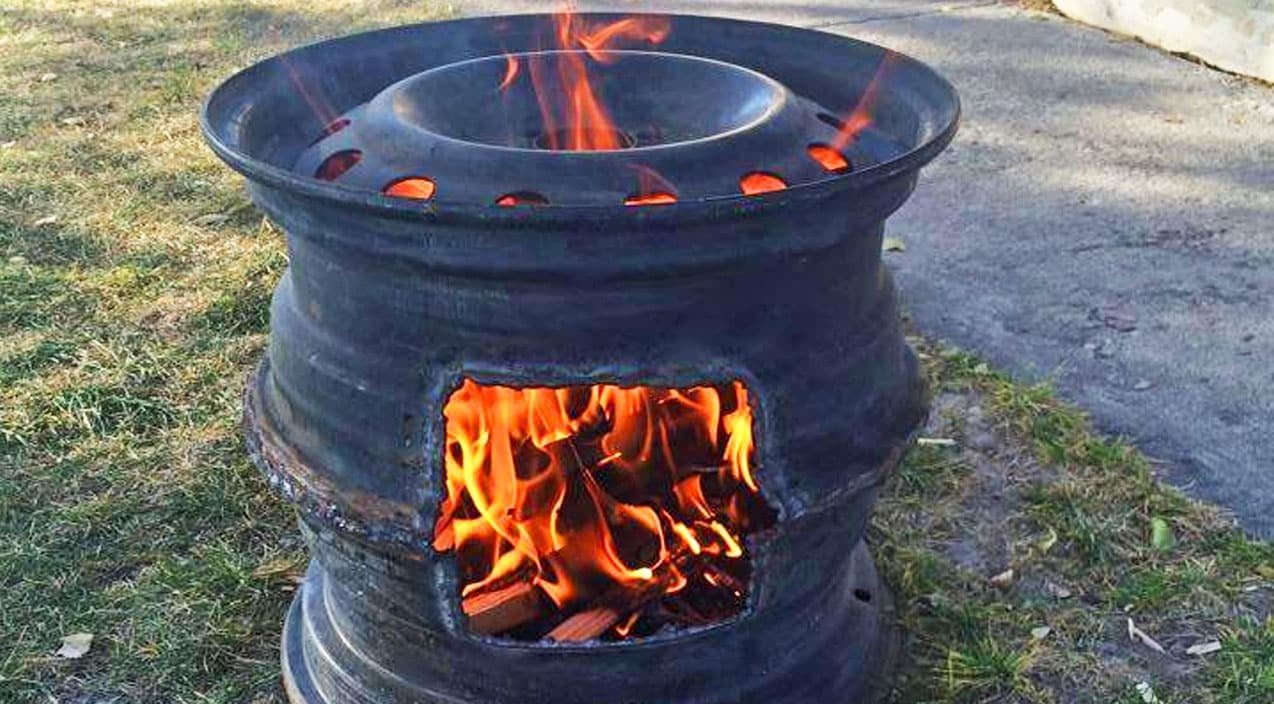
 Rock crusher cone like this |
|
|
|
[#25]
Quoted: I poured a concrete slab in the bottom of mine. Super easy to clean with a square shovel. The firepit at the last house was just landscape blocks in the dirt and I always ended up with about as much dirt as ashes when I scraped it out Quoted: Quoted: I was considering something like that but was hoping to go with something that wouldn't need constant replacement. Was hoping that between the pavers with grooves for the base and vent holes I'm going to leave at the bottom I could just hose out the ashes but didn't have any idea how it would work out. I poured a concrete slab in the bottom of mine. Super easy to clean with a square shovel. The firepit at the last house was just landscape blocks in the dirt and I always ended up with about as much dirt as ashes when I scraped it out Yeah, I'd definitely like to do it on a poured slab down the road when I can finalize my outdoor space (plan to expand the deck on this place I bought and have a proper fire pit area off it). Figured the pavers are a good non-permanent solution for now. Not going to use adhesive on the blocks either so I can trial and error it then move it when it's time. |
|
|
|
[#26]
My China Pit
|
|
|
|
[#27]
Quoted: @M4ger THANK YOU! Quoted: Quoted: https://www.ar15.com/media/mediaFiles/401845/arfcomOutside_jpg-2421126.JPG https://www.ar15.com/media/mediaFiles/24334/arfcom_store_jpg-1140983.JPG https://www.ar15.com/media/mediaFiles/334993/IMG_2786_JPEG-1144093.JPG https://www.ar15.com/media/mediaFiles/334993/IMG_2784_JPEG-1144095.JPG https://www.ar15.com/media/mediaFiles/334993/IMG_2785_JPEG-1144096.JPG https://www.ar15.com/forums/General/-ARCHIVED-THREAD-I-wish-I-was-able-to-go-to-Arfcom-s-Brick-and-Mortar-Store--F-YOU-CUOMO-/5-2266813/?page=1 @M4ger THANK YOU!  Glad to help! |
|
|
|
[#28]
|
|
|
|
[#29]
Quoted: Yeah, I'd definitely like to do it on a poured slab down the road when I can finalize my outdoor space (plan to expand the deck on this place I bought and have a proper fire pit area off it). Figured the pavers are a good non-permanent solution for now. Not going to use adhesive on the blocks either so I can trial and error it then move it when it's time. Quoted: Quoted: Quoted: I was considering something like that but was hoping to go with something that wouldn't need constant replacement. Was hoping that between the pavers with grooves for the base and vent holes I'm going to leave at the bottom I could just hose out the ashes but didn't have any idea how it would work out. I poured a concrete slab in the bottom of mine. Super easy to clean with a square shovel. The firepit at the last house was just landscape blocks in the dirt and I always ended up with about as much dirt as ashes when I scraped it out Yeah, I'd definitely like to do it on a poured slab down the road when I can finalize my outdoor space (plan to expand the deck on this place I bought and have a proper fire pit area off it). Figured the pavers are a good non-permanent solution for now. Not going to use adhesive on the blocks either so I can trial and error it then move it when it's time. solid pavers in the bottom, air gaps in the bottom row of block around the pit. battery powered leaf blower to stoke the fire I plumbed a 2" piece of ABS under my slab and has a large reducer that fits my leaf blower, it comes up in the the middle of the fire pit. Its always full of ashes and nails and shit, I need to build a permanent elevated metal grate to keep the ashes out. If I did it again, I'd do a metal pipe through the sidewall to blow air into the fire rather then up from the bottom. It works, it just gets clogged up  Someday I'll cut the pipe down and make another wood grain paver with the reducer sitting flush  Woodgrain textured caps I cast for the top.  |
|
|
|
[#30]
Cowboy Cauldron...

|
|
|
|
[#31]
I'm making my own park grill from scrap at the moment.
Going to use it for normal charcoal grilling, but also going to have risers to be able to simmer a scalding pot for chicken processing over a wood fire. 
|
|
|
|
[#32]
Quoted: I'm making my own park grill from scrap at the moment. Going to use it for normal charcoal grilling, but also going to have risers to be able to simmer a scalding pot for chicken processing over a wood fire. https://i.imgur.com/y99nbGy.jpeg That looks awesome!!! We had one of them in the yard growing up - bet that my dad stole it from the state... lol Red |
|
|
|
[#33]
Making my fireplace a couple years ago.
Need to work on a patio around it to tie it into the house patio |
|
|
|
[#34]

|
|
|
|
[#35]
Quoted: solid pavers in the bottom, air gaps in the bottom row of block around the pit. battery powered leaf blower to stoke the fire I plumbed a 2" piece of ABS under my slab and has a large reducer that fits my leaf blower, it comes up in the the middle of the fire pit. Its always full of ashes and nails and shit, I need to build a permanent elevated metal grate to keep the ashes out. If I did it again, I'd do a metal pipe through the sidewall to blow air into the fire rather then up from the bottom. It works, it just gets clogged up https://imagizer.imageshack.com/v2/640x480q90/921/MqxXbB.jpg Someday I'll cut the pipe down and make another wood grain paver with the reducer sitting flush https://imagizer.imageshack.com/v2/640x480q90/924/QYy7wT.jpg Woodgrain textured caps I cast for the top. https://imagizer.imageshack.com/v2/640x480q90/922/RhCah8.jpg Quoted: Quoted: Quoted: Quoted: I was considering something like that but was hoping to go with something that wouldn't need constant replacement. Was hoping that between the pavers with grooves for the base and vent holes I'm going to leave at the bottom I could just hose out the ashes but didn't have any idea how it would work out. I poured a concrete slab in the bottom of mine. Super easy to clean with a square shovel. The firepit at the last house was just landscape blocks in the dirt and I always ended up with about as much dirt as ashes when I scraped it out Yeah, I'd definitely like to do it on a poured slab down the road when I can finalize my outdoor space (plan to expand the deck on this place I bought and have a proper fire pit area off it). Figured the pavers are a good non-permanent solution for now. Not going to use adhesive on the blocks either so I can trial and error it then move it when it's time. solid pavers in the bottom, air gaps in the bottom row of block around the pit. battery powered leaf blower to stoke the fire I plumbed a 2" piece of ABS under my slab and has a large reducer that fits my leaf blower, it comes up in the the middle of the fire pit. Its always full of ashes and nails and shit, I need to build a permanent elevated metal grate to keep the ashes out. If I did it again, I'd do a metal pipe through the sidewall to blow air into the fire rather then up from the bottom. It works, it just gets clogged up https://imagizer.imageshack.com/v2/640x480q90/921/MqxXbB.jpg Someday I'll cut the pipe down and make another wood grain paver with the reducer sitting flush https://imagizer.imageshack.com/v2/640x480q90/924/QYy7wT.jpg Woodgrain textured caps I cast for the top. https://imagizer.imageshack.com/v2/640x480q90/922/RhCah8.jpg Nice! Thanks for sharing. Good to know what works and what doesn't. I'd seen a couple videos with a similar bottom vent design and had concerns about that. |
|
|
|
[#36]
Propane fire pub height table. Push a button and boom...fire. Also don't smell like a fire when I got back inside.
|
|
|
|
[#37]
|
|
|
|
[#38]
Quoted: Nice! Thanks for sharing. Good to know what works and what doesn't. I'd seen a couple videos with a similar bottom vent design and had concerns about that. Mine works, its just not completed with a elevated grate to block ash from filling up the vent. I welded up a box and chopped some holes in it with the plasma cutter messing around but didnt come up with a proper way to attach it to the vent hole - 4" piece of 1.75" OD pipe welded to the bottom of the box would have worked fine. On the previous firepit that was just blocks in the dirt I removed one of the bottom blocks and was able to blast the base of the fire with the leaf blower and was able to get the fire raging. The pit was large enough to throw whole pallets in. Between the 2 designs, being able to blow air sideways at the base of the fire seemed to work better than having a fixed location underneath the fire for forced air. |
|
|
|
[#39]
I have a solo stove and a steel fire pit. My favorite steel ones are made from a propane tank end. The welder I used used to make them that way - but decided he was too damn old to make a fire pit that damn heavy anymore.
Do want to make a smokeless burn barrel someday soon. |
|
|
|
[#40]
 Looked for a year or so. Cablea’s FTW. |
|
|
|
[#41]
|
|
|
|
[#42]
I stacked regular bricks in an overlapping circle pattern then filled the bottom with sand and around the outside with sand.
Not the best but it only took 1 afternoon. Not me but I heard some guy then let his kid shoot some old spray cans that were sitting on the side while it was lit. |
|
|
|
[#43]
I've got string lights hanging from the trees too. Work in progress.
  
|
|
|
|
[#44]
|
|
|
|
[#45]
|
|
|
|
[#46]
The ladies out Friday night making use of the perfect evening. We are going to look at a replacement pit to fit in our rock ring this week. The mesh top is starting to disintegrate after the years of use.

|
|
|
|
[#47]
Just thought I'd follow up with an update. Mine is complete*.
Got the holes drilled in the ring for the smokeless design. 1" holes spaced 2" apart drilled with a step bit for nice chamfered holes. Shot with some high temp black after. The screws that came with the pit were useless. Consistency of cheese. My Milwaukee ratchet snapped one tightening it. Replaced them with some quality M6 metric phillips screws. And fully assembled: *I may revise the design and remove a layer of the bricks depending on how well this works in terms of smokelessness. A little concerned the lava may actually restrict air flow into the space outside the ring (tried to keep as much inside) but we'll see. If I drop it down a row the ring will keep more of the lava rock inside the ring. I've got no problem with experimenting since, like I said, it's only semi-temporary. Also got one of these to increase the angle on the cap stones slightly so they fit together a little more tightly for a better look. |
|
|
|
[#48]
Quoted: Just thought I'd follow up with an update. Mine is complete*. Got the holes drilled in the ring for the smokeless design. 1" holes spaced 2" apart drilled with a step bit for nice chamfered holes. Shot with some high temp black after. https://www.ar15.com/media/mediaFiles/102941/IMG_3521_jpg-2434771.JPG https://www.ar15.com/media/mediaFiles/102941/IMG_3524_jpg-2434772.JPG The screws that came with the pit were useless. Consistency of cheese. My Milwaukee ratchet snapped one tightening it. Replaced them with some quality M6 metric phillips screws. And fully assembled: https://www.ar15.com/media/mediaFiles/102941/IMG_3567_jpg-2434776.JPG *I may revise the design and remove a layer of the bricks depending on how well this works in terms of smokelessness. A little concerned the lava may actually restrict air flow into the space outside the ring (tried to keep as much inside) but we'll see. If I drop it down a row the ring will keep more of the lava rock inside the ring. I've got no problem with experimenting since, like I said, it's only semi-temporary. Also got one of these to increase the angle on the cap stones slightly so they fit together a little more tightly for a better look. @Ryan_Ruck Ok - what brick/block did you use? How many do you have in it? Thanks, Red |
|
|
|
[#49]
This is mine just before I finished the block work for the control valve and ignitor. It is propane so it's quick to light and smoke free. Perfect combo for the cooler evenings when your sitting by the koi pond having a couple drinks. Turn it on then turn it off and carry on with your evening. |
|
|
|
[#50]
Quoted: @Ryan_Ruck Ok - what brick/block did you use? How many do you have in it? Thanks, Red Quoted: Quoted: Just thought I'd follow up with an update. Mine is complete*. Got the holes drilled in the ring for the smokeless design. 1" holes spaced 2" apart drilled with a step bit for nice chamfered holes. Shot with some high temp black after. https://www.ar15.com/media/mediaFiles/102941/IMG_3521_jpg-2434771.JPG https://www.ar15.com/media/mediaFiles/102941/IMG_3524_jpg-2434772.JPG The screws that came with the pit were useless. Consistency of cheese. My Milwaukee ratchet snapped one tightening it. Replaced them with some quality M6 metric phillips screws. And fully assembled: https://www.ar15.com/media/mediaFiles/102941/IMG_3567_jpg-2434776.JPG *I may revise the design and remove a layer of the bricks depending on how well this works in terms of smokelessness. A little concerned the lava may actually restrict air flow into the space outside the ring (tried to keep as much inside) but we'll see. If I drop it down a row the ring will keep more of the lava rock inside the ring. I've got no problem with experimenting since, like I said, it's only semi-temporary. Also got one of these to increase the angle on the cap stones slightly so they fit together a little more tightly for a better look. @Ryan_Ruck Ok - what brick/block did you use? How many do you have in it? Thanks, Red I noticed you're in FL so you might not have any luck with this but as mentioned everything but the fire ring came from Menards, who is mostly in the Midwest and Northern Plains. But, here's the breakdown on materials. I based it off their Ashwell Heavy Duty Fire Pit Project List. - 20 12 x 16 Charcoal EZ Cottage Stone Paver Block - 68 3-1/2 x 7 Sienna Tumbled Belgian Wedge Wall Block - 92 3-1/2 x 1-3/4 Tan Small Tumbled Belgian Wall Block - 14 2-3/8 x 12 Tan Retaining Wall Cap I bought extra so I've got some left over but that's what I ended up using, all said and done. The rest was 5 bags Red Lava Rock - 1.0 Cu. Ft. and the Blue Sky Outdoor Living Heavy-Duty 36 in. x 10 in. Round Steel Wood Fire Pit Ring with 2.7 mm Steel. Forgot to mention, when I'm done shaping the cap stones, I'm going to also wash the whole thing with some soap and water to try and get rid of all the rock dust on it and bring out the color in the stone a bit more. |
|
|
 Win a FREE Membership!
Sign up for the ARFCOM weekly newsletter and be entered to win a free ARFCOM membership. One new winner* is announced every week!
You will receive an email every Friday morning featuring the latest chatter from the hottest topics, breaking news surrounding legislation, as well as exclusive deals only available to ARFCOM email subscribers.

AR15.COM is the world's largest firearm community and is a gathering place for firearm enthusiasts of all types.
From hunters and military members, to competition shooters and general firearm enthusiasts, we welcome anyone who values and respects the way of the firearm.

Subscribe to our monthly Newsletter to receive firearm news, product discounts from your favorite Industry Partners, and more.
Copyright © 1996-2024 AR15.COM LLC. All Rights Reserved.
Any use of this content without express written consent is prohibited.
AR15.Com reserves the right to overwrite or replace any affiliate, commercial, or monetizable links, posted by users, with our own.


