


Posted: 11/25/2025 11:03:18 AM EDT
I love shooting my short AT-XC. After a weekend of shooting in Idaho, I decided I wanted to try something longer. It currently has an 18" 6.5 Creedmoor barrel that I made from a $100 Green Mountain blank in it. Shoots one hole groups at around 2600 fps with Norma 143s. The crazy thing to me is a buddy that was shooting along side me had a factory 24" barrel shooting the same 143s and was only 50 fps faster. The current barrel is quite chunky. It's 18" long, 1.235 at the shank and tapers to 1.1" at the muzzle. Impressively, it's 6" shorter than a factory barrel but roughly 2 lbs heavier. With my current setup, it balances perfectly on the bag forward of the magwell.  I'm far from an expert barrel maker, but follow along if you're interested and I'll try my best to document the whole process start to finish and answer questions as best I can. |


|
Pretty cool. It's always interesting when barrels have significantly differently speeds to them. I've seen guys buy two barrels from the same smith and have 100-150 fps difference. Look forward to seeing this. |
BikerNut:
Normal people like motorcycles. Real people like motorcycles.
People who don't like motorcycles are just... weird.
Normal people like motorcycles. Real people like motorcycles.
People who don't like motorcycles are just... weird.
|
Had a few minutes to work on this a bit this morning. This is roughly the profile I have drawn up in Fusion 360. It should come out to 18oz heavier than the previous barrel. General profile is the same, 1.25" at the shank and 1.1" at the muzzle, just 4" longer.  My blank came in from Preferred Barrel Blanks. I've had good results with their blanks, so i ordered a 26" 1.25"diameter blank that's 1:7 twist and lapped. I chose to go with the slightly faster 1:7 twist since I only really shoot140s or 143s and also want to try the crazy high BC Berger 153's (0.356 G7). https://preferredbarrelblanks.com/product/unturned-barrel-blanks/ Berger 153's https://bergerbullets.com/product/6-5-mm-153-5-grain-long-range-hybrid-target/ Even though it's going to finish out as a 22" barrel, blanks are usually ordered a few inches long to account for the ends being belled out from the manufacturing process.  Should have everything I need to get started, except for more free time and some machine time.  I recently switched to using Alpha Reamers. I had been using Manson HSS for most things mainly due to availability, but switched to carbide Alphas to try out. The nice thing about their reamers is they use the same pilot bushings at HSS reamers, so I have a ton of bushings already. https://alphamunitions.com/product/alpha-legacy-reamer/  If you're curious about a solid method to chamber barrels, I'd highly Recommend Gordy Gritter's book. As an engineer and somewhat self-taught machinist, I always had doubts of more common chambering methods and their downsides (that I'll get into with another post), so his book made complete sense to me. Amazon link to book |
|
Originally Posted By JKinAZ: In, I've been watching lots of videos on chamber cutting and barrel fitting lately. Have a new Remage barrel from Preferred that I'm going to be putting on my 700 long action this winter, so interesting to see them featured here too. The wild thing is there are a lot of ways to do it, they can all work, but there are a few techniques that help with accuracy. |

|
Originally Posted By SpeyRod: I do 0 gunsmithing. But this is very interesting to me. Is your reamer, pardon my vernacular, forced coolant? This particular barrel is going to get chambered on my Haas ST-20Y. I developed a through spindle / bore coolant flushing system that allows me to flush chips as the chamber is being cut and is all run through the control and program. I think the chambering portion of the process takes maybe 2 minutes. |
Joined:
Apr 2025
Posts:
14
EE: 100% (1)
 TX, USA
|
Originally Posted By unclemoak: I love shooting my short AT-XC. After a weekend of shooting in Idaho, I decided I wanted to try something longer. It currently has an 18" 6.5 Creedmoor barrel that I made from a $100 Green Mountain blank in it. Shoots one hole groups at around 2600 fps with Norma 143s. The crazy thing to me is a buddy that was shooting along side me had a factory 24" barrel shooting the same 143s and was only 50 fps faster. https://i.imgur.com/7nM1zrU.jpeg The current barrel is quite chunky. It's 18" long, 1.235 at the shank and tapers to 1.1" at the muzzle. Impressively, it's 6" shorter than a factory barrel but roughly 2 lbs heavier. With my current setup, it balances perfectly on the bag forward of the magwell. https://i.imgur.com/i2SR3RG.jpeg I'm far from an expert barrel maker, but follow along if you're interested and I'll try my best to document the whole process start to finish and answer questions as best I can. What SD were you seeing with the Norma 143? |
|
Originally Posted By texasgunner022003: What SD were you seeing with the Norma 143? ES shows very large because the chronograph picked up a round or two from another shooter.  |
In a very abbreviated order of operations my process to make a bolt action barrel is:
There are plenty of nuances to each step that I'll get into later to help explain why things are done a certain way, but if you have any questions, please ask. |
|
Step 1 is prepping the blank for through coolant flushing. This is done to help flush all the chips as the chamber is cut. The reason I do this is to get a better surface finish in the chamber and a speed up the process. If there is coolant continuously flushing chips from the flutes of the reamer, you don't have to retract the reamer as much to keep out the build up. Excess chips can be a problem if they build up too much because they can be forced between the cutting edges of the reamer and the chamber walls, which can cause scoring and a rough chamber, which if extreme enough can cause extraction issues. Here's a picture showing some chip buildup on a reamer.  While it's perfectly okay to use other methods, it can take more time. To me it was a no brainer to modify my CNC lathe with a flushing system. For the flushing system to work, I need to connect a small, flexible hose to the end of the blank to direct the coolant through the bore of the barrel.  I have a Haas TL-1 toolroom lathe that is generally on barrel threading duty in the shop.  As a point of reference, I want to see how accurate my calculated weight prediction was going to be. So I took a quick weight of the blank to track it's reduction along the process.  I have a program saving in the lathe specifically for prepping the end of the blank. It roughs in a 5/8" tenon, then cuts 5/8-24 threads to be able to connect the hose fitting.  One thing you'll learn about running a CNC machine is they are dumb, they will do anything you tell them to, even if it involves self-destructing. I need to adjust the G54 work offset, so the machine knows where the front of the part is (Z axis zero point). Since this is a quick and dirty process, I don't need to be too exact here. I can simply bring a tool over close to the front of the part and it's close enough.  Hit Z face measure on the control and it loads that reference point.  It'll runs the first block of code and reduces the diameter down from 1.25" to 5/8"  Then cuts the 5/8-24 threads and I can do a quick double check to make sure my fitting threads on.  Since it fits, I can pull the blank out of this machine since the next few steps will be done on my ST20-Y.  Already down a little over 2oz.  |
|
I got a bit distracted for a bit doing actual work in the shop so I haven't had much time to work on this personal project. I was busy chambering and contouring some KAC SR-30 300 blk barrels which was a whole endeavor getting the machine programmed and dialed in to cut 300 blk chambers and contour the blanks afterward. While I've chambered tons of barrels on the ST-20Y, I'd never contoured them before. The main reason was that I hadn't taken the time to learn to program the tail stock. These blanks in particular need done on the ST-20Y mainly due to the threaded portion in front of the gas block journal. I'm unable to thread something these far back on the TL-1 because of how I have the tooling configured.  Anyway, back to the AX-TC barrel...... I got pretty bored last weekend sitting around the house. So I spent most of the weekend at the shop tinkering with this. The first thing was to swap out the normal hydraulic chuck on this machine for a fairly specialized one that is adjustable and allows you to correct for both axial and radial runout.  With my True Bore alignment system and 6 jaw chuck installed, I left about 2.75" of stick out from the face of the chuck to machine my tenon and chamber the blank. I also connected the previously mentioned tubing to my through flush coolant system.  Here's an imagine from Ultimate Reloader showing how the chuck can be adjusted radially and axially. 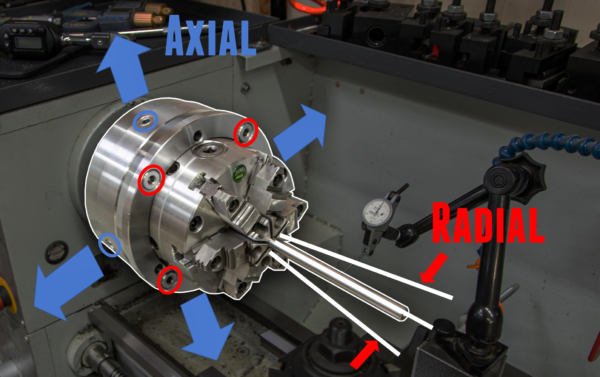 As with any new program or machining project, setup is 90% of the work. Thankfully since I had been chambering some other projects, I just had to setup the 6.5 reamer and a drill bit. One thing I've learned about CNC machines is they are stupid and will do anything you tell them to, so you have to be smarter than the machine. This machine is equipped with a tool pre-setter, With it, you simply touch the tool off the probe and it automatically adjusts some parameters in the control so the machine knows where the tip of the tool is.  Before I start cutting anything, I'll have to roughly indicate the blank both radially and axially. Since this is only a rough indication, you can get away with using a Range rod (sometimes called a grizzly rod) to indicate the bore of the blank. In this step, I'll get everything adjusted so it's within 0.001" - 0.002" of runout on both indicators. For reference, a sheet of paper is approximately 0.003" thick.  Next I'll have to tell the machine where the front of the piece of stock is and set the origin for the rest of the machining operations. The blank is plenty long, so I've found the easiest way to do it is to bring up the tool I use to cut the tenon and bring it over slightly behind the face of the blank.  Then in the control, hit the z face measure button for the G54 work offset.  Then it's hit cycle start and the machine with rough contour my tenon.  To understand the next part, it's helpful to take a look at the chamber print. The diameter at the shoulder is 0.463". In order to hog out a fair bit of material and prolong the life of my $400 carbide reamer, it's better to use a $2 drill bit. I used a 13/32 (0.40625") and will pre-drill the blank 1.4" deep to get rid of most of the material for the finished chamber. I intentionally drill it to that size to allow for even more clean up prior to chambering that we'll get to in a few more steps.  Pre-drilling complete  Next is another round of indicating. This go around, we use a long stem indicator to indicate what's going to be the throat of the barrel. This step does take some time going back and forth so there's less than 0.0001" (one ten thousandth of an inch) of runout axially and radially.  This image shows where the throat is in a barrel. When you cut the chamber, you want the transition in the throat to be as aligned as possible to the chamber.  I didn't get a picture of this next part, but after this last fine tuning of the alignment of the blank, I'll come in with a boring bar and remove some more material to open up the bore to 0.435" which will give me roughly 0.015" of clean up for the reamer. This step trues the hole that we pre-drill. This is done because drill bits don't cut straight and leave irregular holes. With the nature of how reamers work, if the pre-drill hole was off or not true, the reamer would follow whatever is there and leave us with a possible mis-aligned chamber relative to the rest of the blank. Now I can cut my tenon to the final shape and dimension.  I like to double check that the tenon is the correct length. I should be 1.5", so 1.4995 is more than acceptable.  There are some differing opinions on when to thread the barrel. Some folks I know like to thread the blank last, but I like to do it prior to chambering. Their thought is that if something goes wrong during the chambering process, the tenon shoulder could be bumped back and chamber cut deeper should there be chatter or some other anomaly when chambering on a manual lathe. But I thread it first and double check that the thread go gage has a nice machinist fit on the threads.  Sometimes it's necessary to adjust the cut depth if the threads are tight. In this case, I had to rerun the threading block of code after I adjusted the tool X wear to make the pitch diameter of the threads 0.001" smaller since my gage was a little tight.  Now comes the fun / nerve racking part, actually cutting the chamber. This was the first time using this particular Alpha reamer, so I adjusted my program to cut the chamber shallow, then I could fine tune is to the proper depth so the headspace was correct. Here's a shot of the coolant flush system I have the machine set up with. It will continuously flush chips off the reamer and helps give the chamber a mirror finish.  After running the chambering cycle, I used a GO headspace gage to see where I'm at relative to the tenon shoulder.  This 1.65" dimension needed to shrink to 1.6315", so I needed to go another 0.0185" deeper with my reamer.  Came out right on the money.  The chamber came out nicely. I will have to tweak my dimensions slightly. I don't like how the threading tool cuts threads on the chamber end. While it's only cosmetic, I don't think it looks good, so I'll adjust that in the future when I make another one.  Once I check over everything one last time, it's okay to pull the blank out of the machine.  |

|
Home stretch on finishing this barrel up. Weight is down to roughly 8lbs 9 oz.  The next step was to shorten it to it's final length of 22" prior to contouring it. A couple minutes in the TL-1 got it cut and threaded. I always like to double check that a 2A thread gage fits.  Just lopping 4" off the end of the blank lightened it over a pound  The next step is to get the barrel setup in the lathe for contouring. I'll put a muzzle device on the barrel to protect the threads and the crown when it's supported by the tail stock. The chamber end goes in the chuck and is indicated in to 0.0001-0.0002".  Like the other machine, it's dumb, so you have to touch one tool off the front of the shoulder to set your origin.  A couple minutes later, the roughing is done. I leave about 0.05" in diameter for the finish pass. This helps to get a nice smooth finish and prevent chatter. There's also a feature on the lathe that varies the lathe rpm similar to a sine wave to disrupt any resonance (which is the root cause of chatter)  Finish came out fairly nice. Unfortunately I forgot to turn on the spindle speed variation in the program, so there was some slight chatter on the front end of the barrel. Not enough that it wouldn't polish out though which was nice. Final weight was less than one oz over what fusion predicted which was pretty cool.  Original 18" barrel that I made in comparison to the new one. 
|

