


AK Sponsor


Red Stain Formulas (Page 1 of 2)

Posted: 12/30/2004 3:11:46 PM EDT
|
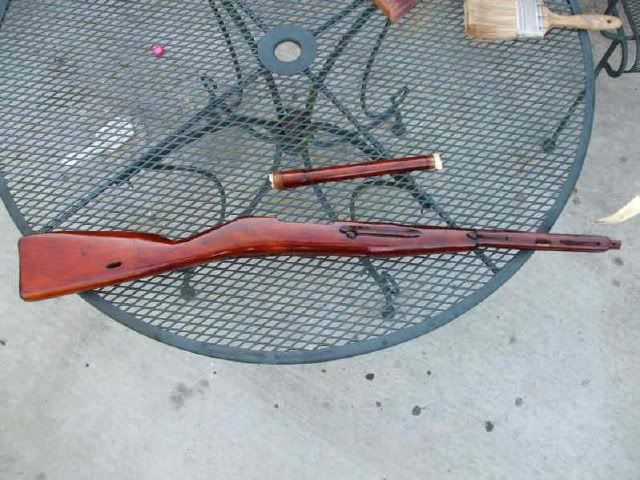
I have had a couple eMails about my "formula" for the Russian finish tint. There are a couple was to go about this. First of all some people would have you believe that this can only be accomplished by some soooper secret method, not true! Anybody with mild wood refinishing skills can accomplish it, but they need to take their time! For you Chemical Engineer types out there...... The Varnish formula is as follows: Russian Gun Stock Varnish Percent Spar Varnish 98.920 Bayer Macrlolex Yellow 6G 0.800 Finos Red 693 0.125 Finos Blue 1402 0.155 Heat to 150-180F for 2 hours. Shake or shear contents for 10 minutes. Filter when cooled to room temp through 100 micron bag. This isn't too much help for those of us who are not Chemical Engineers, or access to a full chemical lab. There is however another way for the common man to accomplish this feat. Here is an example of what can be done with some simple products and some time For the Homebrew types........ Required materails Rit Dye #42 Golden Yellow #25 Dark Brown #16 Tan #5 Scarlet Isopropyl Alcohol Yellow Varnish 0000 Steel Wool mixing cups cheese cloth(I have used coffee filters also) rags brush Start off by putting a few teaspoons of the yellow dye in the filter materail, then pour a cup of alcohol thru it. The reason is we want the color, but not the salts. After it has filtered thru once then pour it thru again and again until you have a bright yellow mixture. (Side note: if you wanted to duplicate the light Chinese wood finish you would stop here) Now get another filter this time do this with the scarlet. Then depending on the "brown hue" you want either the the tan or the dark brown. (you won't need much of this mixture). Now, slowly add some red to the yellow making an orangish (Iodine) colored mixture. Find a piece or a spot of the wood that is not so noticable, and "stain it" using some of your rag materail. Adjust color to suit mixing in more red, yellow, brown, etc. I usually put on about 3 coats of this lightly buffing in between with 0000 steel wool. Next with your wood "tinted" Open your Yellow Varnish. DO NOT SHAKE!!!!!, this will cause bubbles in your finish. Slowly stir with a wooded stick. Using a brush to apply. Apply light coats, again AFTER each coat has had time to dry lightly buff with 0000 steel wool. I do not buff after the final coat as you want very light brush marks to remain. |
Send lawyers guns and money....the shit has hit the fan..


| If you like the plum color and darkened grain that old oiled stocks get, try KIWI Cordovan shoe polish in the tin. Gives a nice aged Russian look. This is for oiled stocks only, like the Yugos and the Polish front handguards. I havent tried putting a surface finish (like urethane or varnish) over it, but I would think adhesion might be a problem because the KIWI has a wax base. |

I spent last summer shooting Wolverines in Alaska
Joined:
Nov 2000
Posts:
7494
EE: 100% (8)
|
Start off by putting a few teaspoons of the yellow dye in the filter materail, then pour a cup of alcohol thru it. The reason is we want the color, but not the salts. After it has filtered thru once then pour it thru again and again until you have a bright yellow mixture. (Side note: if you wanted to duplicate the light Chinese wood finish you would stop here) Now get another filter this time do this with the scarlet. Then depending on the "brown hue" you want either the the tan or the dark brown. (you won't need much of this mixture). Now, slowly add some red to the yellow making an orangish (Iodine) colored mixture. Find a piece or a spot of the wood that is not so noticable, and "stain it" using some of your rag materail. Adjust color to suit mixing in more red, yellow, brown, etc. I usually put on about 3 coats of this lightly buffing in between with 0000 steel wool. Next with your wood "tinted" Open your Yellow Varnish. DO NOT SHAKE!!!!!, this will cause bubbles in your finish. Slowly stir with a wooded stick. Using a brush to apply. Apply light coats, again AFTER each coat has had time to dry lightly buff with 0000 steel wool. I do not buff after the final coat as you want very light brush marks to remain. |
Every normal man must be tempted, at times, to spit on his hands, hoist the black flag, and begin slitting throats.
H. L. Mencken
H. L. Mencken

I spent last summer shooting Wolverines in Alaska
Joined:
Nov 2000
Posts:
7597
EE: 100% (8)
| I wrote up a tutorial on using RIT dye. It has several pictures of the finished product. www.ar15.com/content/page.html?id=198 |


|
Before and after pictures: http://hometown.aol.com/u873/images/2%20romanian http://hometown.aol.com/u873/images/ak%20wood%20redo.jpg I would of never thought of using Rit Dye until I read all of the above. Works great. Cheaper than stain. |
|
I use Mahawk brand dye with the mahawk dried laquer mixed with alcohol. The weird thing is it seems to darken and coagulate over time, so now I'mm oly mixing enough for wqhatever batch of 20 stock sets I'm doing. I mix a batch and it takes 5 coates to get the depth of red I wanted, but then a week later the same stuff is too dark in one coat (mohawk red mahogany shifting to "oxblood". Anyway, I just cut it with some more alcohol and fresh lac flakes. I switch to amber from red if the first two coates ge the color I want. Since these are production guns, I mix it thin enough to dunk without getting too much pooling. drip dries in about 10 minutes, so I can do 5 coats on 20 stocks in a couple hours. Then I let it dfry overnight, buff with steel wool, then hit with 1-2 final coats. I've also used the bullseye brand of amber varnish from ACE hardware, it works well for amber, but I like to thin it.  heres a darker "oxblood"  and a lighter "dark red mahogany"  |
do You think there is a way to sub some of thoes colors to make an fadded grey blue effect?
|
|
For "odd" colors like Grey-Blue, I recommend using LEATHER DYE. The type I used to stain woods was Tandy Pro Alcohol-based leather dye. Tandy recently discontinued it and replaced it with an "Eco-Dye" that's water based. Water-based dyes are great for wood, since they soak in fast and give true colors. Thin well with alcohol to prevent staining the wood too dark. I used Tandy Red, Yellow, and Cordovan (Red-Brown) to do my AK stock, and it worked MUCH better than the RIT dyes, plus the leather dye contains no salt like the RIT does. For odd ball colors, like an OD Green stock, or in your case, a Gray-Blue, this should be the best since you can get the leather dyes in MANY colors including Blue. |
|
The Yugo is red leather dye and a little yellow. In the sun this really pops. Looks like candy apple red. The romy is yellow food coloring. both have multiple coats of Deft clear. Wood was bleached in deckwash acid and then clorox. It also helps to soak the wood in acetone to get out the oil. Isn't AK building Fun, Steve http://i157.photobucket.com/albums/t56/22zSteve/DSCF4181.jpg http://i157.photobucket.com/albums/t56/22zSteve/DSCF4180.jpg |
|
Here's a useful tip for running the de-natured alchohol through the Rit dye...
Instead of using a paper coffee filter to contain and hold the dye powder to run the alchohol through, today as I was mixing up some of the Russian red stain for my WASR 10/63's wood, I happened to have one of those gold mesh coffee filters that was left over from a dead coffee maker. It's the kind that uses the cone shaped filters to brew. I just put the dye in the filter, set the filter over an old mason jar to catch the liquid and poured the alchohol over the dye. No waiting six months for a little dab of alchohol to drain through a paper filter, it ran right through. With another jar at the ready, I poured the dye solution back and forth over the dye several times till it looked about right, dumped the dye residue in the trash can, ran water over the gold mesh filter and continued on with my stain job on the wood. By the way, it turned out beautiful. ( Don't know if it'd be a good idea to use the one your wife makes her morning coffee with though |
| These are some of the most insanely complex instructions I've ever heard for a "russian red" mixture. All you need is amber shellac, denatured alcohol(or 90%rubbing alcohol)and a bottle of iodine. If it were as complicated as described above, the # of Russian weapons with this colorization would be in the hundreds, not the millions! |
|
Originally Posted By 10mm4ever:
These are some of the most insanely complex instructions I've ever heard for a "russian red" mixture. All you need is amber shellac, denatured alcohol(or 90%rubbing alcohol)and a bottle of iodine. If it were as complicated as described above, the # of Russian weapons with this colorization would be in the hundreds, not the millions! +1 I really don't know where this "Russian Red" stock color came from. I have never seen a Russian stock that really had any red in it. |
|
Originally Posted By 10mm4ever:
The Russkies have used amber shellac for a LONG time. Certain arsenals may have adjusted the tint with iodine and used alcohol to thin the mixture somewhat. Who comes up with these outlandish "secret stain recipes" is beyond me,lol!! +1 A friend of mine tells me they used pine tar and amber shellac. When I get the chance I'm gonna refinish a Romanian set with the iodine and shellac method and see how it turns out. |

|
Originally Posted By Troubledjoe:
Originally Posted By 10mm4ever:
The Russkies have used amber shellac for a LONG time. Certain arsenals may have adjusted the tint with iodine and used alcohol to thin the mixture somewhat. Who comes up with these outlandish "secret stain recipes" is beyond me,lol!! +1 A friend of mine tells me they used pine tar and amber shellac. When I get the chance I'm gonna refinish a Romanian set with the iodine and shellac method and see how it turns out. Post picks I am wondering what it looks like |
Sorry I didn't see your request for a pic until just now. This is a pic of a Mosin stock that Candyman from the Surplusrifleforum finished. All credit for the pic goes to him. I think this finish is pretty right on the money, and would look great on an laminate AK stock.
|
 Tell us how you did that, you just soaked it in iodine and then shellac

|
The real Russian finish is a finish/stain mix of Amber Shellac and a reddish stain.
It's also an easy finish to do. Step one is to buy some Amber Shellac. You can buy it ready to use in cans at woodworker supply houses, and some local stores like Lowe's. OR, you can buy flaked Amber Shellac and mix your own "cut" with denatured alcohol. Note that Shellac has a definite shelf life. The canned types may be treated to keep for up to 3 years, but the normal shelf life is about 6 months, which is why most people who use Shellac buy the flaked type and mix up what they need each time. Mixing is easy, basically pour the correct amount of alcohol in a container and add the measured amount of Shellac and let stand. Once you have the Amber Shellac, mix in iodine to a 4 parts iodine to 8 parts Amber Shellac mix. You may need to add more alcohol to get a thinner "cut" or mix. You really can't have it too thin, but you can have it too thick. About the only way to screw up Shellac is to use it too thick. Thin coats adhere better. After getting a good mix of iodine and Shellac, simply brush on a thin coat and let dry. (Shellac dries fast, 1 hour or less). Continue brushing on thin coats until you get the depth of color you want. For fine furniture type finishes you lightly sand between coats. For military look AK wood you don't. Russian Red wood ranges from a light dirty orange to a red-orange, to a deep, dark almost Burgundy red. Just continue brushing on thin coats until you have the color you like. Remember, photos of AK wood tend to look a lot redder and brighter then they really are. Shellac is a bright gloss. If you want less gloss, they sell "flattener's that are added to the Shellac that reduce the gloss, or you can rub it out with 0000 steel wool to flatten the gloss. Here's a good article on how to work with Shellac: http://americanwoodworker.com/blogs/shop/archive/2009/07/02/shellac.aspx |
|
McCormics red food coloring........................6 coats of Minwax Poly
http://i499.photobucket.com/albums/rr359/jrken1/AK47.jpg |

|
Originally Posted By tx318:
Originally Posted By Troubledjoe:
Originally Posted By 10mm4ever:
The Russkies have used amber shellac for a LONG time. Certain arsenals may have adjusted the tint with iodine and used alcohol to thin the mixture somewhat. Who comes up with these outlandish "secret stain recipes" is beyond me,lol!! +1 A friend of mine tells me they used pine tar and amber shellac. When I get the chance I'm gonna refinish a Romanian set with the iodine and shellac method and see how it turns out. Post picks I am wondering what it looks like +1 for Pine Tar and shellac. You'll want to mix the desired stain (red) with the shellac and apply it over the pine tar once it's dried. Here's what it can look like.This is a set I did. 


Pine Tar Process |


|
I bought a WASR with some tight grain on the foregrip and a Tapco folder (ACE folder is on the way) and I refinished the wood by sanding it down, then using Minwax "Sedona Red 222" and clear/transparent Shellac. It came out better than I expected and wasn't a 3 day project.
Before: http://i29.photobucket.com/albums/c291/TK4063/Weapons/Personal%20Firearms/100_2031.jpg http://i29.photobucket.com/albums/c291/TK4063/Weapons/Personal%20Firearms/100_2035.jpg After: http://i29.photobucket.com/albums/c291/TK4063/Weapons/Personal%20Firearms/100_2042.jpg http://i29.photobucket.com/albums/c291/TK4063/Weapons/Personal%20Firearms/100_2039.jpg |
|
I have a video series that shows you how to prep, fit, strip, stain, and finish your AK stock from start to finish with a deep, dark "Russian Red" finish. Please see the following videos. Any questions? PM here or on YouTube. Thanks!
Part 1 - Intro/What To Expect Part 2 - Getting Everything To Fit Part 3 - Difficult Upper Hand Guard Removal Part 4 - Stripping & Bleaching The Old Finish Off Part 5 - Refinishing Old Metal Hardware Part 6 - Staining & Creating The Custom Russian Red Finish Part 7 - Applying The Custom Russian Red Finish Part 8 - Final Steps & The Completed Rifle - nsz |
|
Originally Posted By Kujo:
I have a WASR id like to refinish but have never refinished anything so sorry for the beginner questions. Is the purpose of these steps originality? can you not get a similar style stain and sealant at say, lowes or home depot? I ordered a wood furniture set for CA WASR10 including foregrip (9.99 plus 9.99 shipping at centerfiresystems.com/, part # STKAKA12 1 ), removed finish and stain, sanded smooth as described in OP. I then stained with Rustoleum product 'Ultimate Stain', color 'Cabernet', and finished with several light coats of Rustoleum product 'Ulimate Polyurethane' soft touch matte finish, both purchased at Lowes. I stained 2-3 times with light buffing using 0000 steel wool between coats (stain or any moisture raises grain) until saturation/color was as desired. I then applied 6 coats of poly, allowing to dry, then buff to allow next coat to adhere. The last coat gets no buffing. I preferred the satin coat as it will not become slippery when wet, it has a nice feel and look. Note: I only used the foregrip furniture and red colored pistol grip from the 3 piece set. The set does not include the gas tube furniture or hardware: I used my existing hardware with no problems. https://photos-6.dropbox.com/i/l/VjDAitxeFOEVG9SO2d31-svOzujVldZSxAECv0TWiOw/25087504/1337904000/e7471e3/2012-05-03%2010.55.38.jpg#6 |
| I was exploring the site today and came across this stock refinishing post and noticed the original post mentions "heating varnish to 150 - 180 degrees". I 've been in the coating business (aka paint business) for 24 years to my knowledge spar varnishes are solvent based and should never be exposed to an open flame nor heated. |
Red Stain Formulas (Page 1 of 2)
AK Sponsor