


AR Sponsor

Posted: 8/17/2006 9:16:01 AM EDT
|
On my first build here and have hit a snag. Putting a Stag lower together with a Stag LPK. Here's my problem: I've been working this pin in for the better of 3 hours, slowly tapping it in. How tight is too tight? I'm afraid of stessing that tab of the receiver. Should I back it out or just continue seeing as I am almost through the first tab? Or am I just treating it too nice?Thoughts? Oh... and here's a pic: http://img.photobucket.com/albums/v299/roughrider/Real/0506ad8c.jpg Thanks |
|
You ARE following the instructions tacked above right? www.ar15.com/forums/topic.html?b=3&f=4&t=226782 Reason I ask is you mention "tapping" but they suggest ya start this way above: 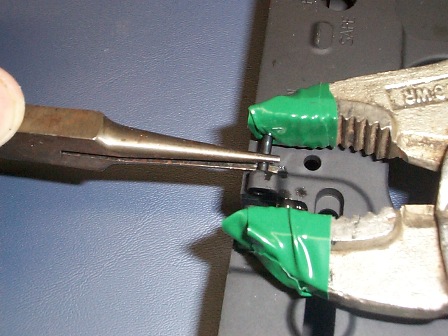 Do make certain the hole is clean and free of burrs..... Mike |
| Dont do the wise grip thing or at least becarefull. mine slipped and took the finish off the receiver and when I was done I still had to use a pin punch. Check your hole dimension. If you have time, they do sell roll pins that install eaiser. Spirol |
|
|
I've done three lowers now, two Stags and one Superior, all with Stag parts kits. I've not had a single problem installing the bolt catch pin. But I've also found the right sized drill bit and run in the hole, with my fingers, to clean any crap out of it. I also lube the hell out of the hole with CLP. ADCO sells a set of two roll pin punches that are the cat's meow. Snap your roll pin into the proper hole and it slightly compresses the pin. This helps also. I've also used a small pair of needle-nosed ViseGrips to squeeze roll pins. Don't squeeze too hard or you'll collapse the pin.  Others have had good results with pressing the pin in with ViseGrips but I've had such good luck with my method I'm reluctant to try something else. |
|
built 5 complete lowers all using visegrips on the bolt catch and trigger guard.. it looks like the pin is in to where it's about to buttup against the bolt catch? this is were the vise grips really shine as you can feel the pin touching the boltcatch.. you just wiggle it a little as you are squeezing the visegrips... if the route you're taking with the punch don't work, read the visegrip instuctions and give it a try.. remember to set grips so that you only do a little at a time (real important). |
|
How could one pin and a chunk of aluminum be so damned stubborn?!? Got the vice grips... taped and all. Eased them in and ever so slowly managed to bite into the finish on the front. he So... next question: How do I take it out? I don't see an easy way to knock it back out the way it came. It's still flush on the insde of the first hole. BTW.. thanks for all the advice so far. |
|
you need the properly sized punches. the right sized punch can be inserted from the opposite side to drive the pin out as you would do when you disassemble. my favorite method for inserting this pin (on the livingroom coffee table) is the 3 hand method. wife holds the upper on end while i drive the pin down with an oversized punch and hammer. takes 10 seconds to get it started and then i can hold it straight and drive the pin home. i have a hobby file set in anticipation of something out of spec. - never had to use it, but if i did, i wouldn't use more than a couple strokes. i don't have the tools to determine which part is out of spec. if the pin is deformed in any way, i'd chunk it. |
| Use a roll pin starter punch of the proper size. It will prevent the punch slipping off the roll pin. Place a piece of cardboard or other materiel between the pin and the receiver all the way to the end of the receiver. I use alot of DPMS Lower Parst Kits and the cardboard backing with their Logo is perfect for this. Hold the bolt catch in place and tap on the punch holding the roll pin, drive it in with taps until it hits the bolt catch, you might get lucky and it will go through the hole, if not the pin is touching it under light pressure, move it into place, it will center itself into the pin hole. Tap your roll pin punch driving the pin in until just before the punch touches and scars the receiver, then switch punches to the proper size roll pin punch. Finish tapping to the proper depth. This method takes seconds and can be used under just about any circumstances. I have intalled hundreds and hundreds this way at gunshows while talking at the same time. Just don't ask me to chew gum! |
| Did you try the split roll pin in the bolt hold back to make sure the hold back hole has clearence to work freely on the pin before starting? On some lower parts kits the hole is to small and once installed, the hold back won't work because its to tight on the pin. If that's the case with yours, put the pin in a drill chuck and while running the drill, file the center of the pin until you have removed just a little metal where the hold back will ride. |
|
looks like you already have it started good so... put another layer of tape on there and knock the hell out of it with your hammer. you don't have to use the punch to drive the pin in. i use a small ball peen hammer and just slide it back and forth on the tape. cover the whole side of the receiver. hold the receiver with your left hand, the catch with your left thumb. hit with your right hand. hit it hard enough that it almost hurts the palm of your left hand. keep an eye on the tape to make sure you aren't rubbing through it. sometimes you have to stop and put on another layer. you can use the punch at the very end to flush up the pin if you are afraid of marring the finish next to the hole. GOOD LUCK! Keith |
|
I dont use the vise grip method - I added that as an alternative since others seemed to like it. I dont use roll pin punches either, but I can see their use. First - I inspect the bolt catch and the roll pin. I make damned sure the roll pin will go through the hole in the bolt catch before I attempt to install it. Many, many bolt catches have pivot holes that are undersized and once installed they will bind because of this. I'd say I probably adjust one out of every 5 I do. I use a small diamung/carbid dremel bit that makes quick work of it - since a drill bit will just break. www.widgetsupply.com/page/WS/PROD/dremel-diamond-cylinder-3/D-CC10 I tape up the lower, then just tap the roll pin with a brass punch from the set in my instructions. Nothing fancy. Always works fine. I have been seeing LPK's with slightly oversized roll pins that are hard to start and take more tapping force. I sometimes will grind one end into a taper to make it easier to start, and then apply some grease to make it stick in the hole, and lubricate it. A long brass punch is your friend. The brass deforms - not the roll pin. Flat steel punches slip off too easy. Brass will mark your lower a lot less in the case of a slip too. |
|
Grinding a slight bevel on the end of the pin and applying a little oil or grease inside the hole will certainly help. That's my thumb you see in the photo with the Vise Grips and green tape. Never had one slip. Read the tacked thread on that well. Adjust the knob on ViseGrips so that the handles are almost closed when the jaws begin to push in the pin. That gives maximum leverage, and least force require for you to work the pliers. Even if it slips, there is very little movement of the jaws. After you move it that first fraction open the handles, one half turn clockwise on the knob, reset the Visegrips and repeat. Keep doing this until you are finished. |
|
"Eh, chicks are a pain in the ass. These guys bust my balls about living in my mom's cellar and all, but I have a great post count, a super action figure collection and mom says we can play airsoft in the garage after I mow the lawn. (posted by Aimless) " Hilarious!! While I don't live at my mom's anymore nor have a good post count I still have a good figure collection (despite those ruined at my parents by the weather and I still shot up a bunch of stuff with my airsoft Marui M4) UPDATE.... I drove the pin in too far.hock.gif I need to knock it back about a /32. ready to sell this bee-otch. |
AR Sponsor