MI, USA
|
[#1]
Originally Posted By cruz1911:
triger jobs are better left to a profesional.and remember.that if you happen to shoot someone with that weapon,it falls under modification. The muzzle should NEVER be pointed at anyone. Practice safe gun handling at all times. Treat every gun as if it is loaded and the safety has malfunctioned. Lots of people have stated to do the drop test. But even with that done, crap can happen. It can happen with stock and aftermarket stuff too. Now; This is a great thread. I plan on doing one of my guns. Thanks to all that have contributed their experience and knowledge. |
|
|
|
[#2]
Originally Posted By shooterdon:
Originally Posted By cruz1911:
triger jobs are better left to a profesional.and remember.that if you happen to shoot someone with that weapon,it falls under modification. The muzzle should NEVER be pointed at anyone. Practice safe gun handling at all times. Treat every gun as if it is loaded and the safety has malfunctioned. Lots of people have stated to do the drop test. But even with that done, crap can happen. It can happen with stock and aftermarket stuff too. Now; This is a great thread. I plan on doing one of my guns. Thanks to all that have contributed their experience and knowledge. Never? Not even if I intend to shoot them? |
|
|
|
|
[#3]
Originally Posted By shooterdon:
Originally Posted By cruz1911:
triger jobs are better left to a profesional.and remember.that if you happen to shoot someone with that weapon,it falls under modification. The muzzle should NEVER be pointed at anyone. Practice safe gun handling at all times. Treat every gun as if it is loaded and the safety has malfunctioned. Lots of people have stated to do the drop test. But even with that done, crap can happen. It can happen with stock and aftermarket stuff too. Now; This is a great thread. I plan on doing one of my guns. Thanks to all that have contributed their experience and knowledge. I have done this mod to three rifles now and have fired thousands of rounds at this point. No malfunctions of any kind have occured. Now, friends with fancy adjustable triggers can't seem to keep cash in their pockets and their hammers resetting at the same time. |
|
|
|
SWE
|
[#4]
Did any of you re-harden the parts after polishing? I'm looking to do this or something similar with new DPMS parts. What type of steel are they made of? Do I need to case-harden them, or can I harden them with oil or water? I've watched the AGI video on hardening but never attempted anything similar.
Any tips would be helpful as I haven't been able to find much information about re-hardening sears etc on-line. "Leave it to a qualified gunsmith" or similar is not very helpful although I do appreciate the concern. /jake |
|
|
SC, USA
|
[#5]
Originally Posted By jakeSWE:
Did any of you re-harden the parts after polishing? I'm looking to do this or something similar with new DPMS parts. What type of steel are they made of? Do I need to case-harden them, or can I harden them with oil or water? I've watched the AGI video on hardening but never attempted anything similar. Any tips would be helpful as I haven't been able to find much information about re-hardening sears etc on-line. "Leave it to a qualified gunsmith" or similar is not very helpful although I do appreciate the concern. /jake would like to know what steel the disconnector is myself. I'm a hobby knike maker and harden blades alot, but knowing what steel helps greatly for hardening. |
|
|
SWE
|
[Last Edit: jakeSWE]
[#6]
I sent them (DPMS) an e-mail. I'll come back with the info they provide (if any).
|
|
|
SC, USA
|
[#7]
Had my R25 to the range today. No issues, good directions.
|
|
|
LA, USA
|
[#8]
Great write up. I have one question, what is the purpose of changing the disconnector sping that comes with the JP kit?
|
|
|
IL, USA
|
[#9]
kwrangin, this question is directed at you, but at everyone essentially.
Why are you lightening triggers when you can strengthen your hands and fingers for free? Also, Why make your hammer a few grams lighter by cutting it down (I know, mass in motion yada yada), and then you add heavy stuff to your gun; such as the extra mag well hanging off the port side and that rediculous L shaped thing that appears to be welded with green glue to the bolt catch. Thank You. BTW , very good pictures on the 1st page, kwrangin |
|
|
|
[#10]
Originally Posted By sigbangin:
kwrangin, this question is directed at you, but at everyone essentially. Why are you lightening triggers when you can strengthen your hands and fingers for free? Also, Why make your hammer a few grams lighter by cutting it down (I know, mass in motion yada yada), and then you add heavy stuff to your gun; such as the extra mag well hanging off the port side and that rediculous L shaped thing that appears to be welded with green glue to the bolt catch. Thank You. BTW , very good pictures on the 1st page, kwrangin I work with my hands on a daily basis turning wrenches and the like so I doubt any extra exercises are going to increase my digital dexterity. What the trigger mod does is give me a more consistent break that requires a lot less guess work. As far as kwrangin's gun...His gun, his rules. This freedom stuff is a beautiful thing. |
|
|
|
IL, USA
|
[#11]
Very good.
I jump all over my guys when they add on aftermarket parts just because the item is in the current tough guy magazine. The trigger finger should not go anywhere near the trigger except to fire. Not for tripping the bolt catch.... My opinion. |
|
|
AL, USA
|
[#12]
Originally Posted By sigbangin:
kwrangin, this question is directed at you, but at everyone essentially. Why are you lightening triggers when you can strengthen your hands and fingers for free? Also, Why make your hammer a few grams lighter by cutting it down (I know, mass in motion yada yada), and then you add heavy stuff to your gun; such as the extra mag well hanging off the port side and that rediculous L shaped thing that appears to be welded with green glue to the bolt catch. Thank You. BTW , very good pictures on the 1st page, kwrangin No problem, I can explain. It seems you are missing the point of the mods. Lightening a trigger is not because of the effort it takes to pull it, it so that the pull is smooth and crisp. Talk to some bullseye shooters who run sub 1 lb trigger pulls in the name of accuracy. I've worked metal fabrication and mechanic type work since I was a kid, hands are plenty strong. Lightening the hammer is not to save weight, it is strictly a mass motion issue to make up for the lighter springs and provide reliable ignition with hard primers. As for my setup, i'm primarily a pistol shooter, and as such I'm used to being able to manipulate all the controls on the weapon without changing my firing hand grip. I've strove to make my AR the same way, the only thing the support hand has to do is rack the charging handle, much like a pistol where all it does is rack the slide. The Redi-mag was removed a long time ago, decided I didn't like the extra weight on there. Still debating replacing the UBR stock, love it, but it is pretty hefty. The bolt catch lever goes a long way towards my goal of functioning all controls without changing my grip. It is not glued, it is tig welded to the bolt catch and reheat treated afterwards. The green is just an epoxy in there for looks from the company that produces the lever (Phase 5 Tactical) I assure you my booger hook is nowhere near the trigger when using the lever. It is no different than having your trigger finger at rest on the reciever, or working the mag release. Pics will explain better. Trigger finger at ready rest. 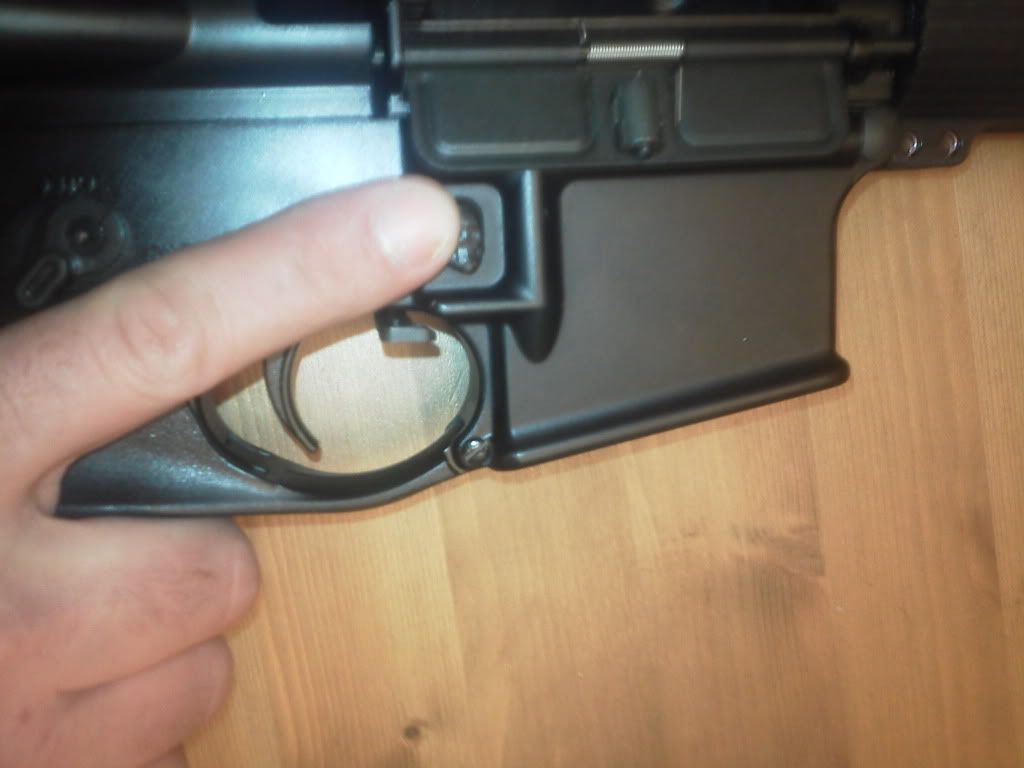
Working the mag release. 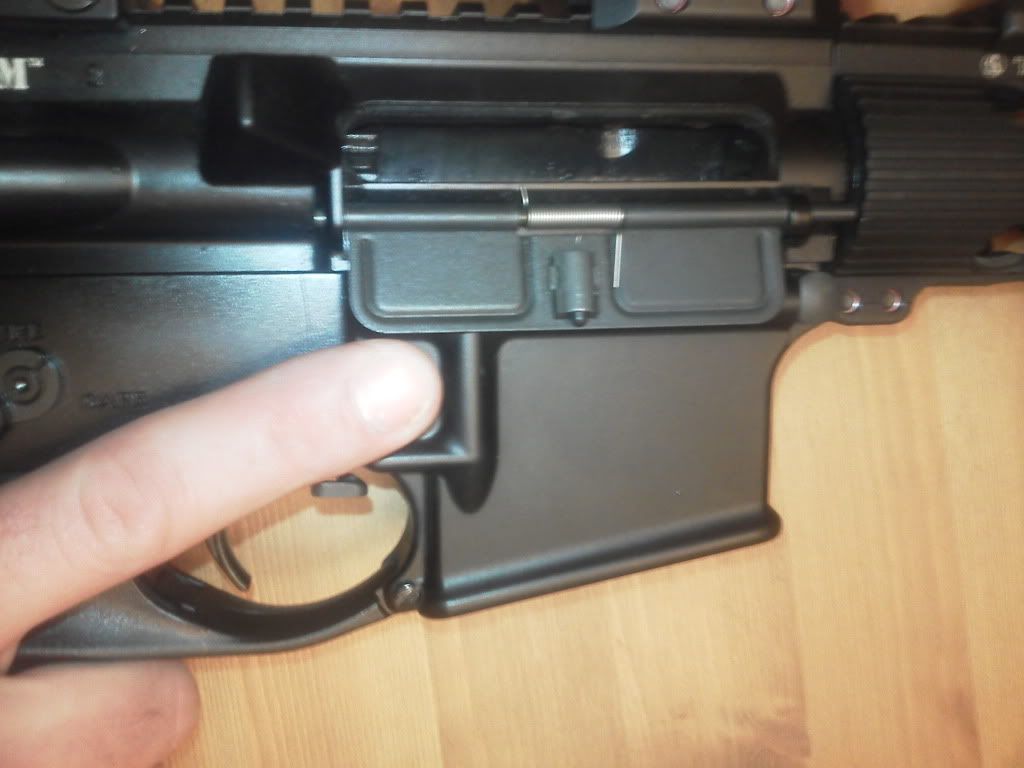
Releasing the bolt. 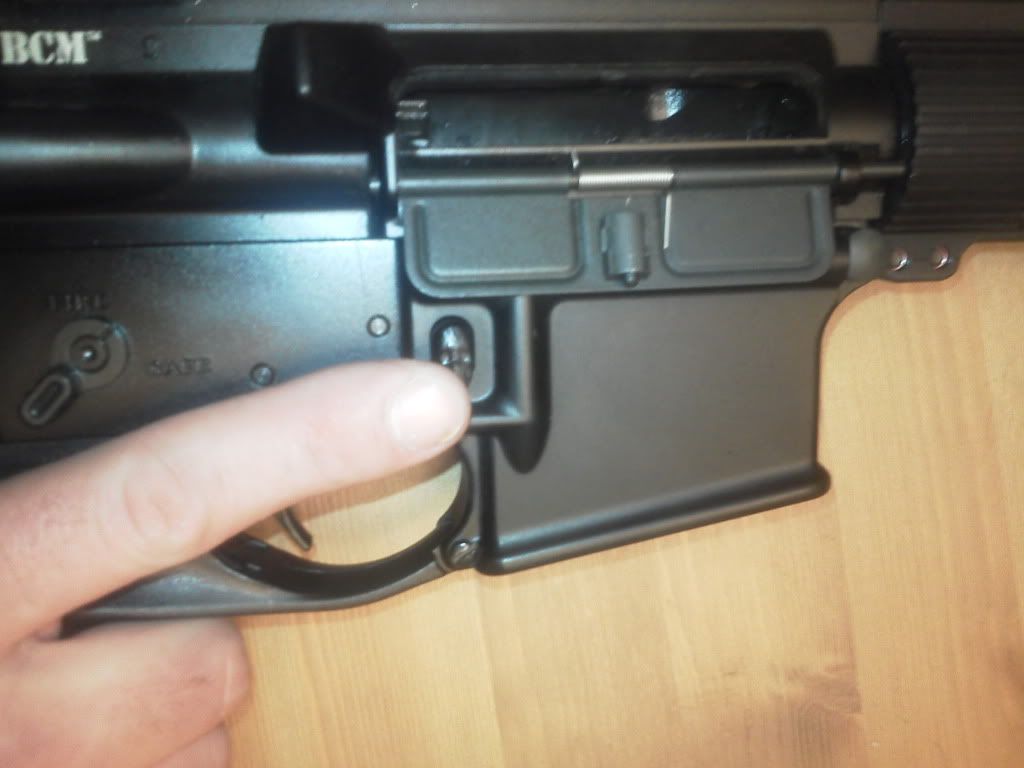
Note that all three actions are a far cry from the booger hook on the bang switch. 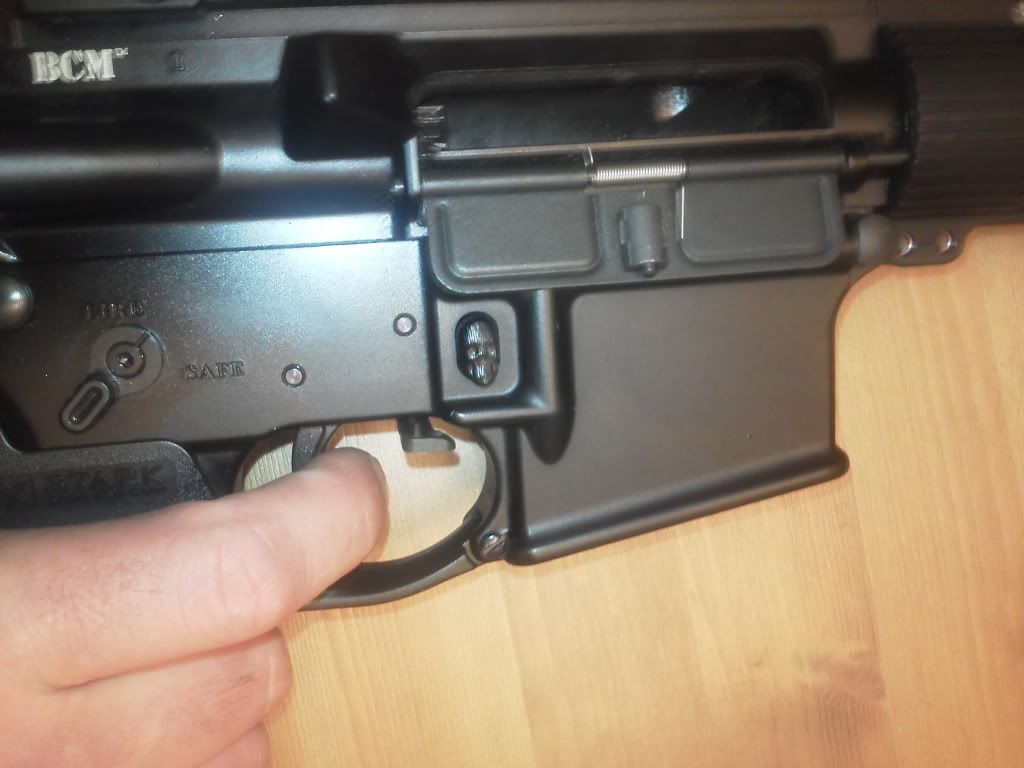
And thanks for the props on the pics, I try to doccument stuff in the hopes that it will help others, still working on the quality with my cheap camera. |
|
|
PA, USA
|
[Last Edit: scudzuki]
[#13]
I've been lurking for a while trying to become educated. First post here.
I applied the setscrew mod to my Windham Weaponry HBC. I used this page trigger mod as my guide. I was a little surprised to find my lower threaded 1/4-28 given that the author is pretty emphatic that it's usually 1/4-20 and WWI claims their ARs are milspec. In reading more of the comments on this thread it would appear that 1/4-28 is more common, not that functionally there is really a difference (other than interchangeability). Since I was a toolmaker in a past life I already had NF and NC taps on hand. The setscrew was a diffferent story. The local HD had no NF (1/4" or otherwise) hardware in stock, let alone a setscrew. I was able to find one odd 1/4-28 capscrew mistakenly dropped in a 1/4-20 bin, so I made my own slotted set screw like others have done. Polished the sear faces with first an india oilstone (what toolmakers call a slipstone) followed up by some mother's mag polish. The hammer needed very little work as the sear face was ground already. Left the spring and hammer mass alone... been shooting a lot of Wolf ammo so I don't want to risk light strikes. I ended up not tapping the hole the rest of the way... there was maybe 1 unfinished thread and it worked out nearly perfectly, the setscrew got tight in the threads at the correct depth, although I did add a bit of blue loctite before I was done. Did not have to grind the trigger to clear the safety, either. I can return it to OEM condition in 1 minute. Trigger travel reduced to 1/3 of the original travel and less gritty. Definitely worth the time. Great resource here guys. Joe |
|
|
TN, USA
|
[#14]
Originally Posted By kwrangln: Since arf keeps archiving threads and the search sucks, I'll throw up some pics again.. 1. Tap the grip screw hole all the way through. http://i277.photobucket.com/albums/kk58/kwrangln/new%20ar%20build/newar47.jpg http://i277.photobucket.com/albums/kk58/kwrangln/new%20ar%20build/newar54.jpg 2. Take your run of the mill LPK hammer and cut the crap out of it to lighten it up. Touch it up with a spray of paint when you're done. An object at rest stays at rest until acted upon. A heavy hammer takes more force to accelerate than a light hammer. Since I use light springs, the light hammer allows them to accelerate it to full travle speed alleviating light strikes. http://i277.photobucket.com/albums/kk58/kwrangln/new%20ar%20build/newar26.jpg http://i277.photobucket.com/albums/kk58/kwrangln/new%20ar%20build/newar27.jpg 3. Add in some light weight springs, they are cheap and work great. http://i277.photobucket.com/albums/kk58/kwrangln/new%20ar%20build/newar31.jpg 4. Clean up the machining marks on the sear surface. These are what gives you that gravel road trigger pull. Before. http://i277.photobucket.com/albums/kk58/kwrangln/new%20ar%20build/newar28.jpg After. http://i277.photobucket.com/albums/kk58/kwrangln/new%20ar%20build/newar29.jpg My tool of choice is a small ceramic knife sharpening stone. Very fine cut and a nice flat surface. You don't need to take much off, and be careful to keep the sear flat on the stone, you don't want to change any angles. http://i277.photobucket.com/albums/kk58/kwrangln/new%20ar%20build/newar30.jpg 5. Put it all together. FIrst you'll need a set screw and some blue locktite. http://i277.photobucket.com/albums/kk58/kwrangln/new%20ar%20build/newar48.jpg Run that puppy up the grip screw hole untill it contacts the bottom of the trigger. http://i277.photobucket.com/albums/kk58/kwrangln/new%20ar%20build/newar49.jpg Hold the trigger to the rear and cock the hammer so that it is caught by the disconnector. http://i277.photobucket.com/albums/kk58/kwrangln/new%20ar%20build/newar51.jpg Then let go of the trigger and back out the set screw until the hammer falls from the disconnector to the sear. http://i277.photobucket.com/albums/kk58/kwrangln/new%20ar%20build/newar52.jpg Function check and adjust as necessary. You may have interference issues with the safety, if so then use a round file to make a groove in the back upper surface of the trigger so the safety clears. Once everything is good, set it aside and let the locktite set up. 6. Go to the range and see just how good the trigger feels now, you'll be amazed. Could someone post some pics of where you would need to file if you have issue with the safety? |
|
|
TN, USA
|
[#15]
OK, done the "trigger job" on my ar. I bought the spring kit from jp for a 4-4.5# pull and cut the hammer as the pics showed. Now my ar won't fire. The firing pin hits the primer but not hard enough to ignite it. What did I do? Using pmc rounds.
|
|
|
|
[#16]
Try replacing your old springs and see if the problem persists. If it does then you will need to replace your hammer. The earlier posts explain why your situation is possible.
|
|
|
|
MI, USA
|
[Last Edit: Laust]
[#17]
Originally Posted By kwrangln:
Originally Posted By sigbangin:
kwrangin, this question is directed at you, but at everyone essentially. Why are you lightening triggers when you can strengthen your hands and fingers for free? Also, Why make your hammer a few grams lighter by cutting it down (I know, mass in motion yada yada), and then you add heavy stuff to your gun; such as the extra mag well hanging off the port side and that rediculous L shaped thing that appears to be welded with green glue to the bolt catch. Thank You. BTW , very good pictures on the 1st page, kwrangin No problem, I can explain. It seems you are missing the point of the mods. Lightening a trigger is not because of the effort it takes to pull it, it so that the pull is smooth and crisp. Talk to some bullseye shooters who run sub 1 lb trigger pulls in the name of accuracy. I've worked metal fabrication and mechanic type work since I was a kid, hands are plenty strong. Lightening the hammer is not to save weight, it is strictly a mass motion issue to make up for the lighter springs and provide reliable ignition with hard primers. As for my setup, i'm primarily a pistol shooter, and as such I'm used to being able to manipulate all the controls on the weapon without changing my firing hand grip. I've strove to make my AR the same way, the only thing the support hand has to do is rack the charging handle, much like a pistol where all it does is rack the slide. The Redi-mag was removed a long time ago, decided I didn't like the extra weight on there. Still debating replacing the UBR stock, love it, but it is pretty hefty. The bolt catch lever goes a long way towards my goal of functioning all controls without changing my grip. It is not glued, it is tig welded to the bolt catch and reheat treated afterwards. The green is just an epoxy in there for looks from the company that produces the lever (Phase 5 Tactical) I assure you my booger hook is nowhere near the trigger when using the lever. It is no different than having your trigger finger at rest on the reciever, or working the mag release. Pics will explain better. Trigger finger at ready rest. http://i277.photobucket.com/albums/kk58/kwrangln/04.jpg Working the mag release. http://i277.photobucket.com/albums/kk58/kwrangln/03-1.jpg Releasing the bolt. http://i277.photobucket.com/albums/kk58/kwrangln/02-1.jpg Note that all three actions are a far cry from the booger hook on the bang switch. http://i277.photobucket.com/albums/kk58/kwrangln/01.jpg And thanks for the props on the pics, I try to doccument stuff in the hopes that it will help others, still working on the quality with my cheap camera. kwrangln,I did some of your mods and my system is mutch mutch smoother , Ill be gettin a set screw this afternoon.What I would like to ask you is.The little symbol on your BCM upper,next to the white BCM. Do you know the significance of these? Mine is hammer forge,lite weight and has a square, Do you know what they mean? OK, BCM told me.Alls well. |
|
|
PA, USA
|
[#18]
I am under the impression that the case hardened trigger sear and hammer sear are hardened to a depth of between 1mm and 1.5 mm. That is roughly between 1 and 1.5 credit cards thick.
I hear a lot of people say NEVER polish the above mentioned surfaces because you will remove the case hardening and go cyclic. Polishing the factory tool marks and grinding a credit card worth of material seems like its a fairly wide margin of error. Am I missing something here? |
|
|
|
[#19]
Originally Posted By Chames:
I am under the impression that the case hardened trigger sear and hammer sear are hardened to a depth of between 1mm and 1.5 mm. That is roughly between 1 and 1.5 credit cards thick. I hear a lot of people say NEVER polish the above mentioned surfaces because you will remove the case hardening and go cyclic. Polishing the factory tool marks and grinding a credit card worth of material seems like its a fairly wide margin of error. Am I missing something here? Read through the first five pages that totally explain the mod. No one is grinding off a credit card worth of material. |
|
|
|
PA, USA
|
[#20]
I read through the whole thread. I was not aware it was devoted entirely to one mod.
Perhaps I should have been more specific. It seems that you have to be hacking quite a bit of material to ruin a FCG. Does that sound right? I polished my sear surfaces today with a ceramic Spiderco file. I made no adjustments to travel or weight. I just wanted to get the grit out. I am very pleased with the results, but have not live fired it yet. I only just barely removed all the tool marks but the parts are mirror smooth and feel much better in the pull. I read the mod link and it said that any buffing or polishing will cause damage, which I find hard to believe. In essence, for that to happen only the tool marks that I removed would have had to be hardened. A lot of other people have posted that "professionals" unsuccessfully polish these surfaces quite often. Sounds silly. You would have a much smaller part when you were finished and would probably start to get nervous about the parts fitting together correcly. |
|
|
ND, USA
|
[#21]
I believe this question was posed already, but was never really answered.
I backed off the setscrew 'til the hammer fell from the disco and cleared the safety, but when I re-cock the hammer, it will still make contact with the disco even though I am not holding the trigger down. My first thought was that it could cause excessive wear on the disco/rear sear surfaces, but then it occurred to me that I will be capturing the trigger for a short reset (nearly) every time the rifle is fired. So is this a non-issue? |
|
|
CA, USA
|
[#22]
Originally Posted By kaos:
I sent Bill Springfield a few hammer and trigger sets (keep them paired, with springs) and got back some nice stuff for a few builds I did. I haven't used him for a bit, but I'm still happy with the work. http://www.triggerwork.net/ar15s.html +1 Sent it to Bill tell him what you use the rifle for and you will be pleased. Reasonable pricing as well. |
|
|
AL, USA
|
[#23]
Originally Posted By sw222:
Originally Posted By kaos:
I sent Bill Springfield a few hammer and trigger sets (keep them paired, with springs) and got back some nice stuff for a few builds I did. I haven't used him for a bit, but I'm still happy with the work. http://www.triggerwork.net/ar15s.html +1 Sent it to Bill tell him what you use the rifle for and you will be pleased. Reasonable pricing as well. There have been more than a few stories of issues with his work, and it kinda goes against the whole "DIY" theme of this thread. |
|
|
|
[Last Edit: hero2three]
[#24]
I started this mod today. My tap is about a 1/8 inch short of making it all the way through. The set screw is flush with the receiver. I will run out tonight and pick up a longer one. Smoothed the sear, hacked the hammer and I have JP springs installed. Hopefully I can find a longer tap tonight and be able to finish.
|
|
|
|
|
[#25]
Finished tapping the hole. After a few adjustments this thing rocks. My lower isnt 100% finished yet, as I still have to get a set screw for the rear takedown pin mod. Gonna try to finish up in the morning and head to the range to function test. Thanks for the tutorial.
|
|
|
|
CA, USA
|
[Last Edit: Museone]
[#26]
If you do anything, as far as home trigger work goes, polish the sear and hammer contacts. it is a huge difference. Be sure to polish the front and top faces of the sear and the front and bottom of the hammer. a little bit of time with a sharpening stone and a fine file goes a long way.
|
|
|
CT, USA
|
[#27]
Originally Posted By jakeSWE:
Did any of you re-harden the parts after polishing? I'm looking to do this or something similar with new DPMS parts. What type of steel are they made of? Do I need to case-harden them, or can I harden them with oil or water? I've watched the AGI video on hardening but never attempted anything similar. Any tips would be helpful as I haven't been able to find much information about re-hardening sears etc on-line. "Leave it to a qualified gunsmith" or similar is not very helpful although I do appreciate the concern. /jake 8620 so there is not much carbon in the steel I'm not sure what the best way would be to go about it. |
|
|
NH, USA
|
[#28]
does the set screw and polishing have any advantage with something like a rra 2-stage at all? still haven't decided on a trigger yet
|
|
|
MI, USA
|
[#29]
anyone have issues with lightening the hammer after installing jp 3.5 spring kit? dont wanna lighten mine and then not have the rifle work this weekend.
|
|
|
|
[#30]
Originally Posted By leadslinger479:
anyone have issues with lightening the hammer after installing jp 3.5 spring kit? dont wanna lighten mine and then not have the rifle work this weekend. I do not cut the hammer, just polish, change the springs, and install an adjuster screw. I haven't had any issues on any of my builds. If I did ave light strikes, I would than cut the hammer down. |
|
|
|
|
[#31]
Originally Posted By gmtech825:
does the set screw and polishing have any advantage with something like a rra 2-stage at all? still haven't decided on a trigger yet Yeah, it's a hell of a lot cheaper and takes 30 minutes. |
|
|
|
NH, USA
|
[#32]
Originally Posted By esa17:
Originally Posted By gmtech825:
does the set screw and polishing have any advantage with something like a rra 2-stage at all? still haven't decided on a trigger yet Yeah, it's a hell of a lot cheaper and takes 30 minutes. -not an advantage over the 2-stage, modifying the actual 2-stage. mainly the set screw mod |
|
|
MI, USA
|
[#33]
installed the jp spring kit and the set screw. man what a world of difference! cant wait to shoot it this weekend!
|
|
|
NM, USA
|
[#34]
Did this mod and finally got to shoot last night to sight a scope. I don't think my hammer is "balanced" after cutting but I might get a speed hammer to replace. The take-up is gone and the spikes reg. trigger was pretty smooth by disconnector so I left that alone. I did cut the hammer but did not paint yet. I also installed the set screw and "filed" the back of trigger to allow safety to function properly.
Also did the trigger test afterwards and slammed the buttstock on the ground about 10 times to simulate a drop. The trigger held strong through testing and I took it to the range. I must say that take-up is all but gone, very crisp and responsive. Still heavy even after bending spring a little but I have the JP ent 3.5 springs coming. I am more worried about the balanced hammer than it being light but I did have 1 light strike after a mag change and releasing bolt catch. 1st round did not go bang cycled it out and 2nd took off with no hiccups. It was late so I only got off about 40 rounds and 15 were slow fired for accuracy check on scope. The mag dump before leaving left all on paper at 50 yards with 4x32 cqb scope and the trigger delivered with no problems. Very nice addition to my rifle. Can't wait to spend a little more time at the range. |
|
|
NM, USA
|
[#35]
Range report:
Got my yellow springs in this weekend. After trigger testing at the house with yellow springs, cut hammer the hammer did release after a couple butt strikes to the ground. Trigger pull is very shallow and crisp. I had several "light strikes" at the range. Enough to upset me. I will be going with minimum of red hammer spring or stock spring. The take-up did not cause hammer release until after the yellow spring. Not sure if the hammer is not heavy enough or the spring is not strong enough to engage primer. All primers had indentions although did not fire on rounds I checked after the fact. If this were a zombie strike I would have been dead if I didn't abandon this weapon. I will be readjusting my trigger situation. I do not blame this thread rather than more myself and the newness to gunsmithing and AR triggers. But one thing is for sure: I will be fixing this to be dependable, solid, accurate and SAFE. Other than that when it did go bang I was nailing targets in a 40 mph crosswind at 50 and 100 yards like no ones business. Both with a Leapers 4x32 CQB scope and an EOTech 512 with and without the 3x magnifier. This gun is strikeable in all setup. There is a special place for my AR. I also noticed a problem with not cycling properly but I will be looking into gas system as I just installed a 2 piece YHM specter gas block with no probs until about 100 rounds into it. |
|
|
USA
|
[#36]
I did this mod a few years ago, and it's worked great ever since. One thing I would like to add, if you take too much off the back of the trigger bar and the safety does not work anymore, all is not lost! I took too much off and build it back up with JB weld and filed again. It's worked for me so far.
but I do have a question, has anybody compared pull weight with the yellow hammer spring vs stock spring with a leg cut off? |
|
|
MT, USA
|
[#37]
Polished sear and hammer. Installed set screw(Tactical Innovations didn't need tapped, DPMS did) left hammer and springs alone. Much better!! No creep. Still somewhat heavy,but I'm happy.
|
|
|
LA, USA
|
[#38]
Just reworked my stock DPMS trigger system useing the Junkyard method. What a difference! Now just to change out the springs to 3 1/2 lb set & i'm good to go.
|
|
|
|
[#39]
I recently put together a lower and the stock trigger was awful. It had a nasty "snag" about 2/3 of the way through the travel. Calling it gritty just doesn't properly describe what it felt like.
I just did part of this trigger job. Polished the sear face slightly to get rid of the machine marks and put some Tetra grease on the mating surfaces. Just this minor work not only took the "snag" out of my trigger, but it's nice and smooth and crisp. I am using the stock springs for now. The lower is an AGP and it has a separate threaded hole and came with a set screw to take up the pretravel. For now I decided to leave this alone because this is a HD gun and I like having the safety margin the full travel camming action provides. |
|
|
|
VA, USA
|
[#40]
good afternoon, ok its easy to work on your ar15 trigger.get a small punch set to go into the side of the lower.be shure to see how the #23 hammer pins come out..add new springs one at a time.put in punch to hold parts.push in pins and pull out puch slow.tap in pin last easy. i just got in a JP enterprises trigger spring.went fron the stock DPMS 5 to 8 lb trigger to the new JP 3 to 3 1/2 lb.go to www.midwayusa.com to down load the trigger redo.they all work the same.just you will be looking for a less Lb.pull on a good rifle.
|
|
|
KY, USA
|
[#41]
I did this today to my Spikes Battle Trigger. Used a band saw and wide mouth sheet metal pillars to get a straight cut on the hammer. Added the JP yellow springs and set screw as well. Trigger pull is close to my kimber 1911 (4 lbs) and out of 200 shots, not a single light strike, passed all drop tests.. Looking at the primers and comparing to my pre trigger job, the hammer is hitting just as hard with the lights as with the stock using M885 Lake City 5.56. Should have done this a long time ago.
|
|
|
|
[#42]
Originally Posted By gregrmp:
Originally Posted By esa17:
I'm buying a new hammer and spring set today, along with some anti-roll pins I think. I've never tapped a lower before, what kind of lube do you use? Any other tips for tapping the lower? There are products out there for tapping like "Tap-Magic" - for aluminum they are basically kerosene. Diesel would probably work fine. Just about any lube will work. If you use a heavy grease, like wheel bearing grease, it will catch any chips that are created in the flutes of the tap. Blast it with brake cleaner to clean, then apply some oil for rust prevention. |
|
|
|
NC, USA
|
[#43]
there should be a sticky so we don't have to read through all the mumbo. I finished honing and polishing (to a mirror shine) the trigger of my sig516, feels crisp as hell. second trigger job, first was a tapco 2 in my wasr 10/63.
Can I bend and/or cut the stock springs to reduce the pull? |
|
|
|
[#44]
Buy a set of the Jp springs.
Posted Via AR15.Com Mobile |
|
|
|
FL, USA
|
[#45]
Will this screw modification and jp spring setup have a substantial effect on a Daniel Defense LPK?
|
|
|
|
[#46]
Originally Posted By EKKsoldier622:
Will this screw modification and jp spring setup have a substantial effect on a Daniel Defense LPK? No, I can't think of any reason it wouldn't work on a DD LPK. |
|
|
|
FL, USA
|
[#47]
I wasn't sure if a company like DD would make a lpk that wouldn't benefit from this modification, but I just finished putting my rifle back together. For tapping the grip screw I used a 1/4-28 NF tap and used a 1/4" set screw and all I can say is WOW! I didn't realize how much of a change this would make. I was afraid I'd mess up the tapping process and ruin my lower, but once it caught the threads it was easy, just used royal purple to oil the threads as i threaded it in.
Very snappy, not too heavy trigger that breaks instantly and has very little post travel Considering the speed hammer and jp springs but we'll see how this turns out |
|
|
TX, USA
|
[Last Edit: Skavatar]
[#48]
can't remember the website but when i built my lower last year, i bent the trigger springs approx 30 degrees. and then cut off one leg of the hammer spring, leaving about 3/8" and filed it smooth. it was a PSA lpk, made a noticable difference. i finally went to Lowes and bought the set screw. Home Depot didnt have it in the 1/4 -28 X 1/4 size. nice thing with Surplus Arms and Ammo's lower is that it is tapped all the way through.
i took the hammer and trigger and safety off to get some pics. without the safety i was able to get the set screw in further and really lighten up the trigger. so, with that said, is it legal to not have a safety? pics of the spring modifications. 

|
|
|
|
[#49]
I've been doing AR triggers the same way for quite a few years now. Bend the right leg of the hammer spring 30 degrees back (don't cut it) and let it slip under the trigger pin, bend both legs of the trigger spring up a bit (the angle varies gun to gun), barely stone the contact surfaces, and grease everything with Magnalube, I haven't been as concerned with the shortest possible trigger on most of them, but the 2nd AR I built (varmint gun) had a set screw. Now I'm building a new precision AR so I need to fetch another set screw since this lower (Para) doesn't have one in it.
Originally Posted By Skavatar:
so, with that said, is it legal to not have a safety? Legal, yes. Intelligent, not in the slightest. With the trigger that light there's a very real chance that the gun will runaway if you drop it. |
|
|
|
|
[#50]
Originally Posted By SniperKage:
I've been doing AR triggers the same way for quite a few years now. Bend the right leg of the hammer spring 30 degrees back (don't cut it) and let it slip under the trigger pin, bend both legs of the trigger spring up a bit (the angle varies gun to gun), barely stone the contact surfaces, and grease everything with Magnalube, I haven't been as concerned with the shortest possible trigger on most of them, but the 2nd AR I built (varmint gun) had a set screw. Now I'm building a new precision AR so I need to fetch another set screw since this lower (Para) doesn't have one in it. Originally Posted By Skavatar:
so, with that said, is it legal to not have a safety? Legal, yes. Intelligent, not in the slightest. With the trigger that light there's a very real chance that the gun will runaway if you drop it. I did hundreds of trigger jobs while I was in the service. The spring bending and lightly buffing the catch points was what I did. we were not allowed to "alter" the original components issued with the rifle. Now at the Marine "match or sniper levels" we were given more leeway for permanent alterations. I was never into cutting the springs though. To please a well trained Marine sniper with a trigger job was a real fun task ( yes snipers do use M16's in certain situations), especially on their M-40A1. I can get a nice 2.5 - 3lb smooth trigger break with very little or no creep just by doing the springs and catch point tweaks. I prefer my personal weapons trigger at 3.5lbs of pull. |
|
|
|
 Win a FREE Membership!
Sign up for the ARFCOM weekly newsletter and be entered to win a free ARFCOM membership. One new winner* is announced every week!
You will receive an email every Friday morning featuring the latest chatter from the hottest topics, breaking news surrounding legislation, as well as exclusive deals only available to ARFCOM email subscribers.

AR15.COM is the world's largest firearm community and is a gathering place for firearm enthusiasts of all types.
From hunters and military members, to competition shooters and general firearm enthusiasts, we welcome anyone who values and respects the way of the firearm.

Subscribe to our monthly Newsletter to receive firearm news, product discounts from your favorite Industry Partners, and more.
Copyright © 1996-2024 AR15.COM LLC. All Rights Reserved.
Any use of this content without express written consent is prohibited.
AR15.Com reserves the right to overwrite or replace any affiliate, commercial, or monetizable links, posted by users, with our own.


