


AR Sponsor

Posted: 11/9/2009 9:32:44 PM EDT
| hey i have a bull barrel ar with aluminum ff tube, i purchased a troy quad rail and unscrewed tthe ff tube but i cantt seem tto figure out how to attach/ get the part that tthe ff tube connects to the rifle off... am i missing something? |

| Remove gas tube, Remove free float threaded barrel nut, screw on Troy nut (if it has one) and follow proper torque/retorque proceedures, attach rail. If the rail fits to a standard barrel nut, get the assy shown above and install the barrel with that, again torque/retorque per spec, then add rail. |
|
Quoted:
its a screw on ff aluminum tube that screws onto the barrel nut... wut kind of nut would i need for a troy mrf quad rail The Troy uses the standard Barrel Nut (the one that works with the plastic handguards). BTW you'll need to remove the front sight (or gas block) to remove the barrel nut. |
|
Quoted:
also is there a standard barrel nut under the threaded portion that my aluminum tube screwed onto Not the standard one. There are 2 types of tube handguards. The most basic one just screws onto the upper receiver and replaces the standard barrel nut. The other screwes onto a proprietary barrel nut. |
|
Just did this exact project a while back - hang on and I'll shoot you a link with pics...
Short story is: You will need a standard barrel nut - the FF Aluminum tube acted as it's own barrel nut. A standard barrel nut will NOT fit over a Bull Barrel - figured this out the hard way (Assuming you have a bull barrel to the specs of a WIlson (Such as what RRA used on their varminter) |
|
My post about this was on another site. I'll just copy and paste what I have... Some of it covers what you've already accomplished, but the rest might be helpful...
I have RRA Varmint A4, and I am thinking of replacing the free float tube with a railed handguard. How difficult would something like this be? What tools would be needed, and is it worth it doing it at all? I undertook this exact project a few months ago. I was in the market for a "precision" semiauto and ran into a steal on a RRA Varmint A4 factory upper. At the same time, I caught the bug for an SPR'ish rig and decided to kill 2 birds with 1 stone. Here is what I started with: (The 18 inch model) 
and here's the finished product: 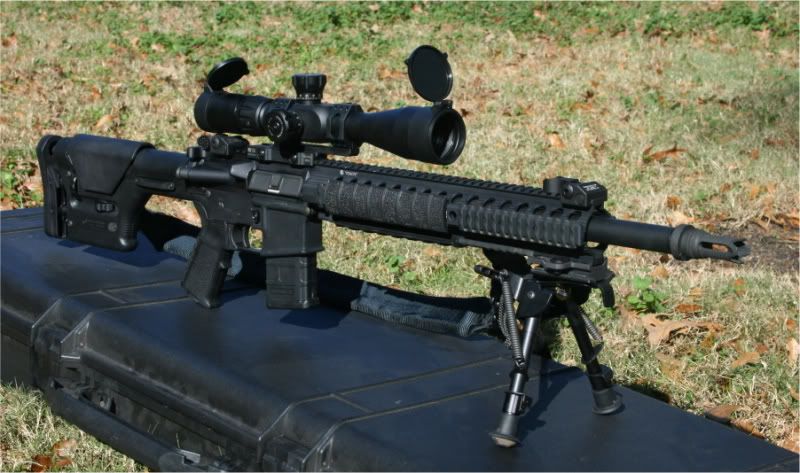
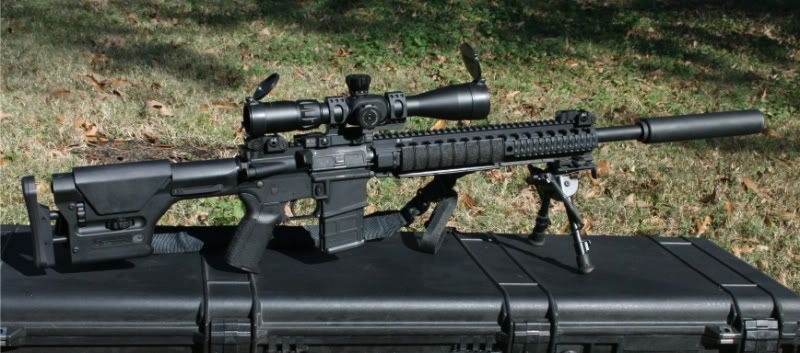
It was a little more involved than I expected, but a good experience overall. I'm working off memory, here - but this is the process as I remember it... 1) Removal of the factory aluminum free float tube: First, the railed gas block is simply held in place using three allen set screws. Just remove them and the block (with the pinned gas tube) slides right off the barrel. The float tube is torqued on and red loc-tite is added for good measure. You'll definitely want a good upper vice block (I think I gave around $30 for mine and I've gotten a LOT of use out of it - you'll use it anytime you rebarrel an upper as well as for various other tasks). I had a bit of correspondence with a RRA rep before I started and he did let me know that some older Varmint A4's use a 3 piece float tube requiring a spanner wrench, but I had the one piece tube (the ones in the stock photo above are the 3 piece design as evidence by the "seam" in the forearm tube near the upper receiver). Secure the upper in the vice block and heat the breech end of the FF tube with a heat gun or (carefully) with a torch. I used the torch and passed the flame over the breech end for maybe 20-30 seconds - just enough to get the loc-tite "tacky" without causing any potential issues with the heat treating of the receiver. Using a wide strap wrench, apply torque counterclockwise (as viewed from the muzzle) until one or both testicles rupture. It helps to have another set of hands to support the barrel while turning the wrench. Once it loosens, the tube will thread right off. You should be aware that the FF tube itself functions as the barrel nut, so be prepared for the barrel to slide from the receiver as it is removed (more on the barrel nut below). 2) If you are going to install a rail system that employs the standard barrel nut (as was the case with my build since I used a Troy MRF rail system - a few other rail systems do the same), you're going to have to purchase and replace the barrel nut to secure your barrel. Problem is, the flange on the inside of the standard AR barrel nut is milled to an internal diameter of 1 inch - the Varmint A4 barrel is 1.050" at the breech end. There are several vendors who will mill open a barrel nut, I did mine at home with a circular grinding stone mounted to a power drill. Again, you'll want to take it slow to avoid affecting the temper of the steel with excess heat and to keep the flange concentric. You're only removing about 5-6 hundreths of an inch, so it's not a huge undertaking. If you are using a rail system which includes a proprietary barrel nut (such as LaRue, certain DD models, PRI or YHM), then check with the vendor to ascertain what diameter of barrel it will clear. I know that some of the mfr's will supply a larger internal diameter barrel nut by request at the time of purchase (PRI offered this when I spoke with them) and others are large enough by design (YHM and I think LaRue confirmed this for me by phone). If you select one of these options, then you eliminate the need to purchase and modify a standard nut. If you're not comfortable with the process of torquing the barrel nut into place, there are some great resources online (There's an excellent DIY thread on TOS under the "build it yourself" forum with good photos to walk you through it.) You're not changing out barrel extensions or anything - simply securing the same barrel assembly back into place - so it's straight forward with no concerns for headspacing, etc. Requires only the upper vice block from step one and an armorers wrench (also about $30 and likely to get more use in the future). 3) If you are using a rail short enough to not extend over the factory railed gas block, then you can skip this section. I used a Troy 13.8" rail, so I needed a low profile gas block. I ordered a PRI lo-pro with an internal diameter of .936" (on the advice of the RRA rep). It was actually a little too tight to fit the diameter of the graduation of the barrel at the gas block. I would suggest ordering the same or similar block in .940" (they are available as such). I was against a time hack so I milled the .936 in the same manner as I did the barrel nut. It sounds like a lot of work, but made for a worthwhile project. I also had my barrel threaded (I hired that part out) so that I could run a suppressor on it. It's been flawless through almost 400 rounds of match ammo and several hundreds od milsurp ball ammo, suppressed and unsuppressed thus far. I haven't seen any decrease in accuracy with the mods, and the suppressor makes it a versatile varmint gun and enjoyable paper puncher. As far as is it worth it? The easier route would be to build with a barrel that could use standard components, but I really wanted to stick with the bull barrel as I had it on hand and can run it pretty hot on long strings of fire without walking my POI around too much - especially with the heavy can hanging out front. That being said, I can't see anyone humping this rig around - it defines "heavy" in the AR platform... It's a setup I haven't seen too many of, and it fills a role as a "tactical" rifle as well as a capable paper puncher. I'd do it over again if I had the need to as I've definitely enjoyed this rifle... Hope it helps - if you decide to go forward, feel free to shoot any questions at me and I'll answer them as best I can. I'm far from an authority on anything, but I picked a lot of other peoples brains when I was trying to figure this project out... |
| thank you very much, i can't begin to tell you how great your insight is... unfortunately, i am a college student so the only time i get to work on my rifle is weekends, so i'll tear it apart this weekend and start comparing the similarities between your build and mine... also i think i'll give oly a call tomorrow with some new questions your post has given birth to. You'll be sure to hear from me this weekend probably but if i am able to accomplish the build, i will be certain to post pics for ya. |
|
Couldn't seem to find the specs on the Oly bull barrel regarding diameter... If their bull barrel is right at or less than an inch, then you may not even have any issue with a factory barrel nut. I'd look into that first, or drop $6 on a barrel nut to see if it might clear on your particular barrel before you get to deep.
Either way, good luck and have fun with your build! |
AR Sponsor