


Armory Sponsor


Posted: 9/17/2010 8:43:25 PM EDT
[Last Edit: danpass][Edited]
|
Reloading Equipment List for Precision / Match Ammo
This will be written: - From the perspective of a CMP / NRA Highpower shooter shooting a semi-auto rifle (AR-15). Course of fire is at 200, 300 & 600 yards. - With the mindset of prepping 100 - 150 rnds at a time. - Having purchased once-fired brass and reloading that. - Moderate eye toward budget. By this I mean that there is no need to spend $75 on an RCBS 505 scale when a Dillon Eliminator Scale will do equally well (especially since they are the same overall design, just branded accordingly) at $55, while the Lee Safety Scale is false economy at $22 ===== I TAKE NO RESPONSIBILITY FOR THIS INFO, THE USAGE OF IT, OR THE RESULTS. ===== There are two shooters in Highpower; the one that shoots one load at all distances and the other that shoots two loads, one load at 200 & 300 and another load at 600. The difference being the bullet (and sometimes the powder, though that has its own issues) used for the 600 stage. In this particular example I'm going to be talking about shooting one load at all distances and the equipment used to create a finished round. The principles shown apply to any ammo that is being loaded for precision. ===== Critical areas in order of importance. All have to be done right, in order, for the rest of it to matter. 1. Case Prep 2. Prime Case and Powder charge 3. Bullet Seating and Case Crimping The overriding rule for creating precision ammo is CONSISTENCY. Once you zero your sights with 2-3 rounds you want the remaining rounds to shoot the same. Otherwise you are constantly adjusting your sights. When you see .mil ammo with a standard of "2-3MOA accuracy" what it is saying is that the ammo will create a group size of 2 to 3 minutes of angle at a certain distance. E.G. 2-3 inches at 100yds, 4-6 inches at 200yards. Consistency in your own ammo should produce rounds mechanically capable of 1MOA at most, in a quality rifle, when using quality components. Results of this loading method: Rock River Arms National Match Rifle with RRA 2-stage trigger, 20in, 1:8 twist stainless steel barrel, Wylde chamber Iron Sights: 0.040 rear aperture, 0.070 front sight post (yep, on purpose, improves front sight focus and therefore accuracy) 
As an aside, great ammo will make a mediocre gun look good. I found this out when using Hornady 75HPBT Match ammo (it was provided and its use was required) in a rack grade M16, complete with 9 trillion pound trigger and loose, slightly rotating handguard, at the Camp Perry Rifle SAFS (Small Arms Firing School), specifically, shooting a 96 out of 100 at 200 yards (the 10 ring on an SR target (SR-1 format shown in the earlier pic) is 7in diameter, aka 3.3MOA if my matheses is right), slung in from the slow prone. There are those who might say that your hold, sight picture, trigger control, etc, etc, etc are far more important than gear ........... but they are wrong, though not exactly for the reasons one may think. For the beginner quality gear is more of a distraction-remover than it is a performance-enhancer. If you're wondering if this stinkin' ammo will shoot right, you're distracted. You may try to muscle something to "make it" perform. Instead of being relaxed "my gear is just right" and not worrying about stuff you're constantly fidgeting, whether mentally or physically. By the time I got to SAFS I was a bit past the beginner stage and reasonably comfortable shooting with a sling in the prone and therefore relaxed. The loose handguard didn't really bother me and therefore wasn't a distraction. If it had been a distraction then I would not have shot a 96/100. I also had prior experience with Hornady 75 Match and knew it was fine match ammo and therefore that wasn't a distraction either. Our load in this example will be: - Lake City, once fired, primer crimped cases. An important note to point out is to acquire cases that have been fired only out of rifles and not machineguns (SAWs). It is felt that the sloppier headspace/chambers/bolt allow for too much case stretch. - Wolf SRM primer - 24 grains of Alliant RL-15 (also called RX-15 and it's official name, Reloder 15, yes, without the 'a' ) - 77grn Sierra Match King bullet. The one with the fake cannelure. Cuz I had em. 
1. Case Prep Equipment used: - Safety glasses the perfect ones - Lee Classic Cast Single Stage Press. Probably the best deal in a single stage out there. Will also load 50BMG without any special equipment http://www.midwayusa.com/viewproduct/?productnumber=317831 - Lee Universal depriming die. I deprime before sizing or cleaning. http://www.midwayusa.com/viewproduct/?productnumber=136543 - Harbor Freight single drum rock tumbler http://www.harborfreight.com/3-lb-rotary-rock-tumbler-67631.html If you get one go ahead and get the dual drum tumbler. A 9mm case full of Lemishine (Walmart dishwashing area) and several generous squirts of Dawn dish detergent. About 50 .223 cases fit. Then fill halfway with water and rotate for 'over an hour'. There are of course numerous other methods for case cleaning. I'll be incorporating stainless steel tumbling media in this cleaning regimen at some point. My primary reasoning for this is to avoid dust, specifically inhaling any of it lol. - Lee RGB die set for 223 and Lee Pacesetter Die set for 223 (ok, sort of, I messed up the sizing die in this set and bought the RGB set as a replacement), what I'm really mentioning here is the Lee Factory Crimp die from the Pacesetter set. It is also available separately. http://www.midwayusa.com/viewproduct/?productnumber=434975 http://www.midwayusa.com/viewproduct/?productnumber=554943 http://www.midwayusa.com/viewproduct/?productnumber=456506 - Lee 223 shellholder for the press (officially Lee Universal Shellholder #4) http://www.midwayusa.com/viewproduct/?productnumber=645558 - Possum Hollow Case trimmer http://www.midwayusa.com/viewproduct/?productnumber=127743 - Possum Hollow power adapter http://www.midwayusa.com/viewproduct/?productnumber=295771 - 2.0mm/0.077in hex key for PH components. It was in a Harbor Freight kit I had. http://www.harborfreight.com/33-piece-precision-screwdriver-set-93916.html - L.E. Wilson chamfer and deburring tool (which fits in the PH power adapter) http://www.midwayusa.com/viewproduct/?productnumber=789334 (the above three items can be replaced with the Giraud Power Trimmer. It performs all three operations in one step. I'm saving up for one  ) )
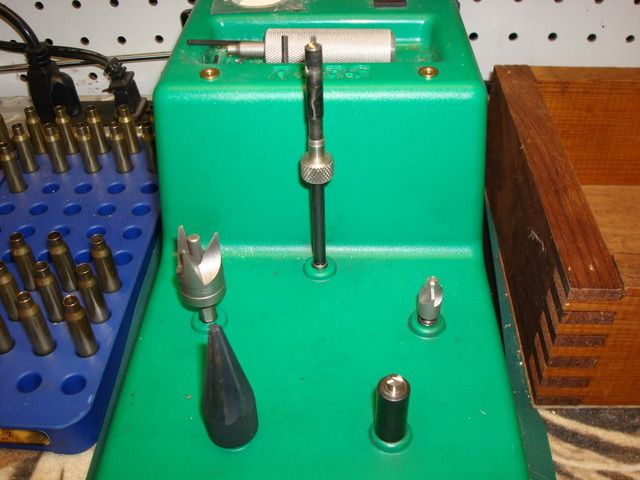
- Lee cutter and lock stud http://www.midwayusa.com/viewproduct/?productnumber=476992 - Lee case length gauge and shellholder for 223, which installs on the cutter http://www.midwayusa.com/viewproduct/?productnumber=107333 - Redding Primer Pocket Uniformer http://www.midwayusa.com/viewproduct/?productnumber=764406 - Hornady Primer Pocket Reamer http://www.midwayusa.com/viewproduct/?productnumber=253550 - Two Redding power adapters (one comes with the PPU and another can be purchase separately for use with the Hornady Reamer) http://www.midwayusa.com/viewproduct/?productnumber=314848 - Drill, like a Ryobi 18V cordless - Dillon case gauge http://www.dillonprecision.com/#/content/p/9/pid/25547/catid/3/Dillon_Rifle_Case_Gages - Sinclair shoulder bump gauge http://www.sinclairintl.com/.aspx/sid=74241/pid=35265/sku/Sinclair_Bump_Gage_Insert__223_Family http://www.sinclairintl.com/.aspx/sid=66325/pid=34014/sku/Sinclair_Comparator_Bump_Gage_Body - Lee case lube http://www.midwayusa.com/viewproduct/?productnumber=482023 - Frankford Arsenal 6in digital calipers http://www.midwayusa.com/viewproduct/?productnumber=604242 - For annealing case necks (jury still out on this one): Black & Decker PD400LG Pivotdriver hand screwdriver, 180rpm, 1/4" hex head http://www.blackanddecker.com/ProductGuide/Product-Details.aspx?ProductID=21342 3/8 Socket with 1/4" adapter Propane torch, BernzOmatic UL2317 - Brass Torch. I measured an untrimmed case, 1.768, and set the inner flame to exactly that length using a digital .................. just kidding. I merely made it the general length of a .223 case. http://www.homedepot.com/h_d1/N-5yc1vZ1xg2/R-100079143/h_d2/ProductDisplay?langId=-1&storeId=10051&catalogId=10053 Free iPhone Metronome app set to 40bpm, heat applied to the neck using the tip of the inner flame. Case angled up about 45deg. tic-tic-tic-tok and apply and remove at the 'tok' lol ===== Deprime cases then clean. The LCC comes with a clear tube that attaches to the bottom of the ram. Spent primers fall thru the ram, thru the tube and to ..... wherever. In my case I cut a hole in a margarine tub top, installed hose, installed small hose clamp on other side, snapped on to margarine tub. The LCC can also prime cases so there is a slot in the ram. I don't do that so I took some paper towel, folded up, and blocked the slot without affecting ram movement or primer drop. Otherwise primers sometimes pop out of that slot. You can size next or prep primer pockets. I alternate. I don't bother with flash hole deburring Ok, there are two methods for resizing that I'll talk about in layman terms: Resizing brass so it fits in the Dillon Case gauge and resizing it so that the end sticks out of the gauge. The first method resizes cases so that they will fit in any chamber. The second method resizes the case so that it fits in THAT rifle. Both still qualify as full length resizing. There is another method that only sizes the neck. Fits in the case gauge: Raise the reloading press ram with shellholder installed to the top of it's stroke. Run the die down until it touches the shellholder. Don't lock it down yet. Using a finger apply a very thin coat of Lee lube just to the body of the case, not the shoulder. There are varying degrees of discussion about this. After I made a shoulder entirely disappear into the case, yep just a body and neck lol, I don't do it anymore, even just a little bit. Run your finger across the mouth of the case. This will get some lube inside the neck. The beauty of the Lee lube is that it will not harm powder the way an oil based lube might. Place case in shellholder and size and hold it there. Any slack in the system will be taken up and you'll see a gap now between the shellholder and the die. Bring the ram down and turn in the die a little. Resize the same case and adjust die until there is no gap, yet also no pressure between die and shellholder. Alternately resize and gauge the case each time, just be sure to clean off the lube (then reapply the lube in the same way). Lock down the ring without moving the die. Resize another unsized case to confirm the setting. Mark this setting. This setting, with the Lee FL sizing die (I'm not familiar with other die brand setups), will size cases so that they fit within the case head max/min steps on the Dillon case gauge. For lubing multiple cases I take a blue paper towel and run a thin bead of Lee Case Lube down the middle. I use the tube opening to spread it as I go. I then line up about 10 cases with the bead along the middle of the body. Then I just rotate them with my hand, all together. One bead will take care of about 20-25 cases. The second method requires a case fired out of THAT gun. This is where the Sinclair shoulder bump gauge comes into play. Install the shoulder bushing into the body and then install the body on one of the caliper jaws. Place the fired case in the calipers and zero the calipers. You can also note the length before zeroing for information sake. This fired case represents the total headspace in THAT chamber with THAT bolt and THAT bolt carrier in THAT upper receiver. Start over with the sizing die and an unsized case (but not the fired one). Move the die down until the sized case is 0.001 to 0.002 LESS than the fired case. Personally, I would go with 0.002, its up to you. Test setting with yet another unsized case. I wipe off the Lee lube using those blue paper shop towels, cleaning the case off using a clean spot of towel each time. While I have the Sinclair items I do the "fits in the gauge" method. Since the AR headspaces off the shoulder in both methods we are creating cases that have the same bottom to shoulder distance (though not the same as each method, just to clarify that) This will play a part in trimming with the Possum Hollow trimmer and Giraud trimmer. So let's go there
Install one of the sized cases in the Lee trimmer setup and trim to 1.750. Take your L.E. Wilson tool and do a light pass, maybe two, to the inside of the neck. Then swap to the other end and deburr the outside. With this tool an even lighter touch is the only thing needed to deburr the outside. Confirm lack of burr by running your fingernail across the neck. If you deburr too hard you create a secondary, lower burr that's tough to get rid of. A burr may shift the neck in the chamber, affecting, you guessed it, ........ consistency. Now you have a 'perfect' case. Take your Possum Hollow trimmer (not the power adapter) and loosen the hex set screw. The cutter will now be free to move within the body. Remove it and clean the oil from the components, inside and out. If you don't brass shavings will build up inside. Now, place the cutter back inside, keep the screw loose (not you, the hex set screw) and, making sure there is nothing (like oil, brass shavings, etc) where the case is inserted, place the case in. GENTLY Place the whole assembly upright, resting on the case head. Now tighten the set screw without putting pressure on the assembly. Place the trimmer in the power adapter in a drill. Run a case or two thru, chamfer/deburr, and check length. Avoid any considerable pressure on the case into the cutter as this WILL affect the trim length. Initially I had to Lee cut a case to 1.751 and then set the PH cutter off that. What I suspect happened is that I dropped the cutter just enough to bite into the neck, thereby shortening up the trim then trying to compensate. So, again, just gently bring the cutter vertical when setting it up. Once I've trimmed my batch I remove the PH trimmer from the PH adapter and install the L.E. wilson tool. I do the inside of the batch, then swap it around and do the outside. So now they're sized, trimmed and wiped off. Onto primer pocket prep. Again there are times where I might start off with this and just create a pile of pocket prepped brass for sizing/trimming later. Again, I don't bother with flashhole deburring. Chuck up the Hornady reamer in a Redding power adapter in your drill. Grab a case and just run that cutter into the pocket. You'll typically get a thin ribbon of brass coming off. Don't worry about cutting into the base of the pocket, it won't. You'll quickly get the hang of keeping the case straight and not cut into the pocket wall A 2-3 second burst should do it. I usually then do a couple of turns by hand to feel for burrs. If so, then a quick burst takes care of it. Pop the Redding Primer Pocket Uniformer into the drill. Again, you'll quickly learn to keep the case straight. A 2 second burst, shake out the case and cutter head (I tap the case down onto the cutter) to clear out build up, then another burst and tap. Done with case prep. For the genuinely OCD, further ways to prep cases can be found here: http://www.6mmbr.com/jgcaseprep.html Cliffs Notes: Weigh cases and segregate the various weights into batches of equal/near equal weight. Also gets into neck turning. 2. Prime Case and Powder Charge Equipment used: - Safety glasses - Lee Perfect Powder Measure with riser (included) screwed into a 3/4 thick block of wood, approx 4 inches wide by 9 inches deep http://www.midwayusa.com/viewproduct/?productnumber=540522 - Lee powder funnel, 22 to 45 caliber http://www.midwayusa.com/viewproduct/?productnumber=974498 - Dillon Eliminator Scale http://www.dillonprecision.com/#/content/p/9/pid/25215/catid/7/Dillon__039_s___039_Eliminator__039__Scale - Loading block and/or ammo box tray (that styrofoam thing) out of a 50ct cardboard ammo box. The 20ct trays are too narrow and will tip over. http://www.sinclairintl.com/.aspx/cid=5541/Products/Loading_Blocks - Lee Auto Prime Hand Priming Tool http://www.midwayusa.com/viewproduct/?productnumber=807875 - Lee Auto Prime Hand Priming Tool Shellholder #4. Despite the number it is different from the press shellholder. http://www.midwayusa.com/viewproduct/?productnumber=875214 - Dryer sheet http://www.walmart.com/ip/Blue-Sparkle-w-Fresh-Release-Fabric-Softener-Dryer-Sheets/13908608 - Try to do this in a climate controlled area. In the Lee Auto Prime Hand Priming Tool I put 20 primers at a time in the black tray. Just shake lightly and they will come right side up. Then cover with the clear lid. They won't right themselves if you cover it first. You get a good feel for the primers going in. All you have to make sure of is that they are subflush from the case head. Take your Lee PPM and run a dryer sheet thru the hopper and every other nook and cranny you can fit it into. Use the back of a pen (not the pointy part which will punch through) to get that sheet into the small spots Fill the hopper full, set the micrometer out 2/3+ and run the whole hopper thru, twice. This should eliminate any remaining static cling in the system. When I first started out I weighed out each charge on a Lee Safety Scale. Talk about marathon type sessions. To top that off the LSS was a bit finicky. It was a good exercise though in consistency and the basics. The Lee PPM comes with instructions for determining powder density then calculating the charge bar setting for a certain weight. Go ahead and do that. Take the pan from the Dillon Eliminator Scale and wipe it well. Fill the hopper half way and drop two charges into the pan and swish it around. Here, again, is where consistency comes in. Some people run the PPM by tapping things at each cycle, Up -tap, Down -tap. I started off this way also but now I simply move things smoothly, no tapping. Now put those two charges back in the hopper (we didn't weight them). Do NOT clean the pan of any powder dust, just tap it on the hopper. Yes, the scales are designed to be that sensitive. A wiff of air will move the bar so try to avoid vents (or at least when air is flowing) Place the pan on the scale and zero it. Its a pretty slick zero setup. Set all the scales to zero and simply turn the base circle to bring the zero TO the balance beam indicator. Much easier than the Lee SS. Another note on consistency. KEEP THE SCALE IN THE SAME PLACE. Otherwise you'll have to rezero it. Drop a new charge into the pan and weigh. In our example we are shooting for 24 grains of RL-15. The initial calculation just gets us close. Here we dial the charge bar to drop 24 grains. If static was removed well enough it will dial in fairly quickly and stay there. A case can be placed right in the mouth of the PPM and cycled. Every 6th or 7th case or so I drop the powder charge from the case into the pan to weigh. If its right on I put the funnel on the case and pour it back in. If not I go back a case, maybe two, and weigh and redrop if necessary. Over/Undercharges are simply dropped back into the hopper. Additional options for powder charging: Equipment used: - Redding #5 Powder trickler http://www.midwayusa.com/viewproduct/?productnumber=487186 Set the PPM to drop a grain or two less than the desired charge. Drop the charge into the pan and set the weight. Using the trickler simply turn the rod, dropping powder, until the scale zeros at the desired charge. Place the funnel on the case and drop the powder. Done with powder charging. 3. Bullet seating and Case Crimping Equipment used: - Safety glasses - Lee Bullet seater and crimping die - Frankford Arsenal digital calipers - Sinclair bullet comparator (no body, purposely). http://www.sinclairintl.com/.aspx/sid=64917/pid=34014/sku/Sinclair_Comparator_Insert__22_cal I'll be replacing this with something else, probably this: http://www.sinclairintl.com/.aspx/pid=33236/Product/Davidson_Seating_Depth_Checkers - Lee Classic Cast Single Stage Press and Lee Shellholder #4 - Lee Factory Crimp Die - MTM Flip-Top Ammo Box 17 Remington, 204 Ruger, 223 Remington 100-Round Plastic Blue http://www.midwayusa.com/viewProduct/?productnumber=120930 Take an empty, sized/trimmed case and place it in the shellholder with the ram fully up. Sure you can use a charged case but why take the chance of spilling anything Take the bullet seater die and run both the bullet stem and locking ring all the way UP Run the die down until it JUST touches the CASE then give it a half turn UP. This will prevent any crimp from coming into play while still allowing this narrow part of the die to straighten the bullet just before it is about to begin seating. Crimping will be done in a separate operation using the Lee Factory Crimp Die Lock the die body down using the locking ring and mark that setting. Leave the bullet seater stem up. Take about 5 or 6 bullets and place them on their base next to each other, line them up carefully. You'll see, even in match bullets, that the overall length of the bullet is different from one to the other due to the way the tip finishes off. But the ogive, the shoulder of the bullet so to speak, is nearly identical from one to the other. The Lee doesn't necessarily push on the ogive itself but it does NOT push on the tip. Which is good. We'll be setting cartridge length off the longest bullet since we are making rounds for full course usage and they all have to fit in the magazine. Generally speaking, once you find a long bullet you can pretty much set length off that one, even for batch to batch. Place a charged case into the shellholder and the 'long' bullet in the case neck. (If the die body was set up right, even just a sorta straight bullet will seat fine.) Run the ram up slowly to check for contact, it shouldn't contact the seating stem. Leave it here and run the stem down until there is light contact with the bullet. Run down the ram and give the stem 2 full turns down. Run the ram up again and this will get the bullet going into the neck. Keep adjusting the stem, seating the bullet, until you reach mag length for the entire cartridge, bullet TIP to base. Take your bullet comparator and reverse it so that the bullet tip of the mag length seated round goes into the 'wrong' end. (The other side ends up contacting the case at one point. It truly is just a bullet comparator lol). Fortunately this is just for setup. With the comparator in, close the jaws and hit the zero button. Place the seated round in and measure. This will very likely be your new cartridge 'length' from now on. For example I seat bullets now so that my length using the reversed comparator is 1.888 for this load and subsequent batches. This way I have the same ogive-to-casehead length from round to round and batch to batch. Again ......... consistency. With ram and shellholder up, no case, install the Lee FCD until it contacts the shellholder. Lower the ram and add a half turn to the FCD and secure the lockring. Insert a loaded cartridge and run the ram up to the handle stop. The shellholder will contact the die but the die is designed to move up. The round is now crimped. Put your rounds in your MTM box
The first time, 100 rounds should take 2-3 hrs total (after deprime and clean). Maybe longer as you develop your technique. Half the time will be case prep and the other half will be prime, charge, set and crimp. Pocket prep needs to only be done once then case prep time will improve. The Giraud trimmer will improve this time even further

|
Psalm 91:7 A thousand may fall at your side, ten thousand at your right hand, but it will not come near you. [img]icon_smile.gif[/img]
<font color=blue>http://danpass.blogspot.com</font id=blue</font>
<font color=blue>http://danpass.blogspot.com</font id=blue</font>

|
Originally Posted By KB7DX:
Great post! Are you and AssaultRifler related?  No
I've been working on this one for the last 5 days and testing it out in a preview window (I once hit submit instead lol and asked for that thread to be deleted) |
Psalm 91:7 A thousand may fall at your side, ten thousand at your right hand, but it will not come near you. [img]icon_smile.gif[/img]
<font color=blue>http://danpass.blogspot.com</font id=blue</font>
<font color=blue>http://danpass.blogspot.com</font id=blue</font>


|
Originally Posted By danpass:
Originally Posted By KB7DX:
Great post! Are you and AssaultRifler related? No
I've been working on this one for the last 5 days and testing it out in a preview window (I once hit submit instead lol and asked for that thread to be deleted) I was wondering about that . thread of yours. Now I know what happened. High praise indeed having your post compaired to an AssaultRifler tutorial. 
AeroE has already set the toggle to keep this thread out of the archives,(beat me to it) so post this up in the Gateway thread. |
Selling agent for Algores carbon credit scam.
Shooting and Reloading, one hobby feeds the other.
Shooting and Reloading, one hobby feeds the other.

|
Thanks fellas.
I'm working on pics for various sections to help break up the wall of text lol |
Psalm 91:7 A thousand may fall at your side, ten thousand at your right hand, but it will not come near you. [img]icon_smile.gif[/img]
<font color=blue>http://danpass.blogspot.com</font id=blue</font>
<font color=blue>http://danpass.blogspot.com</font id=blue</font>




|
Originally Posted By nick89302:
I just finished loading my first rounds using this tutorial as a guide.
Thanks! 
pics! |
Psalm 91:7 A thousand may fall at your side, ten thousand at your right hand, but it will not come near you. [img]icon_smile.gif[/img]
<font color=blue>http://danpass.blogspot.com</font id=blue</font>
<font color=blue>http://danpass.blogspot.com</font id=blue</font>

|
Nice write up. The safety glasses that you recommend are a little hard to get used to...
edited for clarification... |
"GO BLUE!!!!!!!!!!, Hail to the Victors!!!!!!!!!!, Denards my man!!!!!!, Tate Forcier is great!!!!!, F the Badgers!!!!!!!!!!" -Spartan28

|
Originally Posted By JoeRedman:
Originally Posted By Greg_W:
Nice write up. The safety glasses are a little hard to get used to... I used to say that also...but like my Old Chief used to say, It's better than getting used to being blind.. I meant the glasses he recommends above... 
|
"GO BLUE!!!!!!!!!!, Hail to the Victors!!!!!!!!!!, Denards my man!!!!!!, Tate Forcier is great!!!!!, F the Badgers!!!!!!!!!!" -Spartan28

|
Originally Posted By BadLuther: Awesome post, thanks for taking the time to put this together.  someone's reading all 32 pages of Armory->Reloading I should do that too |
"Bullets change governments far surer than votes.." - Lord of War 2005
"The trouble with socialism is that you eventually run out of other people's money" – Margaret Thatcher
"The trouble with socialism is that you eventually run out of other people's money" – Margaret Thatcher
Global Warming Hoax Skeptic before it was cool
Joined:
Jun 2007
Posts:
16093
EE: 100% (1)
 WA, USA
Global Warming Hoax Skeptic before it was cool
Joined:
Jun 2007
Posts:
17733
EE: 100% (1)
WA, USA

Armory Sponsor