


Armory Sponsor

Posted: 3/3/2017 4:16:28 PM EDT
|
I just received my Dillon XL650, and as I binge watch 650 videos, there seems to be a ton of primer tube kabooms with these units. I will agree that most of them can be traced to user error, but nonetheless, it got me to thinking...
On my Lee Classic Turret press, the Safety Prime System seems pretty, well... er... "safe". If the primer I am trying to seat on the LCT press does go kaboom, it should be isolated enough not to set off the rest of the primers. It appears that is not the case with the 650. If my goal is to increase throughput with the 650 over the LCT, it does not make much sense to prime all my cases before loading them into the case feeder. Also, I wonder how safe it would be to put primed cases into the feeder...??? So how to increase the safety of priming system on the 650? Here are some obvious ones that I have read about: 1) Make sure you sort your cases so you know what you are loading, including any stray small primer .45's that might get mixed in with the large primer .45's. 2) Don't force the primers too hard in case of military crimp (maybe swage or ream all the pockets before putting into the case feeder? Yuck.). 3) Clean the primer tubes and primer assembly every 1,000 - 2,000 cases or so. 4) Ground the press to help prevent any static build up. What else can we do to increase the safety of this step that I missed? What are other methods of priming that are safer? |

|
Of all of the Kabooms that happen on press itself, have any of them resulted in injury? I dont recall seeing any.
Thus I say, be safe and prime away. this is one of the most popular and most used progressive presses. I dont own one because I own what I like and need. I am not a fan of the 650 priming system but I wouldnt let it bother me if I owned one. |
|
Priming problems on the 650 are all related to operator error!
Not swaging primer pockets correctly. Operators that are ham-fisted and forcing the machine when meeting resistance. With speed comes complacency! Pay attentions! If something does not feel right STOP AND TROUBLE SHOOT! I have had a dillon press since the middle 80's in many forms 450, SDB, 550, and 650 And, back then the advice was not use Federal Primers, but I did with no problems.... And I have probably used in excess of 400K of Large Pistol Now, the rumor is that CCI primers are "out of round" and not seating easily. Back before the internet CCI were considered to be the "tightest fit" |
|
I have never had issues but haven't been loading as long as some of these other guys. I normally load Federal and seated them sideways, crushed them split them about in half and never had one go off. I also started on a LCT.
Been doing 223 lately and been having issues with federal causing all kinds of issues but think I got a bad batch. I even cut out the crimp and still have issues with primers not seating correctly. |

| Yes have seen your pictures many times. Swagged with swagit first when I had issues I would cut out the crimp with a hand held Lyman tool - sorry called reamed I guess. I figured it out that I was just a little bit off on alignment tonight but still I don't like the way federal seat. Went to Winchester and had no issues. |
|
Quoted:
Yes have seen your pictures many times. Swagged with swagit first when I had issues I would cut out the crimp with a hand held Lyman tool - sorry called reamed I guess. I figured it out that I was just a little bit off on alignment tonight but still I don't like the way federal seat. Went to Winchester and had no issues. |
|
I think you got it covered pretty well.
While I'm not sure I agree with the terms "there seems to be a ton of primer tube kabooms with these units", I have read a few on the interwebS and seen quite the graphic remnants of a hand after a static discharge with a full tube. I suspect at of all the negative/i cidents you will read on the Internet, there is most likely a 1000:1 positives/non incidents not written. Worry not, but be aware. |
|
Thanks guys for the comments.
As I mentioned in the original post, priming off-line defeats the purpose of going with a progressive press when it comes to throughput. BUT... let's just say for giggles that I wanted to prime off the press before loading up the machine, what method would be the safest? Also, how safe would it be to load the case feeder with pre-primed cases? When they drop in the feed tube, could that be enough of an impact to set them off if they hit the case below them just right when falling? When I look at hand priming or dedicated priming stations, I think rifle rounds and ultimate precision as opposed to reloading speed. With pistol (my initial goal with the 650), I want speed with decent precision. So what methods are deemed "safest"? Are any of these safer than the Dillon system? -Forster Co-Ax primer (uses tubes as well) -RCBS Automatic priming system (tubes) -RCBS APS priming system (uses plastic strips) -RCBS hand priming system (universal or standard) -Sinclair primer (slow as heck, hand loading one primer at a time) -Lee Hand priming system I have also looked at the Primal Rights CPS_Lite press priming system, but it is also a tube system, which seems like we are back to the same dangerous Kaboom system potential. The Dillon presses at least have that steel shield that can protect the user in the event of an explosion and directs the explosion skyward. |
|
Life made easy on the 650 in regards to priming.
Pull the primer assembly housing off the sub plate, remove the primer tube shield and primer disc carrier, and with both the large and smaller primer tubes one at a time, put then in housing channel and make sure that the bottom section tubes brass face is flush with face of the channel. If there is a gap (between the end of the tube in the channel and the primmer carrier below it), it can cause all kinds of problems with flipped/side ways primers in the primer carrier, Also, mark the tubes so you remember to swap out the large primer tube to a small primer tube when you are doing the primer size swap on the machine (carrier and ram as well). Where most problems with flipped primer occur, is someone is using the large primer tube with small primers instead. If you go to 8:58 and pause the video, you can see the end of the tube brass section against the bottom of the primer assembly housing surface. Although his is not bad, I like the end of the brass section face on the tube to be dead nuts to the bottom surface of the housing in the channel isntead. [youtube]https://www.youtube.com/watch?v=Z1D04nw48kg[/youtube] In this photo, we can see that the punch is not flush with the top of the housing, 
In this photo, we can see that the primer punch at rest is not sitting flush with the top of housing (it just need to be pulled apart to clean the debris out of it) 
cleaning a primer punch housing, http://www.waguns.org/viewtopic.php?f=74&t=58445&mobile=on]http://www.waguns.org/viewtopic.php?f=74&t=58445&mobile=on]http://www.waguns.org/viewtopic.php?f=74&t=58445&mobile=on If the bottom brass face of the primer tubes is not flush to the bottom of channel they seat in, or the primer punch/housings are not flush to the sub plate when tightened in place, get Dillon on the phone to resolve the problem. Now after you use a primer tube for say a loading session, make sure to pull the tube ,and the fill tubes that you have been using, and clean them with and a patch. Hence every time you grab a tube for your next reloading session, you want them to be pre-cleaned without out primer powder in any of the tubes!!! Also, as you are cleaning the primer tubes each time, take a good look at the bottom brass section inside of channel to make sure that there is not worn or a bur that may need to be cleaned up. Now with the above out of the way, lets focus on seating primers in causes, hence the up and all the way back stroke of the lever. Out the gate, change out the solid tip cam rod with a roller cam rod. 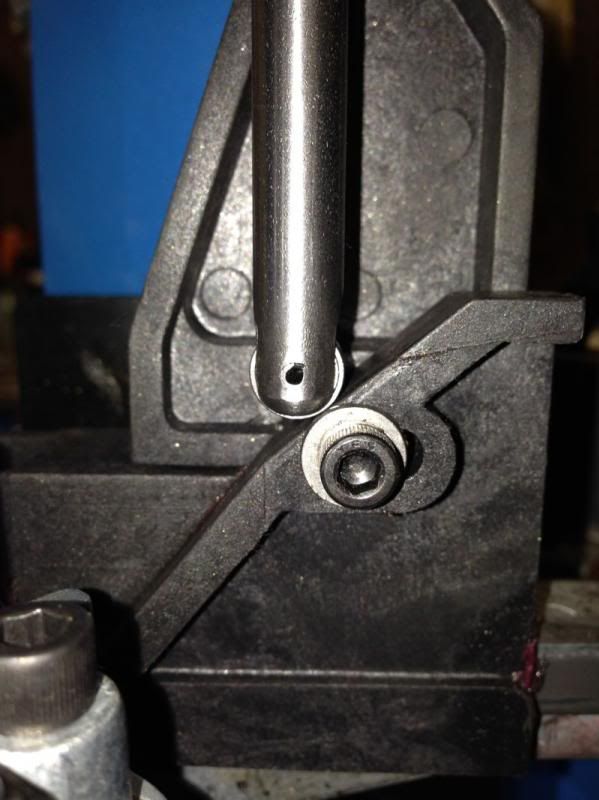
Hence the solid tip cam rod does not give back the desired handle feel so you can tell if the primer is seating correctly since it dragging on the block, and the roller cam rod solves this problem to give a lot more feeling of the primer seating instead. Also, as you are seating the primer, it should be a gently push back on the lever to "feel" the primer seating in place, and not just slamming the handle back instead. Hence anyone that has blown up a primer assembly, has done so by just slamming back of the lever, instead of feeling the primer seating, and stopping if the primer is not seating correctly instead. Lastly, if you have to pull the sub plate for any reason, that you need to get Dillon on the phone for a sub plate index tool. [youtube]https://www.youtube.com/watch?v=rxe8xt_u1NI&feature=youtu.be[/youtube] Truth is, even though Dillon is pretty good about assembling the machines, I will still tear down a brand new machine to go over all the fits of the parts. On the primer drop tubes, often will take then to the lathe to get them dead nuts on the bottom of tube surface level with the bottom of the assembly channel. Same goes for the primer punch housing as well. The primer carriers are not too bad, but still take the time to polish them and check the primer channel entry tapers to make sure they are clean, and the primer assembly is correctly indexing the primers as well. Once I have gone through the the parts,changed out some of the parts to after market parts/mod'd parts, and starting to re-assembling the machine, then make sure that the sub plate is indexed not only to the tool plate in the machine, but the other tool plates that I am going to be using as well. |
|
I've been running my 650 a bunch for about 15 years
when i was shooting a lot of USPSA-IPSC, and 3-gun, over 10,000 rounds a year year after year....without trouble if you kaboom a 650, it's typically your fault. like the post above - don't force it,....don't ham fist it with any progressive, if it doesn't feel right, STOP and investigate |
|
OP if the primer kabooms bother you, don't go google'ing pistol kabooms as a result of: double charges, squibs, 'glock'd brass, bullet setback or just plain bad luck.
Seriously, if you think about it, like anything else- you hear the 1 bad story more times than the 1MM good ones. The folks in this thread provided some very good, common sense ideas of how to minimize your risk. Listen to what has been suggested and add a dollop of caution and a sprinkle of common sense and you'll be fine. The only bit of advice I'll add, as I don't recall seeing it mentioned, is to clean your press periodically, paying special attention to the primer disk and associated components. If a piece of dirt makes its way there, it could bind against a primer (during indexing or seating) and result in a kaboom. |
|
Quoted:
with any progressive, if it doesn't feel right, STOP and investigate Quoted just so EVERYBODY understands this. Anything, anything at all, that is not totally "normal" needs the operator to STOP. Then step back, safe the press (remove primed and primed, powder-dropped rounds), and thoroughly investigate what is happening. Every progressive press I'm aware of has plenty of leverage. This helps when sizing cases, but it can also be a problem, because you can "ham fist" your way through something that should have stopped you in your tracks if you'd felt a difference in the handle. Progressive presses need attention for a number of reasons. First, you need to clean and lube them regularly, because stuff just builds up. One or two flakes of powder now and then will turn into a gooey mess after a while. Indexing that is "almost perfect" will gradually become "bad" if you ignore it. The priming system especially needs to be really carefully watched and cleaned. And it doesn't matter what progressive press you're using, the priming system needs to move very smoothly and without any snags or jolts. Dano's detailed explanation of exactly what he looks at in the priming system is important. He's been at this a while, and with this specific press (and others). His observations aren't "tuning" the press, they're "making sure the press is safe to prime on." There are a few similar "gotcha" spots in the Hornady LnL's priming system, particularly in the primer feed part and the primer punch. This cat can only be skinned in so many ways... This is why I always recommend against starting out with a progressive. I've crushed (hard to find) cases, accordioned cases that should have sized like butter, and crunched primers. All of this both on a single stage and a progressive. Since I knew what each felt like on the single stage press, I knew what had happened. The only thing I needed to look into was HOW I screwed up. I don't know of a single human being who can monitor multiple press stages while learning how a press operates and "feels" while its being operated. |
|
I bought a complete Large priming system from Dillon for my 650. Of the 1000 rounds of 10mm I've run in several batches of 2-300, I've had like a 3-7% failure rate of primers going in upside down or sideways. Worse with Winchester than Federal.
Only thing I haven't done is pull the wheel off to check how the primer magazine is seating into the base. Is there a definitive video guide to getting shell plate timing correct? I switched the shell plate cam to a roller bearing, and it seems to be timed fine when I go slow and watch it, but my guess is that at normal speed there is a misalignment. |
|
One thing I didn't see in the video is this. Before tightening the screws on the primer feed assembly raise the primer seating punch so that it is centered in the hole in the primer plate. There is a very small amount of play and you can catch
the edge of the seating punch. Note that the primer indexing arm spring is a wear item. If the primer disc is not rotating try pushing the arm by hand. If it is free to move but is not indexing the disc replace the spring. I am now on my third spring. I don't know why people condemn Federal primers. I have loaded several thousand of them without any trouble. When loading be alert to anything out of order and stop when this happens. Don't force anything. |
|
Wow. Great stuff. @Dano523 : Thanks so much for the great post. Fantastic information! I did install the roller cam rod already, and I am used to priming "by feel" with my Lee Press, but of course, this is a different beast.
I will work on alignment based on your post this evening if I get a chance, and hope to start cranking out my first rounds soon. I got things most of the way setup today... |
|
Quoted:
Note that the primer indexing arm spring is a wear item. If the primer disc is not rotating try pushing the arm by hand. If it is free to move but is not indexing the disc replace the spring. I am now on my third spring. Granted that the spring will wear out over time, would bank that you are running the wave washer upside down, and the reason that your having problems with the arm not returning correctly as the spring starts to take a set/having to go through too many index arm springs. If you have the wave washer mounted like in the below photo, its mounted upside down and may be even grooving the top of the arm as well. 
Hence you want the inner concave part of the wave washer with it most bearing area against the top of the arm, and the outer tip portion of the wave washer against the head of the stud (with a touch of grease between the top of the arm, and the bottom of the wave washer). This allows the arm to pivot more cleanly against the wave washer, and allows the arm prong to climb out of the channel and back index a lot easier isntead. https://www.dillonprecision.com/docs/650_Pg_53.pdf Also, on the through channel for the arm, it helps to slightly chamfer the top and bottom edge of the channel so there is no burs at the end of the channel that will start to bite into the index pin to mar it over time start to cause it to bind up on the stud more through the life of the machine. Really, when you are changing primer discs, or just pulling the machine down for a good cleaning, get in to the habit of pulling the index arm, the index spring, then primer index pin, to give them all a good cleaning, then reassembly the parts with a touch of grease. As for flipped primers, that always comes from too much distance between the bottom of the primer tube and the primer disc, The brass section ID channel on the bottom of the primer tube too worn/bur/ wrong size primer tube in play, Nick in the primer disc entry channel that is not allowing the primer to drop cleanly from it to disc channel below, Not enough weight on the primer follower rod that is not keeping the primer stack tightly pressed down in the tube (add a 45ACP case to the top of it), As pointed out above, when the primer assembly was installed on the sub plate- was not primer disc channel centered on the primer ram punch when tighenting the two bolts, Top of primer ram housing way to low or high of the sub plate surface to allow the primer to flip there, Or wear in the pawl , and the index block needs to be adjusted so it turns the shell plate all the way to the next detent position cleanly. Hence these and the other parts of the machine, are why I tear down a brand new machine apart to clean/debur and polish such up, so I don't have problems with the machine long term instead. |
|
Dang. This is just GREAT stuff, thank you so much Dano...
So if I understand you correctly, the brass end on the primer tube needs to be flush with the primer disc, but I when I looked last night, I didn't see a way to adjust this. Then in your post that I read this morning, it seems more like a wear/bur/size issue than something that I can actually adjust. Is that correct? So with a new unit, I should be good for a while anyway. I will still take things apart and clean after every session. |
Armory Sponsor