


Armory Sponsor


Posted: 7/31/2014 2:11:44 PM EDT
[Last Edit: EagleArmsHBAR][Edited]
|
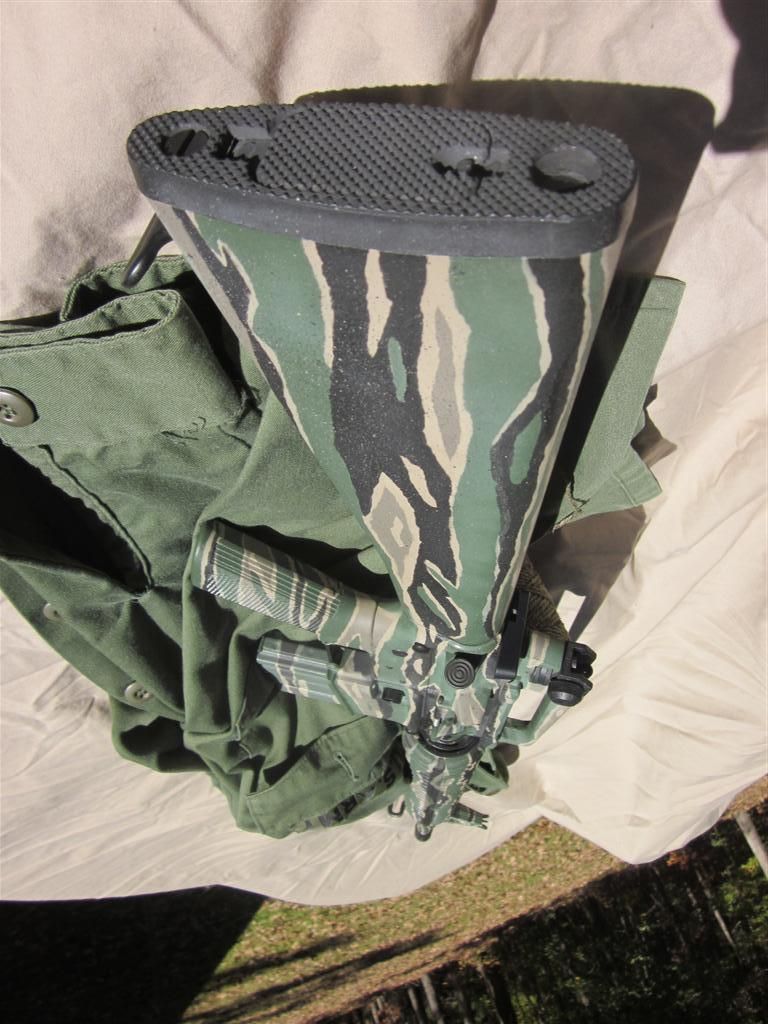
I have painted a few M14s with a tiger stripe pattern and it is quickly becoming my favorite pattern of camo to have on a rifle. I even prefer it to my sponge camo AR15. With the method I use to get the pattern, no tape or stencils are required because let's face it, stencils will make the paint have that weird feel to it when the colors border each other and sometimes the paint is on too thick. Here are the colors I used on the rifles: Rustoleum Camouflage Kakhi Rustoleum Camouflage Deep Forest Green Rustoleum American Accents Satin Nutmeg (desert rifle only) Rustoleum Flat Brown Genaric Flat Black (woodland rifle only) Here are the two M14s I have done. One in desert and one in Woodland: Edit: pics are gone of the desert camo rifle. And my previous desert tiger striped LRB/TRW M14: Attached File Attached File Close ups to show the pattern.   This is the best I can do with a step by step: Step 1: Choose a base color. In this case I used Kakhi Camo Attached File Step 2: Spray secondary color #1 on to a paper plate: Attached File Step 3: Use paintbrush to paint secondary color #1 on to the item: Attached File Step 4: Repeat step 3 but with secondary color #2: Attached File Step 5: Use a third secondary color to outline the areas where the primary and secondary colors 1 and 2 meet and then it will look something like this: Attached File Attached File All together pic now: Attached File Obviously if doing tiger stripe you want the secondary colors to run long ways on the item (parallel to the ground). The good thing is that if you don't like how it turns out, just hose it down with Break Free Powder Blast and the paint will immediately wetten, thin out, and almost drip off. Next up I will be doing an urban tiger stripe on a pistol gripped shotgun that I keep in my truck. Now that the tutorial is up, let's see what you can do! Here is an update on the desert M1A. I got to thinking the camo was too vivid in color since one of the colors I used was a satin instead of flat. So I decided to hit it with some CLP Powder Blast and a paper towel. This is the result: Attached File |


|
I did my truck gun today. Attached File |

| Good job, I can't bring myself to personally make the commitment to paint a rifle, but the Vietnam style tiger stripe has always been my favorite paint scheme. I think it is because my grandfather's BAR 30-06 has a plastic stock cover in that design and that was the rifle I grew up shooting at big game. Yours looks excellent and I really like how the shotgun turned out! |
 " />
" />
 " />
" />
|
Originally Posted By DRAFT1: Very cool. I'm a huge fan of the Vietnam tiger stripe camo. This was my first attempt. Used the duracoat, speckled and clear coated.http://<a href=http://i581.photobucket.com/albums/ss260/DWGLIDE1/IMG_1395Large_zps9e689a33.jpg</a>" /> http://<a href=http://i581.photobucket.com/albums/ss260/DWGLIDE1/IMG_1396Large_zps896fcd64.jpg</a>" /> |
| Based on the three rifles I have painted so far, I think it works best if the base color is a medium color (not too light) because the color that is used for the outlining is best to be the lightest color. I did kind of the opposite of that with the desert camo scheme, so in hindsight I might have made different color choices. |
|
Originally Posted By HeyCoach: Did you happen to change your procedure away from the lightest to darkest like in your desert and woodlands tiger stripe for the urban tiger stripe by starting with the medium tone instead? For the jungle tiger: Primary color: green Secondary color 1: brown Secondary color 2: black Outline color: light tan For the urban tiger: Primary color: light grey Secondary color 1: dark grey Secondary color 2: black Outline color: white |


|
Great tiger jobs!
This is a Vepr .308 I did a couple years ago, didn't brush it, I handcut each piece of blue tape, and applied between different color coats, then top-coated space that was left with black, then a couple coats of clear (which smoothed out the ridges where different levels/colors of paint meet). Really bright sunny day when I took the pics, so it looks kinda washed out but it's really not, colors were super vivid in person. 

|
NO, YOU CAN'T!


|
Attached File I gave it a go. Mines not as pretty as Ops. I’m on the fence about it so far. |
|
Posted this in the other thread above then saw this one, it's just another way I stumbled upon. Mossberg shotgun.  " /> " /> " /> " />Basically, started with black gun, but if you want to do a different base color you obviously could. I then took the varied camos of spray paint and started with one color then onto the next. Sprayed the first color in the lid, then used a Q-tip and dipped it in the paint then steaked it on to the gun in different directions. Let that dry which is usually pretty quick, then rinse repeat and layer with a new Q-tip the other colors till you get the look you want. You could use different sizes of Q-tips for different affects whatever works for you, and feel free to toss it down the driveway if you choose. Anyhoo, maybe it's been done like that before, and I was probably overthinking it but thought I would share. Carry on. |
Armory Sponsor