MD, USA
|
[#1]
@Marnsdorff and @Diz
Where was this advice two days ago?!!?!? Actually, the curves picture in Marnsdorff’s tutorial would have been helpful. I just spaced my clips too far apart so they didn’t hold the curve well. Hindsight being 20/20 and all, I should have started with that inside curve. That middle portion is going to be covered anyway. As much as a I would like to rip it out and start again, I shorted myself on binding tape when I ordered. (Forgot to calculate the amount needed for the shoulder harness, duh). So even with the extra, I wouldn’t have enough to redo it. I’m not placing an order from Rockywoods just for that. There shipping is expensive and takes waaayyyy longer. I’m setting this to the side anyway for now and moving on to the back panel. Maybe I’ll get a hair up my ass and pull it and start again with the tape. Many thanks to all for all the advise. @Painfpefullcommonsense - welcome aboard! Hopefully you can post some pics of your DZrig and pack. |
|
|
NC, USA
|
[#2]
Originally Posted By Diz: Marnsdorf: Excellent tutorial my brother! CAP6888: Lookin' good brother. Don't be afraid of pulling it out and re-doing it. Sometimes it takes a few tries to get it right. That's how we learn and get better. On difficult patches, I've re-done things 2-3 times until it's passable. As long as the thread is completely on the tape, it fully functional. It's all about the attachment, and the right tape, which makes things much easier. Whenever you can, you need to get an attachment. First a parallel one that just bolts on and off, but eventually a 90 deg one, that's inbedded into the machine. The difference is phenomenal. Doing it without the attachment is the hardest way to go. BTDT. When it gets really crazy, as in inside curves and so forth, consider doing it in two steps. Draw a reference line on the back of the work, equal to where your tape will lay (so for 1" tape, roughly 1/2"). Now simply sew that one side down, following the reference line. Turn the work over and do the other side, trying to stay as close as possible to the first row of stitching. Some spray adhesive will also help. Yes, you will have a double row of stitching showing on the back side, but sometimes that's just what you have to do. Add in another row of stitching, approx 1/4" up, through the folded tape, if desired. Corners. Aye yi yi, don't get me started here. In the beginning you can simply sew to the end, cut net, and start another line of tape in the new direction. When completely done, trim ends and sear together. Might sound crude but saves a lot of time and aggro. To form a corner, sew to the end (or very near it). Leave needle down, and pivot work around it. The corners will try and form when you do this. To help them out, take a small screw flat tip driver, and form the 45 deg folds. The bottom one has to be done by feel; just takes some practice. Once the folds are straight, raise the needle and re-position it on the new corner, and drop it down by hand. Continue to march. Frankly I don't mess with folds very much any more. I just cut and sear whenever possible. Agreed to all the above. I was just putting together something for the guys who are only going this stuff once or twice and aren't intending on doing more. I feel like alot of the guys DIYing gear will go that route. I barely mess with corners anymore, I'll almost do it on the fly - I'll stop right before the corner to just double check that there isn't anything dumb about the corner, then just work my way through the corner slowly, pivoting with the needle down like you are talking about. Once you do the corners a few times the correct way, you can start transitioning to doing it on the fly. I mean, it's the same with all the rest of this stuff - once you figure out how to do it the right way, you can start to do alot of this stuff on the fly. That's why I referred to my tutorial as 'training wheels'. Diz absolutely is right though. The binding tape attachment is the way to go long term. If you are going to be doing anything more than a half dozen big items, it's probably worth learning to use the attachment. |
|
|
NC, USA
|
[#3]
Originally Posted By cap6888: @Marnsdorff and @Diz Where was this advice two days ago?!!?!? Actually, the curves picture in Marnsdorff’s tutorial would have been helpful. I just spaced my clips too far apart so they didn’t hold the curve well. Hindsight being 20/20 and all, I should have started with that inside curve. That middle portion is going to be covered anyway. As much as a I would like to rip it out and start again, I shorted myself on binding tape when I ordered. (Forgot to calculate the amount needed for the shoulder harness, duh). So even with the extra, I wouldn’t have enough to redo it. I’m not placing an order from Rockywoods just for that. There shipping is expensive and takes waaayyyy longer. I’m setting this to the side anyway for now and moving on to the back panel. Maybe I’ll get a hair up my ass and pull it and start again with the tape. Many thanks to all for all the advise. @Painfpefullcommonsense - welcome aboard! Hopefully you can post some pics of your DZrig and pack. Leave it for now. As long as the stitching is there, it'll work for now. Get the rest of the pack done. You can always go back and redo the binding tape later - and who knows, you might need to order something else for the pack, or decide you don't like how the harness works when you actually put it on and need to change up the pattern and do a new one, etc. Then you know better what to order when you do put in an order. Like I had mentioned - I'm just now going back in and fixing the binding tape from that part of MY first harness. I messed that same section up. It's been sitting here over a year, and I just last week popped the stitches from that section. |
|
|
|
[#4]
You guy's stuff looks way better than when I first started out. You just gotta get the reps in.
And yeah a good folding attachment. They are dirt cheap from ebay. There are generic ones that fit practically any machine. Once you get to that point you're gonna be on my ass for not making you do it sooner. I've taught a few folks how to sew and they all say the same thing. |
|
|
|
FM, USA
|
[#5]
I should buy an industrial machine. All this diy talk has me thinking about it again. I have made a few handkerchiefs and random pouches or this or that but really ran into issues with the more layers I wanted to get through with my domestic one. I quickly learned I wasn't able to get into anything even close to making a pack or anything close to that level with what I have. Even a set of trousers, smock etc would be pretty fun but I don't have the equipment to get there. I might have to spring for something to test ideas. Very inspiring fellas.
|
|
|
MD, USA
|
[#6]
Originally Posted By sooperxtool: I should buy an industrial machine. All this diy talk has me thinking about it again. I have made a few handkerchiefs and random pouches or this or that but really ran into issues with the more layers I wanted to get through with my domestic one. I quickly learned I wasn't able to get into anything even close to making a pack or anything close to that level with what I have. Even a set of trousers, smock etc would be pretty fun but I don't have the equipment to get there. I might have to spring for something to test ideas. Very inspiring fellas. I’m using a Singer 4452 “heavy duty” machine. Making my PLCE setup wasn’t an issue. So far my pack experiment hasn’t either. The real test will be when I sew the seams. 🤞🤞 |
|
|
|
[Last Edit: Diz]
[#7]
Pull the trigger my brother! I'd like to see a whole network of guys doing home workshop sewing. My goal would be to have patterns, sewing instructions, and even kits for guys to roll their own. I was thinking about LBE made from 50/50 NYCO or 60/40 poly cammie material that would run through most home sewing machines. If you have an industrial, so much the better, then you could move up into cordura.
The way I sew anyway, I use a webbing "skeleton" inside the material, so whether it's 1000, 500, or ripstop, you still have the strength of the webbing holding your kit. On sewing heavier build-ups, as long as you have at least a no. 18 needle, and go real slow, you should be able to punch through it. Even if you have to walk it through by hand. The key is the up-stroke of the thread puller. That's the lever with the little arm with the hole through it. As long as it has the power to set the thread into the material it doesn't matter how fast it's going, as far as strength rating goes. Now you might go broke on a production run, but for custom sewing, who cares. For a good industrial machine, you can't beat a Juki 8700H. Some folks mother-fuck it because it's not a walking foot, however, just getting started and learning the trade, you can't beat it. I never transitioned to a walking foot simply because I can do more precision sewing with it, and do prototype stuff, not production runs. The "H" is important. It has much more ass to pull through the heavier shit we sew. The after fore mentioned thread take up lever, is one of them. It's much beefier than the std machine which helps tremendously when you're pulling up through all that webbing and crap. Also has more aggressive feed dogs for heavier stuff. It will still sew the lighter stuff just as well as the std machine, but not vice versa. Check out the deals on ebay. Brand new about 750, good used for half that. Just make sure you get a servo motor. With a machine like this, you can get a "single fold binding attachment", in 3/4" or 1" size for whichever tape you are using. Or really get 'em both. They will say which machine(s) it's made for. The one that fits the Juki is very common, almost universal. The bed of the machine already drilled and tapped for two screws to hold it on. When you get two machines, you can get an in-bed system, which requires it's own feed dogs, needle plate, and presser foot. But now you have a complete, integrated system, which makes you look like a pro. All over ebay as well. And still dirt cheap. |
|
|
|
|
[#8]
Any update on the next shipment of Diz rigs?
|
|
|
|
|
[#9]
I don't have the time to chime in like Diz does, but I'll second his recommendation on the 8700D. That's what one of my machines is and it's been a solid workhorse for me.
|
|
|
|
FM, USA
|
[#10]
Dually noted! I'll have to keep a look out for one of those machines.
@Diz - a roll your own kit would be awesome, with patterns and all that jazz. With the experimenting I've done, it was definitely interesting how you have to do things in a certain order or you "paint yourself in a corner" and have to start over, or rip a bunch of seams out to get back to a point where that step should have been taken. It is pretty eye opening to the process one has to come up with to get to a point of sewing up something like a belt kit. There's an outfit near me that does their manufacturing in house, I'm half tempted to apply there for the reps, time on a machine, process of putting out a finished product etc. |
|
|
OK, USA
|
[#11]
Originally Posted By marnsdorff: What kind of pouches? I might be able to do them. I can send you some fabric with them too, if you let me know how much you want. PM inbound! |
|
|
|
[#12]
Next shipment is due in, any time now. It was just air-shipped over.
|
|
|
|
|
[#13]
After much experimentation with different kit in different spots, I couldn't get my ALICE pack to work as it should with the DZ Rig.
The ride height adjustment on the Alice, even with mods and upgrades, just isn't enough. So I have a Crossfire DG3 ruck with some optional pouches on the way. I was going to wait a month, but the DG3's may not be available much longer. The camo one's are already gone. The CF packs are upgrades of the CG, but I like some of the features on the DG better. The DZ belt set up continues to impress me in so many ways. I have been able to really set it up for my specific needs and wants, and have added several mollie M4 single mag pouches to the webbing available on the rig for tourniquets, my Silky Saw, etc. I'm no psychic, but I can see another rig purchase (Tiger Stripe) in the near future. Updates to follow. |
|
|
|
|
[#14]
Originally Posted By parrisisland1978: After much experimentation with different kit in different spots, I couldn't get my ALICE pack to work as it should with the DZ Rig. The ride height adjustment on the Alice, even with mods and upgrades, just isn't enough. So I have a Crossfire DG3 ruck with some optional pouches on the way. I was going to wait a month, but the DG3's may not be available much longer. The camo one's are already gone. The CF packs are upgrades of the CG, but I like some of the features on the DG better. The DZ belt set up continues to impress me in so many ways. I have been able to really set it up for my specific needs and wants, and have added several mollie M4 single mag pouches to the webbing available on the rig for tourniquets, my Silky Saw, etc. I'm no psychic, but I can see another rig purchase (Tiger Stripe) in the near future. Updates to follow. Pics, man, pics! |
|
|
|
|
[#15]
As for myself, now that my back injuries have "apparently" healed satisfactorily, I'm hoping my USGI MOLLE Medium pack will properly interface with all the Brit Kit I bought.
If so, will probably work with the DZ rig, and likely at considerably less cost than imported foreign packs. "Informed" speculation at this point. I can certainly see where Crossfire would tout their own packs as compliments to the DZ rig. Other alternatives may exist. |
|
|
|
|
[#16]
Originally Posted By towerofpower94: Pics, man, pics! When it's set up correctly, pics will be up. I am very thorough and make sure to get things "just right" for my applications. |
|
|
|
NC, USA
|
[#17]
Originally Posted By Hawkeye: I don't have the time to chime in like Diz does, but I'll second his recommendation on the 8700D. That's what one of my machines is and it's been a solid workhorse for me. Seconded. I have an old all metal domestic Singer Fashion Mate that I started with, and it will do a couple layers of cordura and webbing ok if you went slow. And they have a good reputation as a nice domestic. But I upgraded to the 8700H and it's night and day different. |
|
|
WA, USA
|
[#18]
Any possibility that the DZ rig will eventually come out in Coyote?
|
|
|
NC, USA
|
[#19]
Originally Posted By sooperxtool: Dually noted! I'll have to keep a look out for one of those machines. @Diz - a roll your own kit would be awesome, with patterns and all that jazz. With the experimenting I've done, it was definitely interesting how you have to do things in a certain order or you "paint yourself in a corner" and have to start over, or rip a bunch of seams out to get back to a point where that step should have been taken. It is pretty eye opening to the process one has to come up with to get to a point of sewing up something like a belt kit. There's an outfit near me that does their manufacturing in house, I'm half tempted to apply there for the reps, time on a machine, process of putting out a finished product etc. I've learned that it's like a puzzle. I spend alot of time looking at the construction of various pouches and gear. If you stop and think about 'why did they decide to do xyz on this pouch?' and walk through the potential sewing process to get to there, things start to make sense. Things like 'well, that lid had to have been sewn on BEFORE they folded that pouch up to sew the main body on, otherwise they couldn't have gotten to those seams. THAT's probably why they put the binding tape around that part of the lid, so that the binding tape end would be hidden under the main body fabric so that it won't fray' You would be surprised at the shoddy design decisions you will see once you start looking at things and working through them. And some brilliant ones. Once you get to the point of noticing stuff like that, then you can factor in things like 'well, is this design choice going to save me enough labor time to be worth using the extra materials I need to do it?' 'will cutting this corner to save material / labor costs going to hamper the durability or usability of the product?' 'so it is worth doing xyz in order to make the pouch aesthetically pleasing ('Cool looking' - half the battle obviously) worth the extra cost?' Once you start asking yourself questions like that, that's when the stars start to align. There is no magical 'this is the steps to sewing all products' - each item is different. There are design choices you make that affect the order things are put together in. I mean, there are general steps - you generally put webbing molle fields on each place they go while the fabric is still 'flat' for instance (before two pieces are sewn together - ie, before you sew the body to the back of the pouch). Once you start thinking about each project as a 3d puzzle that is relatively open-ended (ie, there is no single 'correct' way to design that pouch) then it becomes easier. I have found that it really really helps to get some large sheets of craft paper (I just ordered a roll off of amazon) and draw out your ideas on there. Work out your pattern on the paper. Cut it out and CAREFULLY assemble the product out of paper to see how everything fits. Use those little sewing clips to hold the 'seams' in place. This will save you a ton of time and money and help you visualize how pieces go together. Heck, if you can visualize or convert the measurements you need down to a miniature, you can probably mock up miniature, I dunno, 1/2 scale mockups on regular letter sized paper. Maybe taping two pieces together if you need the extra length. I mock up all my patterns with paper models. They almost always need adjusting. Usually I can cut out sections or add sections with tape on the actual paper model, and once I get things where I want them, I trace out and re-drawn the pattern on paper with fresh, clean lines. Once I do one in actual fabric, if it turns out like I want it, I'll take clear packing tape and tape over both sides of the pattern with basic notes written on it. This way if I ever have to go back and make another one, I have the pattern still. |
|
|
|
[Last Edit: Diz]
[#20]
On CB, well not sure. Some Jarheads have been after us but frankly hardly anyone buys that color any more.
But if we get enough requests, maybe we could do a short run of them. Email website and pound marketing guys. UPDATE: Diz rigs due in Monday. I will keep you informed, but if they get here Monday (probably late), I will sew down drag handles and shoot them out as we get orders. Will probably go live on website Tuesday for orders, but might take 24 hrs for me to sew down handle, and get to shipping for processing. I will try and work directly from order list this time so I'm not doing a box of Tiger Stripe, when we have orders for woodland, MC, and RG. |
|
|
|
|
[#21]
Will any packs be done in woodland?
|
|
|
|
|
[#22]
On modeling, for sure I wish I could tell you there's a program where you just plug in the dims, and out she comes, but it ain't like that. Each type of material, webbing, etc has it's own characteristics. Then you add in velcro, tape and other doodads. Final factor is thread and tension used. An extreme example would be a jump rig container, where you can literally get an inch of shrinkage because of all the intricate sewing required. But even on a pouch, you can lose an 1/8" here, and another there, to the point that the pouch isn't practically useful.
As a general rule, measure up your contents, such as two mags, and add in about 1/8" on your dims. Especially if you're like me and like to use webbing as reinforcement. On P-mags, add in an extra 1/4"-1/2" to top lid dims, to allow for bottom plates; otherwise top lid will not sit all the way down. For example, if pouch depth for mags is 2", make the lid depth 2 1/2". After awhile, you will learn what your typical shrinkage is, with the materials you're using. Even different colors can sometimes act differently, due to the different dyes used. And solution dyed webbing vs batch dyed. Also the thread tension being used. Blah, Blah, blah. It's Friday night; let's get a beer. |
|
|
|
|
[#23]
On packs, yes the plan is to do some special runs in woodland, starting with some CF-1's, which are scheduled to begin production in late February.
|
|
|
|
MD, USA
|
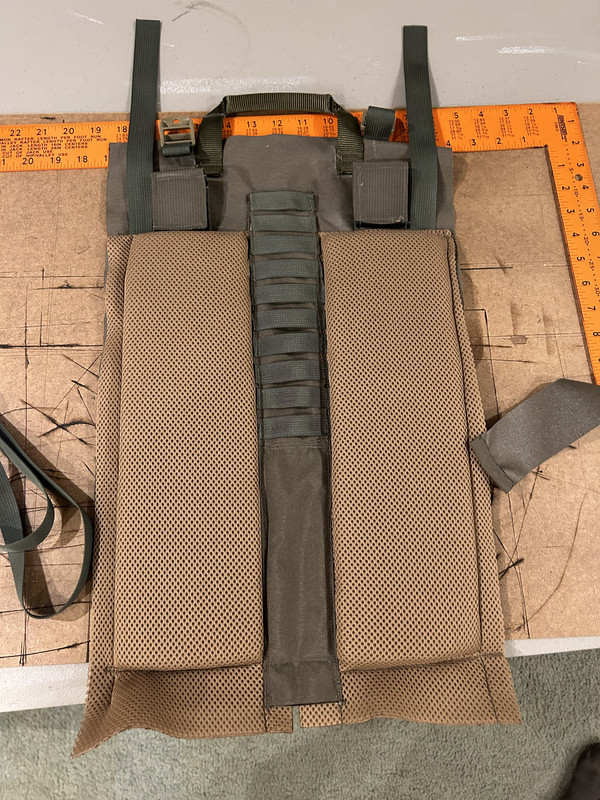
[#24]
Back panel done. Whew! That was as rough as I expected it to be. Actually not really. Just slow going. Lots of measure twice, cut once, then remeasure and cut again. At least I made sure I gave myself extra material.
|
|
|
|
[Last Edit: Diz]
[#25]
Very cool!
Yeah after you join the walls and bottom, you can trim all that net and bind it. 1" for sure with the spacer mesh n all. |
|
|
|
FM, USA
|
[#26]
Originally Posted By cap6888: Back panel done. Whew! That was as rough as I expected it to be. Actually not really. Just slow going. Lots of measure twice, cut once, then remeasure and cut again. At least I made sure I gave myself extra material. https://i.postimg.cc/Sx0dqy1K/IMG-0314.jpg You may have mentioned it already, are you doing an internal frame? Looks awesome so far! |
|
|
FM, USA
|
[#27]
Will the 8700 machine handle heavy scuba webbing in multiple layers? I.e. a belt (think blue alpha or similar)? I've always wondered what those guys are using for that stuff.
|
|
|
|
[Last Edit: Diz]
[#28]
Yes it will. That sucker is unbelievable. If you can get it under the presser foot, you can nail it. You just go up to a no. 23 needle, open up the stitches per inch, and go slow.
|
|
|
|
MD, USA
|
[#29]
Originally Posted By sooperxtool: You may have mentioned it already, are you doing an internal frame? Looks awesome so far! The two sections of 2 inch webbing are tunnels for aluminum stays. The two sections of spacer mesh are covering half inch foam padding. There are two ladder locks centered above the tunnels for stabilizer straps. The other two pieces of webbing are going to be for securing the lid. |
|
|
|
[#30]
In other words, internal frame, ala Brit Bergen and the like.
|
|
|
|
|
[#31]
Originally Posted By Diz: On CB, well not sure. Some Jarheads have been after us but frankly hardly anyone buys that color any more. But if we get enough requests, maybe we could do a short run of them. Email website and pound marketing guys. UPDATE: Diz rigs due in Monday. I will keep you informed, but if they get here Monday (probably late), I will sew down drag handles and shoot them out as we get orders. Will probably go live on website Tuesday for orders, but might take 24 hrs for me to sew down handle, and get to shipping for processing. I will try and work directly from order list this time so I'm not doing a box of Tiger Stripe, when we have orders for woodland, MC, and RG. I agree about the CB, just because it screams Jarhead (I’m a Marine  ). I think CB would work the best in eastern Wyoming, but I’m inclined to go with M81 or even desert tiger stripe in L/XL. ). I think CB would work the best in eastern Wyoming, but I’m inclined to go with M81 or even desert tiger stripe in L/XL. Either way, one will be ordered next week. 
|
|
|
|
|
[#32]
Yeah same here; sometimes I wish the whole production would be a CB base, with camo of your choice for the details, such as pouches, helmet cave, and lids.
It does make a good base. Sometimes I think we just go camo crazy. |
|
|
|
|
[#33]
I think Browns always work in the prone (pretty sure I remember the Panamanian floor being mostly brown), and obviously any place that has "Fall/Early Spring".
|
|
|
|
|
[#34]
Yeah that's gotta be true on this planet at least. Any jungle I was in, from Oki to the PI had brown or tan earth beneath it. That's why I still think the "split pattern" of earth tone trou, and foliage-colored tops makes sense in a variety of settings. It's just when you're surrounded by a riot of foliage, from ankle to noggin, a complete "jungle" pattern makes sense. In other woodlands, with a good majority of the foliage being at head height, or higher, the split tones kick in. The higher on the terrain you are, the more the foliage kicks in; the lower on the terrain you are, the earth tone kicks in. So for sure, if you spend much time proned out in surveillance or ambush positions, earth tone rules. But if you are moving, especially on rolling terrain, where the viewing angles are constantly changing, the foliage color earns it's keep.
If you run the draws and blue lines, earth tones would make more sense. If you trace the military crests and higher ground, the foliage works better. Think of it from your enemy's perspective; if he is higher or lower than you. Old Russian proveb: "the patrol moves as the water flows" meaning they stick to low ground to avoid being seen. However, I was taught to get up on the "military crest" of things, to have a higher position, without "sky lining". And sometimes the terrain gets a vote. If you've ever been in a draw, in fall, filled with twigs and leaves, it's damn near impossible to move through without creating a ruckus. |
|
|
|
MD, USA
|
[#35]
I always the MJT khaki (I think that’s what it was referred to as) was a good color. I feel it kind of blended with the hue of what you were wearing. With DCUs it became more brownish, with RG it was more greenish.
|
|
|
|
[Last Edit: trails-end]
[#36]
A good pack cover will fix the camo issue. I bought this on ebay and it is superb. Some guy near Ft Bragg made them.
The seller said the maker can't keep up with demand. This would be a good project for Crossfire or one of you stitching wizards. https://www.ebay.com/itm/202440353923 |
|
|
|
|
[#37]
All this awesome DIY and homebrew kit needs its own thread. Seriously, a ton of information you guys have offered.

|
|
|
|
|
[#38]
Well, yeah, maybe the mods would consider something like that.
Once the secret is out, that sewing is pretty fucking easy, everybody will be doing it. Back when I was a kid, damn near everyone I knew had a mom who made clothes, for the kids at least. My roommate in college had hand-made suits from home. Dana once called me a sewing terrorist, because "I was giving all the secrets away" on Rinaldi's old DIY site. But here's the thing. Most guys are lucky to make one or two items. If you can make 100 of them, by next Friday, I'll buy them from ya. It's not a threat to me. Hell I could use an OEM for Berry Amendment stuff. I'd love to see a whole network of home workshop guys n gals. Ideally, you could use 5 workshops to make Diz rigs. Yoke, base, ammo pouches, sustainments, and final sew/assembly. Like a de-centralized factory. |
|
|
|
|
[#39]
Originally Posted By Diz: Well, yeah, maybe the mods would consider something like that. Once the secret is out, that sewing is pretty fucking easy, everybody will be doing it. Back when I was a kid, damn near everyone I knew had a mom who made clothes, for the kids at least. My roommate in college had hand-made suits from home. Dana once called me a sewing terrorist, because "I was giving all the secrets away" on Rinaldi's old DIY site. But here's the thing. Most guys are lucky to make one or two items. If you can make 100 of them, by next Friday, I'll buy them from ya. It's not a threat to me. Hell I could use an OEM for Berry Amendment stuff. I'd love to see a whole network of home workshop guys n gals. Ideally, you could use 5 workshops to make Diz rigs. Yoke, base, ammo pouches, sustainments, and final sew/assembly. Like a de-centralized factory. IDK how such things are done nowadays. Perhaps contacting relevant Staff and Sr. Staff with such a request. They will need to get Admin OK to set up a new forum. The goal (from Site perspective) is to generate "hits" on this site, and to NOT re-direct users of this site to other sites, at least not until the new forum is "up and running". Strongly suggest that folks wishing for a DIY gear-sewing forum have some good quality tutorials made up beforehand, and ready to add to the new forum. In some cases, this can be threads posted on this site, appropriately labeled. I think that a Moderator who was interested in the subject would be most helpful; Staff and Sr. Staff have other things to be concerned with. Above all, consider how other DIY gear-making sites have either done well, or failed. Take note; follow good practices and avoid common errors. Before suggesting such a forum, strongly suggest considering how it is organized. Organization is key to "finding" useful info. |
|
|
|
|
[#40]
I've almost thought I should learn to sew/buy an affordable machine... what an awesome skill.
|
|
|
|
|
[#41]
What I've always found fascinating, is taking a roll of raw material, and turning it into something you can wear, or in our case, carry stuff in. How they ever figured out how to make a machine that stitches cloth together is amazing. Not to mention, an electric motor. Or mills, and lathes, and everything else modern society takes for granted.
Then examining how something was made and figuring out a better way to do it. |
|
|
|
|
[#42]
I love my sewing machine. Singer “Heavy Duty”.
But not heavy duty enough for me. I use the hell out of it for putting webbing and buckles, etc. on kit. Upgraded all the old metal hardware on my Alice gear. Makes getting in the packs and butt pouches so much easier. I purchase all my webbing and buckles from here. https://www.strapworks.com/ I also used it to tailor all my uniforms when was on the job. Got married 4 years ago and my wife absolutely loves that I can take things in for her and make repairs to clothes that she loves but can’t replace because they’re not made anymore. PS My DG3 and accessories pouches are on the big brown van and should be in my meat hooks by 16:00. ❤️ |
|
|
|
|
[#43]
Hotshot crews have been using belt-based rigs or low mounted packs forever and I think it's interesting to see people again realizing the utility of something like the DZ-Rig.
Even if you're just goofing off in the woods for a while a small pack or water bladder high up on your back gets far more annoying than these kinds of setups IMO. |
|
|
|
|
[#44]
Originally Posted By mickdonaldson: I've almost thought I should learn to sew/buy an affordable machine... what an awesome skill. Learn to hand sew. Took my wife just a few minutes to teach me the basics. Not great for big projects but gives you the ability to fix that one annoying thing on a piece of kit you like. |
|
|
|
|
[#45]
Update: Diz rigs did not show up today but due in Tomorrow. With any luck will have some up on website in the late afternoon.
|
|
|
|
MD, USA
|
[#46]
Originally Posted By King_Mud: Hotshot crews have been using belt-based rigs or low mounted packs forever and I think it's interesting to see people again realizing the utility of something like the DZ-Rig. Hey Diz…..possible new market for you. Just make some red rigs. |
|
|
NC, USA
|
[#47]
Originally Posted By mickdonaldson: I've almost thought I should learn to sew/buy an affordable machine... what an awesome skill. Look around locally, or even online, for an older used domestic sewing machine. Do a quick search on the model and see if it's any good. Most of the domestics made back in the 1960's and older have all-metal internals and motors that are band-driven (ie, the motors are mounted externally and run with a band) and are thus easily replaces with a modern motor cheaply. I picked up my old Singer Fashion Mate at a thrift store, complete with everything, manual, needles, thread, etc. for $10. I eventually swapped out the motor for a new modern one, which helped alot. But that sewing machine handled anything clothing related and was capable of doing basic gear, though it was slow and had some hiccups. But for $10? It taught me basic sewing and I did some cool projects over the years. If you are careful with what you decide to do and the materials you make it out of, a nice older domestic like that will make most basic gear. And if you decide you like sewing enough, you can step up and get an industrial. I got a new one, but there are quality used industrial machines out there cheap, especially if you live somewhere with a decent population base and can pick it up yourself (shipping is $$$$$$$ when you are dealing with an industrial machine) Even really old industrial machines are fully capable of doing any of this gear. Heck, if you ask around enough, you might even dig one up for free, I bet you definitely can find someone giving away a domestic machine if you spread the word enough. |
|
|
NC, USA
|
[#48]
Originally Posted By Diz: What I've always found fascinating, is taking a roll of raw material, and turning it into something you can wear, or in our case, carry stuff in. How they ever figured out how to make a machine that stitches cloth together is amazing. Not to mention, an electric motor. Or mills, and lathes, and everything else modern society takes for granted. Then examining how something was made and figuring out a better way to do it. Bro, if you do the research on how sewing machines absolutely changed things when it came to clothing and such, it's amazing. Before sewing machines, they had really powerful sewing guilds, and they were militant with holding the knowledge of how to hand-sew within the guild. Part of this was necessary actually, because the ability to sew quality items en-mass, it takes someone with years of experience. However, this also stopped the knowledge of advanced sewing techniques away from the masses - who did sew, or at least repaired, most of their own clothing. And it stopped mass-production of clothing, which kept prices really high. When sewing machines came along, not only could anyone learn to sew in SIGNIFICANTLY less time - months instead of years - but they could sew much much much faster, allowing actual mass-production of clothing items. It also allowed any 'peasant' to be able to sew with as much quality as the guild members, but without having to learn for years and years. It heavily shifted the power to the masses, though eventually it has gotten to the point where mass production of clothing has gotten so advanced nowadays, that sewing has become less popular, as you can go buy a pair of jeans for $15. There's actually an interesting book in a book series, alt-history / sci fi, where a small town in modern America was dumped back into Germany in 1632, and the ramifications of what dumping modern tech and knowledge on a small scale into that environment. One of the books in the series involved 2 teenage girls who decided to make some money by making and selling primitive sewing machines, and the ramifications to society and such that would happen from that. It was an interesting thought experiment. |
|
|
NC, USA
|
[Last Edit: marnsdorff]
[#49]
Originally Posted By GreenMushroom: Learn to hand sew. Took my wife just a few minutes to teach me the basics. Not great for big projects but gives you the ability to fix that one annoying thing on a piece of kit you like. 110% on learning basic hand sewing. Every man should be able to do at least very basic hand sewing - know how to put on a button and how to run a hand stitch that locks the thread in place. Something like a saddle stitch or a back stitch. There are other ones too. You can sew almost any tactical gear via hand if you HAD to (it will take FOREVER) but it's possible. But more importantly, it's important to know how to do that so that you can repair gear yourself. It's not a hard or expensive skill to learn at least the basics. Get some hand sewing needles (including some 'sail' needles, designed to repair sails - amazon has a pack made in england pretty cheap), some decent thread, a metal thimble, and eventually if you want it, a 'speedy stitch' sewing awl comes in handy, though you should learn to sew without one first. On a side note, sewing leather is very similar to hand sewing cloth, though there are some nuances. You do want an awl to at least punch holes in the leather. But learning to hand sew will get you into the ability to sew leather too.  
|
|
|
|
[Last Edit: raf]
[#50]
Concur basic books on hand-sewing and machine sewing would be useful. Bonus points if the books stay open on their own, such as spiral bound, etc.
Ordered one of each from Amazon. Although I've been doing simple hand-sewing repairs for years, there is lots of terminology I don't know, not to mention techniques. When starting, pays to start off on the right foot. ETA: learned that common term for one who sews is Sewist and not "Sewer", which can have unfortunate and confusing connotations. Kinda like Shootist, only different. |
|
|
|
 Win a FREE Membership!
Sign up for the ARFCOM weekly newsletter and be entered to win a free ARFCOM membership. One new winner* is announced every week!
You will receive an email every Friday morning featuring the latest chatter from the hottest topics, breaking news surrounding legislation, as well as exclusive deals only available to ARFCOM email subscribers.

AR15.COM is the world's largest firearm community and is a gathering place for firearm enthusiasts of all types.
From hunters and military members, to competition shooters and general firearm enthusiasts, we welcome anyone who values and respects the way of the firearm.

Subscribe to our monthly Newsletter to receive firearm news, product discounts from your favorite Industry Partners, and more.
Copyright © 1996-2024 AR15.COM LLC. All Rights Reserved.
Any use of this content without express written consent is prohibited.
AR15.Com reserves the right to overwrite or replace any affiliate, commercial, or monetizable links, posted by users, with our own.


