


Armory Sponsor


Posted: 8/28/2010 7:44:35 PM EDT
| hi, has anyone in here bought the ar15 trigger job dvd from agi? talked to j landis from agi. told me to buy some india stones instead of using a belt sander to do the work. a little more tidious, but less likely to ruin a disconector or trigger this way. have not got the dvd yet but was wondering if someone here has done the work as mr. landis suggested. personally, i believe doing the work by hand this way will enable me to do a better job. if someone here has done it in this fashion, do you have any tips that might be a good addition to the dvd. maybe something not shown or talked about in the dvd? thank you! |
|
Stones will take longer and you have to pay attention longer, but stones work just as well.
While a bench sander "can" be easier to maintain a flat, even surface, as long as you're careful you can do the same by hand. I would recommend buying ceramic stones from Brownell's though. The ceramic stones maintain their flat surfaces and sharp edges much better than natural or other man-made stones do. They're also easy to clean since you can use lacquer thinner or most any other solvent to clean them. A friend of mine gave me the AGI video and it shows in detail how to convert the AR trigger unit to a nice two-stage type. This works well because with a two-stage there's far less trouble with getting failures to properly reset or failures to stay cocked and doubling. I was, however somewhat shocked at how rough Dunlap left the parts. He more or less just hacks them up and leaves them rough. This has no effect on the operation or quality of pull, but I always did smoother work just as a matter of good workmanship. |
| already have the stones. came in from brownells yesterday. also have the brownells trigger jig. keeping it flat and at right angles is what mr. landis said was the key to a good job. got a 2`x2` x1/2 thick piece of glass to do the work on. he said this hard, smooth surface will work well. |
|
Quoted:
do not do to your trigger what that hack does it will ruin it and only last about 200 round before it fails, remember it is case hardened once you belt san the material away to the softer metal it willl wear quickly  
I used a ruby stone to re-cut the angle of my hammer and sear then an Arkansas stone to clean it up and give a good final surface. If you look closely you will notice the sear and hammer have a reverse angle that will cam the hammer backwards slightly before it lets loose. I removed some of that in this fashion- 
Here you can see the original wear patterns 

This is what I did to the top of mine. I cut the sear at an angle to reduce the contact area as well as make the final sear edge below the cut, so the edge is protected from the abuse of the hammer and the edge will stay sharp. 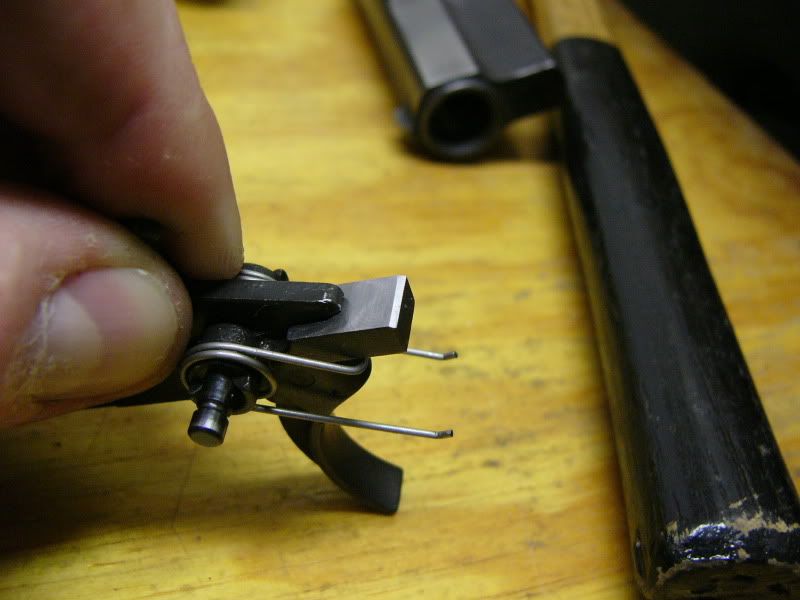
If you want I can get some pics of it tonight now that it's had about 1,000 rounds through it. |
|
Quoted:
Quoted:
do not do to your trigger what that hack does it will ruin it and only last about 200 round before it fails, remember it is case hardened once you belt san the material away to the softer metal it willl wear quickly
I used a ruby stone to re-cut the angle of my hammer and sear then an Arkansas stone to clean it up and give a good final surface. If you look closely you will notice the sear and hammer have a reverse angle that will cam the hammer backwards slightly before it lets loose. I removed some of that in this fashion- http://img.photobucket.com/albums/v294/utahmom/Guns/TriggerGeo.jpg Here you can see the original wear patterns http://img.photobucket.com/albums/v294/utahmom/Guns/P1110762.jpg http://img.photobucket.com/albums/v294/utahmom/Guns/P1110763.jpg This is what I did to the top of mine. I cut the sear at an angle to reduce the contact area as well as make the final sear edge below the cut, so the edge is protected from the abuse of the hammer and the edge will stay sharp. http://img.photobucket.com/albums/v294/utahmom/Guns/P1110720.jpg If you want I can get some pics of it tonight now that it's had about 1,000 rounds through it. thanks a lot !!! that was very nice to send this info. and yes, i sure would like some additional pics. |
| hi again, i was wondering if you would please, show me a pic of your ruby stone with the hammer to show me exactly the correct angle and how you maintained that said angle. and also to show me how it should look while actually doing the work. no hurry, but i would like to get as much information as i can before i start to do the stoning. Again, i appreciate this very much! can you also tell my what the amount of "pull in lbs." you have with this trigger. i borrowed my bro in laws trig pull guage to check it from time to time during this process. |
|
I looked at the stones again and I think I used my fine Crystolon stone, but it's about the same thing as the ruby, but the ruby isn't as hard and I've managed to wear a groove in it so I can't get a nice flat edge anymore from it.
I have a nice cut chunk of marble on my bench that is very flat. I set the stone on the edge of the marble and get down at eye level and more or less free-hand the actual cutting. I talked to Randall Power on the phone for a while before I started and got some good info on a few things, then just figured I had nothing to lose but a trigger so I started slow. I've now done three AR triggers total and while I don't cut them all as much as this, they have been getting better each time. I now just polish the sear face with an Arkansas stone and cut the top back like in these pics. This has helped make the new face last longer as the hammer can't reach the actual sear edge, it also shortens the trigger pull by reducing the amount of engagement surface between the hammer and sear. I can't remember the actual engagement, but I think it started out at about .06" and I cut it down to .04- still about a mile by most triggers. A 1911 can have as little as .013 (I don't run that small on mine) and I run CZ and Hiu-Power engagement surfaces to about .02". The AR is a much different animal, so I really don't think less than .03 is a good idea, and I won't go less than .04. Good geometry helps a ton here as well. I re-cut the hammer only now, on this trigger I re-cut the face of the sear slightly but I've found that the trigger is more crisp and lighter when I only cut the hammer. I take about 1/2 of the back-cut out of the geometry. I've heard a lot of people mention the soft heat-treat and how it will wear out quickly if you touch anything, but the truth is sear and hammer were getting destroyed prior to cutting. The sear face had large deformations and 'wrinkles', the hammer hook was no longer sharp and the top of the sear was taking a beating from the hammer slamming into it as the carrier pushed it back. The more I shot it the worse the stock trigger was getting, not better. If treating was a problem, it was a problem on the original trigger. I have not noticed any accelerated wear at this time, there are marks on the sear where you can see the (much more even) engagement but it's not 'wrinkled' this time. Smooth, but definately getting marked. Anyway- on to the new pics. 


Edit- you can see in the picture below where the hammer abuses the sear. My back-cut on the sear has helped a lot with this, but I also cut just a touch on the contact area of the hammer to help it hit in a more even and directed manner. There's no stopping the contact so I just tried to mitigate the abuse. Also of note is that my hammer hook is still not bearing evenly on the sear face. Before I started I had a big gouge on the left side of the sear face and I tried to help even up the hammer hook when I cut the angle. Clearly I didn't get it perfect, but it's not gouging or deforming the sear surface yet so it must be better than it was previously. 

|
|
Quoted:
nice pics! thanks again! i`ll post back in here when i`m finished and let you know how it works. just finished. i think its pretty good. the first hammer i did i ruined it . took too much off. it had a very nice pull wt.( about 2.75 lb.) but when i put it in the jig, and test fired, it would not engage the secondary sear and it fell forward upon release of the trigger. the second hammer i did i was a little more careful and it work great.( about 3.50 lb) i think if i now polish both surfaces with some rouge, felt bob, and my dremel, i might make it to 3lbs. |
|
Quoted:
Quoted:
nice pics! thanks again! i`ll post back in here when i`m finished and let you know how it works. just finished. i think its pretty good. the first hammer i did i ruined it . took too much off. it had a very nice pull wt.( about 2.75 lb.) but when i put it in the jig, and test fired, it would not engage the secondary sear and it fell forward upon release of the trigger. the second hammer i did i was a little more careful and it work great.( about 3.50 lb) i think if i now polish both surfaces with some rouge, felt bob, and my dremel, i might make it to 3lbs. Cool. I didn't cut much from the hammer hook on the triggers I've done, but this trigger I photographed was very similar to my very first pic/diagram where the hammer hook was actually cutting into the sear face and only the sharp end of the hook was contacting. I stoned enough off the hook to make it bear more evenly, but I think it's still not an even/flat interface with the sear. I'm not cutting any more though, I'm at about 5lbs or so and that's down quite a bit from the original. Rather than push the limits I'm leaving it as is to see how long it will last. I've heard too many cry the 'surface hardened' alarm without much actual experience in what that means to the real world. A clean, crisp trigger will feel light too. Stay away from the dremel, use a nice Arkansas stone and just clean up all the interface surfaces. The dremel will round the edges and you won't get that crisp break. It's easy with stones, just push hard and if it cuts too much use a finer stone. |
Armory Sponsor