


Armory Sponsor

Posted: 3/13/2012 8:15:08 PM EDT
|
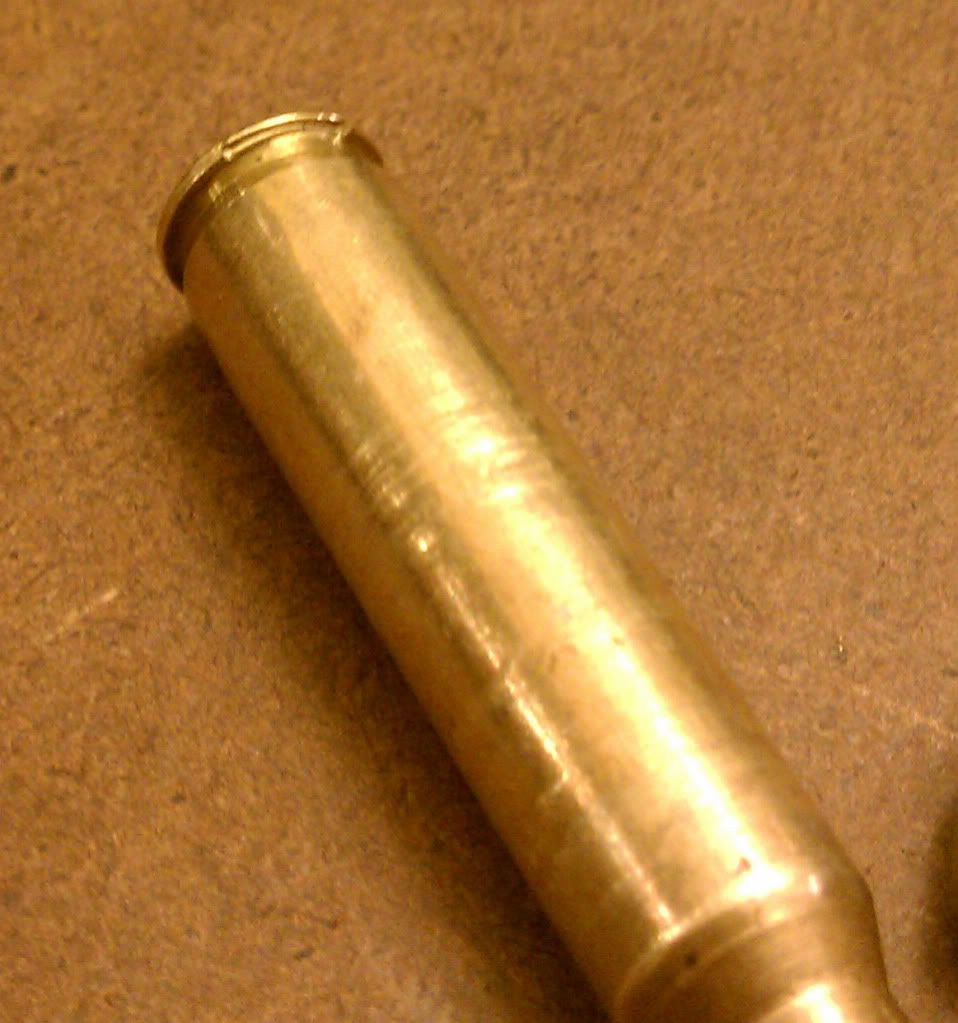
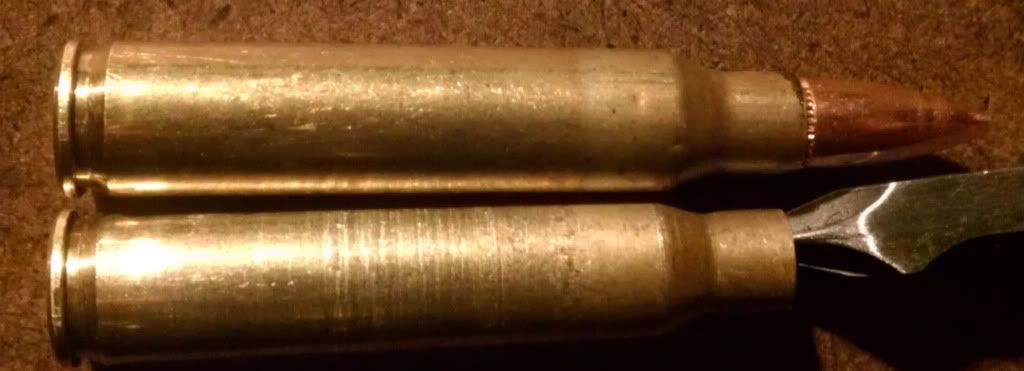
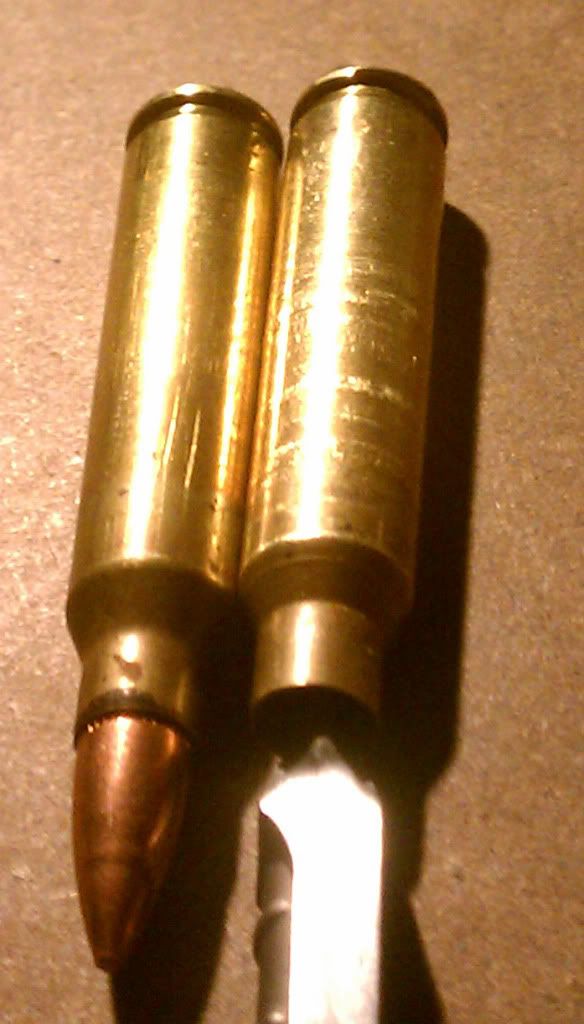
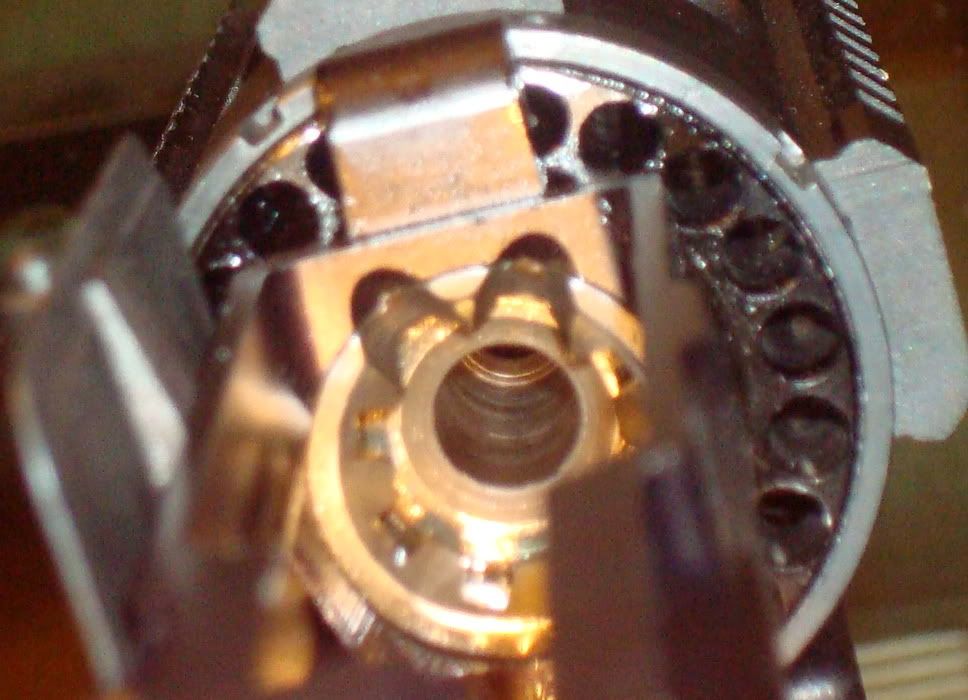
Looking for some opinions and advice. Below are some pics of my chamber as well as a piece of brass fired from it next to a fresh unfired round from the same box.
Does this look excessively ruff? I was having some failures to extract prvi 556 55 gr out of 40- 50 rounds only two extracted, pmc 223 55 gr had 2 failures to extract from ruffly 200 rounds, federal 556 55 gr no issues with extraction in ruffly 60 rounds the federal is in the pics. one pic shows the dent from the extractor on the rim looks like a hard pull to me. The upper is currently with the manufacturer if when i get it back i am told it is merely cosmetic and does not affect function I want to know what my options are besides making it a lamp. My current thoughts : some polishing compound cleaning patches and a drill for a few seconds, Paying a local gunsmith (will probably seek out an opinion before i do anything anyway), Just shoot the hell out of it and clean with chamber brush regularly. Would really appreciate comments on this one have been driving myself crazy about it already went and got a new barrel but then i got all the other stuff for the rest of the upper anyway so im still left trying to make this upper nice. 

|
|
Quoted:
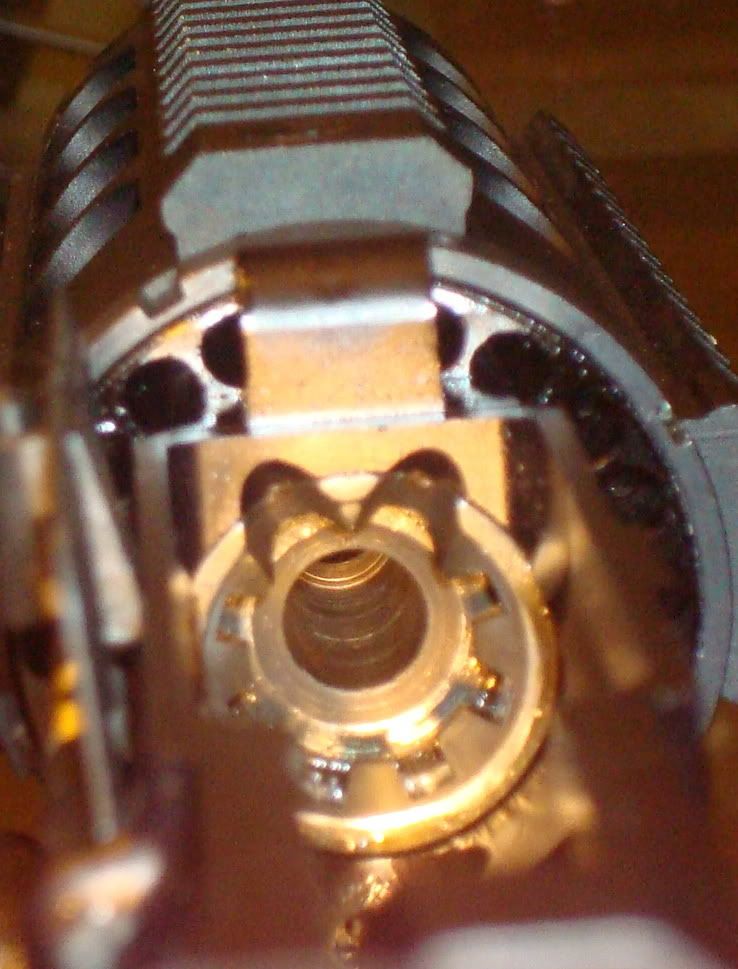
Is that an example of how not to do the M4 feed ramps? sigh... another imperfection that was plaguing me but had little effect on function, no fails to feed. the one on the left in the pic is ok a little too deep but that one on the right is just ridiculous. |
|
That Whole assembly looks like Friday afternoon after 3 beers for lunch.
I'd insist on a replacement. That said, if you are stuck with it, I have polished some rough chambers by using a fired case from THAT CHAMBER as a mandrel. I drill out the primer hole, drive a screw in and cut the head of the screw off. Then In use a automotive wire connector (the yellow size) to crimp a piece of stiff wire long enough to clear the rear of the reciever. Then I chuck it in the drill and put a light cutting polishing compound like flitz on the brass and spin it in the chamber. Work it in and out so that you don't polish the grooves. Try to visualize cross hatching as you spin. Check often, you don't want to over do it, but the brass makes a great mandrel that is fireformed to the chamber. That one may be beyond a simple polish though..... |
|
Polishing with a piece of fired brass will make the rings even larger. The defects have to be removed by polishing with a mandrel that will span the grooves, and that results in a new diameters that meet the worst diameter if polished completely smooth.
Anyone want to guess the depth of the worst groove? 2 or 3 thousandths means finishing at 4 to 6 over. Send the barrel back. |
| I would say new barrel. You could probably pick up a 22lr adapter and run it in that upper full time, but that would be all I would do with it. The groove that would scare me the most to try to get rid of is the one in the shoulder, by the time it was gone it wouldn't headspace anymore. The ones in the body are probably enough to make it out of spec as well and you would end up with a good chance of splitting cases. It looks to me like there were chips in the reamer from being turned backwards just a little bit. |
|
Quoted:
Polishing with a piece of fired brass will make the rings even larger. The defects have to be removed by polishing with a mandrel that will span the grooves, and that results in a new diameters that meet the worst diameter if polished completely smooth. Anyone want to guess the depth of the worst groove? 2 or 3 thousandths means finishing at 4 to 6 over. Send the barrel back. Easily 2 or 3 thou. OP, Grab a small dental pick and drag it across the grooves to get a feel. |
|
Quoted:
Quoted:
Polishing with a piece of fired brass will make the rings even larger. The defects have to be removed by polishing with a mandrel that will span the grooves, and that results in a new diameters that meet the worst diameter if polished completely smooth. Anyone want to guess the depth of the worst groove? 2 or 3 thousandths means finishing at 4 to 6 over. Send the barrel back. Easily 2 or 3 thou. OP, Grab a small dental pick and drag it across the grooves to get a feel. I always overestimate the depth of gouges even when I'm looking directly at a part, so I wanted to be conservative this time. I scored the chamber my very first time out, but fortunately I didn't have the reamer in all the way and it cleaned up; that was a huge relief. That one was caused by getting in a hurry and pushing the reamer in too far on the pass, probably went in 0.100 so it wasn't caused by a big chip. (I was chambering between centers without a pressure lube set up.) |
|
Quoted:
Quoted:
Quoted:
Polishing with a piece of fired brass will make the rings even larger. The defects have to be removed by polishing with a mandrel that will span the grooves, and that results in a new diameters that meet the worst diameter if polished completely smooth. Anyone want to guess the depth of the worst groove? 2 or 3 thousandths means finishing at 4 to 6 over. Send the barrel back. Easily 2 or 3 thou. OP, Grab a small dental pick and drag it across the grooves to get a feel. I always overestimate the depth of gouges even when I'm looking directly at a part, so I wanted to be conservative this time. I scored the chamber my very first time out, but fortunately I didn't have the reamer in all the way and it cleaned up; that was a huge relief. That one was caused by getting in a hurry and pushing the reamer in too far on the pass, probably went in 0.100 so it wasn't caused by a big chip. (I was chambering between centers without a pressure lube set up.) FWIW I've reamed thousands of holes, and I've never reamed a chamber. 
And I call myself Gun_Crank. |
|
As I stated over in trouble shooting, the huge problem is the step at the shoulder edge since the head space is already set, and would require the entire chamber to be reamed .050 to .100 forward just to clean that up, with the breach of the barrel faced forward as well, and then the barrel extension re-timed, reinstall afterwords.
|
| well a$$hole gave it back after 3 weeks all he did was shoot it some and put an o ring under the extractor and left it dirty as heck. never buy an upper at the gunshows in las vegas for $289. That being said it still seems to shoot and extract usually I don't think the little groove in the shoulder is affecting function a whole lot it shows up in the pic pretty bright but does little to the brass. The most deformation on the brass occurs at that ridge in the middle of the body. The chamber does seem on the tight side compared to my new wilson combat stainless. So, I plan to get some emery cloth and a dowel and see what i can do by hand to smooth the body out a bit and maybe a little on the feedramps. My friend that saw the pics saw it in person today and said the pics make it looks a lot worse. It's amazing to me that I can build my first upper and do such a better job of it than someone doing it for a living. |
|
Quoted:
well a$$hole gave it back after 3 weeks all he did was shoot it some and put an o ring under the extractor and left it dirty as heck. never buy an upper at the gunshows in las vegas for $289. That being said it still seems to shoot and extract usually I don't think the little groove in the shoulder is affecting function a whole lot it shows up in the pic pretty bright but does little to the brass. The most deformation on the brass occurs at that ridge in the middle of the body. The chamber does seem on the tight side compared to my new wilson combat stainless. So, I plan to get some emery cloth and a dowel and see what i can do by hand to smooth the body out a bit and maybe a little on the feedramps. My friend that saw the pics saw it in person today and said the pics make it looks a lot worse. It's amazing to me that I can build my first upper and do such a better job of it than someone doing it for a living. You're paying attention. He, on the other hand... |
|
I saw the mention of emery cloth and cringed a little....
FLEX-HONE You can get them in varying grits up to 800 or so. They are hones that are made to the dimension of your chamber. They run ~$30, but might be worth a try in this instance... I had a pistol upper that was rough (but not this bad!) and it solved all my problems. I also used a flexhone on a 50BMG that was having stuck brass. Again, problem solved. The key is to go slow and measure regularly. Sometimes its better to still leave it a tough "rough" than to get it glossy and smooth...but oversized. |
| yeah saw flex hone was trying to avoid a $50 tool im only going to use once on a p.o.s. upper. I did a little hand polishing with a 5/16 dowel wrapped with a small piece of emery cloth. It knocked down some of the sharper ridges at least but the brass is still getting some shiny rings on it just not as bad. Unfortunately I haven't got any internal micrometers but i can tell just from the fit of the round it's still a little on the tight side. I am definitely going as slow as possible polishing it out and i don't expect to get it absolutely perfect but I would like to see the brass eject relatively unblemished. This method is barely doing anything when turning by hand so may have to chuck it in a drill for a bit. only putting the emery on the sides of the dowel so i don't alter head space at all just polishing body of chamber |
Armory Sponsor