|
[#1]
Quoted: Schluter Systems Quoted: Quoted: The problem is a bad installation. Rip it out and do it right. Schluter Systems It makes everything else obsolete. |
|
|
|
[#2]
Quoted: That shit is like a juggernaut in the industry. It makes everything else obsolete. Quoted: Quoted: Quoted: The problem is a bad installation. Rip it out and do it right. Schluter Systems It makes everything else obsolete. It's so easy to use, and for the few extra bucks it's good insurance. I don't do much tile, I don't advertise for it or anything, but when I do now I use the paint on membrane, then when it's dry I line the whole shower with schulter. I'm a huge fan of kerdi for floors too, helps keep it easy to match existing flooring. |
|
|
|
[#3]
Water has gotten under the liner and behind the rock board because if you give water an inch, it takes a mile. You may be surprised by just how much wet and dry rot you find under and around that shower.
|
|
|
|
[#4]
Quoted: Pan liner failed? Isn't there. Full demo, replacement. |
|
|
|
[#5]
Wow.
|
|
|
|
[#6]
You should be able to just caulk around the edges and be good.
|
|
|
|
[#7]
Looks like the faucet cartridge has been leaking for a while.
|
|
|
|
[#8]
Quoted: https://www.ar15.com/media/mediaFiles/418060/IMG_20220720_121619589_jpg-2459831.JPGhttps://www.ar15.com/media/mediaFiles/418060/IMG_20220720_121701309_jpg-2459832.JPG https://www.ar15.com/media/mediaFiles/418060/IMG_20220720_121731724_jpg-2459833.JPG https://www.ar15.com/media/mediaFiles/418060/IMG_20220720_121821582_jpg-2459834.JPG It almost seems like the hallway is getting wider which doesn't seem possible, or that threshold is getting shorter, which also doesn't seem possible. But that threshold is definitely pulling off of the wall. And there's a crack down through some of the stones. There's a rubber liner under the stones which goes up the walls for about a foot. I guess the shower is about 10 years old. There's a 5-in concrete slab under the shower. I should have posted this earlier. I forgot about this one. This is inside of the wall on the other side of the damaged shower. I forgot this laundry room had this opening. I can't begin to speculate on what I'm looking at I did not build the shower. It's not wet. https://www.ar15.com/media/mediaFiles/418060/IMG_20220720_201315474_jpg-2460289.JPG I understand this doesn't change anything. If I could see it in person I could tell you exactly, I have 45 years tile exp. Slate is fucking horrible in shower surrounds. |
|
|
|
[#9]
Quoted: Schluter Systems Quoted: Quoted: The problem is a bad installation. Rip it out and do it right. Schluter Systems |
|
|
|
[#10]
OP,
i have done a fair amount of bathroom rehab work -- and i'm here to tell you that from your pictures that is an entire tear out job. preface: a tile field assembly (consisting of tiles and grout) is not waterproof. once you accept this you can start to understand how to build a shower. since the tile field is not waterproof (whether walls or floor), there needs to be a waterproof barrier behind/under the tiles. otherwise, water penetrates the tile field, wets the substrate -- which incidentally has few avenues to dry out -- and then the substrate and supporting framing degrades. the degradation will be mechanical (loss of strength, loss of bonding, etc) and also biological (organic matter + water = mold and mildew). once this begins to occur, there is little chance of recovery; anything other than a complete tear down is just putting a band-aid on a gunshot wound. principle: the shower has to be completely waterproof before a single tile has been set. in other words, you should be able to take a shower BEFORE ANY TILE IS PLACED. that's right, correctly consider from now on in that the tile is simply decoration. all the waterproofing and/or water management (e.g. at the drain) HAS TO BE IMPLEMENTED prior to the tiles being set. once you have this principle in mind, you can construct a long lasting shower stall. moreover, it is FAR FAR FAR cheaper to do the job correctly the first time, versus doing it over again. onto your pictures: for some time now, water has been getting behind the tiles/grout -- and to my eye this has been happening from about knee-level down. the evidence is very clear: swelled structural wood, tiles adrift from the substrate, mold in the grout joints, moisture line on the drywall, etc. the situation you portray is not recoverable in the sense that you can do trivial "patchwork" and restore to a waterproof shower stall. the longitudinal crack across several of the floor tiles is highly indicative that the subfloor is water-compromised and now flexing. tear out: completely disassemble the shower walls by removing the tiles and discarding all of the backing substrate. break up and remove the floor substrate (it looks like it was an attempt at a "classic" sloped mud pan, but alas it was a failure). tear out any adjacent drywall which is damaged. the shower curb is surely a waterlogged mess. the plumbing should be evaluated to ensure that it wasn't contributing to the water getting behind the wall. even a trivial leak at the shower valve will result in extensive water damage, because there is no route out for the moisture. analysis: the net result is that you should be looking at wall studs and the subfloor -- your setup looks to be on a concrete slab. ANYTHING which is not structurally sound has to be removed and replaced. ANYTHING which will result in wall or floor deflection has to be sistered up or otherwise buttressed. you can not set tile on unsound surfaces; trying to do so will result in cracked or loose tiles. start over: install new framing as needed, all nice and square/plumb. apply purple board (moisture resistant drywall) on the walls. get acquainted with the Shluter shower construction system -- is the dead-on balls-accurate best way to build a shower. thinset the Kerdi onto the walls, and use one of their foam bases to form the floor. when you are done with applying all the orange, you can take a shower. at that point, when you have tested the water integrity of the stall, you can thinset new tiles on. (btw i was not a fan of the aesthetic combination in your pictures...) important: focus on the things UNDERNEATH. everything in the tile setting phase goes SO MUCH SMOOTHER if the walls are plumb and the corners are square and so on. so pay great attention to the "foundation". every single thing you do wrong underneath is going to cause you a problem when you go to set the tiles -- so work bottom-up with great care in every way that you can. investment in detail at the bottom layer makes it much easier to work at the top layer. ar-jedi https://www.youtube.com/results?search_query=schluter+shower https://www.schluter.com/schluter-us/en_US/Shower-System/Waterproofing/c/SS-W https://www.schluter.com/schluter-us/en_US/showers/shower_with_point_drain  |
|
|
|
[#11]
OST
Cause I'm remodeling mine soon and want some ideas. |
|
|
|
[#12]
           |
|
|
|
[#13]
note:
there is nothing intrinsically difficult about the Schluter approach. for the DIY'er, it just requires a bit of learning and also an appreciation for an upfront time investment. the payoff is that the tile setting is really smooth and you never have to worry about water intrusion. ps there is also no way that i could "keep clean" when applying Kerdi in relatively small stalls. so wear old clothes and old shoes, and prepare to divorce some of the same. this looks nice  but to get there  |
|
|
|
[#14]
Quoted: Water damage |
|
|
|
[#15]
lol. looks like a home depot employee installed that
rip it out. use Wedi or Schluter. we prefer Wedi, awesome stuff. |
|
|
|
[#16]
Well, you’re looking at 15-25k
Replaced our leaking shower about a month ago. Previous homeowner installed 2 years ago and was apparently a fucking moron. |
|
|
|
[#17]
I just had my downstairs tile shower replaced last month and when the contractor tore it out he asked who the idiot was that did the install. It was leaking, tile was cracking, just a shit job all the way around. I now have a good looking, properly done tile shower. It wasn't cheap though.
|
|
|
|
[#18]
Quoted: OP, i have done a fair amount of bathroom rehab work -- and i'm here to tell you that from your pictures that is an entire tear out job. preface: a tile field assembly (consisting of tiles and grout) is not waterproof. once you accept this you can start to understand how to build a shower. since the tile field is not waterproof (whether walls or floor), there needs to be a waterproof barrier behind/under the tiles. otherwise, water penetrates the tile field, wets the substrate -- which incidentally has few avenues to dry out -- and then the substrate and supporting framing degrades. the degradation will be mechanical (loss of strength, loss of bonding, etc) and also biological (organic matter + water = mold and mildew). once this begins to occur, there is little chance of recovery; anything other than a complete tear down is just putting a band-aid on a gunshot wound. principle: the shower has to be completely waterproof before a single tile has been set. in other words, you should be able to take a shower BEFORE ANY TILE IS PLACED. that's right, correctly consider from now on in that the tile is simply decoration. all the waterproofing and/or water management (e.g. at the drain) HAS TO BE IMPLEMENTED prior to the tiles being set. once you have this principle in mind, you can construct a long lasting shower stall. moreover, it is FAR FAR FAR cheaper to do the job correctly the first time, versus doing it over again. onto your pictures: for some time now, water has been getting behind the tiles/grout -- and to my eye this has been happening from about knee-level down. the evidence is very clear: swelled structural wood, tiles adrift from the substrate, mold in the grout joints, moisture line on the drywall, etc. the situation you portray is not recoverable in the sense that you can do trivial "patchwork" and restore to a waterproof shower stall. the longitudinal crack across several of the floor tiles is highly indicative that the subfloor is water-compromised and now flexing. tear out: completely disassemble the shower walls by removing the tiles and discarding all of the backing substrate. break up and remove the floor substrate (it looks like it was an attempt at a "classic" sloped mud pan, but alas it was a failure). tear out any adjacent drywall which is damaged. the shower curb is surely a waterlogged mess. the plumbing should be evaluated to ensure that it wasn't contributing to the water getting behind the wall. even a trivial leak at the shower valve will result in extensive water damage, because there is no route out for the moisture. analysis: the net result is that you should be looking at wall studs and the subfloor -- your setup looks to be on a concrete slab. ANYTHING which is not structurally sound has to be removed and replaced. ANYTHING which will result in wall or floor deflection has to be sistered up or otherwise buttressed. you can not set tile on unsound surfaces; trying to do so will result in cracked or loose tiles. start over: install new framing as needed, all nice and square/plumb. apply purple board (moisture resistant drywall) on the walls. get acquainted with the Shluter shower construction system -- is the dead-on balls-accurate best way to build a shower. thinset the Kerdi onto the walls, and use one of their foam bases to form the floor. when you are done with applying all the orange, you can take a shower. at that point, when you have tested the water integrity of the stall, you can thinset new tiles on. (btw i was not a fan of the aesthetic combination in your pictures...) important: focus on the things UNDERNEATH. everything in the tile setting phase goes SO MUCH SMOOTHER if the walls are plumb and the corners are square and so on. so pay great attention to the "foundation". every single thing you do wrong underneath is going to cause you a problem when you go to set the tiles -- so work bottom-up with great care in every way that you can. investment in detail at the bottom layer makes it much easier to work at the top layer. ar-jedi https://www.youtube.com/results?search_query=schluter+shower https://www.schluter.com/schluter-us/en_US/Shower-System/Waterproofing/c/SS-W https://www.schluter.com/schluter-us/en_US/showers/shower_with_point_drain https://sccpublic.s3-external-1.amazonaws.com/sys-master/images/hc2/h49/8936043118622/shower_pointdrain_web.jpg Really, really good info. Thanks for taking the time to put this together. I'll read every word. |
|
|
|
[#19]
Quoted: Well, you’re looking at 15-25k you can save a trainload of money if you take away the things which you are paying the tilesetter a premium for. demolition and disposal, replacing compromised studs, buttressing the subfloor, etc. the tilesetter doesn't really want to do these things; he just wants to set tile. here's perfect analogy: you know nothing about electricity. you want AC utility power out at a shed 100' from your house. just a couple of lights and an outlet to charge the tractor battery during the winter etc. the electrician doesn't look at this job as particularly difficult; what he doesn't like is the idea of trenching 18" (conduit) or 24" (UF cable) down 100' across the yard. that requires a trencher and a shovel and naturally it's going to rain, and then he hits and breaks your sprinkler pipe and your cable TV/fios line, and so on and so forth. this simple job is basically priced because the electrician does not want to move dirt around (twice) -- and btw he will be charging you ~$100-150/hr to do it. you want this job done cheaper? no problem. ask the electrician what the price is just for the electrical work. tell him to put flags where he wants the trench. tell him you will do the backfill and plant new grass. the electrician now can price your job out a lot more efficiently, and it will be far cheaper for you to do the labor part. similarly, you can do the same thing with a tilesetter. do everything YOU can, and then let the tilesetter, well, set the tiles. it does require communication, and you need to make sure you are not skimping on the construction because you are going to hear about it from the tilesetter. but you can DIY the demolition, cartaway, subfloor, framing, pluming, drywall, and so on, and then let the tilesetter waterproof it and put your nice tiles on top of everything. you just knocked AT LEAST $5K off the cost of a bathroom redo, but you are going to have to bring some bandaids. ps to OP https://sccpublic.s3-external-1.amazonaws.com/sys-master/images/h8c/h92/9346680815646/Shower%20System%20Installation%20Handbook.pdf https://sccpublic.s3-external-1.amazonaws.com/sys-master/images/ha8/h5a/9346373615646/Shower%20System%20Data%20Sheet.pdf https://sccpublic.s3-external-1.amazonaws.com/sys-master/images/h84/hc0/9345113554974/Shower%20Checklist.pdf |
|
|
|
[#20]
Quoted: you can save a trainload of money if you take away the things which you are paying the tilesetter a premium for. demolition and disposal, replacing compromised studs, buttressing the subfloor, etc. the tilesetter doesn't really want to do these things; he just wants to set tile. here's perfect analogy: you know nothing about electricity. you want AC utility power out at a shed 100' from your house. just a couple of lights and an outlet to charge the tractor battery during the winter etc. the electrician doesn't look at this job as particularly difficult; what he doesn't like is the idea of trenching 18" (conduit) or 24" (UF cable) down 100' across the yard. that requires a trencher and a shovel and naturally it's going to rain, and then he hits and breaks your sprinkler pipe and your cable TV/fios line, and so on and so forth. this simple job is basically priced because the electrician does not want to move dirt around (twice) -- and btw he will be charging you ~$100-150/hr to do it. you want this job done cheaper? no problem. ask the electrician what the price is just for the electrical work. tell him to put flags where he wants the trench. tell him you will do the backfill and plant new grass. the electrician now can price your job out a lot more efficiently, and it will be far cheaper for you to do the labor part. similarly, you can do the same thing with a tilesetter. do everything YOU can, and then let the tilesetter, well, set the tiles. it does require communication, and you need to make sure you are not skimping on the construction because you are going to hear about it from the tilesetter. but you can DIY the demolition, cartaway, subfloor, framing, pluming, drywall, and so on, and then let the tilesetter waterproof it and put your nice tiles on top of everything. you just knocked AT LEAST $5K off the cost of a bathroom redo, but you are going to have to bring some bandaids. ps to OP https://sccpublic.s3-external-1.amazonaws.com/sys-master/images/h8c/h92/9346680815646/Shower%20System%20Installation%20Handbook.pdf https://sccpublic.s3-external-1.amazonaws.com/sys-master/images/ha8/h5a/9346373615646/Shower%20System%20Data%20Sheet.pdf https://sccpublic.s3-external-1.amazonaws.com/sys-master/images/h84/hc0/9345113554974/Shower%20Checklist.pdf I would also recommend that you visit the John Bridge tile forums. Some very knowledgeable tile folks there. John Bridge Tile Forum |
|
|
|
[#21]
Quoted: Water damage Quoted: Water damage Quoted: Liner is fucked, it's going to cost a pretty penny to fix it. |
|
|
|
[#22]
Did midcap have a lady friend over?
|
|
|
|
[#23]
Full tear out and redo- that's a disaster
|
|
|
|
[#24]
|
|
|
|
[#25]
Quoted: The problem is a bad installation. Rip it out and do it right. Correct answer. First obvious problem - no redguard. |
|
|
|
[#26]
My buddy also says,
"Schluter is nice, but very expensive and IMO not necessary for most DIYers. It's meant for professionals who guarantee their work, which Schluter warranties, as long as the installation is done to Schluter's specs, by someone who's attended their 2 day training seminars. As long as you follow the TCNA's guidelines, you'll be fine. A properly installed pan liner, tied into a wall liner ( tar paper works fine ), with brush/roll on ( Aqua Defense/Red Guard ) waterproofing on the seams and screw penetrations. Most water intrusion issues is due to a lack of any wall liner." |
|
|
|
[#27]
Edit: Wow, that was huge.
YourInstallerFuckedUpAndYourShowersAllRetarded.jpg |
|
|
|
[#28]
Slate is awful for showers…too soft a stone, water gets into it and flakes off.
|
|
|
|
[#29]
What ever the cause is. We will require a full and complete in depth write up on the remodel.. Documented with highly detailed pictures of the progress from start to finish!
|
|
|
|
[#30]
The liner is leaking.
|
|
|
|
[#31]
Quoted: The problem is a bad installation. Rip it out and do it right. This. It would be easier to answer what isnt happening with that stone shower -- It isnt working right at all. I pretty much guarantee: poor or no waterproofing being the stone work on the walls, improper pan, poor stone installation or wrong butter used, huge tile gaps not regularly sealed. Enjoy cleaning the studs when all that is finally pulled off. |
|
|
|
[#32]
Dam, that is bad.
I predict sink hole below shower that will take the house down. 
|
|
|
|
[#33]
It looks like the remains of a 3rd grade class project.

|
|
|
|
[#34]
The first sign someone doesn’t know what they are doing, is using slate in a wet environment.
The second sign is that huge mess of fucked up install. |
|
|
|
[#35]
Quoted: The problem is a bad installation. Rip it out and do it right. This. Doesn't look like anything is correct. Did they manage to get the hot and cold on the correct sides? |
|
|
|
[#36]
Quoted: lol. looks like a home depot employee installed that rip it out. use Wedi or Schluter. we prefer Wedi, awesome stuff. Another vote for Wedi. It is the best |
|
|
|
[#37]
Not a professional.....It's coming apart.
|
|
|
|
[#38]
Quoted: Ar-jedi make very good points in both of his posts. I would also recommend that you visit the John Bridge tile forums. Some very knowledgeable tile folks there. John Bridge Tile Forum +1 on John Bridge forum, it is to tiling what Arfcom is to AR15's! I have done two tile showers by reading and learning on the site. |
|
|
|
[#39]
Quoted: My buddy also says, "Schluter is nice, but very expensive and IMO not necessary for most DIYers. It's meant for professionals who guarantee their work, which Schluter warranties, as long as the installation is done to Schluter's specs, by someone who's attended their 2 day training seminars. As long as you follow the TCNA's guidelines, you'll be fine. A properly installed pan liner, tied into a wall liner ( tar paper works fine ), with brush/roll on ( Aqua Defense/Red Guard ) waterproofing on the seams and screw penetrations. Most water intrusion issues is due to a lack of any wall liner." 1) it's not "very expensive". 2) a traditional mortar bed shower setup is all but permanently wet. it's a mold and mildew factory, because of how much water is ALWAYS present. using a fabric membrane (e.g. Kerdi) or roll-on membrane (e.g. Redguard) directly under the tile field keeps the shower floor grout in much better shape -- and for far longer. this same problem applies to the floor/wall joints, and for the lower part of the walls. traditional setup: 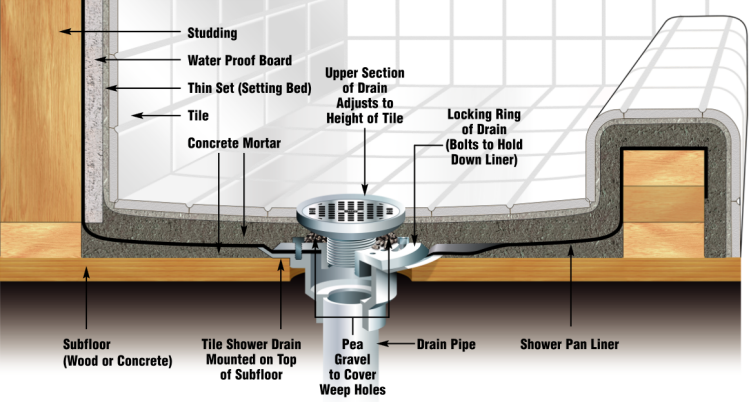
|
|
|
|
[#40]
$10 says that stone was attached directly to sheetrock.
Rip it out, save as much of the stone as you can, lay down cement board floor/walls then re-tile. For extra water proofing but heavy plastoc sheeting behind the cement board. Never mind, ar-jedi nailed it |
|
|
|
[#41]
OP, what's the status of the demolition?

|
|
|
 Win a FREE Membership!
Sign up for the ARFCOM weekly newsletter and be entered to win a free ARFCOM membership. One new winner* is announced every week!
You will receive an email every Friday morning featuring the latest chatter from the hottest topics, breaking news surrounding legislation, as well as exclusive deals only available to ARFCOM email subscribers.

AR15.COM is the world's largest firearm community and is a gathering place for firearm enthusiasts of all types.
From hunters and military members, to competition shooters and general firearm enthusiasts, we welcome anyone who values and respects the way of the firearm.

Subscribe to our monthly Newsletter to receive firearm news, product discounts from your favorite Industry Partners, and more.
Copyright © 1996-2024 AR15.COM LLC. All Rights Reserved.
Any use of this content without express written consent is prohibited.
AR15.Com reserves the right to overwrite or replace any affiliate, commercial, or monetizable links, posted by users, with our own.


