|
Posted: 11/18/2013 6:12:12 PM EDT
So after completing our kitchen/dining room addition a few months ago ( I'll do a picture thread on it later) , I decided I needed to start on the dining room table so we didn't have to eat off of the pingpong table for thanksgiving. Nothing like a deadline to get a project rolling.

The plan is to do a rustic barn beam table that is about 9' long. On Saturday, I found a guy on craigslist who had some nice oak beams, and went and picked them up. I'm using 2x8 planks for the top, 6x6 posts for the legs, and 4x4 posts for the cross pieces. After unloading the truck, I'm starting to realize that the table will weight around 400-500 lbs. So here is the wood - total cost $250.00 

On Sunday, I attacked the shop and cleared out a space to set up the radial arm saw. I'm using this to rip down the edges so I can straighten out the edges for joining the top together. To do this right, I needed to make a 20' long table with the radial arm saw in the middle, that would be solid enough to support the beams. I ended up creating this Frankentable that has 2 folding tables, a desk and a stand (all different heights of course!!!) all screwed together with scrap material to get an even surface. 
Monday: I removed all the nails from the boards that didn't break off. 90% Then started ripping down the edges. I took an 8" wide x 8' long strip of 1/4 plywood and attached it to the bottom of the planks so the I could use the factory edge as a straight edge to rip down the first side. You can see it in this picture between the plank and the fence. 
I ate up 2 older blades ripping the 7 boards. 100 year old oak, plus hand forged nails are not a good combination for saw blade longevity. After trimming them all, I laid them out on the floor, and they actually fit together pretty tight! 
Those 6 give me 42" across, and I can use the last one for bracing underneath. I'm thinking of using glue, and Kreg pocket screws to join the planks together. Has anyone used these before, or have any recommendations? I don't have a biscuit jointer, and this got good reviews. So I have to buy one or the other. I'll keep updating each day! |
|
|
|
[#1]
NICE!!!! Keep posting your updates so we can see your handywork when it is done.
|
|
|
|
[#2]
Here is the picture that I'm designing it after. Hopefully it turns out pretty close.

|
|
|
|
[#3]
Kickass! I am doing the exact same thing started yesterday. Good luck to you and hope your done by Thansgiving!
|
|
|
|
[#4]
Quoted:
Kickass! I am doing the exact same thing started yesterday. Good luck to you and hope your done by Thansgiving! I'm glad that I'm not the only one who waits til the last minute! Post pics if you get a chance. |
|
|
|
[#5]
Long grain to long grain glue joints don't need any mechanical fasteners (pocket screws). Use some Titebond glue and it will be stronger than the wood. The key is to allow for the wood to expand and contract when you attach it to the base. If you don't it will crack.
I like the design you are shooting for. Might have to save that picture. |
|
|
|
[#6]
Taggity. |
|
|
|
[#7]
Quoted:
Long grain to long grain glue joints don't need any mechanical fasteners (pocket screws). Use some Titebond glue and it will be stronger than the wood. The key is to allow for the wood to expand and contract when you attach it to the base. If you don't it will crack. a I like the design you are shooting for. Might have to save that picture. This is spot on. I didn't see a jointer in your shop, you will want to make sure the edges are straight and a perfect 90 from the face, then titebond and clamp. About ten years ago, I had just finished my shop and had a 9' trestle table on my "to do" list a few weeks before Thanksgiving. I got it done, but seriously under estimated how hard it was going to be to move the finished top around the shop and into the house. That sucker is heavy. Steve |
|
|
|
[#8]
Quoted:
This is spot on. I didn't see a jointer in your shop, you will want to make sure the edges are straight and a perfect 90 from the face, then titebond and clamp. About ten years ago, I had just finished my shop and had a 9' trestle table on my "to do" list a few weeks before Thanksgiving. I got it done, but seriously under estimated how hard it was going to be to move the finished top around the shop and into the house. That sucker is heavy. Steve Quoted:
Quoted:
Long grain to long grain glue joints don't need any mechanical fasteners (pocket screws). Use some Titebond glue and it will be stronger than the wood. The key is to allow for the wood to expand and contract when you attach it to the base. If you don't it will crack. a I like the design you are shooting for. Might have to save that picture. This is spot on. I didn't see a jointer in your shop, you will want to make sure the edges are straight and a perfect 90 from the face, then titebond and clamp. About ten years ago, I had just finished my shop and had a 9' trestle table on my "to do" list a few weeks before Thanksgiving. I got it done, but seriously under estimated how hard it was going to be to move the finished top around the shop and into the house. That sucker is heavy. Steve Yeah, no jointer, I just cleaned up the edges on the radial arm saw. They are pretty tight, but not perfect. Would it hurt to add a few pocket screws just for over kill at the ends? I really don't want this to ever crack. Also, the beveled 2x6 that is on top of the legs, and runs across the underside on the top... I was going to screw it into the top to lock it all together. It's from the same wood as the top. I would like the additional support when we have to move it into the house. Does that sound OK? |
|
|
|
[#9]
Good god man, you need a fucking planer like nobody's business.
|
|
|
|
[#10]
Joint lines that are almost flush are problematic. Close doesn't cut it. However, pocket screws won't hurt. I can tell you though if you glue two jointed boards up, let the glue dry and then break the boards, the wood will fail before the glue joint. Really should joint your edges. This can be done on a jointer or with a router a straight edge and a flush trimming bit with a bearing that rides along your straight edge.
If you don't have the right tools (jointer, planer, and a shit ton of clamps) to make your top properly it might be a good idea to farm that out to someone who does. The rest of your table is pretty straight forward. Not saying you can't make the top with the tools you have in hand. If not done properly though it will fail after a couple of years. Beveled 2x6. Drill holes through it that are larger than the screws you're using to attach the top with. Your table top will expand and contract over the years and you need to allow it to move freely from the bottom brace. No glue between the top and the bottom brace. Screw with a washer in an oversized hole. When you move the table, take the top off. Move the base and then reattach the top to the base. If your connection between the top and base is so secure that you could pick up the whole table, it is too secure. |
|
|
|
[#11]
I would build it modularly so it can be assembled at it's destination.
|
|
|
|
[#12]
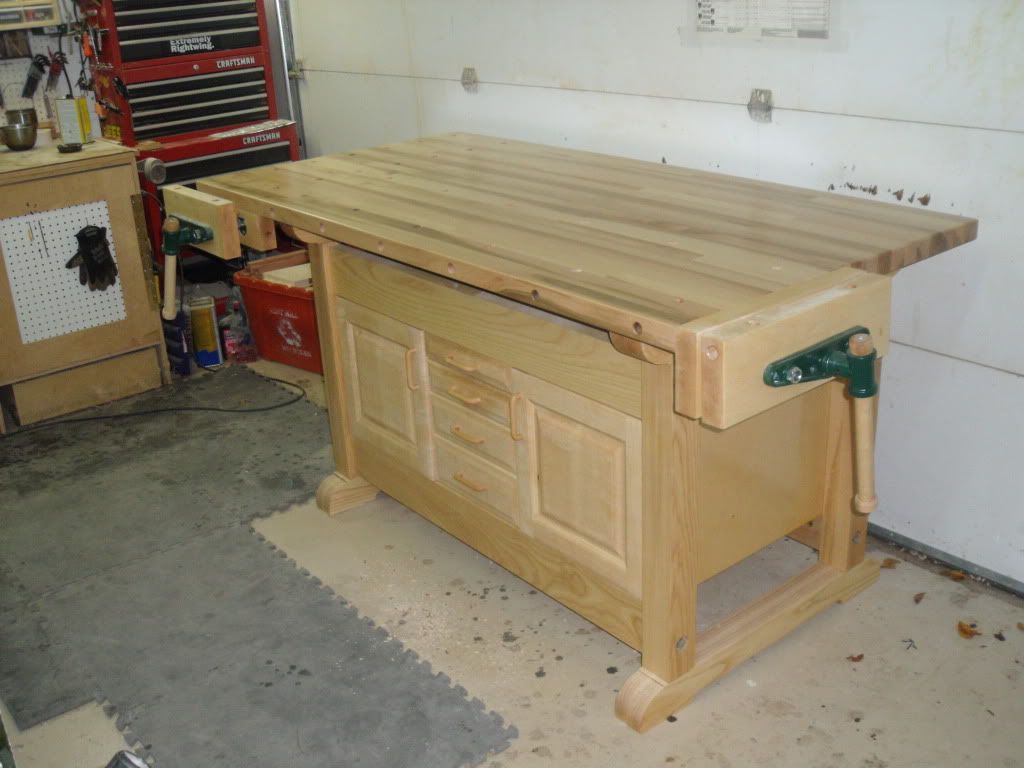
Here is something similiar to your table for an example. This is a solid laminated slab of hard maple on an ash base. You might be surprised to know that there is nothing holding the top down to the base. It is indexed onto the base with two 3/4" dowells. This allows for the wood to move. Here are the plans I based my workbench off of. You can see the two dowells on the top of the leg frames. 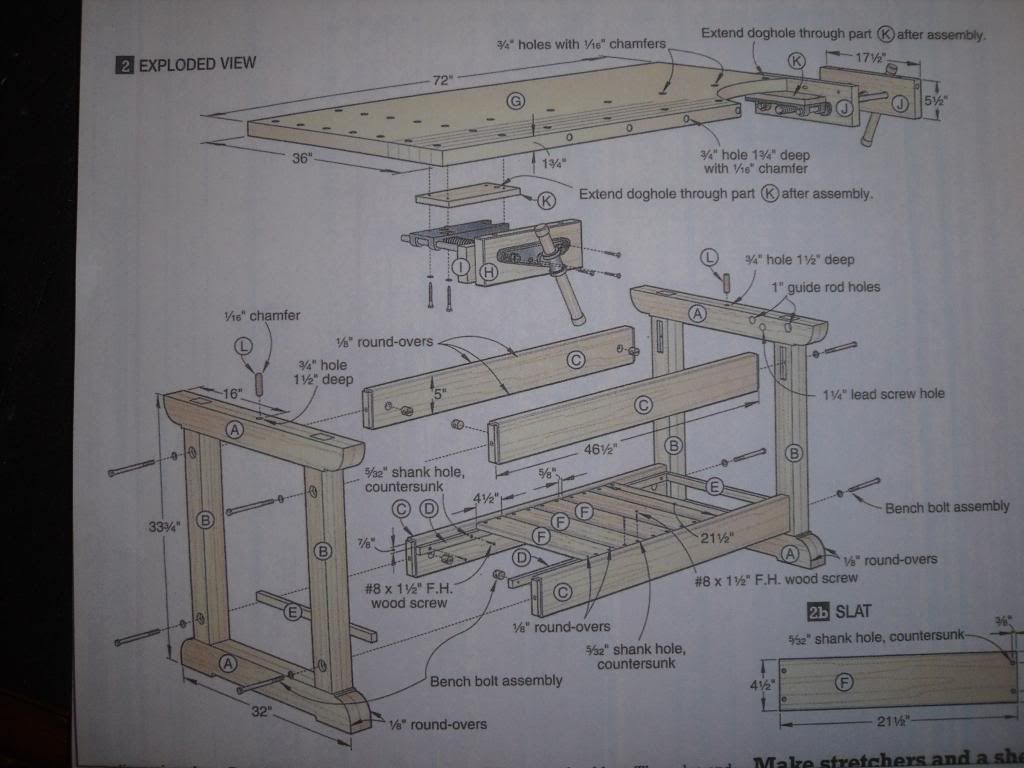
Additionally, even though I have a fully equipped wood shop, I farmed out the lamination of the maple top. It is perfectly planed and parallel on both the top and bottom. All I did was drill the dog holes and mount the vises. The ash base I built. |
|
|
|
[#13]
Quoted:
Joint lines that are almost flush are problematic. Close doesn't cut it. However, pocket screws won't hurt. I can tell you though if you glue two jointed boards up, let the glue dry and then break the boards, the wood will fail before the glue joint. Really should joint your edges. This can be done on a jointer or with a router a straight edge and a flush trimming bit with a bearing that rides along your straight edge. If you don't have the right tools (jointer, planer, and a shit ton of clamps) to make your top properly it might be a good idea to farm that out to someone who does. The rest of your table is pretty straight forward. Not saying you can't make the top with the tools you have in hand. If not done properly though it will fail after a couple of years. Beveled 2x6. Drill holes through it that are larger than the screws you're using to attach the top with. Your table top will expand and contract over the years and you need to allow it to move freely from the bottom brace. No glue between the top and the bottom brace. Screw with a washer in an oversized hole. When you move the table, take the top off. Move the base and then reattach the top to the base. If your connection between the top and base is so secure that you could pick up the whole table, it is too secure. Thanks for the help. It sounds like you've done this a time or two. I'll do a test seam with the pocket screws and glue. Also in looking at the joints, they are pretty tight ( I'm a machinist, so I'm slightly anal. ) so hopefully it will work. I like the washer and over sized whole idea for expansion. Will definitely do that. Since the top will have a moderately rough finish, along with old holes and knots, I don't think a few small cracks would be a problem if it were to happen. |
|
|
|
[#14]
Looks like a great project.
|
|
|
|
[#15]
Another option for your jointing would be to use a butterfly inlay, even if only decorative.
A few examples: 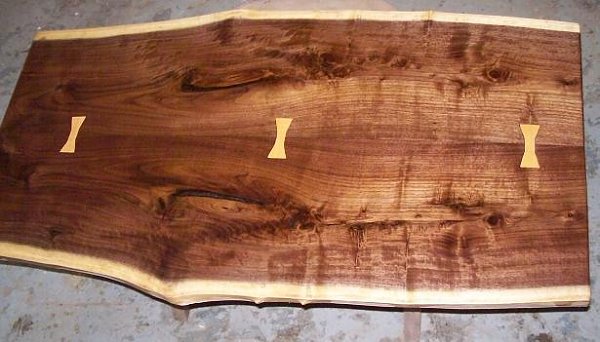


|
|
|
|
[#16]
OST.
|
|
|
|
[#17]
Quoted:
Thanks for the help. It sounds like you've done this a time or two. I'll do a test seam with the pocket screws and glue. Also in looking at the joints, they are pretty tight ( I'm a machinist, so I'm slightly anal. ) so hopefully it will work. I like the washer and over sized whole idea for expansion. Will definitely do that. Since the top will have a moderately rough finish, along with old holes and knots, I don't think a few small cracks would be a problem if it were to happen. Yeah, once or twice
On your test with the pocket screws. Do it first without the glue to see if it comes together nicely. If it does, then take it apart apply your glue and move on. Pay special attention to the top side of your top so that your boards remain flush and level. Test then glue one board at a time until your slab is complete then let it sit overnight for the glue to fully cure before milling. Good luck and if you need any more help let me know. |
|
|
|
[#18]
Quoted:
Yeah, once or twice
On your test with the pocket screws. Do it first without the glue to see if it comes together nicely. If it does, then take it apart apply your glue and move on. Pay special attention to the top side of your top so that your boards remain flush and level. Test then glue one board at a time until your slab is complete then let it sit overnight for the glue to fully cure before milling. Good luck and if you need any more help let me know. Quoted:
Quoted:
Thanks for the help. It sounds like you've done this a time or two. I'll do a test seam with the pocket screws and glue. Also in looking at the joints, they are pretty tight ( I'm a machinist, so I'm slightly anal. ) so hopefully it will work. I like the washer and over sized whole idea for expansion. Will definitely do that. Since the top will have a moderately rough finish, along with old holes and knots, I don't think a few small cracks would be a problem if it were to happen. Yeah, once or twice
On your test with the pocket screws. Do it first without the glue to see if it comes together nicely. If it does, then take it apart apply your glue and move on. Pay special attention to the top side of your top so that your boards remain flush and level. Test then glue one board at a time until your slab is complete then let it sit overnight for the glue to fully cure before milling. Good luck and if you need any more help let me know. Good idea. Thanks. -Oh..... and HELL NO on the butterfly inlay. It has to be done by Thanksgiving of this year! But it does look cool. |
|
|
|
[#19]
Awesome!! I do like those old weathered boards
|
|
|
|
[#20]
Today I was pretty busy with work, but did manage to get some things done.
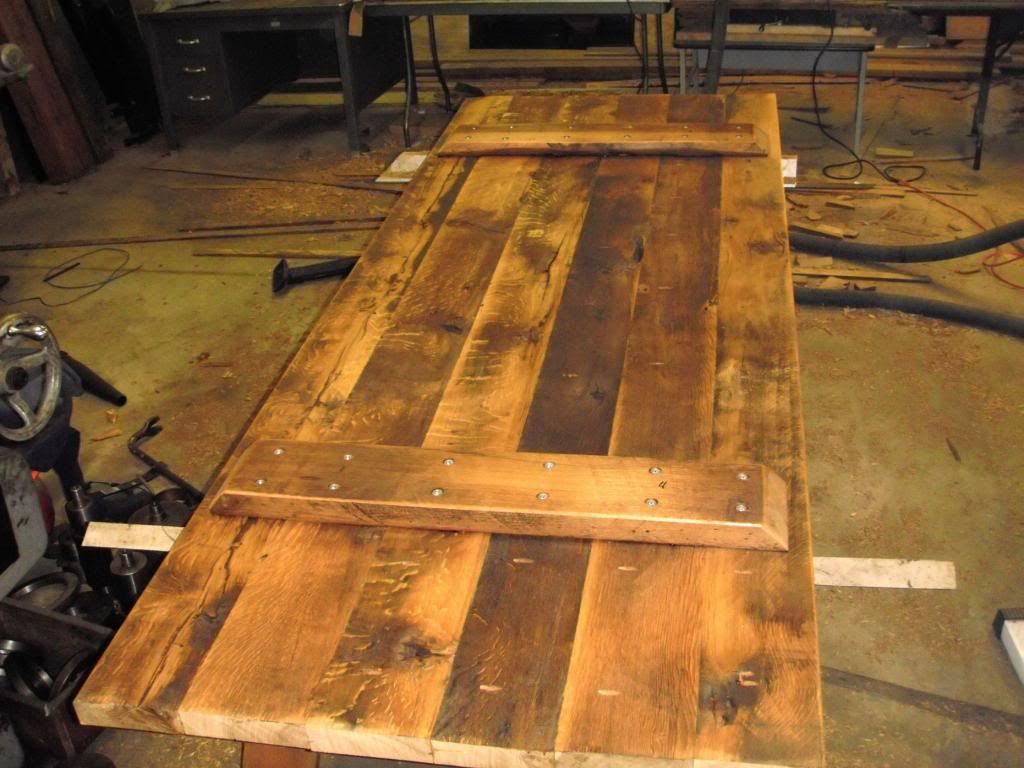
I ended up going with the kreg pocket drill jig, and glue to join the planks together. This was the best option, because I don't have the clamps to try to pull that off. The boards are old, so nothing is perfectly straight, or even the same thickness. By using the pocket screws about every foot and dry fitting them together as Covertness recommended, I was able to adjust the top surface as I moved along the length of the board. Then backed out the screws, slathered on the glue, and screwed it back together. I managed to get 4 out of 6 done today, and will finish them tomorrow. 
Here is a closer picture of the screws. 
The screws actually pulled the joints together very nice, and were easy to use. |
|
|
|
[#21]
Nice. I've been trying to dream up something to build over the winter, drawing a blank so far. I have a very small house so I have to be careful about overfilling it. lol
What are the machine tools in the background? Kinda look like grinders. |
|
|
|
[#22]
When you're done, use a set of winding sticks to check for level across the length of the boards.

|
|
|
|
[#23]
Quoted:
Nice. I've been trying to dream up something to build over the winter, drawing a blank so far. I have a very small house so I have to be careful about overfilling it. lol What are the machine tools in the background? Kinda look like grinders. They are gear hobbers. It's what I do for a living. The rest of the shop. 
And here is one that is half way thru a stack of helical gears. 
|
|
|
|
[#24]
So today I finished gluing the top together, then planed it off some just to clean up the bottom before attaching the cross pieces.
The cross pieces are screwed on using the oversized holes, and washers to allow for expansion. Then I cut the legs to length, and cleaned two of them up with the plane to see what they would look like. By then, I was wishing I had a power planer! 
They need cleaned up and sanded more before they are ready, but I think they will work well. The old mortise's don't match up, so I'll probably have to make my own when I do the cross pieces. |
|
|
|
[#25]
Looking good. Whatcha got for chairs? Bench style?
|
|
|
|
[#26]
Awesome job sir. Keeps me motivated to finish my work/reloading bench.
|
|
|
|
[#27]
Quoted:
Looking good. Whatcha got for chairs? Bench style? We will probably do a bench along the one side that is against the wall, and buy chairs for the rest of it. Haven't really decided yet, but I'm definitely not making them. |
|
|
|
[#28]
I love it.
It looks like it is damn heavy. |
|
|
|
[#29]
Good job so far. It does look heavy, I guess if the Mongal hoards come you could use it to block your door.
|
|
|
|
[#30]
Quoted:
Good job so far. It does look heavy, I guess if the Mongal hoards come you could use it to block your door. Yeah, I guess I always wanted one of those tables you could flip on its side and hide behind when the gun fight breaks out in the saloon. Maybe I'll have to do some ballistics tests with the scrap pieces.... 9-vs-45. |
|
|
|
[#31]
After hand planing ALOT yesterday, I realized two things when I went in the shop this morning:
1) I still had a lot of planing to do. and 2) I was a dumbass for forgetting the 1st rule of any building project... Never waste an opportunity to buy a power tool !!! So I jumped in the truck, went to Lowes, and came back with this baby: 
And using woman shopper logic, I actually saved money because I got to return the $ 15.00 chamfer router bit I no longer needed. Anyways... Wow, what a difference! It cleans the boards up beautifully, and then I do a quick once over with the hand plane to get out any chatter marks. I did put a coat of polyurethane on the bottom to seal it up before I flip it over to work on the top. ( Only want to flip that beast once! ) It also gives me an idea of the final color. I'll probably finish the boards on top a bit more so they are not quite as dark. 
Then I planed the rest of the legs, cut the cross pieces to length and cleaned them up, cut the tenons on the cross pieces, and mortised out the bottom of the legs. Leaving me with this: 
I'm used the radial arm saw to cut the tenons, and I'm using a plunge router to mortise out the legs. |
|
|
|
[#32]
Looking great!
|
|
|
|
[#33]
Might be a good idea to pin your tenons inside the mortises. With the size of your wood I'd probably use 1/2" dowells for this.
(random pic pulled from the internet) 
From looking at your inspirational picture, it would appear that those joints are pinned as well. Nice job so far. |
|
|
|
[#34]
Quoted:
 You are going to learn to love that power planer. It is a specialized tool but when you need it, there's nothing quite like it. Questions - Did you over-size or slot the bolt holes in the battens shown in the photo, above? Are the wood planks seasoned and acclimated to an indoor environment? |
|
|
|
[#35]
Quoted:
Might be a good idea to pin your tenons inside the mortises. With the size of your wood I'd probably use 1/2" dowells for this. (random pic pulled from the internet) http://www.finewoodworking.com/uploadedImages/Fine_Woodworking_Network/Image_Resources/Magazine/191/011191006_01_md.jpg From looking at your inspirational picture, it would appear that those joints are pinned as well. Nice job so far. Along that note, if you do this I would stick with the "rustic" theme and pin the joint as they did it when constructing the old barns. They often utilized "hand-carved" "somewhat rounded" pins in the construction like the ones pictured below (basically really quickly carved pins with bit of a rounded/pointed nose to make alingment easier then they would either cut or just break the excess off the back side. I think that would give a really nice touch to the project. 
|
|
|
|
[#36]
Quoted:
You are going to learn to love that power planer. It is a specialized tool but when you need it, there's nothing quite like it. Questions - Did you over-size or slot the bolt holes in the battens shown in the photo, above? Are the wood planks seasoned and acclimated to an indoor environment? Quoted:
You are going to learn to love that power planer. It is a specialized tool but when you need it, there's nothing quite like it. Questions - Did you over-size or slot the bolt holes in the battens shown in the photo, above? Are the wood planks seasoned and acclimated to an indoor environment? Yes on both. I used pan head screw with washers underneath, oversized the screw holes, and just barely snugged them so they can move if needed. The planks on top have been stored indoors in the guys work shop for at least 10 yrs. The beam used for the legs was outside but tarped, so after planning, I brought them in, and set them next to the wood burning stove for several days to suck some moisture out. |
|
|
|
[#37]
Here is today's update before I eat, and head back out to the shop.
I finished all the mortise and tenons, and cleaned them all up to fit tight, and square. The tenons are 1.25 thick, 3" wide, and go 2.75" into the mortise. I then finish sanded all the legs and cross pieces before setting up to drill the pins. Here is the setup I used for drilling the pins: 
I ended up using 3/4" dowel for the pins and went in 5" so they bottom out 1" before going thru the other side. I squared them up against the straight edge, checked the angles for 90, and tightened them down with the strap so the joints were nice and tight. Everything is just dry fit for now, because I have to notch the long beam that runs between the sets of legs, and then assemble everything at once. Here is the one set after pinning. Came out very solid. 
|
|
|
|
[#38]
Done for the night. Got the base assembled.
All I have to do is attach the curved trim pieces 
|
|
|
|
[#39]
Helluva table!
|
|
|
|
[#40]
I wish I had the know how to do this
Looks awesome |
|
|
|
[#41]
Great work!
|
|
|
|
[#42]
How are you planning on attaching the curved trim pieces?
|
|
|
|
[#43]
Quoted:
How are you planning on attaching the curved trim pieces? I countersunk, and screwed the bottom one into the cross pieces, and the top ones I nailed in using a finish nailer. Here are pics of the finished legs after all sanded and ready for polyurethane. 

|
|
|
|
[#44]
With much effort, I managed to flip over the top without killing myself.
Then I cut the final 1" off each end to make the total length 9ft. I got out the power planer and knocked down any major high spots, and then went across the whole thing on a 45 degree angle to level it out. then I beveled the edges at a 45ish with the planer. When that was done, I switched to the hand plane to smooth out the surface, and remove any marks from the power planer. Tomorrow, I'll finish sand the top and round all the corners. Then suck up all the dust, and put on the first coat of poly. 

|
|
|
|
[#45]
good job op, looking great
|
|
|
|
[#46]
Something to think of and something I highly recommend for the finish of your top instead of poly.
thoughts on oil finishes Here's an example of what you can do with simple Danish Oil 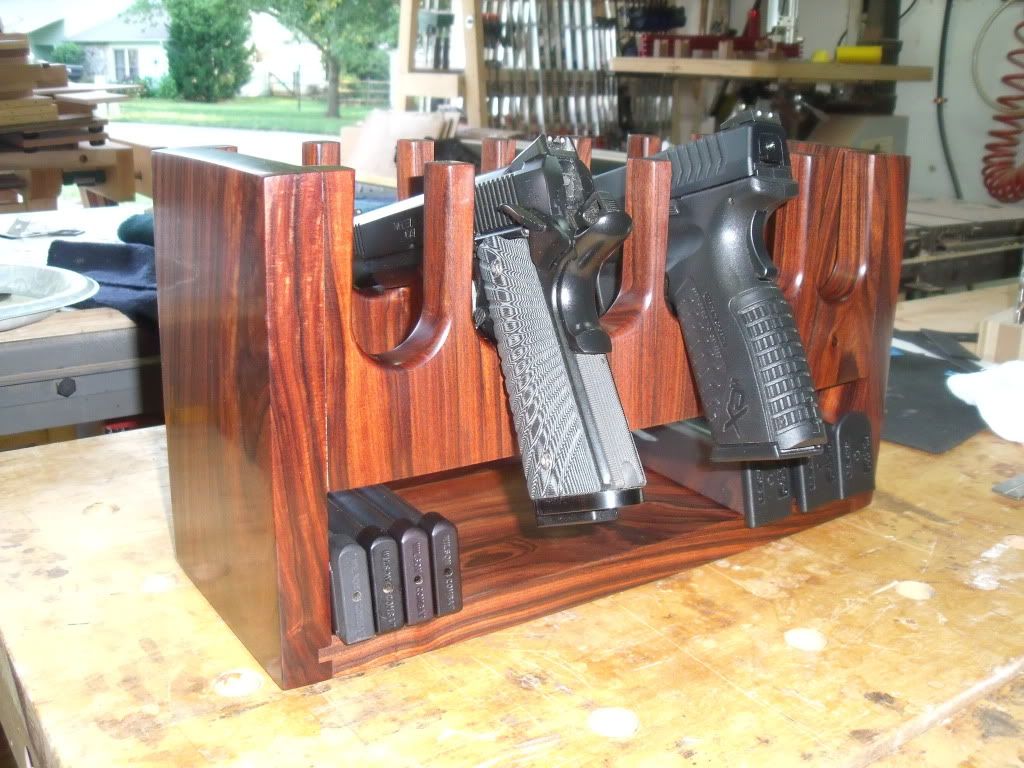
That's if you wanted something with a high gloss. This is a hand rubbed Danish Oil finish. I applied the oil with wet/dry sandpaper starting with 600 grit and my last coat was applied with 12,000 grit. Probably 10 coats total. However, your table has more of a rustic feel to it and subsequently, just slathering on a couple of coats of Danish oil to it would look nice. It will protect the wood from spills and is easier to maintain / repair when it gets scratched from plates and such sliding around on it. Maybe once a year or so just rub in some more Danish oil on it. Plus you don't have to worry about dust settling on the surface as your oil dries like you do with poly. Just my $0.02 |
|
|
|
[#47]
This table looks great. I have some 6"x12" oak beams that have been sitting in my shop for over a decade looking for a project.
If only my house were big enough for a table like that. |
|
|
|
[#48]
Very nice work, and love the old look to it. I think that stuff looks great.
How are you planning on moving that beast into the house? Hope you got some buddies who owe you a favor! |
|
|
|
[#49]
Quoted:
Something to think of and something I highly recommend for the finish of your top instead of poly. thoughts on oil finishes Here's an example of what you can do with simple Danish Oil http://i1096.photobucket.com/albums/g326/Covertness/PistolRack13.jpg That's if you wanted something with a high gloss. This is a hand rubbed Danish Oil finish. I applied the oil with wet/dry sandpaper starting with 600 grit and my last coat was applied with 12,000 grit. Probably 10 coats total. However, your table has more of a rustic feel to it and subsequently, just slathering on a couple of coats of Danish oil to it would look nice. It will protect the wood from spills and is easier to maintain / repair when it gets scratched from plates and such sliding around on it. Maybe once a year or so just rub in some more Danish oil on it. Plus you don't have to worry about dust settling on the surface as your oil dries like you do with poly. Just my $0.02 I thought about doing a hand rubbed finish like that, but opted for the poly. I have a lot of rough areas and holes/cracks especially on the legs that I wanted to seal completely, and the poly with a brush slopped it in there quite nice. I'm in NE Ohio ( GO STEELERS! I'm using the satin minwax, and I saw that some people use a #0000 steel wool and wax after the final coat has dried 3-4 days to give at a hand rubbed feel. I'll consider that if I need to. |
|
|
|
[#50]
Quoted:
This table looks great. I have some 6"x12" oak beams that have been sitting in my shop for over a decade looking for a project. If only my house were big enough for a table like that. Just make a smaller project like a bench, or a coffee table. This project has been a blast! You don't have to be super picky about your fit and finish because it's supposed to be rustic. When you plane it and sand it, the beauty of the wood comes out like you can't see in new furniture. |
|
|
 Win a FREE Membership!
Sign up for the ARFCOM weekly newsletter and be entered to win a free ARFCOM membership. One new winner* is announced every week!
You will receive an email every Friday morning featuring the latest chatter from the hottest topics, breaking news surrounding legislation, as well as exclusive deals only available to ARFCOM email subscribers.

AR15.COM is the world's largest firearm community and is a gathering place for firearm enthusiasts of all types.
From hunters and military members, to competition shooters and general firearm enthusiasts, we welcome anyone who values and respects the way of the firearm.

Subscribe to our monthly Newsletter to receive firearm news, product discounts from your favorite Industry Partners, and more.
Copyright © 1996-2024 AR15.COM LLC. All Rights Reserved.
Any use of this content without express written consent is prohibited.
AR15.Com reserves the right to overwrite or replace any affiliate, commercial, or monetizable links, posted by users, with our own.


