


Posted: 9/5/2011 7:30:39 AM EDT
|
Anyone have one of these in their garage shop? Looks like they are pretty nice and sturdy and best of all easy and quick to build. I've seen some pretty nice ones in the reloading bench picture thread in the reloading forum but lets see some being used as an actual workbench. Mostly just looking for ideas to paint them, stain them, or put some shelves on them. And, overall pictures of how they look in the garage.
Mark |
|
Quoted: I use these in every basement shop I have had with a few mods.Anyone have one of these in their garage shop? Looks like they are pretty nice and sturdy and best of all easy and quick to build. I've seen some pretty nice ones in the reloading bench picture thread in the reloading forum but lets see some being used as an actual workbench. Mostly just looking for ideas to paint them, stain them, or put some shelves on them. And, overall pictures of how they look in the garage. Mark Take a 3/4 " 4x8 sheet plywood rip down the middle Cut 2x4's to length & width to create a box screw box together place 2x4" sheet of plywood on top of the box frame screw down the plywood to the frame Mount the back underneath of the frame to the wall by screws or masonary, which ever is relevant The is now no need for back legs. Cut the two front legs so they fit from the front top underneath the box frame to the back wall at the floor ht. short Carpet or other finish top done 1 hour & done |

|
That is the way to go, but with a few mods. I would double on the 2x4 for the legs(or use 4x4 for the legs). Give yourself 2 inches of overhang on the tabletop for a clamping surface. Screw a piece of masonite on top of the plywood for a nice, smooth, cheap surface. |

|
I plan on purchasing this bench to serve as my reloading bench. I just moved and left my old bench at my previous home.
http://www.samsclub.com/sams/shop/product.jsp?productId=prod1490086 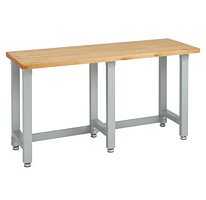
|
|
Quoted:
Is this a reloading bench or a workbench? A work bench (where you will mount a large vise, strike something with a hammer, etc.) needs to be built out of something more substantial than 2X4s. Not necessarily, guess it depends on how large of a vise you want to mount. I'm sure this would stand up to the majority of everyday use (unless you are the 99% of ARFCOM with Thor-like strength). |
|
Quoted: I plan on purchasing this bench to serve as my reloading bench. I just moved and left my old bench at my previous home. http://www.samsclub.com/sams/shop/product.jsp?productId=prod1490086 http://scene7.samsclub.com/is/image/samsclub/0040635885969_A?wid=206&hei=200&op_sharpen=1 I have that table. It works well for reloading. Very sturdy. I stack cases of shot shells beneath it. |
|
Well darn, this is very close to what I built.. Quoted:
Quoted:
I use these in every basement shop I have had with a few mods.
Anyone have one of these in their garage shop? Looks like they are pretty nice and sturdy and best of all easy and quick to build. I've seen some pretty nice ones in the reloading bench picture thread in the reloading forum but lets see some being used as an actual workbench. Mostly just looking for ideas to paint them, stain them, or put some shelves on them. And, overall pictures of how they look in the garage. Mark Take a 3/4 " 4x8 sheet plywood rip down the middle Cut 2x4's to length & width to create a box screw box together place 2x4" sheet of plywood on top of the box frame screw down the plywood to the frame Mount the back underneath of the frame to the wall by screws or masonary, which ever is relevant The is now no need for back legs. Cut the two front legs so they fit from the front top underneath the box frame to the back wall at the floor ht. short Carpet or other finish top done 1 hour & done |
|
Great minds think alike Quoted: Well darn, this is very close to what I built.. Quoted: Quoted: I use these in every basement shop I have had with a few mods.Anyone have one of these in their garage shop? Looks like they are pretty nice and sturdy and best of all easy and quick to build. I've seen some pretty nice ones in the reloading bench picture thread in the reloading forum but lets see some being used as an actual workbench. Mostly just looking for ideas to paint them, stain them, or put some shelves on them. And, overall pictures of how they look in the garage. Mark Take a 3/4 " 4x8 sheet plywood rip down the middle Cut 2x4's to length & width to create a box screw box together place 2x4" sheet of plywood on top of the box frame screw down the plywood to the frame Mount the back underneath of the frame to the wall by screws or masonary, which ever is relevant The is now no need for back legs. Cut the two front legs so they fit from the front top underneath the box frame to the back wall at the floor ht. short Carpet or other finish top done 1 hour & done |