|
[#1]
Originally Posted By myfakename:
It is an AVS model. I like the 1405 Eddy I have on my 62 and is stupid simple to set up out of the box. And for a street car the VS and simplicity is great. It runs on a max 6.5lb of fuel pressure so it works well with the factory style pump. For full performance I'm sure the Holley is more tunable and probably better after it is set up. I love the look of the Holley, but the two Holleys I have ever used (DP and VS) required a lot of tinkering and they never were right. Looking good, man. Can't wait to hear it run! |
|
|
|
|
[#2]
this is so damn awesome OP
always been my dream to have the know how to restore old cars how did you learn all this? |
|
|
|
|
[#3]
Originally Posted By NorthBridge:
Oh, I thought Edelbrocks were AFBs, oops. If you can make one of those work, then hell yeah. I've never been able to tune those worth a damn and Holley 4150s I can do in my sleep. I guess I just kinda assumed that was typical. lol Looking good, man. Can't wait to hear it run! |
|
|
|
|
[#4]
Originally Posted By drago6:
this is so damn awesome OP always been my dream to have the know how to restore old cars how did you learn all this? |
|
|
|
|
[Last Edit: Chairborne]
[#5]
Originally Posted By myfakename:
Self taught. The internet helped out a bit lol. I have never done panel replacements before and never a roof. I tackled it one problem at a time and just thought through the best way to do the things that needed to get done. Originally Posted By myfakename:
Originally Posted By drago6:
this is so damn awesome OP always been my dream to have the know how to restore old cars how did you learn all this? |
|
|
|
|
[#6]
Originally Posted By myfakename:
https://www.AR15.Com/media/mediaFiles/96423/20170604-205739-224169.JPG |
|
|
|
|
[#7]
Originally Posted By dasol:
Did you go with a separate headlight harness w/ relay or just upgraded stock? Originally Posted By dasol:
Originally Posted By myfakename:
https://www.AR15.Com/media/mediaFiles/96423/20170604-205739-224169.JPG |
|
|
|
|
[Last Edit: dasol]
[#8]
Originally Posted By myfakename:
That is a stock replacement harness....for now. I know a guy who makes plug and play relay kits for the headlights which I may get in the future. |
|
|
|
|
[Last Edit: 1969GTX]
[#9]
It is alive!!!!!
But it didn't come into this world quiet and nice. It had some issues, namely two plug wires caught on fire, the throttle cable snapped, the dust shield got beat up by the converter bolts, and it overheated due to no thermostat. But it runs and sounds really good. This video sucks and this is after break-in. I still need to tune the carb and adjust timing a little better. My light was acting all flaky but it looks to be around 16 BTDC initial which puts it at 35 degrees total.  1969 GTX 440 After Motor Break-In. |
|
|
|
|
[#10]
Originally Posted By myfakename:
It is alive!!!!! But it didn't come into this world quiet and nice. It had some issues, namely two plug wires caught on fire, the throttle cable snapped, the dust shield got beat up by the converter bolts, and it overheated due to no thermostat. But it runs and sounds really good. This video sucks and this is after break-in. I still need to tune the carb and adjust timing a little better. My light was acting all flaky but it looks to be around 16 BTDC initial which puts it at 35 degrees total. |
|
|
|
|
[Last Edit: 1969GTX]
[#11]
|
|
|
|
|
[#12]
Sounds great. Congrats 
|
|
|
|
|
[Last Edit: 1969GTX]
[#13]
Thanks! I am happy so far. I still need to swap in the dual springs before I break it in on the road. Tuned it more today. Set initial at 16 degrees, total is 35 degrees. Still need to check all in after getting it on the road. Vacuum is at 12 in/hg and idles nice at 900rpms.
 1969 GTX 440...OMG It Moves! |
|
|
|
|
[#14]
That. Is. Awesome! Well done sir. Can't wait to see the final product. Have you said what wheel and tire combo you are going with? I had a cool GIF picked out but I apparently suck at posting them.
|
|
|
|
|
[#15]
Originally Posted By camarofrk:
That. Is. Awesome! Well done sir. Can't wait to see the final product. Have you said what wheel and tire combo you are going with? I had a cool GIF picked out but I apparently suck at posting them. |
|
|
|
|
[#16]
Originally Posted By myfakename:
Thanks! I am happy so far. I still need to swap in the dual springs before I break it in on the road. Tuned it more today. Set initial at 16 degrees, all in is 35 degrees. Still need to check all in after getting it on the road. Vacuum is at 12 in/hg and idles nice at 900rpms. 
|
|
|
|
|
[#17]
Originally Posted By Striker:
much disappoint..was hoping to see those skinny's go up in smoke. He was in the car so no video...yet.
|
|
|
|
|
[Last Edit: miker84]
[#18]
love it.
Great to see them back on the road. Today, OP was awesome.
They come back into this world kicking and screaming. My old 79 Bronco created an oil fountain on the first startup due to the cheapo sending unit failing. Cleaned that up and the aftermarket trans cooler sprung a leak on the way to the gas station to fill up the tank for the first time lol. |
|
|
|
|
[#19]
Sweet! I've ruined a few dust shields and converter bolts before.
|
|
|
|
GA, USA
|
[Last Edit: OldArmy]
[#20]
While breaking it in, try not to stay a constant speed like on the highway for to long or idle a long time. Try to very the throttle and speed a lot, engine breaking as well. Helps to seat/seal the rings. (I'm not saying go beat the shit out of it though.)
How fast this happens also depends on how the cyl's were honed, piston to wall clearance, ring pack etc. |
|
|
|
[#21]
Originally Posted By OldArmy:
While breaking it in, try not to stay a constant speed like on the highway for to long or idle a long time. Try to very the throttle and speed a lot, engine breaking as well. Helps to seat/seal the rings. (I'm not saying go beat the shit out of it though.) How fast this happens also depends on how the cyl's were honed, piston to wall clearance, ring pack etc. This motor should do well shifting at 6100rpms so I need to find where it actually shifts. It has a shift kit plus 5800rpm governor which should put it in the ballpark. |
|
|
|
|
[#22]
Double springs are installed and valves lashed. I also put in a new throttle cable and fan shroud. I need to get a larger diameter fan because the opening is bigger than stated. And I need to change the oil and flush the cooling system. Then I should be ready for a road test.
|
|
|
|
|
[#23]
Originally Posted By myfakename:
Double springs are installed and valves lashed. I also put in a new throttle cable and fan shroud. I need to get a larger diameter fan because the opening is bigger than stated. And I need to change the oil and flush the cooling system. Then I should be ready for a road test. https://www.AR15.Com/media/mediaFiles/96423/20170612-105152-230304.JPG https://www.AR15.Com/media/mediaFiles/96423/20170613-124346-230306.JPG https://www.AR15.Com/media/mediaFiles/96423/20170613-124435-230308.JPG 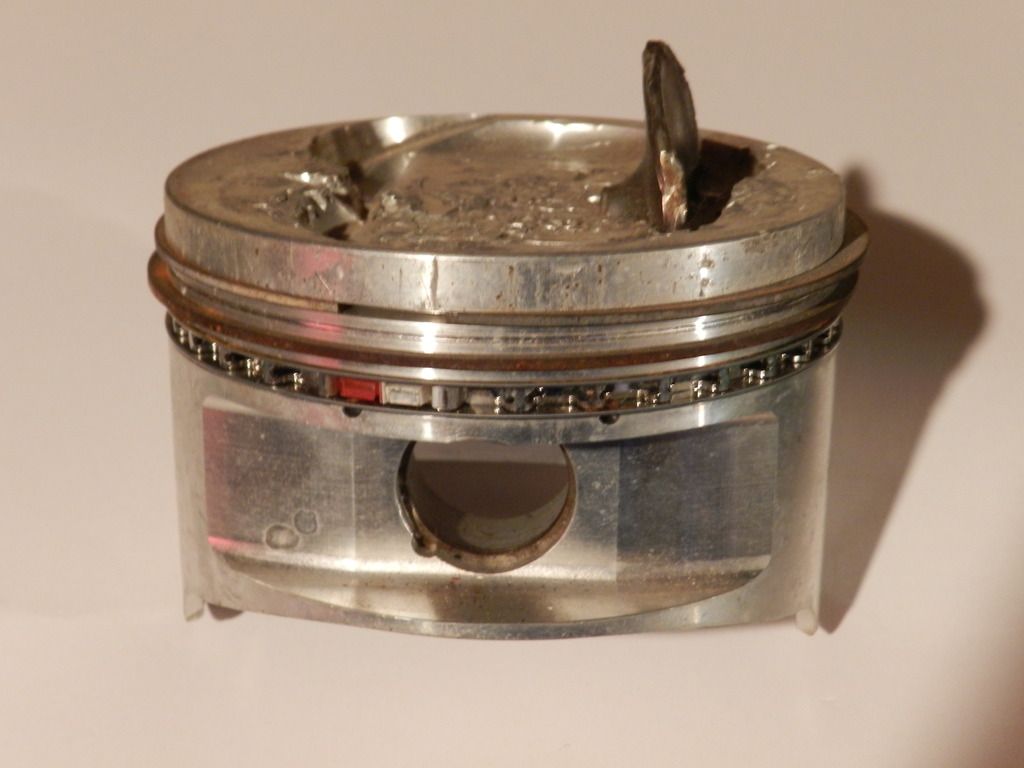
Thread in GD. |
|
|
|
CO, USA
|
[#24]
Love this thread! I've been following it for months now, getting closer to the burnout!
|
|
|
GA, USA
|
[#25]
Originally Posted By Andrapos:
I hope you have better luck on your road test than I had on mine a while ago http://i743.photobucket.com/albums/xx78/Andrapos/Misc/Piston1_zpsvmzgawcu.jpg Thread in GD. so ugh, that's an interference engine huh... 
|
|
|
|
[#26]
I sense a burn out video in the near future.
|
|
|
|
|
[#27]
Originally Posted By OldArmy:
Ouch, so ugh, that's an interference engine huh...
|
|
|
|
|
[#28]
I am awaiting my insurance and registration to get it out and get burnout footage lol.
I did do a lap around the neighborhood getting it up to 4k. Traction is an issue and I'm a little hesitant to wind it out without wider tires on back. I got on it around 35 mph and lit both tires up |
|
|
|
|
[#29]
I did give it a bath so here are a few pictures. I still need to cut and buff...
|
|
|
|
|
[#30]
Lookin' Good!
|
|
|
|
|
[#31]
Looks sweet.
Now you need a Craig 8 track player and a pair of Jensen 6x9s in the back deck
|
|
|
|
|
[#32]
Originally Posted By myfakename:
Double springs are installed and valves lashed. I also put in a new throttle cable and fan shroud. I need to get a larger diameter fan because the opening is bigger than stated. And I need to change the oil and flush the cooling system. Then I should be ready for a road test. https://www.AR15.Com/media/mediaFiles/96423/20170612-105152-230304.JPG https://www.AR15.Com/media/mediaFiles/96423/20170613-124346-230306.JPG https://www.AR15.Com/media/mediaFiles/96423/20170613-124435-230308.JPG |
|
|
|
|
[Last Edit: disorientedpilot]
[#33]
which rockers?
|
|
|
|
|
[#34]
Originally Posted By dasol:
What was that throttle linkage that you used in the second picture? Mine is binding up on my 440 and irritating me to no end. |
|
|
|
|
[#35]
Originally Posted By disorientedpilot:
which rockers? |
|
|
|
|
[#36]
Originally Posted By dphill:
Looks sweet. Now you need a Craig 8 track player and a pair of Jensen 6x9s in the back deck
|
|
|
|
|
[#37]
It's hot as hell so work has slowed down a bit, plus I am dealing with a few issues.
1. Had an overheat condition at idle, even with fan shroud. The fix was a larger fan fitting tighter to the shroud. I also have a 16lb radiator cap instead of the 13lb I had originally. 2. Rear was getting real grabby and popping when turning. I have friction modifier on the way to hopefully fix it. I used Lucas 80w--90 gear oil which claimed to be for lsd but apparently not enough. 3. This last one is frustrating. Lights work on low beam, hit high beam switch and headlights all go off. This is with new switches swapped in. Front end light wires are all new. Two wires, red and violet, go through bulkhead to floor dimmer. Have to check these and ground but it is hot out. I am also going to bypass the ammeter and wire relays for the lights to relieve the high load on the switches. |
|
|
|
|
[#38]
is the dimmer switch new?
|
|
|
|
|
[Last Edit: 1969GTX]
[#39]
Originally Posted By Striker:
is the dimmer switch new? I am thinking either the 2 connections at the bulkhead or a ground issue. With mopar, when the high beams are on so are the low beams so the draw is quite high. No issues with any of the lights when using low beam only. Which leads me to think a wire somewhere is not tight or not capable of the load. Now, add in a relay for the lights and that wire will have no issue switching a relay on or off. What do you suggest? |
|
|
|
TX, USA
|
[#40]
you probably have it but just in case
http://www.mymopar.com/downloads/1969/69BelvedereGTXSatelliteRoadRunnerFull.pdf this may sound silly, and I think the lows would still work but have you checked to see if the highs are burned out? seems odd that 3 different switches made no difference. they all source from the headlight switch, so unless it is wired wrong, that is the harness has some issue, I might try one more obvious thing. |
|
|
|
[#41]
Originally Posted By Andrewh:
you probably have it but just in case http://www.mymopar.com/downloads/1969/69BelvedereGTXSatelliteRoadRunnerFull.pdf this may sound silly, and I think the lows would still work but have you checked to see if the highs are burned out? seems odd that 3 different switches made no difference. they all source from the headlight switch, so unless it is wired wrong, that is the harness has some issue, I might try one more obvious thing. I figured out what the problem was....ammeter. I bypassed the factory gauge and everything works fine now. In Chryslers infinite wisdom they ran full load through the bulkhead, into the gauge and back out the firewall to the battery. This system is known to get hot and melt shit because of the crappy connections. I am going to upgrade the power wiring and add relays to the headlights to make it as efficient and reliable as possible. |
|
|
|
|
[#42]
Originally Posted By myfakename:
Thanks! I figured out what the problem was....ammeter. I bypassed the factory gauge and everything works fine now. In Chryslers infinite wisdom they ran full load through the bulkhead, into the gauge and back out the firewall to the battery. This system is known to get hot and melt shit because of the crappy connections. I am going to upgrade the power wiring and add relays to the headlights to make it as efficient and reliable as possible. |
|
|
|
|
[#43]
Originally Posted By Andrapos:
Relays are the way to go! I also ditched the ammeter wires (joined and insulated them together) and converted the old gauge to a voltmeter. Easy to do! |
|
|
|
TX, USA
|
[#44]
you cannot convert the existing.
A guy on moparts found that sunmeter or something like that makes gauges about the same size. you just have to pick if it is a from the bottom or from the top where the arm comes out. you disassemble the gauge and swap the guts into the regular cluster instead of the amp meter. https://www.summitracing.com/parts/SUN-CP7985/ this is the one I was planning on using for my 65 coronet. |
|
|
|
[#45]
Originally Posted By myfakename:
Is there a website that shows how to convert the gauge to volts?
Sunpro CP8215 StyleLine Voltmeter - Black Dial |
|
|
|
|
[Last Edit: 1969GTX]
[#46]
Finally got the wiring all straightened out. With the ammeter bypassed, there were two primary wires going into the cabin. These were spliced together and soldered with a 16ga fusible link which attaches to the starter relay, which becomes the main power buss. The wire from the alternator now goes to the starter relay as well. I ordered the CP8215 voltmeter (thanks Andropos!) but everything works well.
I also added the two headlight relays on the drivers side radiator support. They are wired into the battery (I am adding fusible links when it get here). The headlights are much brighter. And I forgot to add that I adjusted the timing again and I think it is damn good now. I brought it up to 21*btdc initial and gained a few in/hg, I then pulled out the mechanical and welded the slots to get me 35* total, all in around 2100 rpms. With this plus the fan, car is staying very cool. No issues driving it around in 109* weather lol. Bigger fan... My big issue is I cannot wind it out until I get better tires. Anytime I tried to get on it traction disappeared and I came real close to spinning it around...that was at 40 mph |
|
|
|
|
[#47]

|
|
|
|
|
[#48]
Originally Posted By myfakename:
Finally got the wiring all straightened out. With the ammeter bypassed, there were two primary wires going into the cabin. These were spliced together and soldered with a 16ga fusible link which attaches to the starter relay, which becomes the main power buss. The wire from the alternator now goes to the starter relay as well. I ordered the CP8215 voltmeter (thanks Andropos!) but everything works well. I also added the two headlight relays on the drivers side radiator support. They are wired into the battery (I am adding fusible links when it get here). The headlights are much brighter. https://www.AR15.Com/media/mediaFiles/96423/20170629-173908-241840.JPG https://www.AR15.Com/media/mediaFiles/96423/20170629-173921-241841.JPG https://www.AR15.Com/media/mediaFiles/96423/20170629-173941-241842.JPG And I forgot to add that I adjusted the timing again and I think it is damn good now. I brought it up to 21*btdc initial and gained a few in/hg, I then pulled out the mechanical and welded the slots to get me 35* total, all in around 2100 rpms. With this plus the fan, car is staying very cool. No issues driving it around in 109* weather lol. Bigger fan... https://www.AR15.Com/media/mediaFiles/96423/20170622-200032-241845.JPG My big issue is I cannot wind it out until I get better tires. Anytime I tried to get on it traction disappeared and I came real close to spinning it around...that was at 40 mph I've had to pull my gauge cluster a few times too many so the ammeter/voltmeter was necessary to avoid more frustration when working under there. I did an electronic flash pot & LED conversion on the instrument and signal bulbs to reduce the electrical load and ran into a whole host of issues. Signal cam lever was bad, one of the new NAPA flash pots was bad, and putting LED bulbs into the dash for the turn signal indicator lights caused the flash pots to malfunction. Very strange stuff. I wound up with LED bulbs everywhere except the two green indicators in the dash. While I was under there the last time I damaged the connector pin for my temp gauge & had to add a jumper so the gauge would work. Fortunately I've got another pcb with good connector pins and I'll install that when I have to pull the cluster again (because I know something else will come up and I'll need to yank it). Bottom line: be careful when doing the ammeter/voltmeter conversion
|
|
|
|
|
[#49]
OP, buy this and use in all of your oil changes.
ZDDPPlus additive Also, on the exhaust, if it were me I would take a wire wheel to those welds and hit them with some silver header paint. Looking great! |
|
|
|
|
[Last Edit: 1969GTX]
[#50]
Originally Posted By Andrapos:
Nice & tidy wiring conversion under the hood! The forward light harness w/ relays that I swapped in was almost too short on the D-side and was way too long on the P-side which made it a bit difficult to tuck the relays in. I've had to pull my gauge cluster a few times too many so the ammeter/voltmeter was necessary to avoid more frustration when working under there. I did an electronic flash pot & LED conversion on the instrument and signal bulbs to reduce the electrical load and ran into a whole host of issues. Signal cam lever was bad, one of the new NAPA flash pots was bad, and putting LED bulbs into the dash for the turn signal indicator lights caused the flash pots to malfunction. Very strange stuff. I wound up with LED bulbs everywhere except the two green indicators in the dash. While I was under there the last time I damaged the connector pin for my temp gauge & had to add a jumper so the gauge would work. Fortunately I've got another pcb with good connector pins and I'll install that when I have to pull the cluster again (because I know something else will come up and I'll need to yank it). Bottom line: be careful when doing the ammeter/voltmeter conversion On the relays I just in cut the front harness right where it goes through the support and soldered in the relay wires. The two red wires in the picture next to the battery are where my fusible link is going. Total cost was around $25 and I have 3 relays and a bunch of fusible link left over. |
|
|
|
 Win a FREE Membership!
Sign up for the ARFCOM weekly newsletter and be entered to win a free ARFCOM membership. One new winner* is announced every week!
You will receive an email every Friday morning featuring the latest chatter from the hottest topics, breaking news surrounding legislation, as well as exclusive deals only available to ARFCOM email subscribers.

AR15.COM is the world's largest firearm community and is a gathering place for firearm enthusiasts of all types.
From hunters and military members, to competition shooters and general firearm enthusiasts, we welcome anyone who values and respects the way of the firearm.

Subscribe to our monthly Newsletter to receive firearm news, product discounts from your favorite Industry Partners, and more.
Copyright © 1996-2024 AR15.COM LLC. All Rights Reserved.
Any use of this content without express written consent is prohibited.
AR15.Com reserves the right to overwrite or replace any affiliate, commercial, or monetizable links, posted by users, with our own.


