


The thread for new to 3D printing to ask questions (Page 3 of 7)

|
Originally Posted By turtle2472: I had another realization today that should be obvious: Reprinting a job from the panel doesn't take into account new and updated filament profiles.  I made those changes to my profile last night so I could set the bed temp and fan control. (Not the full calibration yet... maybe today.) Going through my previous print jobs, changing the color and hitting print uses the profile I sent with that job. So I now manually turn off the fan and raise the bed temp. I know it should be obvious, but yet it wasn't to me. I've got one more tray and two more sets of cups I'll print from the previous job but changing the color. Then I'll send new jobs for the spoons because they will have changes for the text. If you use the Bambu Cloud, and you are keeping everything connected and synced, it actually SHOULD take changes into account. When you select a print job it should ask you which filament profile to use, etc. you may have to push the refresh filament profile button (it's a circular arrow) to refresh the profiles but it should be possible. |

Joined:
Jan 2026
Posts:
24
EE: 100% (2)
 USA
USA
|
Any recs for a "buy once buy good" filament dryer? I have ordered the Snapmaker version of the PolyDryer system (I just got a U1). But eventually I want to get into engineering-grade filaments like PA6-CF and would like an auxiliary dryer that will dry that kind of stuff. I have seen the Sunlu E2 and the Creality Space Pi X4L mentioned... any opinions? |
|
Originally Posted By fbdm: Any recs for a "buy once buy good" filament dryer? I have ordered the Snapmaker version of the PolyDryer system (I just got a U1). But eventually I want to get into engineering-grade filaments like PA6-CF and would like an auxiliary dryer that will dry that kind of stuff. I have seen the Sunlu E2 and the Creality Space Pi X4L mentioned... any opinions? E2 is basically the gold standard right now. |

|
Originally Posted By fbdm: Any recs for a "buy once buy good" filament dryer? I have ordered the Snapmaker version of the PolyDryer system (I just got a U1). But eventually I want to get into engineering-grade filaments like PA6-CF and would like an auxiliary dryer that will dry that kind of stuff. I have seen the Sunlu E2 and the Creality Space Pi X4L mentioned... any opinions? If PA6 is your goal, get the E2. |

Last night I thought I might have broken my printer. I went to print my last set of seed starting cups and this popped up after I went to preheat the bed:  The Bambu AI assist said might be wiring or bad sensor. I started to just be done (it was already after midnight) and deal with it in the morning. Since I was still up at about 0020 I went ahead and tried again with the faint "I hope I don't start a fire with my printer in the basement as I'm going to sleep" though going through my head. It preheated the bed normally without an alert. I issued the print job and it started normally. I woke up this morning to the cups popping off the plate. Side note: it is so cool how those things literally pop/crackle off the plate as it cools! |
Louis L'Amour, “To make democracy work, we must be a nation of participants, not simply observers. One who does not vote has no right to complain.”
Joined:
Jan 2026
Posts:
25
EE: 100% (2)
USA
|
So this is my first ever 3D Print, a DB Ridgeback grip. Snapmaker U1 Snapmaker Orca Slicer Snapmaker SnapSpeed PLA Turned out OK, but looks like I might have a bit of stringing or layer shifting going on? (Most pronounced on back of the beavertail) Some settings: 60% infill Precise Wall Off .2mm Layer Height I think I printed at default speed, I think maybe that could have contributed to the lack of smoothness. The table the printer is on isn't the most stable. Edit: Upon further checking, it looks like I had "slow down for overhangs" enabled but not for curled perimeters. Not sure if curled perimeters would have helped.   |
|
Originally Posted By -Obsessed-:Why would you print your own spools? Mostly because so many filaments I want right now are only available in refills. I only have one spool I have finished and is waiting for me to buy a refill. ETA: I'm gathering that I'm going to be overflowing in spools down the line. I'm just not there yet. |
Louis L'Amour, “To make democracy work, we must be a nation of participants, not simply observers. One who does not vote has no right to complain.”
|
Originally Posted By turtle2472: Mostly because so many filaments I want right now are only available in refills. I only have one spool I have finished and is waiting for me to buy a refill. ETA: I'm gathering that I'm going to be overflowing in spools down the line. I'm just not there yet. Out of curiosity, what do you want that only comes in refills? I suggest you buy yourself copious amounts of Sunlu filament to learn and experiment on. It's available in Amazon and cheaper than dirt, and the spools are perfectly acceptable for refills. Sunlu makes just about any filament you'd need as you're getting your feet wet. They even have PEEK. 
|
|
Originally Posted By -Obsessed-:Out of curiosity, what do you want that only comes in refills? I suggest you buy yourself copious amounts of Sunlu filament to learn and experiment on. It's available in Amazon and cheaper than dirt, and the spools are perfectly acceptable for refills. Sunlu makes just about any filament you'd need as you're getting your feet wet. They even have PEEK. My wife has been running wild in BBL and found their translucent PETG. There are 5 or so colors she has in the cart that are refill only. Sunlu is what I've been buying to this point that isn't BBL. Wait until she finds out about glow in the dark! |
Louis L'Amour, “To make democracy work, we must be a nation of participants, not simply observers. One who does not vote has no right to complain.”
|
Originally Posted By turtle2472: My wife has been running wild in BBL and found their translucent PETG. There are 5 or so colors she has in the cart that are refill only. Sunlu is what I've been buying to this point that isn't BBL. Wait until she finds out about glow in the dark! Sunlu sells translucent PETG on spools. Prints really well too. Not trying to keep pushing, just saying there are plenty of options out there. Buy one 4-pack of trans PETG, ABS, and PLA and you'll have 12 rolls when you're done to cycle through. Soon you'll have so many spools you won't know what to do with them. At my peak I was throwing 15 of them away per week. 
|
|
Originally Posted By -Obsessed-:Sunlu sells translucent PETG on spools. Prints really well too. Not trying to keep pushing, just saying there are plenty of options out there. Buy one 4-pack of trans PETG, ABS, and PLA and you'll have 12 rolls when you're done to cycle through. Soon you'll have so many spools you won't know what to do with them. At my peak I was throwing 15 of them away per week. I'm good with your confidence in Sunlu and my experience to this point. I'll have her look there instead. I need to order a couple of .2 nozzles and mentioned getting some things from BBL so it set her looking to fill the cart so we don't pay shipping. It all snowballs from there.
|
Louis L'Amour, “To make democracy work, we must be a nation of participants, not simply observers. One who does not vote has no right to complain.”
|
Originally Posted By turtle2472: I'm good with your confidence in Sunlu and my experience to this point. I'll have her look there instead. I need to order a couple of .2 nozzles and mentioned getting some things from BBL so it set her looking to fill the cart so we don't pay shipping. It all snowballs from there. Get a build plate and some liquid glue. And yep, extra nozzles are always good. No reason you can't get filament refills too, but I am not convinced printing spools is the best use of your time. You do you though. 
|
|
Originally Posted By -Obsessed-:Get a build plate and some liquid glue. And yep, extra nozzles are always good. No reason you can't get filament refills too, but I am not convinced printing spools is the best use of your time. You do you though. Those are some good ideas. I have a Cool Plate SuperTack but haven't used it yet. I will need an engineering plate eventually. I guess the idea behind printing spools is kinda like buying advancements in games rather than waiting my time. I hate doing it in a game because I have no good reason not to wait it out. I guess I'm actually in the same boat here. I'll have plenty of spools to go around eventually. Plus, it seemed like a good idea at the time. At least I didn't ask y'all to hold me beer. 
|
Louis L'Amour, “To make democracy work, we must be a nation of participants, not simply observers. One who does not vote has no right to complain.”
|
New question: Does the indicator being green means I'm plugged in? From the wiki, their example is grey. Mine is green. I just want to be sure my AMS is now going to do a full drying using the brick not the 6 pin connector.   I don't recall if I was grey or green before. I looked through the wiki and I guess they expect us to assume it means powered by the brick. I bought the aftermarket model with matching specs, that is why I'm not 100% assuming on this one. Also, my wife wanted new colors for her seed starters and we have the in PETG but they aren't dried and I don't have my discreet dryer yet. So I'm going to be running through the calibration after running the drying cycle for 12 hours overnight. ETA: Never mind, found it in the AMS 2 Pro guide under P1S. If you don't use the switching power cable and try drying, you will see a notification indicating insufficient power, and you will be prompted to plug it in. The power icon in the lower right corner of the page is grayed out too. But once you connect it properly, it turns green instead. 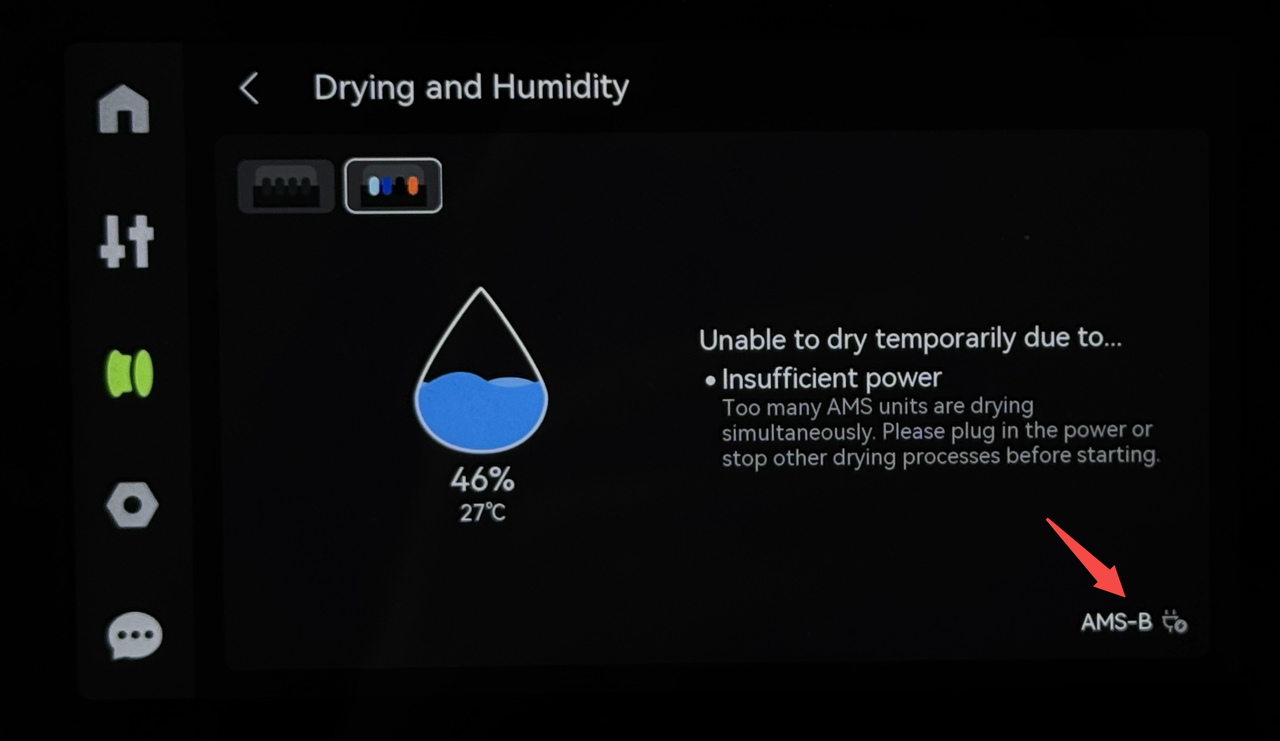 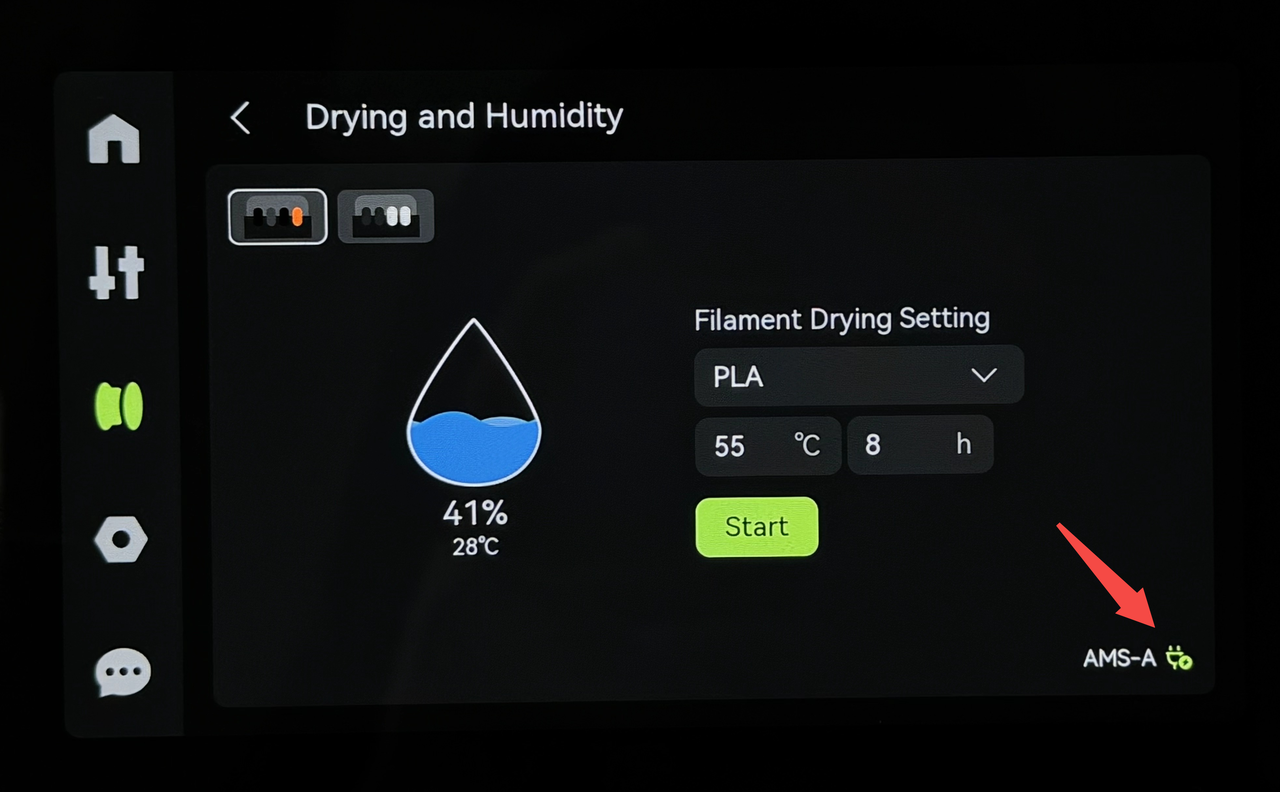 Adapter I used from Amazon. |
Louis L'Amour, “To make democracy work, we must be a nation of participants, not simply observers. One who does not vote has no right to complain.”
OK, second time this has happened. My printer is just over a month old now. I was trying to print Obsessed's cereal box desiccant inserts and got the middle finger from my printer. Is it a sign? ETA: I powered off the printer and tried again. It gave the temp error again. I hit resume immediately and it proceeded. Something isn't right. I shouldn't have to do this. :( |
Louis L'Amour, “To make democracy work, we must be a nation of participants, not simply observers. One who does not vote has no right to complain.”
|
Originally Posted By turtle2472: OK, second time this has happened. My printer is just over a month old now. https://turtle2472.com/ar15/heatbedtempmalfuntion.jpeg I was trying to print Obsessed's cereal box desiccant inserts and got the middle finger from my printer. Is it a sign? ETA: I powered off the printer and tried again. It gave the temp error again. I hit resume immediately and it proceeded. Something isn't right. I shouldn't have to do this. :( Is your auxiliary fan on? The only time I've seen a similar code was when the auxiliary fan was blowing hard enough across the bed to keep it from cycling to hold the set temperature. |
|
Originally Posted By ScooterInVegas:Is your auxiliary fan on? The only time I've seen a similar code was when the auxiliary fan was blowing hard enough across the bed to keep it from cycling to hold the set temperature. It is possible that it was during that time. I didn't think to check it. I'll be sure to check if it happens again though. My wife asked me to do one more set of seed starters in ABS so I set the bed to 100°C this morning, changed the filament, set to 100 again because it timed out. In all of that it never faulted. The bed was really low though because my last job was tall (Obsessed's cereal box desiccant holders) so the bed wasn't near the fan. I did turn off the fan as the homing and bed leveling started though. |
Louis L'Amour, “To make democracy work, we must be a nation of participants, not simply observers. One who does not vote has no right to complain.”
|
Originally Posted By ScooterInVegas: Is your auxiliary fan on? The only time I've seen a similar code was when the auxiliary fan was blowing hard enough across the bed to keep it from cycling to hold the set temperature. Odd. Wouldn't the printer turn the auxiliary fan off during preheating? I've not had this issue before on my X1C or H2D but I just find that to be a silly oversight if that's truly what it is. The start gcode routines should turn the aux fan off. |
| In the image I posted on the 13th up the page some I see that the exhaust for the chamber heater was blowing on the heatbed. This very well could have been the issue. When in heating mode, that is the exhaust for it. I might have to play with this a little to see if I can figure out exactly why it happened. I think I'll print those diffusers though in ABS and see how it impacts this fault notice. |
Louis L'Amour, “To make democracy work, we must be a nation of participants, not simply observers. One who does not vote has no right to complain.”
| Are these Bambu Labs plate reversible? I know I shouldn't need to ask, but I don't want to assume and I'm not seeing where it says they are. Is it safe to assume all plates are reversible if they feel the same on both sides? |
Louis L'Amour, “To make democracy work, we must be a nation of participants, not simply observers. One who does not vote has no right to complain.”

|
Originally Posted By turtle2472: Are these Bambu Labs plate reversible? I know I shouldn't need to ask, but I don't want to assume and I'm not seeing where it says they are. Is it safe to assume all plates are reversible if they feel the same on both sides? Yes they're reversable |
EP429: Today's lesson - Don't provoke ARFCOM. People will see your butthole.
|
Another question thanks to looking through Obsessed's cereal box files. What is the difference between the H series and X + P? I printed two that were for the H series it seems and they printed just fine in PETG (Sunlu) after slicing and sending via Studio. I didn't mean to use the wrong one, I just noticed since I grabbed the .3mf for the labels. ETA: On that note, which bearings for the desiccant insert? I don't see them mentioned other than don't print the pegs if you don't want them. ETA2: Video says "Standard 608 bearings." Don't know what that is yet, but the video does say even though the text doesn't. :p |
Louis L'Amour, “To make democracy work, we must be a nation of participants, not simply observers. One who does not vote has no right to complain.”
|
Originally Posted By turtle2472: Another question thanks to looking through Obsessed's cereal box files. What is the difference between the H series and X + P? I printed two that were for the H series it seems and they printed just fine in PETG (Sunlu) after slicing and sending via Studio. I didn't mean to use the wrong one, I just noticed since I grabbed the .3mf for the labels. ETA: On that note, which bearings for the desiccant insert? I don't see them mentioned other than don't print the pegs if you don't want them. ETA2: Video says "Standard 608 bearings." Don't know what that is yet, but the video does say even though the text doesn't. :p Obvious answer is different Bambu printers, not sure exactly what the question is....so I'll guess that you're just seeing the different print profiles that are part of MakerWorld. 608 is the trade number of a bearing size, in this case 8mm inside diameter x 22mm outside diameter x 7mm wide. It's a very common size used in the 3D printing world. Example Amazon 608 bearings |
EP429: Today's lesson - Don't provoke ARFCOM. People will see your butthole.
|
Originally Posted By fox2008:Obvious answer is different Bambu printers, not sure exactly what the question is....so I'll guess that you're just seeing the different print profiles that are part of MakerWorld. 608 is the trade number of a bearing size, in this case 8mm inside diameter x 22mm outside diameter x 7mm wide. It's a very common size used in the 3D printing world. Example Amazon 608 bearings Thanks for the link. After watching the video and him saying it in the video it made sense. Also, thanks for answering about the plates. I would lave liked the post if we had that option. I guess what I’m asking about the profile difference isn’t just the obvious, for a different printer, but more what about it is different? I mean, the H series version printed, but maybe it is just because I did it from Studio and sliced it there vs. sending the print job from Handy. It is easier to understand the difference when you’re printing something large and it has to be broken up into different plates for P series vs the larger plate of H. I’m just trying to understand rather than hit the “I believe button”. |
Louis L'Amour, “To make democracy work, we must be a nation of participants, not simply observers. One who does not vote has no right to complain.”
|
Originally Posted By turtle2472: Thanks for the link. After watching the video and him saying it in the video it made sense. Also, thanks for answering about the plates. I would lave liked the post if we had that option. I guess what I’m asking about the profile difference isn’t just the obvious, for a different printer, but more what about it is different? I mean, the H series version printed, but maybe it is just because I did it from Studio and sliced it there vs. sending the print job from Handy. It is easier to understand the difference when you’re printing something large and it has to be broken up into different plates for P series vs the larger plate of H. I’m just trying to understand rather than hit the “I believe button”. The profiles are largely the same. Sometimes, folks have reported importing an H series print profile into a smaller printer's build plate and the settings don't transfer (primarily, the print orientation). So out of habit I always make two copies of the print profile. Other prints (again, not this one) you have different filament types for interface filament, etc, and the settings entered into the H series machines that have left and right nozzles, vs. a P or X series print profile (which requires purge volumes) is again, different. So in this case, either one will get you to the end. I just always make a habit of offering both, because all it takes is one goof ball to print something with the wrong settings and then blame you for it by giving you a one star rating and then that print gets suppressed in search results. It's a racket.
|
|
Originally Posted By -Obsessed-:The profiles are largely the same. Sometimes, folks have reported importing an H series print profile into a smaller printer's build plate and the settings don't transfer (primarily, the print orientation). So out of habit I always make two copies of the print profile. Other prints (again, not this one) you have different filament types for interface filament, etc, and the settings entered into the H series machines that have left and right nozzles, vs. a P or X series print profile (which requires purge volumes) is again, different. So in this case, either one will get you to the end. I just always make a habit of offering both, because all it takes is one goof ball to print something with the wrong settings and then blame you for it by giving you a one star rating and then that print gets suppressed in search results. It's a racket. Thanks for the explanation! That makes a ton of sense. I also noticed a common thing for my heatbed malfunction. It happens when I don't let the bed cool to room temperature. I just finished another set of cups for my wife's seed starters and then moved on to a diffuser once the cups popped off the plate. The plate was still in the 50's when this was done and I set the bed to 100°C. It started to heat, but then faulted. Did it again and it faulted again. Did it a third time and it didn't fault. Maybe I'm just being completely impatient. I would never do that.
|
Louis L'Amour, “To make democracy work, we must be a nation of participants, not simply observers. One who does not vote has no right to complain.”
|
Originally Posted By turtle2472: Thanks for the explanation! That makes a ton of sense. I also noticed a common thing for my heatbed malfunction. It happens when I don't let the bed cool to room temperature. I just finished another set of cups for my wife's seed starters and then moved on to a diffuser once the cups popped off the plate. The plate was still in the 50's when this was done and I set the bed to 100°C. It started to heat, but then faulted. Did it again and it faulted again. Did it a third time and it didn't fault. Maybe I'm just being completely impatient. I would never do that. Is the exhaust fan or chamber fan on during this time? If so that could be causing issues I suppose. |
|
Originally Posted By -Obsessed-:Is the exhaust fan or chamber fan on during this time? If so that could be causing issues I suppose. It wasn’t this time. I made sure of that. I was standing at the printer and set the bed temp on the screen while making sure it wasn’t using any fan. |
Louis L'Amour, “To make democracy work, we must be a nation of participants, not simply observers. One who does not vote has no right to complain.”
|
Originally Posted By turtle2472: It wasn’t this time. I made sure of that. I was standing at the printer and set the bed temp on the screen while making sure it wasn’t using any fan. I'd be reaching out to Bambu, or at least follow their wiki guide (they'll ask you to do that anyway) first and see where that leads you. There should be a QR code that when you scan it takes you to the troubleshooting page. |
|
Originally Posted By -Obsessed-:I'd be reaching out to Bambu, or at least follow their wiki guide (they'll ask you to do that anyway) first and see where that leads you. There should be a QR code that when you scan it takes you to the troubleshooting page. :( I hope it isn't anything big. Not that I wouldn't expect it to be fixed, but I'm at something like a month and 10 days with this printer. I'm more concerned about the hassle to get it fixed if something is actually wrong with it. |
Louis L'Amour, “To make democracy work, we must be a nation of participants, not simply observers. One who does not vote has no right to complain.”
|
How accurate is the filament consumption of Studio when going to print a plate? I've not weighted the spools at all, nor really paid attention to it at all until now that I'm almost out of the ABS in red, white, and blue I had on hand. More is coming, but I don't want to lose a print because I didn't have enough of a given filament on hand. Which brings up another question, what do y'all do with barely there spool remnants? I think I saw a splicer thing out there to make parts become one long one. |
Louis L'Amour, “To make democracy work, we must be a nation of participants, not simply observers. One who does not vote has no right to complain.”
|
Originally Posted By turtle2472: How accurate is the filament consumption of Studio when going to print a plate? I've not weighted the spools at all, nor really paid attention to it at all until now that I'm almost out of the ABS in red, white, and blue I had on hand. More is coming, but I don't want to lose a print because I didn't have enough of a given filament on hand. Which brings up another question, what do y'all do with barely there spool remnants? I think I saw a splicer thing out there to make parts become one long one. It's pretty close but usually overestimates a bit. Weighing remaining material can be hit or miss because the spools themselves vary in weight, but so will the filament because it is not a consistent diameter across its entire length. Cardboard spools from polymaker that I've weighed can vary by up to 15-20 grams. And that's assuming my kitchen scale is even that accurate (it's probably not). I've had parts with near empty spools that I weighed before printing and some finished right where I predicted and some finished with several extra feet of filament remaining. I'm pretty bad about finishing rolls. I have around 25 spools of PET-CF with about 20-30 grams each sitting in my closet. That's pretty much a whole spool of material. If you have an AMS you can load multiples and it will automatically change over to a new spool once it detects that one has ran dry. I like to be there during the print and stop it manually when it's printing infill so I don't end up with a blemish in my external perimeters. The filament connectors don't seem to work very well from what I've seen, and using them on high temp material isn't viable at all. |
|
Originally Posted By turtle2472: How accurate is the filament consumption of Studio when going to print a plate? I've not weighted the spools at all, nor really paid attention to it at all until now that I'm almost out of the ABS in red, white, and blue I had on hand. More is coming, but I don't want to lose a print because I didn't have enough of a given filament on hand. Which brings up another question, what do y'all do with barely there spool remnants? I think I saw a splicer thing out there to make parts become one long one. I've found that Sunlu and Bambu spools are all within 2 grams of like spools. I use a kitchen scale with an empty spool of each kept close. I tare the empty and then put in the partial spool, downweight it a few grams for buffer and it goes on painters tape on the box as I shared previously. Partial rolls just get to be the start of the next print once I get replenishment, assuming I will. AMS auto resumes with a new roll once the old roll runs out, no different than Prusa's Spooljoin feature on their MMU, just smarter so it doesn't spooljoin the wrong spool. That said, if I'm not getting replenishment and It's just a different color or something I'll use it on a prototype and just set the color to the others so the auto swapl of the AMS works. |
|
Thanks for the feedback guys. I forgot about the feature of the AMS to pick the next spool. That makes more sense than trying to splice them. Also changing the color of one to match the original for prototype is also a great way to use up smaller sections. Thanks for the idea! |
Louis L'Amour, “To make democracy work, we must be a nation of participants, not simply observers. One who does not vote has no right to complain.”
Talk to me about supports. I just did a trash box for my vehicle that fits over a hump. It is from MW, not my design. I opened it in Studio, sliced and sent to printer. No changes in any way other than specifying my ABS in the AMS.   This is a shorter gap than I've seen other prints do that didn't need support but this one looks like it wanted supports. It feels rigid when pushing on the top of the hump. It isn't load bearing so I'm going to put it in the vehicle anyway. I just want to understand why this one came out this way when other prints didn't seem to mind using the same filament and profile. Oh, I'll add that Studio didn't bark at me to enable support for this slice either. |
Louis L'Amour, “To make democracy work, we must be a nation of participants, not simply observers. One who does not vote has no right to complain.”
|
Originally Posted By turtle2472: Talk to me about supports. I just did a trash box for my vehicle that fits over a hump. It is from MW, not my design. I opened it in Studio, sliced and sent to printer. No changes in any way other than specifying my ABS in the AMS. https://turtle2472.com/ar15/IMG_1962.jpeg https://turtle2472.com/ar15/IMG_1963.jpeg https://turtle2472.com/ar15/IMG_1964.jpeg This is a shorter gap than I've seen other prints do that didn't need support but this one looks like it wanted supports. It feels rigid when pushing on the top of the hump. It isn't load bearing so I'm going to put it in the vehicle anyway. I just want to understand why this one came out this way when other prints didn't seem to mind using the same filament and profile. Oh, I'll add that Studio didn't bark at me to enable support for this slice either. 1. That outcome is normal for ABS assuming you printed ABS correctly. ABS bridging performance is trash given the lack of high fan speed. Even bridges speed isn't 100% in the vast majority of cases. 2. Fan speed, and use of supports, is a setting in the slicer. If the slicer doesn't have supports enabled, it won't tell you it needs them. 3. You generally need "support for ABS" (which is usually a flavor of HIPS) for a clean support interface given a part this size. On smaller parts you can get away with PETG but PETG softens enough to jam at temps above 50C or so in the chamber based on my testing. Now that I've experimented extensively with different interfaces and settings, I'll never not use a support interface. Depending on printer this can be easy or a bit more involved. P series with an AMS is kinda in the middle here. Load HIPS in one slot, load ABS in another, set support interface to HIPS in the slicer, and set purge volumes both directions to 800mm³. That should do it. You could also use Support for ABS, which is a specialized filament Bambu makes. It is even on sale right now I believe.
|
|
Great info! Thank you for helping. I'm back to printing PETG spoons for my wife's seed starters so who knows when I'll get back to ABS. Hopefully I won't need to deal with support for it much. I have to admit, I'm already looking at a dual nozzle printer in the future. Budgeting for it is a thing though. Things like support for ABS, two color prints, etc... I am good with the waste changing filaments for now. But doing so many two color things lately I can see the real benefit of two nozzles. |
Louis L'Amour, “To make democracy work, we must be a nation of participants, not simply observers. One who does not vote has no right to complain.”
|
Originally Posted By Monkey_Wrench: Tagging this, as I've been looking at getting into 3D printing. Make sure you check out this thread. |
This thread made the ARFCOM Newsletter. I'm guessing there will be a bit more activity in it shortly. I'm looking forward to all the learning! Oh, and I managed to fit 6 desiccant boxes on one plate. 
|
Louis L'Amour, “To make democracy work, we must be a nation of participants, not simply observers. One who does not vote has no right to complain.”
|
Originally Posted By turtle2472: This thread made the ARFCOM Newsletter. I'm guessing there will be a bit more activity in it shortly. I'm looking forward to all the learning! https://turtle2472.com/ar15/newsletter2.jpeg Oh, and I managed to fit 6 desiccant boxes on one plate. https://turtle2472.com/ar15/6toplate.jpeg Hopefully your bed adhesion is good all the way to the edges and the power doesn't go out. I would put the tallest parts in the center of the plate personally. And probably just run a few at a time to minimize loss risk. |
|
Originally Posted By Blob:Hopefully your bed adhesion is good all the way to the edges and the power doesn't go out. I would put the tallest parts in the center of the plate personally. And probably just run a few at a time to minimize loss risk. I really need to get an UPS for this printer. I have Powerwalls, but they do have a "blip" if the grid goes down. I haven't had a problem with PETG and adhesion, but not I'm apprehensive about it. I was fine until you wrote that. Now I have doubt. It also dawned on me I haven't washed my plate in a while. Well, I was able to cancel that job before it actually started. So, the logic isn't fill the plate by minimize loss because it does happen in a print job and there is no fixing it. (Like my Squirtle x Michelangelo at the start of this thread.) ETA: Ok, I just sent the default job with 2. After I get an UPS on it I might be willing to be a little more adventurous. |
Louis L'Amour, “To make democracy work, we must be a nation of participants, not simply observers. One who does not vote has no right to complain.”
|
Thought you were printing these from ABS. You shouldn't have any adhesion problems with petg. There is always some risk running long jobs but it's up to you how much risk you want to take. Power loss, part detachment, support structure failure, or a layer shift at the very end of a job can ruin the entire plate. Not that I'm trying to talk you out of doing it, just to be aware. During the work week I'll run 24 hour jobs so I can start the print in the evening and not have to mess with it until the next evening. But if I'm going to be home for a while then I'll split it up into shorter runs and just restart the printer every few hours as needed. Then there's the consideration of layer time changes with one or more parts and what that can mean for you print quality. |
|
Originally Posted By Blob: Thought you were printing these from ABS. You shouldn't have any adhesion problems with petg. I'm almost out of ABS. :( More is on the way though. These holders should be able to dry with the desiccant in them in PETG so I was just using it. Speaking of filament though, my shipment of ASA should be here today! I'm looking forward to making some garden signs for them. Things like which grape is on which trellis and such. Oh, and my wife ordered a ton of translucent PETG that should be here too. I don't have enough dry storage for all that is coming for that matter so I'll have to get something figured out pretty quickly. I've thought about building a locker and forced air circulation that pushes over a large desiccant stash, just haven't put much effort into that beyond concepts in my mind. |
Louis L'Amour, “To make democracy work, we must be a nation of participants, not simply observers. One who does not vote has no right to complain.”
|
Originally Posted By Blob: Hopefully your bed adhesion is good all the way to the edges and the power doesn't go out. I would put the tallest parts in the center of the plate personally. And probably just run a few at a time to minimize loss risk. Only risk is if one tips over and takes another one out. If one fails you just skip that object and keep rolling. |
|
Originally Posted By -Obsessed-: Only risk is if one tips over and takes another one out. If one fails you just skip that object and keep rolling. If you're there to stop it. You could get a blob of death otherwise. Still doesn't eliminate the risk of losing the whole plate from power loss or layer shift. |
|
Originally Posted By -Obsessed-:Only risk is if one tips over and takes another one out. If one fails you just skip that object and keep rolling. You can skip an object during the print! Now I have to look for this. |
Louis L'Amour, “To make democracy work, we must be a nation of participants, not simply observers. One who does not vote has no right to complain.”