


[ARCHIVED THREAD] - Sig p320 80% - easy enough for most cavemen to do! (with photos & video links) (Page 1 of 3)
Posted: 3/4/2020 5:42:24 PM EDT
|
First off: Please do not post “but, but, it’s CHEAPER to buy a factory pistol at the gunshop / PX . . . “ Go buy and transfer a 320 through your FFL if you can’t afford this 80% freedom project. I was inspired by this thread: https://www.ar15.com/forums/general/Polymer80-So-easy-a-caveman-could-do-it-/5-2075494/ (but the third response there was “but it’s cheaper. .” 
Whew! With that out of the way, here Is the TL;DR version: (thorough version to follow): 1) order a Sig P320 insert “MUP-1” and jig from JSD Supply (they manufacture the jig and the “Fire Control Unit” - for the Sig 80%. 2) pre-bend the rails like this (front and rear): Attached File 3) Finish bending rails using a press or a hammer like this (a larger bench vise would also probably work): Attached File 4) Use the included drill bits to drill some holes (highly recommend a drill press - even a cheap Harbor Freight or Home Depot would work. Hand-held drill only as a last resort): Attached File 5) Trim frame rails and cut trigger clearance like this: Attached File Attached File 6) Connect holes for safety bar slot (next post). |
|
Attached File 7) Assemble and it will look like this: (Time to go shooting! ). Attached File That is the “quick / Cliff Notes” version of building the 320 (the civilian version of our military’s new M17 service sidearm). Easy to do and fun to build!  —————————————————————————————————————————- Starting here, I’ll try to be more thorough and give a detailed, step by step account of this build, including videos and photos. Feel free to ask questions along the way IN THIS THREAD. But please DO NOT email or IM me. I am willing to help out any who ask (within this thread) but I don’t want to fill up my inbox (besides - someone else might have the same question as you). I ordered a jig and an insert from JSD a few weeks back and they ship FAST! (Other vendors sell these, but JSD is the only manufacturer I am aware of). A few initial observations about the JSD insert: UNBOXING THE INSERT - this thing is high quality!! The heavy stamped stainless steel frame is quite thick (same thickness as the Sig original FCU). Much thicker than any stamped AK, for example. - the steel is true stainless steel - like the original. It is touted as 316 Stainless Alloy - and it does not attract a magnet. It appears to be very very close in almost every detail to the original FCU. UNBOXING THE JSD JIG: - this jig is a stroke of genius and a metallic piece of artwork. The machine work is top-notch and it should last a lifetime. It’s also very tough. Seeing the quality that went into making these pieces (especially the jig) it took away the initial “sting” of the $149 cost of the jig and $99 cost of the insert (but again - no one wants to hear “but it’s just cheaper to go to the gunshop or PX and . . . seriously. Just don’t). Did I mention that the jig comes WITH all the drill bits needed? (More on that later). DO YOU REALLY NEED A DRILL PRESS?: Is it recommended? Definitely. Is it possible to complete this with just a hand-drill? Not recommended - but I believe it’s possible IF you clamped down the jig to a bench with C clamps or in a vise, and you were careful (ie - slow and cautious with the drill. I definitely recommend upgraded quality metric drill bits if you choose this route). Still - Harbor Freight sells drill presses for $69 ( even less than that with available coupons):  I have an old mini-mill, so that’s what I used with the included drill bits (as you will see). If you are curious and/or prefer to see the process in video, here are 2 Youtube videos I recommend (and there are some I do NOT recommend. See below). First: this one is by a place that re-sells the JSD Supply made inserts and jigs:  Failed To Load Title Next, the maker of these parts: JSD Supply, has their own video channel and tutorials (note: there are no printed instructions included with the jig or inserts. Every instruction is online): Here is one of the 5 or so completion videos on JSD’s channel:  Failed To Load Title As for what NOT to do, this youtuber made a bunch of mistakes (even trashed an insert). At the 3:20 mark he talks about some of what he did wrong). Link: https://m.youtube.com/watch?v=tPJYdQtfgvE A summary: 1) tried to drill the holes WITHOUT the center piece in the jig/insert. Don’t do that. Leave the center piece in while drilling and YES - you will drill partial holes right into the center piece (you are supposed to do that. See the JSD video). 2) he kept taking the jig completely apart throughout the build. Don’t do that. It only comes apart when needed near the end of the build to cut the safety slot. 3) he took the insert out of the jig, and THEN tried to “grind down” (??) the frame rails. Instead: trim the rails while the insert is held solidly in the jig, using the centerpiece as a trim guide (it is very very close to OEM spec). If still needed, you can very carefully use a small flat file for final fitting. Go slow here! Despite his mistakes, his gun works perfectly! . There is another video out on YouTube (the one from Cougar innovations/ NorCal Stippling) - that wrongly suggests: stick small pieces of wood paint stirrers in the insert. Don’t do that. I wont even link that video. Again - leave the center piece in the jig, and drill right into it. |
|
Back to my detailed version of my build: I started by completely degreasing the insert and jig with Brake Cleaner from the auto parts shop. Then I coated the OUTSIDE ONLY of the insert with talcum powder (baby powder) - being careful to not get any on the screws that hold the jig together. Talc between 2 steel parts acts like gravel on an icy road: it tends to keep them from sliding. I wanted the insert held firm in the jig while bending the rails. Entirely optional (feel free to skip this step). It’s now time to “pre-bend” the rails. The center piece is designed to work like a punch or a chisel and spread apart what will become the frame rails. The first photo at the top of this page shows this step. Apply oil or grease to the center piece and the rails first (I used Mobil 1. Grease is probably better). JSD suggests using a hammer to pre-bend these, and my ordinary ball peen hammer worked great. No need for a 5 lb sledge. Once they are pre-bent (front and rear) its time to flatten the rails the rest of the way using the center piece, and a lot more oil / grease: Attached File Notice the concrete garage floor? Recommended. In the 1776 video, the guy really beats on the jig sitting on top of a particle board cabinet - which seems to work eventually, but concrete is probably easier. Also - in my photo you can see a large C-clamp on the jig; it kept the jig from bouncing around. Another option (used in the JSD video) is holding the jig in a $12 “light duty” vise from Home Depot like this (comes in handy on the drill press later too): https://www.homedepot.com/p/Yost-4-in-Light-Duty-Drill-Press-Vise-LDPV-4/306059507?mtc=Shopping-B-F_D25T-G-D25T-25_1_HAND_TOOLS-Multi-NA-Feed-PLA-NA-NA-HandTools_PLA&cm_mmc=Shopping-B-F_D25T-G-D25T-25_1_HAND_TOOLS-Multi-NA-Feed-PLA-NA-NA-HandTools_PLA-71700000034127224-58700003933021546-92700049573927173&gclid=EAIaIQobChMIoKqi6PSB6AIVg5-fCh3UIgqhEAQYBCABEgLGYvD_BwE&gclsrc=aw.ds  With the rails bent, it’s time to start drilling! All drill bits are included with the jig (but more on this later). |
|
DRILLING HOLES IN STAINLESS:
“Use lots of lube and go slow.” (gee where have I heard that??  ). ).
The stainless used is really tough. It’s also (difficult to describe, but) “grabby” - meaning once the bit begins to cut, it tries to dig into the metal too quickly. To prevent drilling problems, I used some Dark Cutting Oil from Home Depot as drilling lubricant (motor oil of any type will probably work fine too. Use any sort of oil except NOT WD40 since it’s very flammable and works poorly as a cutting oil): 
It smells like 3 in 1 oil and it’s tough to get that smell off your skin (wear gloves. Or use less smelly oil). But it works really well. Use a SLOW RPM - especially with the larger holes you need to drill. Most of all: don’t force things. If you see smoke, then stop and add oil. If weird noises start happening, stop, let it cool and add oil. Remember: drill deep enough to go RIGHT INTO the center piece. The steel center piece needs to be there to support the insert. Drilling looks like this (this one was the 9mm hole and it was the largest / most difficult. It produced the most “swarf” or chips. Also, I got a little impatient, forced the drill, and it actually stopped! Luckily the mill’s gears were not harmed, and it continues to work. Attached File Attached File As the photos show, all the holes are marked and they correspond to the supplied drill bits. You can all see the drill bit sizes: #22, #32, #39 size, #40 size, 9mm, etc. Strange sizes? Yep. I suspect that Sig actually uses metric sizes, and that the supplied bits are the closest equivalent. They work! But I suspect metric would work as well (maybe better. More later). TRIMMING THE RAILS: It’s helpful to own a factory Sig FCU for this step so you have something to measure and duplicate. Here is a factory FCU: Attached File As you can see, the width is about .9655” (installed in the gripframe). In contrast, the centerpiece measures: .9640”. (See photo). But wait! The jig also “compresses” the insert a slight amount. It only appears the centerpiece is undersize. Besides, we are talking about 0.001 - or a thousandth of an inch - divided in half. The centerpiece is accurate within tolerance. At this point (rails fully bent and all holes drilled) it’s also OK to remove the insert and measure it installed in a grip frame for final fitting (in my opinion). Attached File Before the finish trim, it’s time to rough-trim. My first post shows a Dremel cut-off wheel, and I am sure that works. I have also seen a photo using a hack-saw; it would work too. I used a small mill: Attached File Here you can see the (almost) finished trim (plus 2 mistakes I made): Attached File You can see I went a little too far and slightly tagged the side of the centerpiece (oops). I also forgot the lock the mill table down - which partly caused the “saw blade” rough pattern on the rail (and the centerpiece). The endmill was also much thinner than needed, and I probably need to re-build the headstock on the mill. Live and learn. Just 2 small steps to go! CUTTING THE TRIGGER HOLE SLOT: This part I actually did cut with the Dremel and a cut-off wheel (after I scribed or scratched 2 lines where I needed to cut): Attached File Knowing it’s nearly impossible to put metal back, I was very cautious. After cutting it as shown, I put it back in the jig and finished trimming using a diamond burr in the Dremel tool. Just one more cut to go: CONNECTING THE HOLES TO FORM THE SAFETY LEVER SLOT: Again I used the mill; this time with an even smaller diameter endmill shown here: Attached File Holding the insert in the mill vise - without the jig - required some creativity to not bend anything. I ended up using a small section of rectangular steel to pinch the rear tab of the FCU between the vise jaws. I was worried this setup would not be rigid enough to hold the FCU while milling the slot. But my worries were unfounded. The endmill pictured is carbide, which cut through the stainless steel like a hot knife through butter - no chatter. Also - this slot’s dimensions are not too critical (unlike the rest of the holes - which must be located precisely). A Dremel would have been quicker here, in hindsight, and it would work equally as well. |
|
DE-BURRING THE HOLES:
The drilling left behind 2 types of burrs: 1) where I drilled into the centerpiece, there was a perfectly round, raised “ring” of stainless around the holes. Where the centerpiece didn’t support the back of the FCU, there were the normal steel burrs. A counter-sink cleaned up the “ring” burrs. The same Dremel diamond bit (a set from Harbor Freight was about $10) made quick work of the rest of the burrs. FINAL PARTS INSTALLATION: Impatiently, I did not take photos of the lower parts kit installation into the FCU (but see the video linked below for detailed instructions). The toughest part was the rear-most pin (actually a Sig roll-pin). It holds the sear block in place. The problem is the hole as drilled is very slightly undersized. I will likely ream the next one to 2.5mm like the factory FCU. The other holes tended to be very slightly undersized - but manageable. Still, if you have a metric drill bit set (or buy a cheap set off Amazon) it can serve as a reamer set for this project. Here are some photos alongside the factory FCU for comparison, but BE AWARE- the 1st one is very misleading! The takedown lever hole appears “botched” - I assure you it isn’t. It’s square and perfect (it just caught the light wrong in this first photo. See the last photo for proof) Attached File Attached File Attached File Attached File |
|
I neglected to take step-by-step FCU assembly photos. But, I need to add the most difficult step (and probably the biggest potential disaster) for home-builders: the rear-most pin - which is actually a roll-pin from Sig.
First: the bit I used from the ones included with the jig somehow left a hole which was very slightly undersize. I believe it is supposed to be 2.5 mm hole.’But the jig comes with a Number 39 and a Number 40 drill bit - And those 2 sizes precisely bracket 2.5 mm. If you have metric drill bits, it’s a good idea to “chase” the hole you drill with the supplied bit unsung a true 2.5 mm bit. As it is, I just used the hole I ended up with. Trying to tap it in with just a small hammer nearly bent the whole FCU! Use caution here. To help get the pin started, I put a 45 degree chamfer on the pin, using a drill and and a file, like this: Attached File Note - this isn’t the actual roll pin, nor my home built lower, but you get the idea. Next, start the pin into ONE side of the FCU frame using vice grips; I use this same technique to start the roll pins in AR15 trigger guard ears, and I’ve never broken one off this way: Attached File Here is another view: Attached File |
Installing parts into the FCU frame: here is another video (this one is an animation) showing how the parts fit into the completed FCU: MUP 1 Small Parts Assembly |
|
I think this might be a cool project this summer just to say I did it. Not sure what I'd drop it in. Maybe a Flux Defense build or so,etching. Anyways thanks for the info OP.
Edit, are you smoothing the drill holes or are you leaving them as is? I wonder if it effects function or performance. |
|
Quoted:
I think this might be a cool project this summer just to say I did it. Not sure what I'd drop it in. Maybe a Flux Defense build or so,etching. Anyways thanks for the info OP. Edit, are you smoothing the drill holes or are you leaving them as is? I wonder if it effects function or performance. Attached File This photo shows a factory Sig FCU. As you can see from the metric reamers, 2 of the holes are clearly metric: a 3 mm and a 4mm. These holes on the jig correspond with the “numbered drill bit sizes” marked on the jig: #32 and #22. A drill bit size chart is HERE. But the other holes are “as drilled.” The combination of the jig and the included bits held in R8 collets left a good smooth finish in this stainless alloy. |
|
Quoted:
Eh - be careful. BATFE cracked down on build parties a few years ago. You want to sell the jig on, not rent it or loan it out.
You are one of my home building inspirations. BTW - I recall a site (yours maybe?) with a certain “Project Bloomberg” lower; have there been any updates to that? I believe we both share the belief: you can’t stop the signal. 
|


 . I am a bad friend with no regard for your financial well-being.
|
Some background on the current state of the P320 (and why I bought / built one): Once you complete your FCU (the actual firearm) it looks very much like this factory Sig FCU (you can see Sig’s serial number on this factory unit) 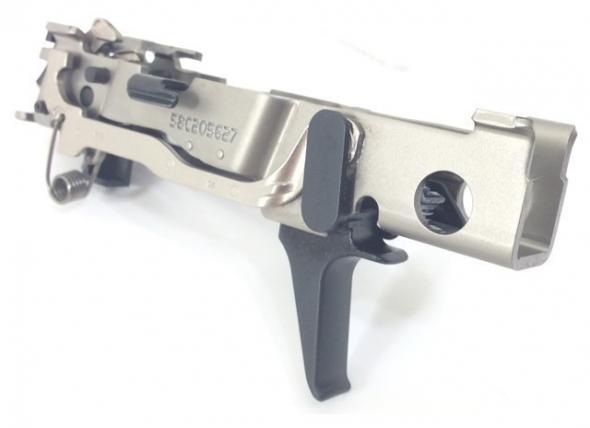
This same “firearm” fits EVERY Sig P320 in 9mm, 357Sig, .22 long rifle and .40 (plus sometimes .45 - I’m still researching this, but did find THIS ARTICLE COMPARING THE 2 ). Maybe a 10mm will be on the horizon? Here are the rest of the parts with the FCU to give you an idea of how they fit together (but remember - everything else is “just parts” and not controlled): 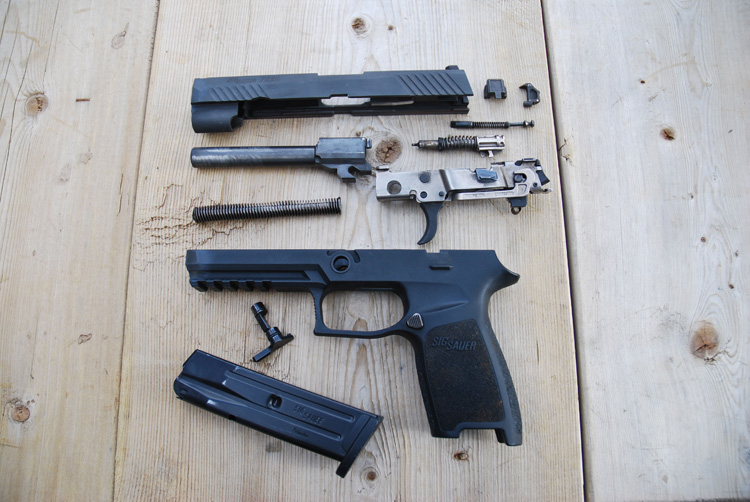
That same FCU fits all these configurations of the Sig 320 (and more - including optics-ready versions):  So, Sig USA is happy to sell you “xchange” kits with everything to change caliber, size, grip, etc. They look like this (just drop in your existing FCU). The x-change kits even include a magazine. It takes less than 1minute to change between configuration s. Sig’s full retail price / MSRP for the complete kit is $399 - right from Sig (street price is often less). 
There are even special edition P230s which use the same FCU; there is the Xcarry series: /arc-anglerfish-arc2-prod-mco.s3.amazonaws.com/public/NKGFYQ54YNF6DNM4KQT3CCVONU.jpg)
Which accepts the Sig Romeo1 RDS (and likely others): 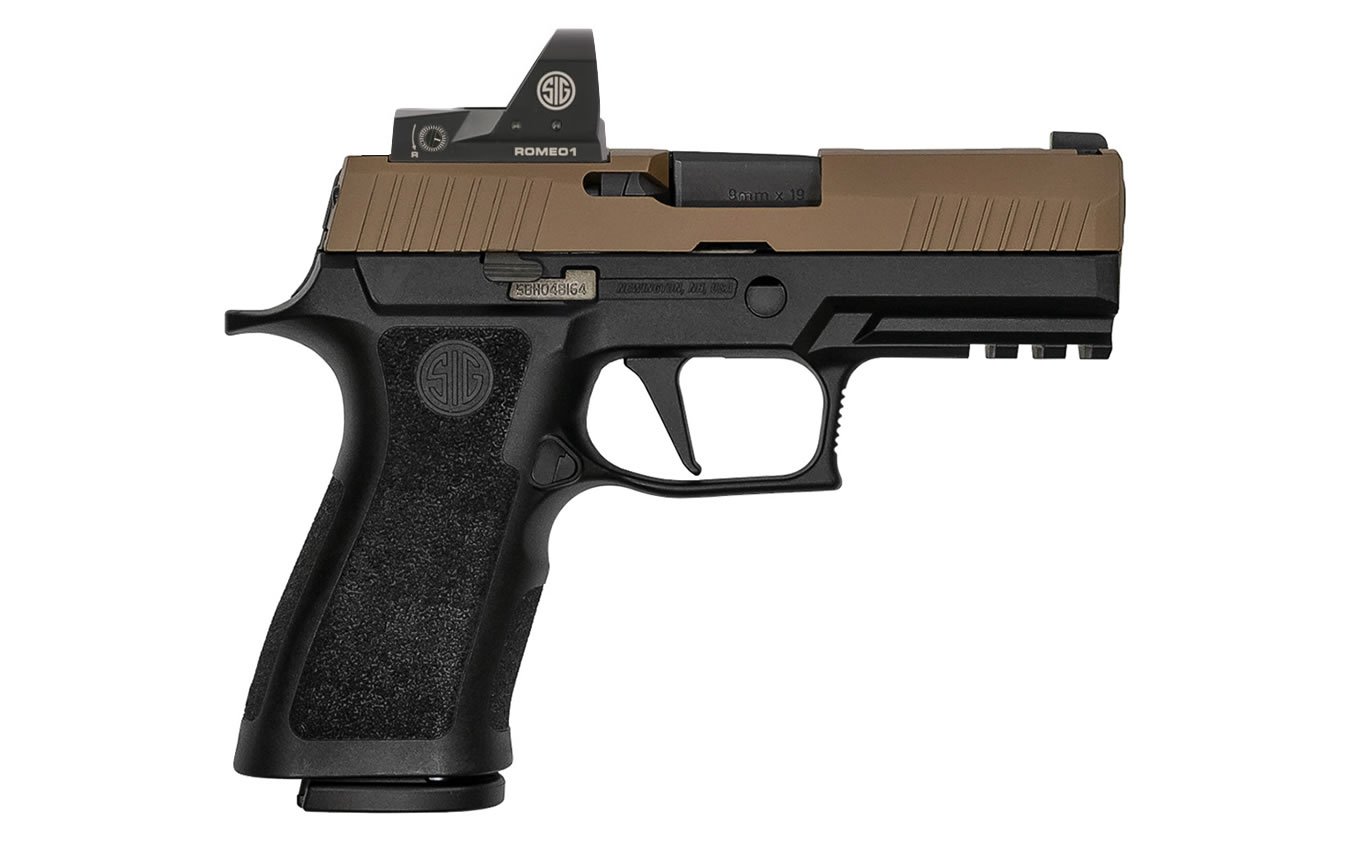 But you are not limited to just Sig parts. All-metal grip frames are just coming on the market. Here is one new example: 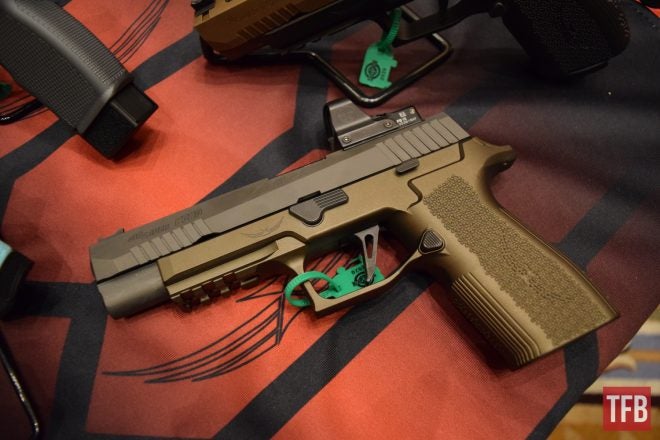 You are not even limited to handguns only. Your same basic FCU will fit carbines, PDWs, and soon even rifles: 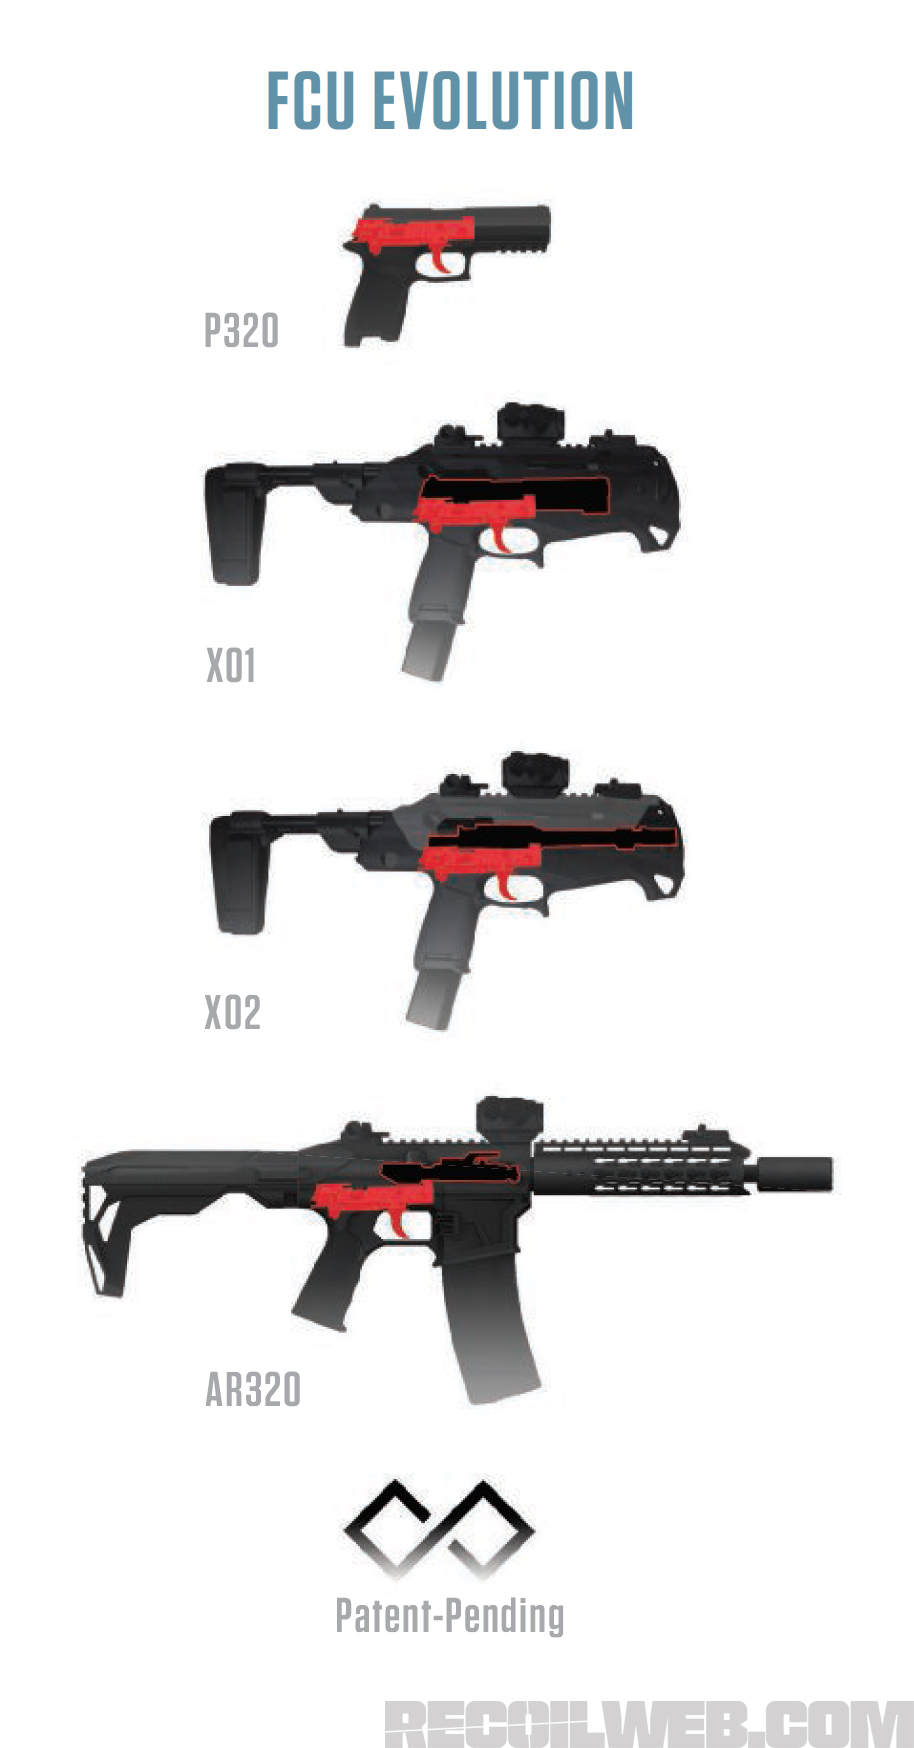
But there is still another reason I am attracted to owning this Sig: the military has adopted the P320 in the form of the M17 and M18 sidearms: 
I am not .mil or a veteran (thank you for your service if you are a veteran ).But I am a dad, and it’s my responsibility to teach my children gun safety. Beyond safety, I want them to have a basic familiarity with service small arms (including the M17). I also believe the adoption of the M17 means the P320 design in all its variations is here to stay for at least the next few decades. |
|
Quoted:
Maybe I missed it, where's the part on assembly of the FCU sub components? What's that part set cost?  Sig Sauer P320 FCU reassembly video |
|
Quoted:
Maybe I missed it, where's the part on assembly of the FCU sub components? What's that part set cost? - least expensive “lower parts kit” I have found online comes from a company that’s been around for a while and has a decent reputation: ABprototype: https://www.abprototype.com/sig-p320-fcu-parts-kit-refurbished/ This factory Sig refurbished kit includes every part to complete the FCU. The steel Sig uses seems extremely hard and wear-resistant. This kit is $189 from ABprototype. They also sell a factory new P320 lower parts kit (post upgrade parts: https://www.abprototype.com/sig-p320-fcu-parts-kit-lower-parts-kit/ . This kit is $239, but there is also a kit without the factory trigger for $215: https://www.abprototype.com/sig-p320-fcu-parts-kit-no-trigger/ Why sell an LPK with “no trigger?” Some guys want an Apex brand flat trigger, or another brand (there are more out there for sale every day). I also suspect tons of nearly new factory triggers are sitting in parts drawers after guys installed Apex or other triggers, and the originals could be had for next to nothing if you ask in the EE. My X-carry came with an Apex trigger and the stock trigger was left over - so I went that route with the gun pictured at the top of this thread. Are there even less expensive LPKs out there? Probably. EDIT: PLEASE POST A LINK IN THIS THREAD IF YOU FIND DEALS ON LPKs OR DISCOUNT FCU PARTS, OR ANY P320 PARTS DEALS.
And a Brownells sale or discount code could lower the price of new parts considerably (plus you would support our site owner at the same time). But I’ll be the first to agree: Sig lower parts are not cheap. That could well change over time. |
|
Quoted:
So assuming you have none of the parts when you start one of these, what's the total cost? I looked at doing this about a year ago but decided against it due to the cost. At that time, you could buy a stripped chassis on line for $20. I could not justify buying a 80% chassis blank for $100 when I could buy a completed one for $20. Now stripped chassis are going for $50 to $100. I am all for building your own and it’s a fun thing to do. I bought a stripped chassis and then built my own FCU. |
|
Quoted: About double of what a store bought gun would be but the price goes down with the more you do. I looked at doing this about a year ago but decided against it due to the cost. At that time, you could buy a stripped chassis on line for $20. I could not justify buying a 80% chassis blank for $100 when I could buy a completed one for $20. Now stripped chassis are going for $50 to $100. I am all for building your own and it’s a fun thing to do. I bought a stripped chassis and then built my own FCU. Also, Sig manufacturers the entire top end (barrel, slide, internals, recoil system, etc), plus the grip frame. All Sig quality. In addition - Sig factor magazines have a retail price of $49.99each - but they are very high quality and reliable. And, as pointed out above, you could either split the cost of the jig with a bunch of shooting friends/relatives, and then sell it when you are done (they seem to sell, used, in the EE for about $100 when they come up for sale). I cannot argue that current LPK prices are high. Finally, I remember when AR 80% lowers were over $100 - and quite rare back when I joined this site in 2000. If these Sig frames follow the pattern, they will come down in cost over time. But only time will tell on this. |
|
Quoted:
About double of what a store bought gun would be but the price goes down with the more you do. I looked at doing this about a year ago but decided against it due to the cost. At that time, you could buy a stripped chassis on line for $20. I could not justify buying a 80% chassis blank for $100 when I could buy a completed one for $20. Now stripped chassis are going for $50 to $100. I am all for building your own and it’s a fun thing to do. I bought a stripped chassis and then built my own FCU. Quoted:
Quoted:
So assuming you have none of the parts when you start one of these, what's the total cost? I looked at doing this about a year ago but decided against it due to the cost. At that time, you could buy a stripped chassis on line for $20. I could not justify buying a 80% chassis blank for $100 when I could buy a completed one for $20. Now stripped chassis are going for $50 to $100. I am all for building your own and it’s a fun thing to do. I bought a stripped chassis and then built my own FCU. |
|
Quoted: If I need a P320 right now I'll go down to the gun store and buy one. This kind of thing is a project gun. You don't have to buy everything up front all at once. You can buy things here and there and custom build a pistol the way you want it. These are like having spare lowers in your safe. Nobody is saying you have to turn them into anything, they just give you options. The P320 is starting to pick up steam again after Dropgate. With the military adoption of the M17 and M18s the P320 will continue to grow in popularity. The aftermarket is growing for it already. These will eventually drive the price down like you see with the P80 Glocks. I lost a bid on a pack of 5 FCUs on gunbroker recently. My plan is to have spare FCUs like I have stripped lowers. When I get bored I build something. The cost gets spread over time which takes the sting out of it as well. The point I was trying to make for the poster that asked about the cost was this project is not cheap. |
|
Quoted:
I think some of you are misunderstanding my post. I’m not knocking people who want to do 80% builds. I’ve done at least one glock 80% myself, maybe more. I was just saying the SIG 80% are not cheap. I already stated I built one 320 FCU from a stripped chassis and I’m actually getting ready to do a second build. They are fun to put together. Nor am I knocking the 320, as I have more than one of them. The point I was trying to make for the poster that asked about the cost was this project is not cheap. Quoted:
Quoted: If I need a P320 right now I'll go down to the gun store and buy one. This kind of thing is a project gun. You don't have to buy everything up front all at once. You can buy things here and there and custom build a pistol the way you want it. These are like having spare lowers in your safe. Nobody is saying you have to turn them into anything, they just give you options. The P320 is starting to pick up steam again after Dropgate. With the military adoption of the M17 and M18s the P320 will continue to grow in popularity. The aftermarket is growing for it already. These will eventually drive the price down like you see with the P80 Glocks. I lost a bid on a pack of 5 FCUs on gunbroker recently. My plan is to have spare FCUs like I have stripped lowers. When I get bored I build something. The cost gets spread over time which takes the sting out of it as well. The point I was trying to make for the poster that asked about the cost was this project is not cheap.  Now we don't have to take you out back and beat you with a water hose. Lol. I think like all things the price will come down once things really start to gain in popularity. Especially as more people start to realize these things have great potential. Now we don't have to take you out back and beat you with a water hose. Lol. I think like all things the price will come down once things really start to gain in popularity. Especially as more people start to realize these things have great potential.
|
|
Quoted: Sig-Sauer has never been a brand associated with “low cost.” Also, Sig manufacturers the entire top end (barrel, slide, internals, recoil system, etc), plus the grip frame. All Sig quality. In addition - Sig factor magazines have a retail price of $49.99each - but they are very high quality and reliable. And, as pointed out above, you could either split the cost of the jig with a bunch of shooting friends/relatives, and then sell it when you are done (they seem to sell, used, in the EE for about $100 when they come up for sale). I cannot argue that current LPK prices are high. Finally, I remember when AR 80% lowers were over $100 - and quite rare back when I joined this site in 2000. If these Sig frames follow the pattern, they will come down in cost over time. But only time will tell on this. 1) mags were abundant and produced by multiple sources 2) patents expired and couldn't be renewed/rephrased to extend 3) the competitive shooting market had become saturated with both high end and budget friendly accessories and primary components(slides/barrels/stripped uppers/LPK/etc) This is a cool project for sure but I don't think it will be fully realized for another 15-20 years unless someone comes up with some amazing 3D printer tech for home users or Sig releases the design from patent protection and the aftermarket jumps in. |
|
Does anybody even know what is SIG doing right now when it comes to parts? They currently have a very limited selection of caliber x-change kits and extra slides. Last year they had a very wide selection for different models and calibers. Now they have 1 in 9mm and 2 in .40. Or is SIG just getting ready to push new “kit models” out but just have not done it yet? |
|
Quoted:
Does anybody even know what is SIG doing right now when it comes to parts? They currently have a very limited selection of caliber x-change kits and extra slides. Last year they had a very wide selection for different models and calibers. Now they have 1 in 9mm and 2 in .40. Or is SIG just getting ready to push new “kit models” out but just have not done it yet? |
Just bought this $13 metric, metal-cutting drill bit set through Amazon:

Several posts up, I posted a photo of 2 metric reamers I happened to have on hand. They came in handy to slightly enlarge 2 of the holes I drilled with the supplied drill bits. Reamers are not inexpensive. And drill bits do a fine job too. This metric set should work perfectly ( I’ll report back after they arrive and I get the time to try them). |
|
Quoted: I think Sig is consolidating their platform. Specifically in the slide cut versions. Prior to this year there were four different slide cuts. Now I believe there are only two. The M17/M18/X-Five/X-Compact that are cut for the DDP footprint and the PRO/RXP versions which are also cut for the DPP. The M17/M18 will likely never change as a change for them would require military approval and a change in the TDP. When I first bought a 320, I could get the subcompact- buy a carry/compact slide and then a x-series grip module to reconfigure my subcompact 320 into a x-carry or into what ever configuration I could come up with. There are not as many options currently on SIGs webpage to buy these extra parts to do this now. I am wondering if this is SIG cutting support for end uses to change around their 320’s or is SIG getting ready to release new x-change kits, ones that have the precut slides or something else. |
|
Quoted: I get that but they have cut the basic caliber exchange kits. They have none listed for . 45, 1 for 9mm, and 2 for .40. You also used to be able to buy just the slide of several models besides the 320 and they seem to have been cut as well. When I first bought a 320, I could get the subcompact- buy a carry/compact slide and then a x-series grip module to reconfigure my subcompact 320 into a x-carry or into what ever configuration I could come up with. There are not as many options currently on SIGs webpage to buy these extra parts to do this now. I am wondering if this is SIG cutting support for end uses to change around their 320’s or is SIG getting ready to release new x-change kits, ones that have the precut slides or something else. |
|
Quoted:
Sig discontinued the sub compact line entirely. You can buy the slide, barrel, and grip module still. The sub compact line was a bit redundant with the P365 IMO. The .40 and .45 line up is a much lower demand item so I'm not sureprised they are OOS right now. You can find stuff on EBay, MWG, and a few other sites. The stuff is still out there. 1) Introduce two semi-compatible modular pistols 2) Discontinue the .380 parts completely 3) Discontinue the 1st pistol entirely 4) Discontinue the subcompact parts, leaving just the choice btwn the service and compact 5) Profit? |
|
Quoted: That would be like Glock discontinuing the 26. SIG consistently shoots itself in the foot. 1) Introduce two semi-compatible modular pistols 2) Discontinue the .380 parts completely 3) Discontinue the 1st pistol entirely 4) Discontinue the subcompact parts, leaving just the choice btwn the service and compact 5) Profit? 
Can anyone list the aftermarket slide manufactures that are making slides if you don't want to go with a Sig kit? Also, can you make the P250 slides work? Here's a comparison of the 250 vs 320  SIG Reps Lie! SIG P250/P320 Comparison Looks like you could work the 80% kit a bit to make the 250 parts work. |
|
Quoted:
https://i.pinimg.com/originals/35/64/fe/3564fe639120dadec76ef2a9b672954f.gif Can anyone list the aftermarket slide manufactures that are making slides if you don't want to go with a Sig kit? Also, can you make the P250 slides work? Here's a comparison of the 250 vs 320  https://www.youtube.com/watch?v=hOKt96CpCbo https://www.youtube.com/watch?v=hOKt96CpCbo
Looks like you could work the 80% kit a bit to make the 250 parts work.
The JSD Supply jig is set up with an extra hole marked “P250” ; you can see it marked on the jig in the third photo I posted in this thread. EDIT: Sig manufactured the P250 - but only as a .22 LR for a while - then discontinued it completely a year or more ago. Still - I am tempted to try a P250 build someday; the challenge would be to locate all the FCU parts unique to the P250, plus a used centerfire slide. I’m also tempted to try an M17 build someday - but right now, the jig is not set up to cut the odd-shaped slot for the manual safety. |
|
Quoted: Thanks Wangstang! Humorous and informative P320/250 video.
The JSD Supply jig is set up with an extra hole marked “P250” ; you can see it marked on the jig in the third photo I posted in this thread. I believe Sig still manufactures the P250 - but only as a .22 LR and only as a complete pistol. Still - I am tempted to try a P250 build someday; the challenge would be to locate all the FCU parts unique to the P250, plus the slide. I’m also tempted to try an M17 build someday - but right now, the jig is not set up to cut the odd-shaped slot for the manual safety. I think the P320 might shake out that way as well right now depending on what type of pricing folks have access to with police trade-in's, sig dealer equivalents of "blue label" pricing and so on. |