|
Posted: 11/9/2010 1:46:29 PM EDT
Update bottom of of page one
A few things: - Sorry about the poor lighting and camera quality, but I'm a broke college student. Some of these pictures are cell phone pictures, some are real pictures. - This may not be the easiest, strongest, prettiest way to make the hammock, but it's my way. - I weigh 235 lbs, and this hammock holds my weight at a pretty good bounce (I’m estimating about 350 lbs. capacity, conservatively). 
Step One: Knowledge This hammock utilizes the most basic of knots to create the final product. There are only 5 knots you need to know: 1.Whipping a.This is less of a knot than a preliminary technique that everyone dealing with cordage should know. This not only prevents the fraying of both natural and synthetic cordage, but also secures lines together. i.www.ropeworks.biz/reader/whipping.pdf ii.Method 2 2.The cow hitch: a.The cow hitch passes the two working ends inside a loop created on the opposing side of a standing bar b. 
3.The Bowline: a.The Bowline is one of the best knots to learn; used to tie a length of cordage to a post, it doesn’t slip and is THE securing knot taught in the Scouts. It will hold weight; it’s not pretty, but it does the job. b. 
4.The Overhand knot: a.Seriously, if you can tie your shoes you know this one, you just may not know the name. Here ya go: i. 
5.The Simple Noose: a.If you’ve ever done any sort of knotwork, you’ve probably tied this on accident. If you’ve ever fooled around with a piece of cordage, same deal. While simple, it takes some practice. Here’s some instruction: i. 
ii.In our hammock, instead of tying around a pole, we’ll be tying around a thicker rope. Step Two: Materials This project is fairly paracord-heavy, in that you’ll need quite a bit of cordage. Here’s the list of all the materials I used: 2- 2” Steel Rings 
2- Carabiners (Each one should be able to carry double your weight, I’ll explain this further later) 
10- 14’ Lengths of paracord 
2- 5’ Lengths of paracord 1- 26’ length of 3/8” Utility Cord (The endgame/finishing process is much easier if you have an extra couple feet of this cord) 
(Obviously not my photo) Lighter (and Torch if available) and cardboard to prevents the burnings 
Pliers 
Nail/Spike/Clay Stylus A stool 
The carabiners are a convenience item: You don’t need them, but they make hooking up your hammock a lot less painstaking. Similarly, the torch, pliers, stylus, cardboard, and stool all make this job easier/more convenient but all can be substituted or omitted. Before tying any knots, burn both ends of each and every piece of cordage to prevent fraying. Be careful with the melting paracord, it’s like napalm, for lack of a better comparison; it burns, drips, and sticks. Step Three: Groundplan First, tie each 14’ strand of 550 paracord to the ring using a Bowline knot. 
Once all are tied, go back and even the knots up for the sake of uniformity. 
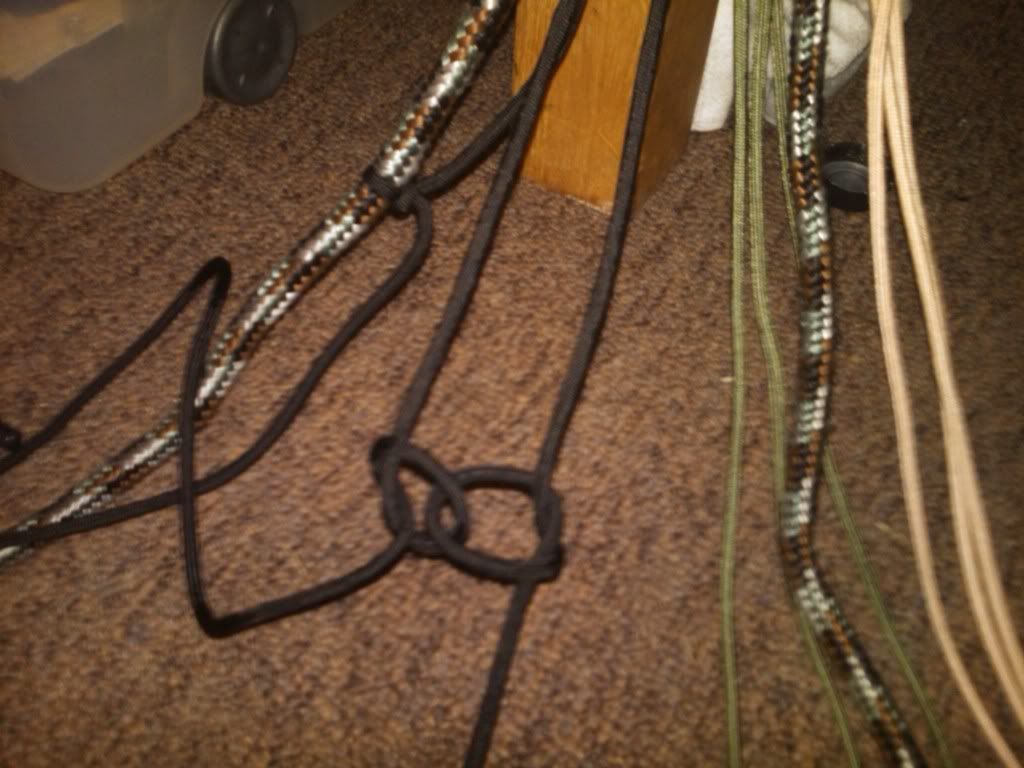
Next, take one of your Steel Rings and tie a Cow hitch in the middle of your 26’ piece of 3/8” rope, laying the working ends outside the paracord you attached to the ring. 

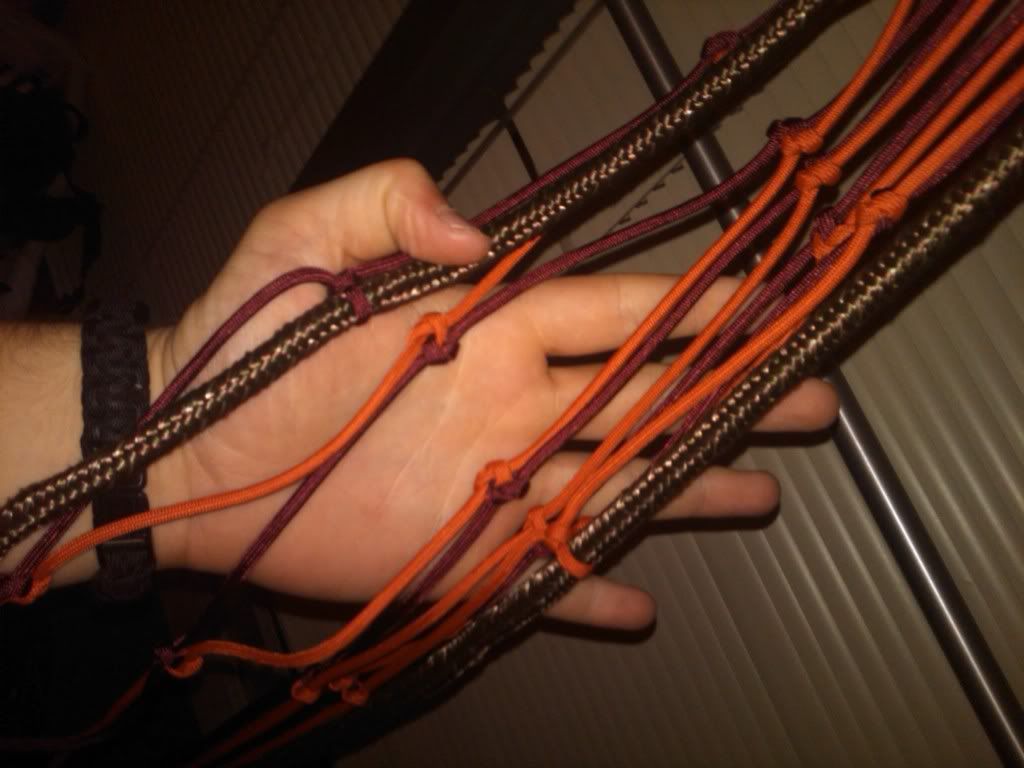
Step Four: Construction Now we start the actual construction of the hammock netting. Hook the steel ring with the cow-hitch up to a vertical point of some sort to give you a sturdy point to pull against. I started left to right, but as long as you start from one edge your pattern will be okay. The edge knots: Starting with your furthest left length of paracord (rope #1), tie a Simple Noose onto the 3/8” rope about a foot from where your paracord is attached to the ring. The center knots: Using your next length (rope #2), tie an overhand knot, also a foot from the ring, and leave it loose. With your next length (rope #3), tie another overhand knot through the first one, interlocking the loops together. Pull snug but not tight. These pictures were the best example I could find (picture credit to Stormdrane from a post over on EDC) 

My example: 
Tie ropes #4-#9 together in pairs, using the same process. Finally, tie #10 with a simple noose to the other 3/8” rope. This completes the first row. Go back through the row and tighten up each knot at the same length. You can be meticulous if the piece is to be gifted, but if it’s for personal use (like mine was) you can tighten the knots to be approximate. If solely for personal use, keep them within an inch or two from the top of the highest knot to the bottom of the lowest knot (this provides for a somewhat good looking hammock without having to take too much time to make it perfect). This process does not significantly affect overall strength. Repeat for the next row, but tie 5 pairs of paracord together instead of attaching the outer paracord to the perimeter rope. Step Five: Tedium Repeat. Repeat again. And again about 18 times after that. In all seriousness, this process is repetitive and pretty tedious. Get settled in. This step takes quite a bit of time, as do most projects that are worth the effort. 
Step Six: The Second Ring Tie your lengths down to the second ring, stopping with about 14” of cordage remaining. 
Now, tie all the lines to the second ring using more Bowline knots. Even them up and tighten them down. Your goal is to leave the same amount of untied paracord next to both rings (this is the foot or cord we skipped in the beginning; we will weave this later for aesthetic effect). 

Step Seven: Securing the Edge Lines Next we have to secure the thick edge rope. I did this by whipping the two cords together using an inner strand from a spare scrap of 550 cord. Using the two loose ends of your 3/8” utility cord, tie another cow hitch to the ring and whip/lash the two loose ends together. 

Doubled the lashing 
After you finish this step, make sure you cut off the ends of the thick line and burn them to seal them. This is a bit redundant since the whipping should serve the same purpose, but we’ll take the extra bit of security here. Replacing the outer line would be painfully difficult. Step 8: Aesthetics From here on, the hammock is structurally sound. The rest of this process can be used to customize your hammock. The main addition I made was to use the foot of unknotted cordage near the steel rings and created a weave pattern. I used a 2.5 foot length of paracord and secured it to the thick edge line near the steel ring and used an over-under weaving pattern. 
Just alternate over and under between the thin lines and around the thick edge lines. Every two times I weaved across I stopped and used my spike (a nail, in my case) and tightened the weave down toward the ring. 
Keep going until you’re nearly out of cord then tie it off to the edge line. Repeat on the other side. 
Other ideas for aesthetic improvements could be: Decorative knots Different color combinations Glow in the dark 550 paracord Step 9: Completion I used 2 of the screw-type carabiners and clipped them to the steel rings. Then, using the extra 3/8” rope from the edges of the hammock, tie some simple Bowline knots around your tree, then to your carabiner. 
The first time you get in your hammock, it will stretch a bunch. This is normal, but you’ll need to sit in it a couple times, tighten it, and then repeat. |
|
|
|
[#1]
Very cool. I wish I had the patience to do something like that.
|
|
|
|
[#2]
neat!
|
|
|
|
[#3]
Cool! I'll have to try this. Weird thing was I was just telling the old lady earlier that we should get a hammock.
|
|
|
|
[#4]
Nice build.
|
|
|
|
[#5]
Quoted:
Very cool. I wish I had the patience to do something like that. This, I would end up getting drunk and burning the concrete balcony down... Yea that drunk |
|
|
|
[#6]
My (Hokie) sister's Christmas present

|
|
|
|
[#7]
bet u could sell a few of them
|
|
|
|
[#8]
Quoted:
Quoted:
Very cool. I wish I had the patience to do something like that. This, I would end up getting drunk and burning the concrete balcony down... Yea that drunk Well shit drinking's half the fun.. The other half is untying all the knots you fubarred while drinking 
|
|
|
|
[#9]
Knots and knife sharpening... Two things I'd love to learn and have tried countless times, but always end up pissed off and unsuccessful.

That's fucking awesome though, and if it weren't so likely to result in me sticking my head in the oven, I would absolutely love to give it a try. *sigh* |
|
|
|
[#10]
Quoted:
Knots and knife sharpening... Two things I'd love to learn and have tried countless times, but always end up pissed off and unsuccessful.
That's fucking awesome though, and if it weren't so likely to result in me sticking my head in the oven, I would absolutely love to give it a try. *sigh* I never quite mastered that one.. |
|
|
|
[#11]
Quoted: Very cool. I wish I had the patience to do something like that. |
|
|
|
[#12]
An in-action view of the knot used for the webbing of the hammock |
|
|
|
[#13]
And snugged down

|
|
|
|
[#14]
Looks good, I'll have to try it sometime. Thanks for the write up
|
|
|
|
[#15]
Awesome, thanks!
|
|
|
|
[#16]
ost
|
|
|
|
[#17]
That's cool as Hell.
I couldn't do it, I'd end up hanging myself somehow. |
|
|
|
[#18]
Quoted: <snip> - I weigh 235 lbs, and this hammock holds my weight at a pretty good bounce (I’m estimating about 350 lbs. capacity, conservatively). <snip> Doesn't one strand of 550 cord support 550 pounds? |
|
|
|
[#19]
Quoted:
Quoted:
<snip> - I weigh 235 lbs, and this hammock holds my weight at a pretty good bounce (I’m estimating about 350 lbs. capacity, conservatively). <snip> Doesn't one strand of 550 cord support 550 pounds? Then obviously the hammock should support a full size truck.
|
|
|
|
[#20]
Awesome. |
|
|
|
[#21]
Very cool!! I keep a hammock in my flight bag and its gotten a lot of use over the years. Every Chinook FE should have one. I'm going to have to make one now
|
|
|
|
[#22]
Quoted:
Quoted:
<snip> - I weigh 235 lbs, and this hammock holds my weight at a pretty good bounce (I’m estimating about 350 lbs. capacity, conservatively). <snip> Doesn't one strand of 550 cord support 550 pounds? In theory yes. That's a static point load. You have to consider that knots weaken rope by as much or more than half. Also that this load is moving. Really, it's not so much about the rope as the knots (which, since they're bowlines, probably hold a lot more than I stated). Just covering my ass saying that's all the weight I've had on it
|
|
|
|
[#23]
Quoted:
bet u could sell a few of them +1 Tactical or Tier 1 Hammocks would sell like hotcakes. |
|
|
|
[#24]
Quoted:
Quoted:
bet u could sell a few of them +1 Tactical or Tier 1 Hammocks would sell like hotcakes. I'll let y'all know if I find a way to make them bacon-flavored |
|
|
|
[#25]
neat OP..
|
|
|
|
[#26]
Quoted:
Quoted:
Quoted:
bet u could sell a few of them +1 Tactical or Tier 1 Hammocks would sell like hotcakes. I'll let y'all know if I find a way to make them bacon-flavored Make me a bacon hammock and you have a sale. |
|
|
|
[#27]
I want dibs on the first edition bacon flavored heavy duty hammock out da door!
You should post this in one of our forums that matter, like survival (if you haven't |
|
|
|
[#28]
Quoted:
I want dibs on the first edition bacon flavored heavy duty hammock out da door! You should post this in one of our forums that matter, like survival (if you haven't I'll post the link in the SF DIY Links thread, maybe I'll get some love. But let's be honest, everything deserves to be posted in GD if for nothing other than the laughs to ensue |
|
|
|
[#29]
Looks good man!
Have you weighed one yet? |
|
|
|
[#30]
Quoted:
Looks good man! Have you weighed one yet? The hammock itself? No.. The caribiners I used for this example are probably overkill, but they weigh a good bit. I probably wouldn't take it backpacking cross country or anything, but for a 2 or 3 day hike in lieu of a tent, maybe. I'll try to weigh it without the caribiners and post it here. |
|
|
|
[#31]
I'm making mine right now. I'm about half done. I don't currently have access to 3/8 rope, so I braided 3 colors of 550 cord together. That was a pain.
|
|
|
|
[#32]
very cool!
|
|
|
|
[#33]
Wow, that's pretty cool man.
|
|
|
|
[#34]
Quoted:
I'm making mine right now. I'm about half done. I don't currently have access to 3/8 rope, so I braided 3 colors of 550 cord together. That was a pain. Hell that's probably a better idea than the 3/8" rope––I'm sure it looks good. Make sure you throw some pictures up when you're done. |
|
|
|
[#35]
Cool, thanks for sharing. I like Gold Toe sock also

|
|
|
|
[#36]
Very cool!
|
|
|
|
[#37]
Great job OP.
|
|
|
|
[#38]
[Shang Tsung] Outstanding! [/Shang Tsung]
|
|
|
|
[#39]
OST
|
|
|
|
[#40]
Quoted:
Cool, thanks for sharing. I like Gold Toe sock also Kohl's sale FTW. A little thin for my liking though. |
|
|
|
[#41]
I didn't read all of the instructions yet but, could I make the web sections closer some how?
Thanks for posting this. I showed my son and he wants to build it. |
|
|
|
[#42]
Quoted:
I didn't read all of the instructions yet but, could I make the web sections closer some how? Thanks for posting this. I showed my son and he wants to build it. As in how? If you mean make the knots in the webbing closer together absolutely. Just remember every knot uses up a bit more paracord so add some feet to make up for it. I made my knots about a fist width apart from each other, for reference. 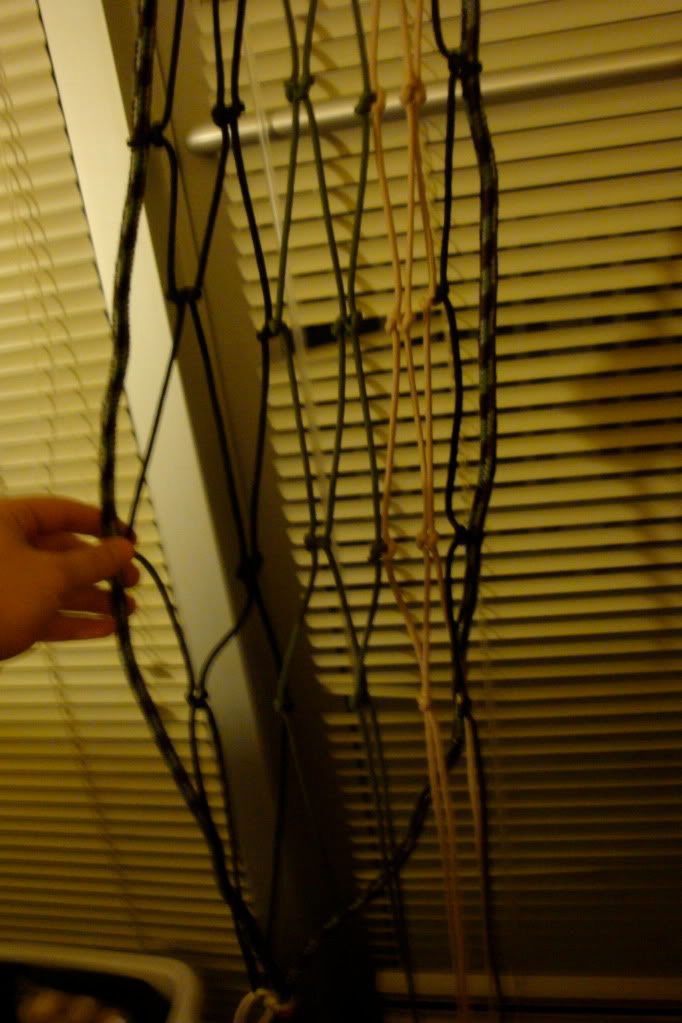
|
|
|
|
[#43]
Bump - pics aren't working for me
Of course even though i refreshed the page it only works after I bump it. |
|
|
|
[#44]
Quoted:
Bump - pics aren't working for me Of course even though i refreshed the page it only works after I bump it. That's the plan
|
|
|
|
[#45]
Humpday is Bump-day
Makes a great gift for wives and kids, gentlemen |
|
|
|
[#46]
tagged!
will be down the road, but will definitely try this |
|
|
|
[#47]
Here's mine, thanks for the guide! As I already said, I don't have rope so I braided some 550 cord together. I also don't have rings so I just used the carabiners to tie the knots onto.

Uploaded with ImageShack.us 
Uploaded with ImageShack.us 
Uploaded with ImageShack.us |
|
|
|
[#48]
Quoted:
Here's mine, thanks for the guide! As I already said, I don't have rope so I braided some 550 cord together. I also don't have rings so I just used the carabiners to tie the knots onto. <a href="http://img607.imageshack.us/i/40828502.jpg/" target="_blank">http://img607.imageshack.us/img607/9096/40828502.jpg</a> Uploaded with ImageShack.us <a href="http://img261.imageshack.us/i/20368103.jpg/" target="_blank">http://img261.imageshack.us/img261/5093/20368103.jpg</a> Uploaded with ImageShack.us <a href="http://img210.imageshack.us/i/dsc02877c.jpg/" target="_blank">http://img210.imageshack.us/img210/3293/dsc02877c.jpg</a> Uploaded with ImageShack.us Nice! Good idea just tying off to the carabiners, looks like it would work for weight-reduction. Bump, reuploaded the pictures. Fuckin' ARF kills bandwidth 
|
|
|
|
[#49]
Quoted:
Here's mine, thanks for the guide! As I already said, I don't have rope so I braided some 550 cord together. I also don't have rings so I just used the carabiners to tie the knots onto. <a href="http://img607.imageshack.us/i/40828502.jpg/" target="_blank">http://img607.imageshack.us/img607/9096/40828502.jpg</a> Uploaded with ImageShack.us <a href="http://img261.imageshack.us/i/20368103.jpg/" target="_blank">http://img261.imageshack.us/img261/5093/20368103.jpg</a> Uploaded with ImageShack.us <a href="http://img210.imageshack.us/i/dsc02877c.jpg/" target="_blank">http://img210.imageshack.us/img210/3293/dsc02877c.jpg</a> Uploaded with ImageShack.us The holes in that look huge, like, your leg would fall through.
|
|
|
|
[#50]


|
|
|
 Win a FREE Membership!
Sign up for the ARFCOM weekly newsletter and be entered to win a free ARFCOM membership. One new winner* is announced every week!
You will receive an email every Friday morning featuring the latest chatter from the hottest topics, breaking news surrounding legislation, as well as exclusive deals only available to ARFCOM email subscribers.

AR15.COM is the world's largest firearm community and is a gathering place for firearm enthusiasts of all types.
From hunters and military members, to competition shooters and general firearm enthusiasts, we welcome anyone who values and respects the way of the firearm.

Subscribe to our monthly Newsletter to receive firearm news, product discounts from your favorite Industry Partners, and more.
Copyright © 1996-2024 AR15.COM LLC. All Rights Reserved.
Any use of this content without express written consent is prohibited.
AR15.Com reserves the right to overwrite or replace any affiliate, commercial, or monetizable links, posted by users, with our own.


