AK, USA
|
[#1]
Thank you for the great write-up VaderSpade!
|
|
|
KY, USA
|
[#2]
You have inspired me to try this myself. Now i just have to find a 80& lower.
|
|
|
|
[#3]
Originally Posted By larry502:
You have inspired me to try this myself. Now i just have to find a 80& lower. Ditto |
|
|
|
TN, USA
|
[Last Edit: detroitmedic]
[#4]
Harbor Freight has a nice looking Mini Mill on sale this month, plus a 20% off coupon code: 8634902 $399.00 after coupon
http://www.harborfreight.com/two-speed-variable-bench-mill-drill-machine-44991.html |
|
|
WI, USA
|
[#5]
make sure to order the 12mm t-nut stud/ clamping kit for $70 with it.....it'll save a few headaches.
advntrjnky Originally Posted By detroitmedic:
Harbor Freight has a nice looking Mini Mill on sale this month, plus a 20% off coupon code: 8634902 $399.00 after coupon http://www.harborfreight.com/two-speed-variable-bench-mill-drill-machine-44991.html |
|
|
|
[#6]
Is there a thread or recommended place to get the 80% lowers, I tried searching but came up empty.
|
|
|
|
FL, USA
|
[#7]
Ares Armor, taking orders for November shipment.
|
|
|
|
[#8]
holy crap i give up even the 80% lowers are out control price wise, maybe "instock" wise for that matter
damned if i am going to pay finished $$ or better, for something i have to put time and $$$ into. Will it ever end?  |
|
|
|
ME, USA
|
[#9]
I hope this link helps those looking for 80% lowers. http://billet80.com/index.php?route=product/product&path=59&product_id=50
|
|
|
PA, USA
|
[#10]
Originally Posted By Christopher67:
I hope this link helps those looking for 80% lowers. http://billet80.com/index.php?route=product/product&path=59&product_id=50 Ordered 3 from there a week and a half ago myself, they shipped 415 and lower im order 713, they claim ill have them in my hands within 2-3 weeks. Ive heard nothing but good things about their 80%'s though so im keeping my fingers crossed |
|
|
ME, USA
|
[#11]
Originally Posted By marshn07: Originally Posted By Christopher67: I hope this link helps those looking for 80% lowers. http://billet80.com/index.php?route=product/product&path=59&product_id=50 Ordered 3 from there a week and a half ago myself, they shipped 415 and lower im order 713, they claim ill have them in my hands within 2-3 weeks. Ive heard nothing but good things about their 80%'s though so im keeping my fingers crossed Ok keep us posted, i haven't ordered any yet lol. |
|
|
|
[Last Edit: Kyoami]
[#12]
Originally Posted By Christopher67:
Originally Posted By marshn07:
Originally Posted By Christopher67:
I hope this link helps those looking for 80% lowers. http://billet80.com/index.php?route=product/product&path=59&product_id=50 Ordered 3 from there a week and a half ago myself, they shipped 415 and lower im order 713, they claim ill have them in my hands within 2-3 weeks. Ive heard nothing but good things about their 80%'s though so im keeping my fingers crossed Ok keep us posted, i haven't ordered any yet lol. I ordered 5, they showed up today, they look great. order 432 from 14-JAN |
|
|
|
ME, USA
|
[#13]
Originally Posted By RyJones: Originally Posted By Christopher67: Originally Posted By marshn07: Originally Posted By Christopher67: I hope this link helps those looking for 80% lowers. http://billet80.com/index.php?route=product/product&path=59&product_id=50 Ordered 3 from there a week and a half ago myself, they shipped 415 and lower im order 713, they claim ill have them in my hands within 2-3 weeks. Ive heard nothing but good things about their 80%'s though so im keeping my fingers crossed Ok keep us posted, i haven't ordered any yet lol. I ordered 5, they showed up today, they look great. order 432 from 14-JAN Awesome, thanks. |
|
|
|
[#14]
|
|
|
|
ME, USA
|
[#15]
Originally Posted By RyJones: http://farm9.staticflickr.com/8237/8451743741_bb4b72aa69.jpg 80% lowers by Ry Jones, on Flickr http://farm9.staticflickr.com/8380/8451743625_85b121c40a.jpg 80% lowers by Ry Jones, on Flickr Very nice indeed. |
|
|
|
[Last Edit: sonmtn]
[#16]
i would love to get a Tactical Machining Jig and lower but looks like a heck of wait.
Any ideas who may have some? |
|
|
|
ME, USA
|
[Last Edit: Christopher67]
[#17]
Originally Posted By sonmtn: i would love to get a tacTM jig and lower but looks like a heck of wait. Any ideas who may have some? Try here http://billet80.com/index.php?route=product/product&path=59&product_id=50 http://billet80.com/index.php?route=product/product&path=59_64&product_id=52 |
|
|
|
[#18]
i ordered one so the wait begins
this kinda seems like sending the paper work in for a supressor "I want it, I want it" |
|
|
|
|
[Last Edit: Kyoami]
[#19]
To answer my own question, you will need four 8/32 x 3/4 inch long bolts to use the jig. I also needed to buy an 8/32" tap, since the threads in two of the holes were so bad as to be unusable.
I used something like this (except I got hex drive instead of square drive) |
|
|
|
WI, USA
|
[#20]
I'll take one.
|
|
|
|
[#21]
Originally Posted By xfphoQ:
I'll take one. 
|
|
|
|
TX, USA
|
[#22]
Originally Posted By Christopher67:
Originally Posted By sonmtn:
i would love to get a tacTM jig and lower but looks like a heck of wait. Any ideas who may have some? Try here http://billet80.com/index.php?route=product/product&path=59&product_id=50 http://billet80.com/index.php?route=product/product&path=59_64&product_id=52 Their out of stock on the fixtures also...and the problem with that billet rifle jiig / fixture is it is made out of aluminum. No drill bushings, but it is a full height fixture, un-like some others I've seen. I have been looking for a while and everyone is out of stock on the lower reciever and the fixtures...but the Tactical is worth waiting for...unless you can find a cad file that is a copy and make your own. |
|
|
|
[#23]
with all the 80% being sold the line at the atf window must be looooonnnnnnnggggggggggggggg.
|
|
|
|
TX, USA
|
[#24]
Excuse my lack of knowledge on this in advance as I have never owned a Military style firearm other than my Springfield Armory 1911. I'm not asking about legal advice, just concerned about it being confiscated and or me being arrested.
I do have a concern about publicly displaying this when its a completed AR 15 (because of all the P#$%&*s opinions) as I do fully intend to have it out (just because of their irrational fear of a black gun) if someone comes down my road that doesn't belong here. It will have no information it other than the 2nd amendment and the Texas snake with "don't tread on me". I say this because we've had some thefts and break-ins surrounding our properties of late. 1. I live in a private area and me and my 2 neighbors own the 3 sections of the only road in or out to our properties and in a nu-incorporated Texas county. If someone reports that they saw me on my property with this and, or the county sheriff sees it, could there be any consequences like going to jail? 2. Could their be a problem with me taking it to my local firing range or hunting? |
|
|
WI, USA
|
[#25]
The ATF recommends putting a serial number or identifier on home built firearms, but is not required. Your local sheriff can do what ever they want and make you go through due process to prove you are legal. Neighbors and ignorant people will call law enforcement on you for stupid crap, that's life. The ATF website has a lot of answers to your questions and a google search will turn up endless amounts of other info.
Advntrjnky |
|
|
TX, USA
|
[#26]
Originally Posted By bartlanz:
Is there a thread or recommended place to get the 80% lowers, I tried searching but came up empty. BRS "billet rifle supply" saying about a 4 week ship |
|
|
|
[#27]
Excellent tutorial.
|
|
|
|
|
[#28]
Does anyone know the backorder time frame from Billet Rifle Systems (billet80) as of present time?
I see earlier around 2/5/13 they were 2-3 wks out. |
|
|
|
|
[#29]
Originally Posted By sonmtn:
Does anyone know the backorder time frame from Billet Rifle Systems (billet80) as of present time? I see earlier around 2/5/13 they were 2-3 wks out. He rate limits ordering to match production. My guess is he's still 2-3 weeks out |
|
|
|
|
[#30]
i'll bet they are swamped kinda wonder if they are all loving life or wanting the merrygo round to slow down

|
|
|
|
|
[#31]
Bump for cleanup
|
|
|
|
|
[#32]
I want to point something out to people that are using Billet Rifle Systems' jig. I originally bought some 3/8" end mills with 1" flutes; this means whenever I touched the jig, I took a shaving off. As such, my jig looks like crap.
Also, a 2 1/2" long end mill will just barely allow you to cut the trigger hole without the collet contacting the jig and with enough engagement to hold on to the end mill. Barely. I ordered two of these end mills (they are 3/8"x3/8" three flute end mills, 2 1/2" long) (MSC part number 85610491, in case they change the way the search engine works again). The space above the deck and below the jig is almost 3/8"; if you plunge in in the middle and go to an edge, you can treat the jig more as a guide, as there is no cutting surface to contact the jig. The exception is the trigger hole, so you'll still have to be very watchful there, but with this specific end mill, you will have a lot less worry. Of course, don't run into the freaking jig and snap your end mill off. At the end of the day, you will still need to make a finishing pass without the top of the jig in place, but you had to do that, anyway. |
|
|
|
PA, USA
|
[Last Edit: marshn07]
[#33]
I ordered 3 BRS 80% lowers about 4 weeks ago, shipped on week 3-3.5 about. Ordered another one mid order of that one and shipped about a week after the first order shipped. The original guy that started it sold the company and production is going much faster now. Trust me its worth the wait for their lowers, they look amazing and machine amazing. I used a 1/4 flat endmill to machine the whole lower and worked perfectly. You will definately be satisfied with anyone who ordered from billet rifle systems
EDIT: also if people are using a mill, you dont nessesarly need to spend the extra 100 some odd dollars for the jig. Its only nesesary if you dont trust yourself reading blueprints but i just used a heavy duty clamp and 2 blocks of MDF wood on each side of the lower, made sure it was level and marked everything on the lower and machined away. turned out top quality |
|
|
MT, USA
|
[Last Edit: sonmtn]
[#34]
thanks for the info guys very helpful
got my engraved 80% back from Vader today and they are awesome The man does fine work |
|
|
NY, USA
|
[Last Edit: hambino]
[#35]
Great build! Any idea roughly what the Rockwell hardness is after anodizing? I'm a mechanical engineering student doing my first lower build as a project for a CNC class. Have an 80% lower from ares armor. So far very pleased. Thanks!
|
|
|
USA
|
[#36]
Here's some notes about my experience machining and etching a lower.
Machining. I used a BRS 80% lower with fig using a drill press & XY table. Like many others, I probably would not use the drill press again - they just can't control the end mill (also I have a mill, but it is used for production and I did not want to have to set it up again). However, the machining is fairly easy and the FCP came out ok. The main problem is that the drill press flexes like crazy with side load, and the end mill will walk all over the place. - 4 flute end mill with a very short cutting surface (for aluminum 2 flutes are normally used, but 4 has less chatter). - 300 rpm worked best - don't bother drilling any holes to start with - make plunge cuts with the end mill near the middle of the FCP until you get to the ballpark depth. At this point, depending on the fixture & end mill, the smooth side of the end mill will ride on the fixture so you can cut accurately later. - then start to move in clockwise direction around the FCP. Clockwise gives a non-climbing cut which will be smoother, but has a problem as I found later. - I used WD40 to stop the chip sticking, but with 7075 the chips just break off anyhow. - Keep removing material until the shank of the end mill is against the fixture, then start to move the part up to get the correct depth. A lot of removing, measuring and replacing here. - Eventually you're done. It's not that hard. - don't use an end mill for the trigger slot. It will walk for too much and you'll get a diagonal slot. Drill instead and file. The main problem is that the bite of the end mill will twist the drill press main tube, so that the FCP will end up over dimension in width and length. If I did it again I'd try a climbing cut, which gave more chatter, but should stop the end mill twisting the drill press as much. What would also help is having the XY table mount to the base of the drill press rather than the round table which travels up and down. Etching (serial & ID marks). I used a laser printer and office depot iron on transfers 'for dark fabric' to make a mask for etching. Rather than print directly to the paper I had to go via mspaint to flip the image. Steps: - create the text in word or google docs in a block table using white text. - screen capture (alt - print screen) - past into ms paint - copy and crop to show only the black text. - flip the image horizontally. - copy a bunch of the text over the page (6-12 copies) - set the laser printer to 'dark' if possible & switch off toner saver - print on to the paper - cut out the stencil and tape onto the lower - iron the stencil on. This is the hard bit. You need a lot of heat, and the lower conducts the heat away. In the end I held the iron on the lower for about 5 minutes to pre-heat it, and then another 5 minutes on the stencil. - remove the tape - soak in water. After about 2 minutes the paper component will come off with your thumb. Then there is a plastic like layer which has to get peeled off. If you did not use enough heat, then the toner will come off the lower. If it makes you feel better I took 8 attempts over several hours before I was happy with the toner stencil. - examine the stencil to make sure it looks ok. I used some insulating lacquer around the edges to stop any stray etching. - prepare electrolyte. I found table salt in warm water works ok. Tried vinegar & salt but did not work very well. - etch with power supply / electrolyte and q tip. Positive goes to the lower, negative to the Q tip. I used 18-19V, and found it varied from 0.1 to 1.5 amps depending on how much contact you have with the electrolyte. - I found it best to coat all the text with the electrolyte, then give each line of text about 30 seconds of etching. Then I removed the lower and ran under water to get rid of all the oxide in the letters. - Total etching was about 4-5 rounds before I could see the fine parts of the letters starting to erode, so I stopped. eg the island in the middle of 'a' would start to disappear. - end result was fairly good. - rinse, polish and I'm ready for the next step (anodizing). Hope this helps someone out. |
|
|
CA, USA
|
[#37]
just a few thoughts on the etching process.
I used a 12v 200mA ac/dc power supply , you know the kind that comes with just about every elect. item we use day to day. it takes a bit longer but im a cheapskate and didnt mind the extra time. make sure your mask is complete , as you etch the fluid will spread out and if you have any holes in your mask they will show up. i couldnt justify buying a vinyl cutter so i worked up my template using a free downloadable program called inkscape , it uses vector graphics then i took a thumbdrive with the file on it to fedex office and had them do the cut out cost was 15 dollars for a 12x12 cut out. i used vaders gungsuche font for the most part although the company had a little difficulty with tear out on the smaller letters. hope this helps |
|
|
PA, USA
|
[#38]
Little help?
I'm having trouble finding something other than a "smart" charger. Everything seems to have an automatic shut-off circuit or something to make the charger unsuitable. What are you using for anodizing and etching? I would prefer to avoid building a power supply from a CPU power supply, or from parts, if at all possible. Already have too many projects. |
|
|
UT, USA
|
[#39]
During anodizing it went to the orange bucket without a trigger guard, and came out of the bucket with one. Where do you get those buckets?
|
|
|
PA, USA
|
[Last Edit: Suburban]
[#40]
If you are buying an endmill to use with a jig, don't buy one with a 3/8" shank. It won't fit through the 5/16" slot in the plate. D'oh!
Oh well, I can still use it from the bottom of the receiver, as long as it doesn't have an integral trigger guard. Oh, also, on the topic of bits, if you are using one of those drill plates with all the 1/8" holes, a chip-clearing drill bit works really well for that. |
|
|
|
[#41]
OST
|
|
|
|
|
[#42]
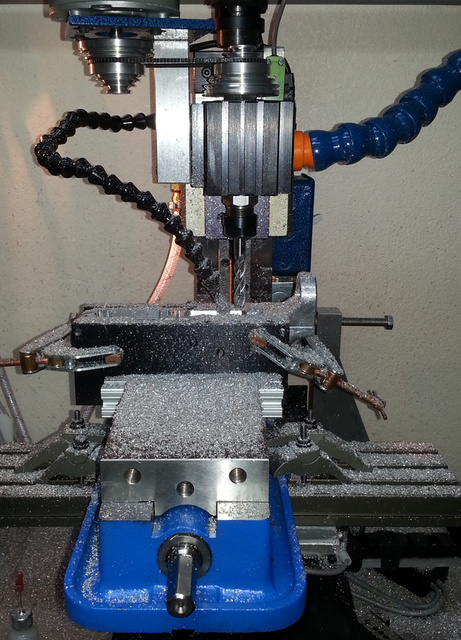
I've been following this thread for a while and thought I'd post in this one instead of starting a new one:
I'm finally going for it this weekend. I've spent some time playing with my little 4-axis CNC uber-micro-baby-prototyping-mill and think I'm ready to give it a shot. I used drawings online and modeled out the FCG pocket. I used MeshCam software for the conversion to g-code. Mach 3 for the CNC. I did a test run last night on some scrap hard wood that I had in the shop. I'm going for aluminum this weekend. Here is the little mill that I'm going to use. The little one on the left. I've got the feed rate and depth of cut pretty low, so it should do ok. Hopefully.  The FCG pocket model.  The test run and the lower.   I have the program set up for a 1/4" end mill only so I don't have to do a tool change. Run time last night was ~35 minutes after I hit GO. I've dropped the feed rate down and lightened up the cut and that increased estimated time by another 20 minutes. I still might try it on a chunk of aluminum before I go for a live run. Wish me luck!  CHRIS |
|
|
|
|
[#43]
I don't see why a block of hardwood would not work as a lower, if one made a plate to hold the buffer/stock assembly, and installed metal inserts for all the pins...
|
|
|
|
|
[#44]
Originally Posted By Cixelsyd:
I've been following this thread for a while and thought I'd post in this one instead of starting a new one: I'm finally going for it this weekend. I've spent some time playing with my little 4-axis CNC uber-micro-baby-prototyping-mill and think I'm ready to give it a shot. I used drawings online and modeled out the FCG pocket. I used MeshCam software for the conversion to g-code. Mach 3 for the CNC. I did a test run last night on some scrap hard wood that I had in the shop. I'm going for aluminum this weekend. Here is the little mill that I'm going to use. The little one on the left. I've got the feed rate and depth of cut pretty low, so it should do ok. Hopefully. http://img.photobucket.com/albums/v108/Chrissopher/millstwo_zps8ee5e8ec.jpg The FCG pocket model. http://img.photobucket.com/albums/v108/Chrissopher/triggerpocket1_zps75230763.jpg The test run and the lower. http://img.photobucket.com/albums/v108/Chrissopher/lower1_zps5cb588af.jpg http://img.photobucket.com/albums/v108/Chrissopher/lower2_zps9a3f2a5f.jpg I have the program set up for a 1/4" end mill only so I don't have to do a tool change. Run time last night was ~35 minutes after I hit GO. I've dropped the feed rate down and lightened up the cut and that increased estimated time by another 20 minutes. I still might try it on a chunk of aluminum before I go for a live run. Wish me luck!
CHRIS looking good and good luck |
|
|
|
CA, USA
|
[#45]
Watch that your end mill doesn't pull out.
My first time with a CNC mill I cut a perfect pocket in a scrap piece of 6061 but when I set it up to cut a 7075 forged lower my tool pulled out and went through the bottom. I now always mark my end mills with a sharpie and watch them closely. |
|
|
|
[#46]
Finished the FCG pocket. Still have to drill the pin holes. First run was a HUGE learning experience. I had my depth of cut a little more than my CNC could do, so I used Mach3 to adjust the feed rate to compensate. That slowed the whole run time down a lot. Rapids and plunges slowed down a lot with tweak. That sucked. I'll adjust on my next one. I initially chucked up the end mill too far into the collet and had to adjust it during the run. When I was resetting X/Y/Z zero, I turned the end mill the wrong way and took some metal off of my origin.
oops! In the end, everything looks like it turned out ok. My origin was off a little. .005" inch more to the left side. I'll use my manual mill to drill the pin holes tomorrow. Total run time was way longer than I was expecting. 3 hours all in after I hit the go button. I really need to tune the feed rates and depth of cut!Well, here are some pictures. The fixture setup that I came up with.  Pulled back a little so you can see the whole thing.  Making some wee chips.  Had to add a barrier to keep the swarf off of my CPU. That stuff flew everywhere when I hit the air. I'm going to rig up a curtain system next time.  End result still on the mill. You can see my boo boo at the front of the trigger pocket. Like I said...oops!  Last pic. Next to an untouched TR-Enabling 80% lower.  Thanks for the inspiration guys. This is going to get more fun. CHRIS |
|
|
|
|
[#47]
I love the flexibility of Mach 3!!!
I use a 3/8" Cobalt HS 2 flute EM @ 4200 rpm. .025 doc @24 ipm My machine time is just over 1 hour...... I love CNC, because the machine does all the work I just to watch my lube level and sip a pepsi... Ca_Longshot |
|
|
|
|
[#48]
Originally Posted By ca_longshot:
I love the flexibility of Mach 3!!! http://photos.imageevent.com/scl_electronics/cfguns/ar15/websize/lower1.jpg I use a 3/8" Cobalt HS 2 flute EM @ 4200 rpm. .025 doc @24 ipm My machine time is just over 1 hour...... I love CNC, because the machine does all the work I just to watch my lube level and sip a pepsi... Ca_Longshot I have been looking into the MicroMill 2000, would anyone here be willing to share their programming for the fire control group pocket??? Im unfamiliar with CNC programming and will need some help to get started LOL |
|
|
|
|
[#49]
I wish I had half the skill (and equipment
Was curious if anyone had tried to use the etching technique that Vader was originally using on an anodized lower. Any takers? Will it not work at all? Work, but with really poor results? |
|
|
|
|
[#50]
Originally Posted By jclaypool:
I wish I had half the skill (and equipment Was curious if anyone had tried to use the etching technique that Vader was originally using on an anodized lower. Any takers? Will it not work at all? Work, but with really poor results? The salt and vinegar technique? The aluminum has to be raw. Clean it first 1000 grit paper or extra fine stainless steel wool. It starts slow, but speeds up after you break through the outer layer. I go through 15-20 Q-tips in about an hour or so. I usually use an old mororcycle battery and a float charger, seems to be plenty of amps. |
|
|
|
 Win a FREE Membership!
Sign up for the ARFCOM weekly newsletter and be entered to win a free ARFCOM membership. One new winner* is announced every week!
You will receive an email every Friday morning featuring the latest chatter from the hottest topics, breaking news surrounding legislation, as well as exclusive deals only available to ARFCOM email subscribers.

AR15.COM is the world's largest firearm community and is a gathering place for firearm enthusiasts of all types.
From hunters and military members, to competition shooters and general firearm enthusiasts, we welcome anyone who values and respects the way of the firearm.

Subscribe to our monthly Newsletter to receive firearm news, product discounts from your favorite Industry Partners, and more.
Copyright © 1996-2024 AR15.COM LLC. All Rights Reserved.
Any use of this content without express written consent is prohibited.
AR15.Com reserves the right to overwrite or replace any affiliate, commercial, or monetizable links, posted by users, with our own.


