|
[#1]
A Taig mill is very small. Does it have a DRO or dial measurement system on it? If not use markup die and scribe your pocket on the surface as best as you can. Looking at the size of a Taig mill I wouldn't use any endmill over .250" and use conventional cutting paths to avoid vibration issues. Keep your milling pocket clear of chips. Take your time and have fun.
A drill hole to plunge start would be a good thing to have. |
|
|
|
[#2]
its manual hand cranked in each axis, total weight of the mill is 65 lbs. The folks at Taig said it will take a 3/8" endmill no problem and that it will run smoothly as well. They said this was the largest endmill that could be ran nicely and smoothly. However I've seen some folks use half inch endmills with great success as well on the Taig mill but being a 1/2" size bit isn't something that is really called for in the tasks and the largest bit mainly being the 3/8" bit I looked at it as being a sufficient enough mill, or am I wrong?
|
|
|
|
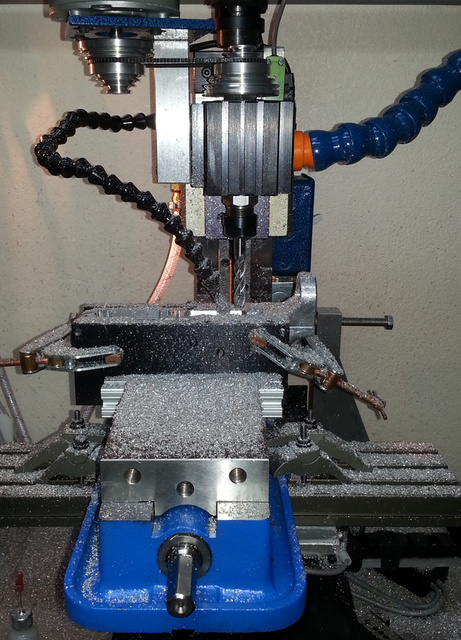
[#3]
If you go .500" on the endmill then use the conventional milling style and take shallow depths of cuts. Use a 2 flute or 3 flute with .375 LOC that way the solid shank will help with keeping it rigid.
If I was near my shop I could post some pictures of the tooling for you. |
|
|
|
[#4]
Give the size of my mill and drill-press am really wanting to proceed in picking up a good set of carbide bits in what lengths and sizes that will be suitable for the tasks as I'd love to get to work on the two receivers I got sometime ending of this month or sooner if possible.
|
|
|
|
[#5]
Are you using a Jig??
They do make your life a bit easier... but make sure everything lines up....Shimming is sometimes needed... AS for my personal experience with a Taig CNC Mill.. It easily handles the finishing of a 80% lower!! For most of the milling, I used 2 flute 3/8" Cobalt HSS EM. They are sharper and takes less torque than Carbide EM. Also they leave a fine finish!! 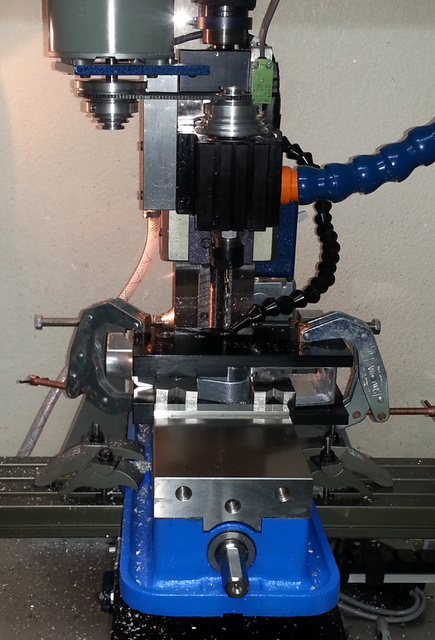
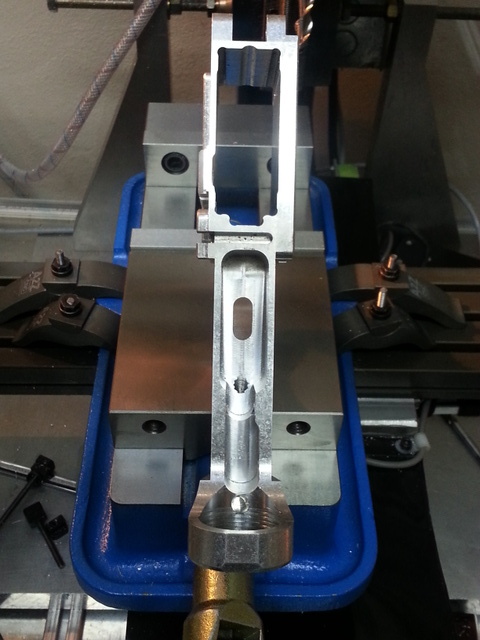
By the Specs and Blueprints I have found on the Internet... For proper radius on the corner in the FCG pocket.. You will need to use a 7/16" EM!! Of course I compensated for this in my CNC coding!! Here is a neat guide to mill the FCG pocket by DRO!!: Colfax milling guide Have Fun!!! |
|
|
|
[#6]
Ahhh yeah thats the same Taig I got but only mine is all manually operated so no CNC. Yeah I do have a complete AR lower jig set for the job. So you say a 7/16" endmill for the correct radius's and not the 3/8" like most are doing? Please do shed some light and confirm this as I have personally read of people who mentioned something similar to having something of a more "spec" or "factory" radius and it NOT being the 3/8" like most do and claim it being. I'd like to get this as much in spec as possible to something that is close or same as factory.
|
|
|
|
[#7]
No Problem....
Here is a clip of one of the many Blueprints out there on the Internet.... 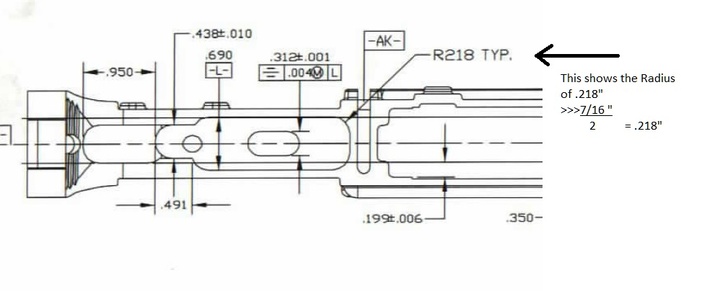
The R.218 states the typical radius used in this section of the diagram is .218" |
|
|
|
[#8]
Does the jig you used (if any) have the same radius's ? The jig that I got for some reason doesn't have much of a "rounded" like radius as most jigs out there. Do I simply bypass the radius's on the jig and go full on with the 7/16" em doing the best I can given the jig maybe having a different radius? so in essence mill a straight slot down the center and then open the pocket up so the radius's match the 7/16" radius's ? Or should I copy and go off of the same radius on the jig?
|
|
|
|
[#9]
Hey guys, do you mind if I jump in here and ask a few questions? I've been shopping for a small mill for the last few weeks and have been looking at the unit from the Little Machine shop. The plastic gears and comments about reliability have had me worried. The Taig unit that you fellas are using appears to be much higher quality for roughly the same price. I went to their website and read all the specifications and it looks like they have roughly the same capacity too. I dont understand why people are buying the Grizzly, LMS or Harbor Freight units when the Taig unit is made in the USA and is made with higher quality parts that are more easily replaced and serviced. What am I missing?
Other than making simple parts and jigs with the Bridgeport machine at my last job, i have no machinist experience. Could you offer any imput on how to proceed? I would likely add the upgraded 1/4 HP motor but what other accessories should I include? The Bridgeport obviously used the R8 collets and fastened with a bolt from the top. Are ER16 collets similar and do they basically work the same way? Im getting in over my head here pretty quickly and could use some guidance. Are there any other high quality mills available for the same price range or is this Taig unit the best for the $1000 - $1200 price range? |
|
|
|
[#10]
Quoted:
Does the jig you used (if any) have the same radius's ? The jig that I got for some reason doesn't have much of a "rounded" like radius as most jigs out there. Do I simply bypass the radius's on the jig and go full on with the 7/16" em doing the best I can given the jig maybe having a different radius? so in essence mill a straight slot down the center and then open the pocket up so the radius's match the 7/16" radius's ? Or should I copy and go off of the same radius on the jig? The TM jig cutout I have is very close to the drawing. So if you follow it with a 3/8 EM, you will be very close! But if you are in doubt, I would layout the pocket on the your 80% lower! Use you jig only as a roughing guide. Then do a finishing cut per your layout!! BTW... I did mine fully CNC.. I drew up my pocket from the blueprints in my Cam program and generated my code. Then I just zero my mill, set my home position and hit Start in Mach3!! That is why I could use a 3/8" EM for all my milling.. Except for the trigger slot(1/4" long EM CNC adjusted for .156" radius) |
|
|
|
[#11]
In Machining, nothing is written in stone..
As for a Mill, every make and model has it's advantages. When I did my research for my own mill... I didn't have the room or the $$ for the Mill I really wanted!! But the Taig is built by a small company run by Aerospace Engineers. The use a lot of Big Machine feature in a Bench-Top machine! But the additions of CNC.... It now Performs almost like Big machine...Well Almost... |
|
|
|
[#12]
Quoted:
The TM jig cutout I have is very close to the drawing. So if you follow it with a 3/8 EM, you will be very close! But if you are in doubt, I would layout the pocket on the your 80% lower! Use you jig only as a roughing guide. Then do a finishing cut per your layout!! BTW... I did mine fully CNC.. I drew up my pocket from the blueprints in my Cam program and generated my code. Then I just zero my mill, set my home position and hit Start in Mach3!! That is why I could use a 3/8" EM for all my milling.. Except for the trigger slot(1/4" long EM CNC adjusted for .156" radius) Quoted:
Quoted:
Does the jig you used (if any) have the same radius's ? The jig that I got for some reason doesn't have much of a "rounded" like radius as most jigs out there. Do I simply bypass the radius's on the jig and go full on with the 7/16" em doing the best I can given the jig maybe having a different radius? so in essence mill a straight slot down the center and then open the pocket up so the radius's match the 7/16" radius's ? Or should I copy and go off of the same radius on the jig? The TM jig cutout I have is very close to the drawing. So if you follow it with a 3/8 EM, you will be very close! But if you are in doubt, I would layout the pocket on the your 80% lower! Use you jig only as a roughing guide. Then do a finishing cut per your layout!! BTW... I did mine fully CNC.. I drew up my pocket from the blueprints in my Cam program and generated my code. Then I just zero my mill, set my home position and hit Start in Mach3!! That is why I could use a 3/8" EM for all my milling.. Except for the trigger slot(1/4" long EM CNC adjusted for .156" radius) So given if I take the route of the 7/16" em what size and length em would I use to make my final pass so there isn't much machine marks and is nice and clean? |
|
|
|
[#13]
Quoted:
Hey guys, do you mind if I jump in here and ask a few questions? I've been shopping for a small mill for the last few weeks and have been looking at the unit from the Little Machine shop. The plastic gears and comments about reliability have had me worried. The Taig unit that you fellas are using appears to be much higher quality for roughly the same price. I went to their website and read all the specifications and it looks like they have roughly the same capacity too. I dont understand why people are buying the Grizzly, LMS or Harbor Freight units when the Taig unit is made in the USA and is made with higher quality parts that are more easily replaced and serviced. What am I missing? Other than making simple parts and jigs with the Bridgeport machine at my last job, i have no machinist experience. Could you offer any imput on how to proceed? I would likely add the upgraded 1/4 HP motor but what other accessories should I include? The Bridgeport obviously used the R8 collets and fastened with a bolt from the top. Are ER16 collets similar and do they basically work the same way? Im getting in over my head here pretty quickly and could use some guidance. Are there any other high quality mills available for the same price range or is this Taig unit the best for the $1000 - $1200 price range? Am personally no machinist, nor have I ever used a mill of any sort either ever in my life so this Taig mill and this lower receiver project will be my first time ever milling something. I'm personally not all that familiar with doing all the fancy cnc and computer stuff with regards to milling cnc style so I figured for the price and my level of experience that it would be best for me to go the manual route and at the sametime also save me some money from having it full cnc ready. I got wind of a Taig being a nice tool for this job after reading about some folks having great success using a Taig mill for such a task. There is also a really old article somewhere that someone showed some detailed pics of how he also completed a few AR lowers using the Taig, though his was also setup for cnc use. I also got hooked on this being the right machine for me after having seen a pretty young guy on youtube who purchased a Taig unit and showed a brief unboxing and some short milling pocket clips. He had also did a clip showing him using a 1/2" cutter in which it looked to have ran very smoothly given its large size. However his was also setup for cnc use. I am just guessing off the top of my head that regardless if you have one that is cnc ready or a manual setup that doing it manually should carry out pretty fine. I haven't got to that point just yet of finding out as my Taig is still new in the box awaiting my purchasing of some bits and a decent vise to hold my work in place. Once I got this stuff at hand I plan to do some test runs on some scrap aluminum just to get a general feel of things to prep me a little for my lowers. Another nice thing I feel about the Taig unit is the fact that people on a budget can start off with a nice manual setup and then save up for when they are ready to go high tech cnc with it so it leaves a little room to grow more into it as time goes on and as a budget allows for more upgrade. One thing about the Taig unit is it doesn't have a electronic control setup to change speeds like some other mills out there, on the Taig you change speeds by moving the little rubber belt on the different portions of the spindles. I believe the Taig has a much nicer column as well which makes the setup a lot more stable when compared to some other mini or micro mills out there. The above is just some of the reasons why i personally purchased it. I do also plan to make me some other nice, neato non-firearm related projects as well down the line so I think I should see some great use out of it and regardless of its size I still think and feel that with taking sometime a user can most likely still make some large goodies with it given that you take minimal cuts and take your time on whatever the piece is that you are working on. |
|
|
|
[#14]
Quoted:
So given if I take the route of the 7/16" em what size and length em would I use to make my final pass so there isn't much machine marks and is nice and clean? It he deepest part of the pocket is 1.249"... So I use a Cobalt 2 Flute EM. LOC 1.5" overall 3.25" Hth.... |
|
|
|
[#15]
|
|
|
|
[#16]
Quoted:
Thanks for the reply. I watched a lot of youtube videos yesterday and have come to the conclusion that this is the best piece of equipment in this price range. I just need to find out if the CNC upgrade can be purchased and added at a later time. I can see myself making the transition from manual equipment eventually. Quoted:
Yes it can.. You can order the CNC ready version and have the Manual handles added!! That is exactly how I started.. It gave me time to learn about my machine!! A great dealer to work with is Nick Cater..Very well know in the Taig groups!! He will give 10% off on all orders! Nick Carter Taig |
|
|
|
[#17]
Hey there,
This is one of my customers and a buddy of mine... It might help some. We've got jigs and end mill/drill bit kits on hand to help you complete your lower. check us out... Jigs and Tooling Right now we're also running a special where you can purchase a 7075 lower and Jig for $199. Use coupon code "combo" |
|
|
|
[#18]
Quoted:
Hey there, This is one of my customers and a buddy of mine... It might help some. We've got jigs and end mill/drill bit kits on hand to help you complete your lower. check us out... Jigs and Tooling Right now we're also running a special where you can purchase a 7075 lower and Jig for $199. Use coupon code "combo" Thanks for the heads up. I actually had grabbed me a jig set sometime ago prior to me getting a mill and other related tooling for this project. Though the jigs you folks do looked to priced quite nicely and also looked to be some well made pieces. Thanks again for the heads up and offering. BTW the clip is also one I've watched a few times prior to me looking into this project venture. I had seen some of his other clips including the one where he gave things a shot with a Roto-Zip tool. LOLLL That thing didn't look like it would fare too well. LOLL! |
|
|
|
[#19]
Thought I should add that I'd really like to give a Big Thanks to ca_longshot on him helping me along with things. We exchanged some messages with each other and I've since ordered all of my needed bits for this project. So far things is looking up. I'm currently just awaiting a nice workbench I ordered from our local Fastenal and awaiting the purchase of a decent vise to hold things nice and secure. When I ordered my bits I made sure to order two of each bit just in case any of them were to ever snap on me during use. This was a costly venture but I figured it was a good move in case ever the need of a backup was needed.
|
|
|
|
[#20]
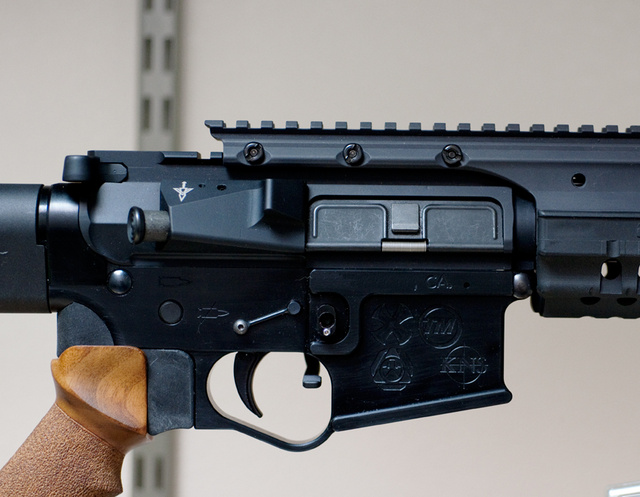
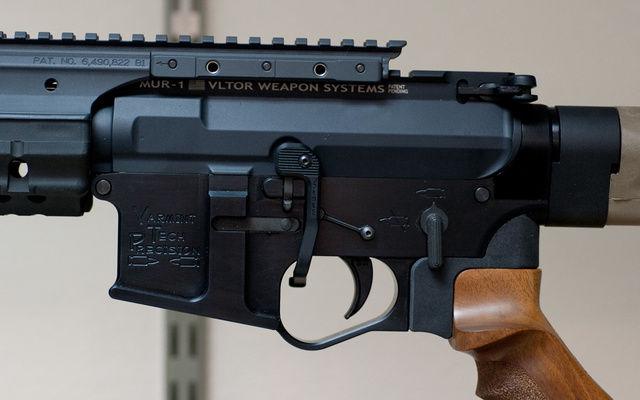
Maybe some have seen as I am also a member over on the Weapons Guild forum, but for those who haven't, just thought I would share my two lowers that will be getting the mill treatment.
http://i22.photobucket.com/albums/b345/webstat/vierra_007_front_zpscba94293.jpg http://i22.photobucket.com/albums/b345/webstat/vierra_007_rear_zpsba54300c.jpg http://i22.photobucket.com/albums/b345/webstat/vierra_gijoe_front_zps49111d01.jpg http://i22.photobucket.com/albums/b345/webstat/vierra_gijoe_rear_2_zpscaaa58fa.jpg http://i22.photobucket.com/albums/b345/webstat/vierra_gijoe_rear_zps735fb1ca.jpg I personally can't take credit for the engraving work except for the layout and themes I was after. The work was done by Greg of SureShot Precision Marking. I had gained much interest in the whole DIY gun thing after finding interest that certain things like the engravings above was something one could do when making any custom firearm. I have found that as folks could make many different firearms either from scratch or from parts one of the biggest differences from something bought already out there was the fact that one could do their very own custom markings to their pieces. This is what got me interested in things and I'm sure down the road I will do maybe two custom AR10 lowers as well. I also plan on some custom 1911's. Though only time and skill gained from these projects will tell how far I will go in this hobby or venture of mine. Given the new aspect of me having this new small mill I'm sure it will also bring some much added goodies to my other hobby which is "scale" radio control trucks and tractors. So I guess I'll now be growing more into both this new founded hobby as well as my exsisting hobby. |
|
|
|
[#21]
On a side note; here's the Mil-spec used to anodize to; "MIL-A-8625F Anodic Coatings, for Aluminum and Aluminum Alloys, with Amendment 1"
http://www.wbdg.org/ccb/FEDMIL/a8625.pdf |
|
|
|
[#22]
I have not milled my own receivers, but here's a interesting website I have come across. I believe the author is also a member of AR15.com.
http://www.ray-vin.com/frtech.htm |
|
|
|
[#23]
The GI Joe one is awesome!!
|
|
|
|
[#24]
Quoted:
Thought I should add that I'd really like to give a Big Thanks to ca_longshot on him helping me along with things. We exchanged some messages with each other and I've since ordered all of my needed bits for this project. So far things is looking up. I'm currently just awaiting a nice workbench I ordered from our local Fastenal and awaiting the purchase of a decent vise to hold things nice and secure. When I ordered my bits I made sure to order two of each bit just in case any of them were to ever snap on me during use. This was a costly venture but I figured it was a good move in case ever the need of a backup was needed. Glad I can help a fellow ar15.com member.... Btw.. once you do take the plunge into CNC... you can do the engraving too! 
|
|
|
|
[#25]
Quoted:
That is why I could use a 3/8" EM for all my milling.. Except for the trigger slot(1/4" long EM CNC adjusted for .156" radius) Can I ask why you didn't just use a 5/16 endmill? |
|
|
|
[#26]
Quoted:
Can I ask why you didn't just use a 5/16 endmill? I used a 3/8" end for economic, and logistical reasons.... 3/8" EM is a common size, available in many configuration.. But it wouldn't break the bank getting one., or require special ordering! I can also get one locally if I had to.... Another thing I should add... the Taig uses ER16 collets. So the largest Shank I can use without an adaptor.. is 3/8"!!! And with the magic of CNC, it really doesn't matter what size EM I use! Just as long as I specify the size in my program... Then the computer and mill does all the work for me!! |
|
|
|
[#27]
Quoted:
Maybe some have seen as I am also a member over on the Weapons Guild forum, but for those who haven't, just thought I would share my two lowers that will be getting the mill treatment. <a href="http://s22.photobucket.com/user/webstat/media/vierra_007_front_zpscba94293.jpg.html" target="_blank">http://i22.photobucket.com/albums/b345/webstat/vierra_007_front_zpscba94293.jpg</a> <a href="http://s22.photobucket.com/user/webstat/media/vierra_007_rear_zpsba54300c.jpg.html" target="_blank">http://i22.photobucket.com/albums/b345/webstat/vierra_007_rear_zpsba54300c.jpg</a> <a href="http://s22.photobucket.com/user/webstat/media/vierra_gijoe_front_zps49111d01.jpg.html" target="_blank">http://i22.photobucket.com/albums/b345/webstat/vierra_gijoe_front_zps49111d01.jpg</a> <a href="http://s22.photobucket.com/user/webstat/media/vierra_gijoe_rear_2_zpscaaa58fa.jpg.html" target="_blank">http://i22.photobucket.com/albums/b345/webstat/vierra_gijoe_rear_2_zpscaaa58fa.jpg</a> <a href="http://s22.photobucket.com/user/webstat/media/vierra_gijoe_rear_zps735fb1ca.jpg.html" target="_blank">http://i22.photobucket.com/albums/b345/webstat/vierra_gijoe_rear_zps735fb1ca.jpg</a> I personally can't take credit for the engraving work except for the layout and themes I was after. The work was done by Greg of SureShot Precision Marking. I had gained much interest in the whole DIY gun thing after finding interest that certain things like the engravings above was something one could do when making any custom firearm. I have found that as folks could make many different firearms either from scratch or from parts one of the biggest differences from something bought already out there was the fact that one could do their very own custom markings to their pieces. This is what got me interested in things and I'm sure down the road I will do maybe two custom AR10 lowers as well. I also plan on some custom 1911's. Though only time and skill gained from these projects will tell how far I will go in this hobby or venture of mine. Given the new aspect of me having this new small mill I'm sure it will also bring some much added goodies to my other hobby which is "scale" radio control trucks and tractors. So I guess I'll now be growing more into both this new founded hobby as well as my exsisting hobby. That's some of the sharpest engraving I have seen yet ! Very nice work, any other details...? |
|
|
|
[#28]
what cam master gibbs edgecam etc
|
|
|
|
[#29]
Quoted:
Glad I can help a fellow ar15.com member.... Btw.. once you do take the plunge into CNC... you can do the engraving too! http://photos.imageevent.com/scl_electronics/cfguns/ar15/websize/engraving.jpg http://photos.imageevent.com/scl_electronics/cfguns/ar15/websize/anodized1.jpg http://photos.imageevent.com/scl_electronics/cfguns/ar15/websize/anodized2.jpg Quoted:
Quoted:
Thought I should add that I'd really like to give a Big Thanks to ca_longshot on him helping me along with things. We exchanged some messages with each other and I've since ordered all of my needed bits for this project. So far things is looking up. I'm currently just awaiting a nice workbench I ordered from our local Fastenal and awaiting the purchase of a decent vise to hold things nice and secure. When I ordered my bits I made sure to order two of each bit just in case any of them were to ever snap on me during use. This was a costly venture but I figured it was a good move in case ever the need of a backup was needed. Glad I can help a fellow ar15.com member.... Btw.. once you do take the plunge into CNC... you can do the engraving too! http://photos.imageevent.com/scl_electronics/cfguns/ar15/websize/engraving.jpg http://photos.imageevent.com/scl_electronics/cfguns/ar15/websize/anodized1.jpg http://photos.imageevent.com/scl_electronics/cfguns/ar15/websize/anodized2.jpg Ah man that is Awesome for sure! I was not aware of good of a job mill engraving would do but it looks just as good as most deep laser engraving commonly done. |
|
|
|
[#30]
Quoted:
That's some of the sharpest engraving I have seen yet ! Very nice work, any other details...? Quoted:
Quoted:
Maybe some have seen as I am also a member over on the Weapons Guild forum, but for those who haven't, just thought I would share my two lowers that will be getting the mill treatment. <a href="http://s22.photobucket.com/user/webstat/media/vierra_007_front_zpscba94293.jpg.html" target="_blank">http://i22.photobucket.com/albums/b345/webstat/vierra_007_front_zpscba94293.jpg</a> <a href="http://s22.photobucket.com/user/webstat/media/vierra_007_rear_zpsba54300c.jpg.html" target="_blank">http://i22.photobucket.com/albums/b345/webstat/vierra_007_rear_zpsba54300c.jpg</a> <a href="http://s22.photobucket.com/user/webstat/media/vierra_gijoe_front_zps49111d01.jpg.html" target="_blank">http://i22.photobucket.com/albums/b345/webstat/vierra_gijoe_front_zps49111d01.jpg</a> <a href="http://s22.photobucket.com/user/webstat/media/vierra_gijoe_rear_2_zpscaaa58fa.jpg.html" target="_blank">http://i22.photobucket.com/albums/b345/webstat/vierra_gijoe_rear_2_zpscaaa58fa.jpg</a> <a href="http://s22.photobucket.com/user/webstat/media/vierra_gijoe_rear_zps735fb1ca.jpg.html" target="_blank">http://i22.photobucket.com/albums/b345/webstat/vierra_gijoe_rear_zps735fb1ca.jpg</a> I personally can't take credit for the engraving work except for the layout and themes I was after. The work was done by Greg of SureShot Precision Marking. I had gained much interest in the whole DIY gun thing after finding interest that certain things like the engravings above was something one could do when making any custom firearm. I have found that as folks could make many different firearms either from scratch or from parts one of the biggest differences from something bought already out there was the fact that one could do their very own custom markings to their pieces. This is what got me interested in things and I'm sure down the road I will do maybe two custom AR10 lowers as well. I also plan on some custom 1911's. Though only time and skill gained from these projects will tell how far I will go in this hobby or venture of mine. Given the new aspect of me having this new small mill I'm sure it will also bring some much added goodies to my other hobby which is "scale" radio control trucks and tractors. So I guess I'll now be growing more into both this new founded hobby as well as my exsisting hobby. That's some of the sharpest engraving I have seen yet ! Very nice work, any other details...? yeah I glass bead blasted the lowers prior to having them engraved. Both of them were deep laser engraved a little more beyond the .003 per ATF spec. I believe it took quite a few passes to get things as deep as they are. |
|
|
|
[#31]
Quoted:
I used a 3/8" end for economic, and logistical reasons.... 3/8" EM is a common size, available in many configuration.. But it wouldn't break the bank getting one., or require special ordering! I can also get one locally if I had to.... Another thing I should add... the Taig uses ER16 collets. So the largest Shank I can use without an adaptor.. is 3/8"!!! And with the magic of CNC, it really doesn't matter what size EM I use! Just as long as I specify the size in my program... Then the computer and mill does all the work for me!! Quoted:
Quoted:
Can I ask why you didn't just use a 5/16 endmill? I used a 3/8" end for economic, and logistical reasons.... 3/8" EM is a common size, available in many configuration.. But it wouldn't break the bank getting one., or require special ordering! I can also get one locally if I had to.... Another thing I should add... the Taig uses ER16 collets. So the largest Shank I can use without an adaptor.. is 3/8"!!! And with the magic of CNC, it really doesn't matter what size EM I use! Just as long as I specify the size in my program... Then the computer and mill does all the work for me!! Oh,I understand all the logistics involved,I was a Toolmaker for 25+ years.Manual and CNC,though making something yourself was always more satisfying. It's just that since the standard shank size for a 5/16 endmill is 3/8 it just makes sense to eliminate possible things to forget,such as compensating for a .156 radius using a .25 mill rather than a 5/16,which gives you a .156 rad all on it's own. Just a suggestion from an old timer. |
|
|
|
[#32]
By now you have probably jumped in with both feet, hopefully you did it, I was going to suggest you do a bunch of practice with the mini mill on some scrap blocks of aluminum, practice and practice, make some slots, do some surface work along the edges with small milling cuts, please research the two milling methods, normal and climb milling, you want to do normal milling, it's hard to explain but check it out on youtube, you will understand the first time you hit an edge the wrong way, you may not hurt anything but it will be very odd to you if you don't do some practice first on some cheap scraps. Have fun. I love it. learned on some manual machines, old school, now am using a Grizzly G0619. Oh and think about a decent vice to hold your jigs. You can have a ball on ebay.
Don't forget one important thing, you can't put metal back once you cut it off. With practice, you won't have to think about what way to turn your crank handles for X, Y and Z. I'm old school on most of my trades, learn the basics and get good at them, then take the CNC plunge oneday..... Good luck. |
|
|
|
[#33]
Another dupe post stupid computers lol !
|
|
|
 Win a FREE Membership!
Sign up for the ARFCOM weekly newsletter and be entered to win a free ARFCOM membership. One new winner* is announced every week!
You will receive an email every Friday morning featuring the latest chatter from the hottest topics, breaking news surrounding legislation, as well as exclusive deals only available to ARFCOM email subscribers.

AR15.COM is the world's largest firearm community and is a gathering place for firearm enthusiasts of all types.
From hunters and military members, to competition shooters and general firearm enthusiasts, we welcome anyone who values and respects the way of the firearm.

Subscribe to our monthly Newsletter to receive firearm news, product discounts from your favorite Industry Partners, and more.
Copyright © 1996-2024 AR15.COM LLC. All Rights Reserved.
Any use of this content without express written consent is prohibited.
AR15.Com reserves the right to overwrite or replace any affiliate, commercial, or monetizable links, posted by users, with our own.


