|
Posted: 5/27/2008 10:35:34 AM EDT
I've seen several guns with a sort of snake skin camo patern that people have done themselves and would like to give it a try. I know they lay a base coat and then use some kind of net as a stencil. Anyone have any tips for doing this?
Post pics if you feel like it |
|
|
|
[#1]
I've seen a guy who does snake-skin type patterns on rifles that looks like real snake skin. If that's what you're looking for, look through the Refinishing Forum picture thread, it's in there.
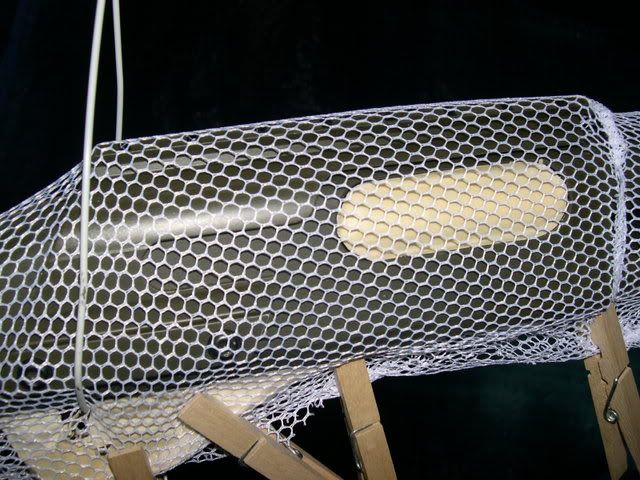
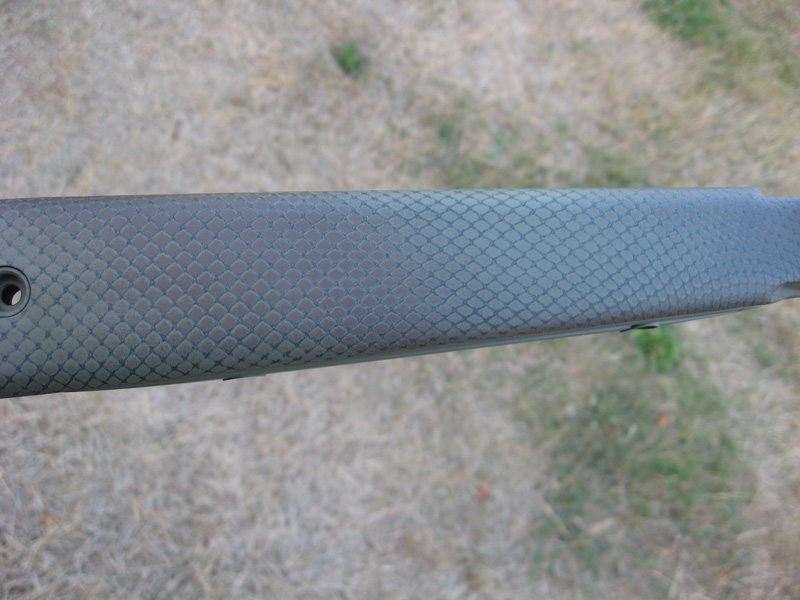
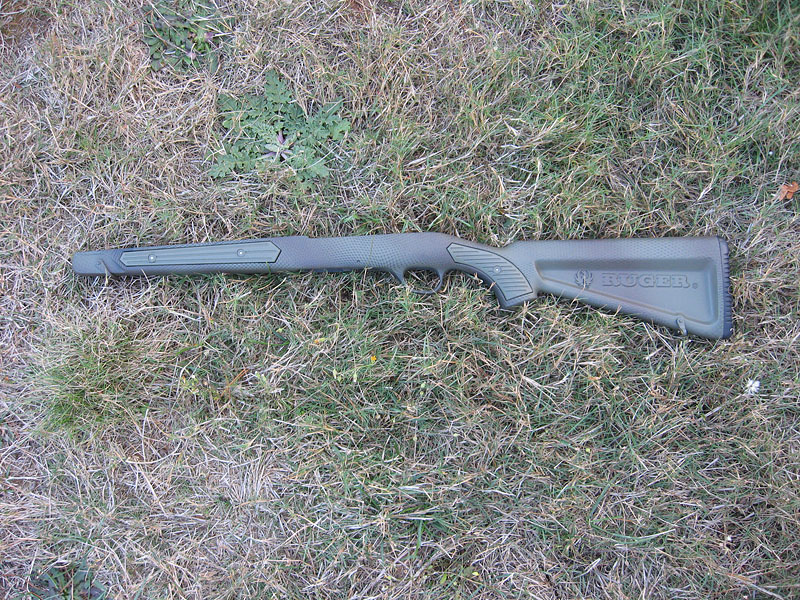
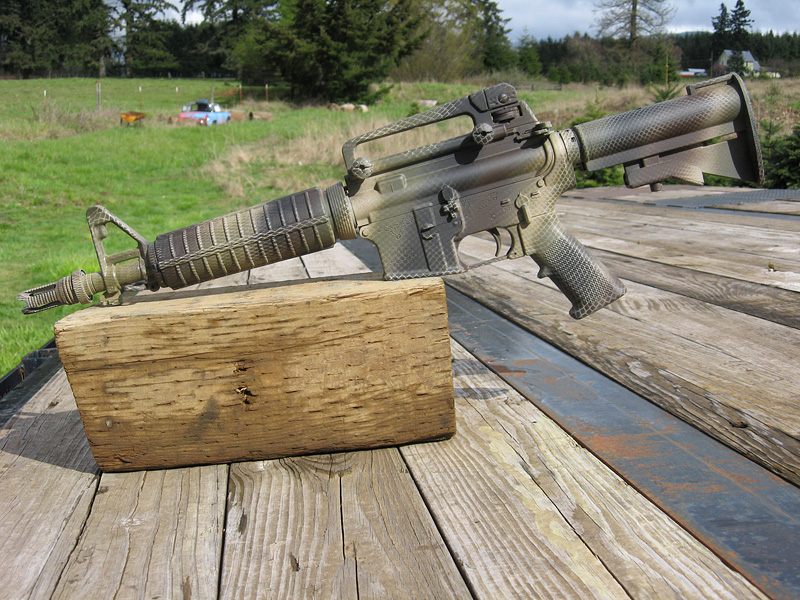
I did a variation on the "Sniper Veil" method that came out looking like snake scales. The Sniper Veil Method is where you take a sniper veil and lay it over the firearm and paint. I don't have a sniper veil--and am too cheap to buy one I put down a base coat of flat dark earth, then put the laundry bag over it. The thing under the stock (covered with laundry bag--to the left in the photo) is a Harris bipod. I wanted it to have matching camo; but I also wanted to make sure the part of the stock under the bipod would be camo'd, also (in case I took off the bipod). So I kept the bipod close and painted it at the same time; but didn't attach it until I was done.  I then sprayed VERY LIGHT coats of six different colors (Aervoe paint that I bought from Brownell's--you get a discount if you buy six), going over and over again. You can see dark colors on top of light; light on dark; brown on green, etc. etc.:   I then finished up with Duracoat Matte Clear coat to really seal the colors. (If I'd used six colors of Duracoat, it would've been pretty expensive; but by using regular paint then sealing it with Duracoat I've got the durability of Duracoat at a cheaper overall price.) Here it is right after the application of the Duracoat clear coat. It looks kind of shiny; but that's because it hasn't cured yet. This photo was taken from about five feet away and you can see how everything is blending together well at that short distance. Even further away the effect is enhanced:  I put the stock in the closet for four weeks to let the Duracoat cure, then I took it out and put the rifle together. You can see how it's a nice overall matte finish now that it has cured well. The scope is a Bushnell Elite 3200 10x40 (fixed power) with mil-dot reticle.:    If that's what you were asking about, hope it helps! |
|
|
|
[#2]
is there any kind of spray adhesive that will make the netting stick better? I tried this once and it came out looking like shit cause I couldnt get the net to stay in place or stay tight.

|
|
|
|
[#3]
I don't know. I didn't use adhesive to keep the laundry bag in place--Mean Ol' Mr Gravity held it in place for me.
The biggest thing with spray painting weapons is to do VERY LIGHT coats--whether you're doing a single color or a camo job. Before you start on a weapon, get a piece of cardboard or something and practice. Doing light coats means the colors lay on each other smoother and therefore blend easier; and the biggest thing is that by doing very light coats, if you paint something you don't like, you can just over it again with another light coat and you don't have this thick gloppy mess. If you look at the photos of the stock and hand guards--the close-ups--that's about four coats of paint, all very lightly applied on top of each other. At one point I had too much brown overall. I went back over it, no big deal. And the other thing is to just go with and have fun with it. Don't think about it needing to be perfect, because nothing in nature is perfectly square or perfectly round or perfectly striped or anything else. If you make little mistakes here and there, it'll actually make the camo better. The other thing to remember is sharp and blurry--some of the camo should have sharp edges, some blurry. If you make all of the edges sharp, the colors don't blend well and look unnatural. And one final thing: Look at the area around you. Most of the US has trees that have smallish leaves. Your camo colors should be small- to medium-sized blobs, not large blobs. If you were going to be in a jungle environment that has a lot of elephant-ear plants, then go with large- and medium-sized blobs. Don't go with all medium-sized, or all small-sized blobs, mix it up. Once again, avoid perfection and go with a certain degree of randomness, just like nature. Hope it helps--and let us see some pics when you're done! |
|
|
|
[#4]
I've done a couple.
    and 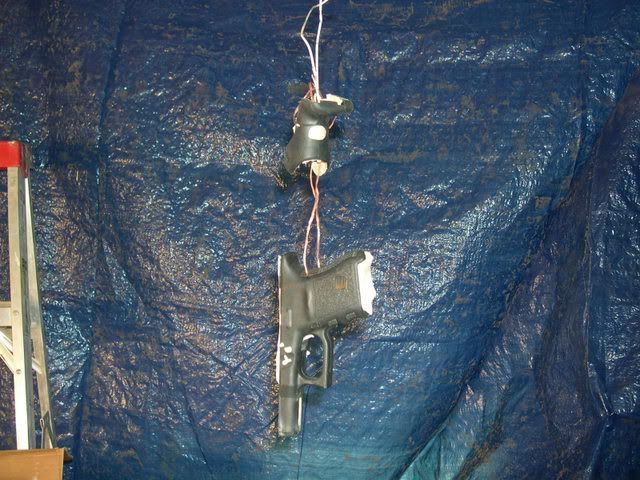 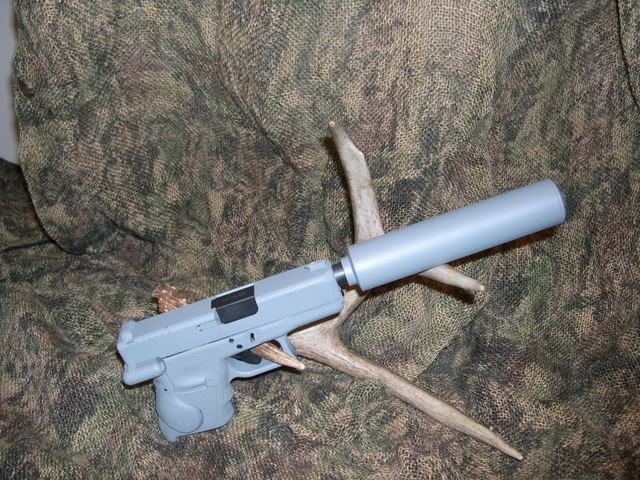 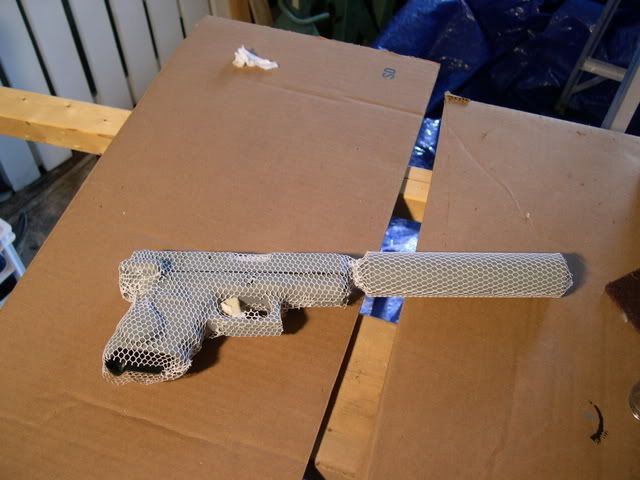 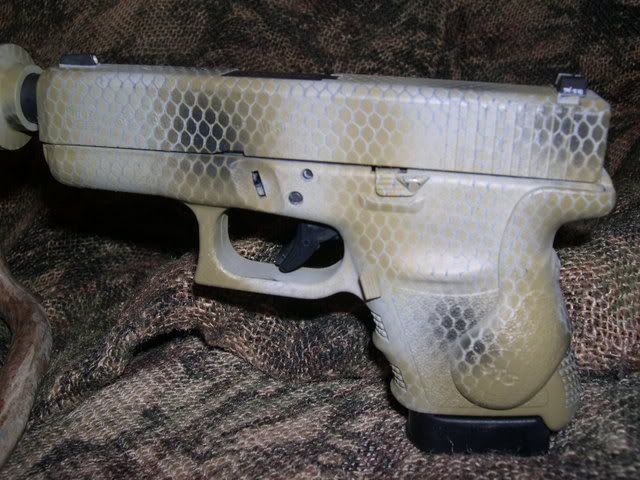 I used a $3 sports equipment bag and stencil spray adhesive on the pistol. Pmc |
|
|
|
[#5]
Looks very good, pmc1! Me likee!
|
|
|
|
[#6]
I like the clothes pin idea.
I have used thread and 'sew' it up around the item. Photo sucks 
|
|
|
|
[#7]
I've done a couple using fishnet stockings and Krylon
|
|
|
|
[#8]
ok sorry for the complete newbie questions here but i am just going to start refinishing some rifles and i want to start with the snake skin.
are these the steps: 1 - clean gun with brake cleaner (is this all?) 2 - apply base coat (like a tan color) 3 - put on snake skin template with with stencil glue 4 - let dry for 1 hr 5 - start the camo painting with drying 1 hr inbetween colors 6 - after I get the desired camo pattern then I seal it with a clear coat. 7 - bake at 110* for 1 hr so my questions: 1 - are my steps right? 2 - can I use krylon for all the colors and duracoat for the clear coat to seal it? 3 - do I ahve to tape anything off so tape won't get anywhere? |
|
|
|
[#9]
The most important step with any painting is the PREP. You've got to make sure to get ALL of the grease and oil off of your firearm. Brake cleaner works, as does Gun Scrubber, as does boiling the parts in water. The rule of thumb for me is: Once you've got it where you think it's totally de-greased, go over it one last time just to make sure. Any residual oil will mess up your paint job. By that same token, once you've got your firearm de-greased, only wear clean gloves--the oils from your hand can get on the metal or plastic and mess up the paint.
Tape off any areas that you don't want painted. Take a foam earplug (the cheap ones, the ones people use at the shooting range) and put one about 3/4 of the way down the muzzle so paint doesn't get into the bore. If you're painting a firearm with an open ejection port (FAL, AK, etc, etc) put crumpled-up newspaper (or any paper) into the receiver and LIGHTLY pushed into the chamber, then tape over it. This makes sure no paint gets into the receiver or chamber. Honestly, even with an AR I'd close the dust cover and still put some crumpled-up paper inside the receiver to make sure no paint got in the chamber. Some people will cover their serial number or brand logo with tape--that's totally a personal thing and is up to you. One thing I suggest, though, is to use the Blue Masking Tape (that you can get wherever paint is sold). It sticks well, comes off easy, and doesn't leave behind any sticky residue. I personally used Duracoat clear coat over the regular spray paint. It came out well, and provides a very durable finish to coat the paint. However, it may not work in every situation, or for every one. Duracoat is EXTREMELY durable. It's hard to get off. If you are going to change your camo for any reason down the road, I wouldn't use Duracoat clear coat. It almost impossible to get off without sand-blasting. If there's a chance that you'll want to change the camo, use regular spray-on Matte Clear spray paint that you can get at any store that sells spray paints (Lowe's, Home Depot, Wal-Mart, local paint stores, etc.) It'll do the job of protecting the camo from rubbing off; but isn't as permanent as Duracoat. The final thing is to make sure you let the paint cure properly. If you're using regular spray paints only (including regular spray-on Matte Clear coat), once you finish painting set the whole thing aside for week. If you're using any Duracoat (even if it's just Duracoat clear coat over regular paint), set it aside for 4 (four) weeks to make sure it's totally cured. If you mess around with it before the paint is totally cured, you have a good chance of chipping the paint easily. I'd follow the above cure times even if I was putting part(s) in the oven, just to make sure it's fully cured. (But then again, I'm pretty obsessive about it  ) )Hope these little tips help out. Make sure you post photos when you're finished! |
|
|
|
[#10]
what do I do to prepare the original surface besides clean it? say it's a mossberg 500 stock finish still in good condition. should I sand it down with a 1000 grit paper? sand blast it of some sorts? or jsut a good ole fashion cleaning.
also I went to wally world to get some netting. I found in the fabrics some netting. it's the perfect size holes but the material is pretty thing. you can rip it with your hands. will that thin thread allow it to bleed through too much? I tried it on a piece of wood and you couldn't tell the netting was there. but I think I put it on WAY to thick plus the wood will soak it up. probalby not a good test now that I think about it. thanks for the info. |
|
|
|
[#11]
Yeah--oops! Sanding goes under Prep, and I totally forgot it. You should LIGHTLY sandpaper whatever you're painting. You're not trying to sandpaper it like you sandpaper wood--you're not trying to get down to bare metal--just a LIGHT sanding, just enough to give the material "tooth" for the paint to adhere to. I've always sanded and then degreased; others degrease and then sand. I personally sand first because the degreasing will then wash out any of the "sawdust" the sanding makes; but either way works.
I can't say anything about Wal-Mart's netting. No experience with it. Can't help there, sorry. When you start painting your firearm, though, do VERY light coats. If you put the paint on too thick, not only does it get the "gloppy" look; but the paint tends to be shiny. Very light coats keep the paint matte/flat. Hope it helps. |
|
|
|
[#12]
Here's a thread from when I did my snake skins. Building a reflector box and using 2 halogen lamps speeds the cure time dramatically.
http://24hourcampfire.com/ubbthreads/ubbthreads.php?ubb=showflat&Board=39&Number=1289868&Searchpage=9&Main=115935&Words=PMC&topic=0&Search=true#Post1289868 Pmc |
|
|
|
[#13]
my favorite camo..i'll post pics of mine
|
|
|
|
[#14]
My wife is a Quilter and she has a temporary spray adhesive called Sulky KK 2000 that sticks her Quilts togeather for a short time so she can sew it. It's made in Germany and you can get it at most Quilting or sewing supply stores. I used it on an old 1911 parts gun I had and it came out nice.
http://i265.photobucket.com/albums/ii217/1973rrc/IMG_0580.jpg http://i265.photobucket.com/albums/ii217/1973rrc/IMG_0579.jpg http://i265.photobucket.com/albums/ii217/1973rrc/IMG_0578.jpg |
|
|
|
[#15]
has anyone done this with just rattle cans?
I am thinking of going with the snake skin route, but was wondering if it would be possible to lay down a regular camo pattern also. Not sure if that makes sense but I was thinking something like viet tiger stripe snake skin. Anyone tried this? I want to go the rattle can route for easy removal easy change. I was going to give it a try on my cheapy mossberg, but eventually I want to do one of my black rifles. Any help or more pictures as a guide? Maybe I should just start with a simple camo pattern practice with something that isn't an ammo box and work up from there. It just seems to me from looking a these pics, the snake skin really breaks up the lines well and helps blending. |
|
|
|
[#16]
Here's a link to a stock I did in a King Snake pattern.
Snake skin camo I used fish net stockings to get the scale effect with good results. 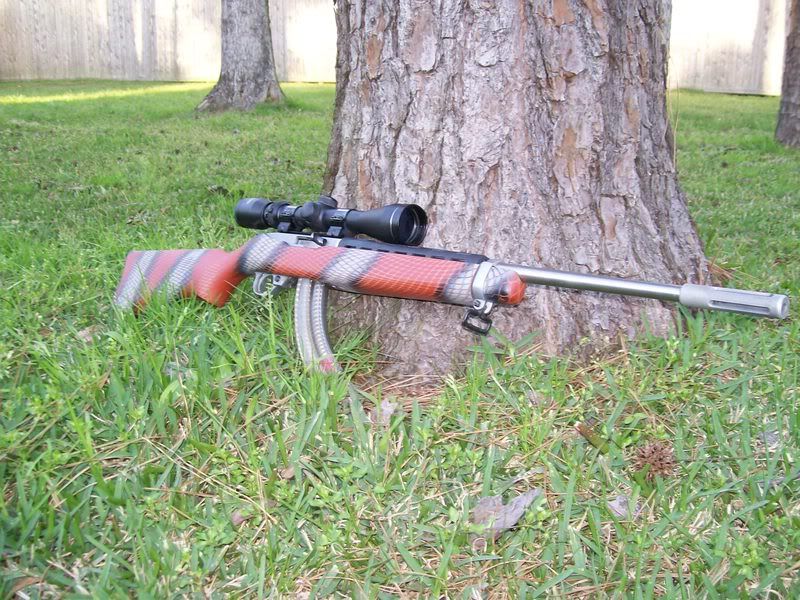 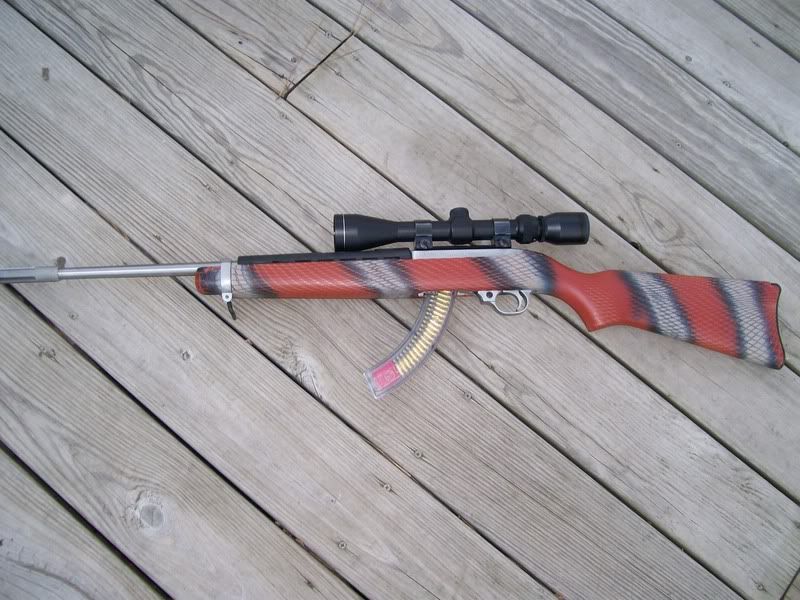 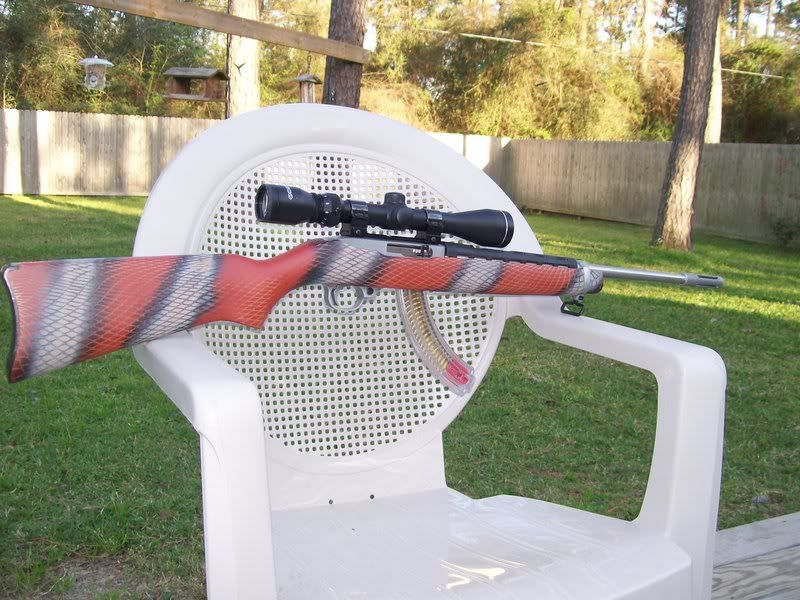 AKASL LIVE FREE OR DIE |
|
|
|
[#17]
that is awesome, did you tape off anything to get the striping done?
|
|
|
 Win a FREE Membership!
Sign up for the ARFCOM weekly newsletter and be entered to win a free ARFCOM membership. One new winner* is announced every week!
You will receive an email every Friday morning featuring the latest chatter from the hottest topics, breaking news surrounding legislation, as well as exclusive deals only available to ARFCOM email subscribers.

AR15.COM is the world's largest firearm community and is a gathering place for firearm enthusiasts of all types.
From hunters and military members, to competition shooters and general firearm enthusiasts, we welcome anyone who values and respects the way of the firearm.

Subscribe to our monthly Newsletter to receive firearm news, product discounts from your favorite Industry Partners, and more.
Copyright © 1996-2024 AR15.COM LLC. All Rights Reserved.
Any use of this content without express written consent is prohibited.
AR15.Com reserves the right to overwrite or replace any affiliate, commercial, or monetizable links, posted by users, with our own.


