|
[#1]
I imagine the number of anticipated snow days may be a factor in this decision.
Texas can be so bleeping cold, at times! |
|
|
|
[#2]
I just went through this entire thread and all I can say is WOW!
Super bummed I missed out on the Tshirts |
|
|
|
[#3]
Quoted:
I imagine the number of anticipated snow days may be a factor in this decision. Texas can be so bleeping cold, at times! 
|
|
|
|
[#4]
Update 1/3
The bridge in our mural is looking pretty fantastic. 
 Front end parts are now being cut out! 
After a fantastic brainstorming session with a couple students yesterday at lunchtime, I paid our P.E. teacher a visit to see if he would donate a couple balls for us to use. 

And the football is a phenomenal idea. The funny part is we described it as the "football" forever......and yesterday, students came up with this plan. 

A little more trimming, then we will work to cover it with some harder material, much like paper mache. 
|
|
|
|
[#5]
We also recieved this in the mail from a long ways away
 Kids will open it in about 30min. I'll take some pictures. |
|
|
|
[#6]
Quoted:
We also recieved this in the mail from a long ways away https://i.imgur.com/4tE9EAQ.jpg Kids will open it in about 30min. I'll take some pictures. /bradpitt.gif Not at my desk so these will have to suffice.
|
|
|
|
[#7]
Quoted:
We also recieved this in the mail from a long ways away https://i.imgur.com/4tE9EAQ.jpg Kids will open it in about 30min. I'll take some pictures. |
|
|
|
[#8]
Update 1/3 continued:
What's in the box?????? A huge Thank You to pilot CTP. Johnson and everyone at TF Eagle Assault for doing this for us. It's going to make an amazing addition to the display. 

The acting skills might need a little work. 


Look closely at the certificate. Kids were quick to point out actual signatures........it took them a bit to realize the flag hanging from the blackhawk. 

We've got a case planned and a frame for the certificate, and will display them in our Marine One display area. 
|
|
|
|
[#9]
That's pretty cool
|
|
|
|
[#10]
MORE!!!
Our football glued down and ready to cover with a hard shell. 
Blackhawk on the lake is turning out well. 
Nose pieces ready to position. 
Complicated shocktower base form coming together. 
Tail rotor part forming up. 
Kids were wondering how many details we were going to add to the main rotor hub.......I answered, as many as we can.


|
|
|
|
[#11]
Quoted:
Update 1/3 continued: What's in the box?????? A huge Thank You to pilot CTP. Johnson and everyone at TF Eagle Assault for doing this for us. It's going to make an amazing addition to the display. https://i.imgur.com/xa9XvaB.jpg https://i.imgur.com/GEitSSe.jpg The acting skills might need a little work.
https://i.imgur.com/R0v1ZRB.jpg https://i.imgur.com/hdemdpi.jpg https://i.imgur.com/5xsbQ9B.jpg Look closely at the certificate. Kids were quick to point out actual signatures........it took them a bit to realize the flag hanging from the blackhawk. https://i.imgur.com/smGwA5M.jpg https://i.imgur.com/c9eQRDt.jpg We've got a case planned and a frame for the certificate, and will display them in our Marine One display area. https://i.imgur.com/hK6PJqz.jpg 
|
|
|
|
[#12]
Quoted: I gotta admit, that is pretty friggin awesome...to the point of the hair on my neck standing up when the picture loaded and a lump of pride in our service men and women welling up in my throat. Wouldn't it be awesome if those fine men that flew that bird got to come meet the students at Powell and see the display first hand after they returned home? |
|
|
|
[#13]
I know I've been taunting you about the helo getting done, but you don't have to work the kids to death on their first week back.
GREAT work accomplished quickly this week, and that flag and photo totally Rock! Kids (and teacher) were probably energized with new ideas and vigor after the olidays which may wane, so I guess build while the building is good. You've got flag and notes adn patches from low space, rocky helicopters, and I forgot the other, You are going to have a museum soon whether you intended it or not. |
|
|
|
[#14]
Quoted:
Yup, had the same reaction when I saw the certificate. Quoted:
Quoted: I gotta admit, that is pretty friggin awesome...to the point of the hair on my neck standing up when the picture loaded and a lump of pride in our service men and women welling up in my throat. Wouldn't it be awesome if those fine men that flew that bird got to come meet the students at Powell and see the display first hand after they returned home? |
|
|
|
[#15]
Quoted:
I know I've been taunting you about the helo getting done, but you don't have to work the kids to death on their first week back. GREAT work accomplished quickly this week, and that flag and photo totally Rock! Kids (and teacher) were probably energized with new ideas and vigor after the olidays which may wane, so I guess build while the building is good. You've got flag and notes adn patches from low space, rocky helicopters, and I forgot the other, You are going to have a museum soon whether you intended it or not. I get excited every time we solve a difficult lingering problem, like the "footbal". |
|
|
|
[#16]
Update 1/4
Looks like we are ready to find a spot to hang these. Kids spent about 20min trying to fold the flag, and finally found a youtube video to follow to get it done. I was impressed with their determination. I picked up some sheet rock anchors today, so maybe on Monday I can get a chance to get them up.......in my free time......
 Football being skinned. Not sure how many layers we are going to get with this. We will see how it is after a couple and a day of drying out. 
Sliding door being skinned.  Our squadron logo getting some paint. I think we are planning on doing the official Marine One, and possibly the 101st up there too. 
Mural also looking nice. Little lighter on the high lights of the blackhawk. 
Starting to get out of hand........

We are working on those little folded pieces out on the ends.....how do we make them.....the holes will be tough to do well in roofing tin. 

Cockpit portion of the helicopter has now started. We got our main beam in there, and the first of the bulkheads resting in place. 

More details on the shocktower and "fender well"  Our rivet supply is about exhausted again. I ordered some before Christmas, but they are on a slow boat from China....literally.

|
|
|
|
[#17]
Quoted: We are working on those little folded pieces out on the ends.....how do we make them.....the holes will be tough to do well in roofing tin. https://i.imgur.com/kasMtsc.jpg  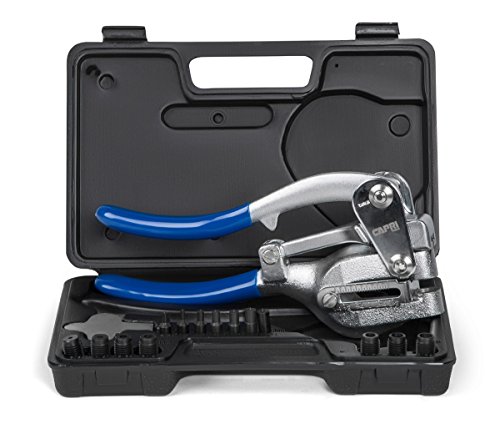
If you don't have the "Light Duty" version for leather working and fabrics/thin wood, nab one of these as well: 
|
|
|
|
[#18]
Guns,
What does your dad think about the painting of his house? |
|
|
|
[#19]
Quoted:
Guns, What does your dad think about the painting of his house? He really didn't say much when I first told him , but he hadn't heard from the insurance company yet.He got to see it in person tonight and thought it was pretty cool. I told him you had asked. Of course, he also got a positive result from the insurance claim, |
|
|
|
[#20]
Quoted: These will do what you want, if I'm understanding the question, they're VERY useful where drills aren't optimal or won't work for some other reason. www.amazon.com/dp/B00OM4GVX0If you don't have the "Light Duty" version for leather working and fabrics/thin wood, nab one of these as well: www.amazon.com/dp/B00KY3WAK6
|
|
|
|
[#21]
Quoted:
Leather punch is a decent idea, but the holes need to be 7/8" wide. Quoted:
Quoted: These will do what you want, if I'm understanding the question, they're VERY useful where drills aren't optimal or won't work for some other reason. www.amazon.com/dp/B00OM4GVX0If you don't have the "Light Duty" version for leather working and fabrics/thin wood, nab one of these as well: www.amazon.com/dp/B00KY3WAK6 Faster than a drill and far neater hole. 

|
|
|
|
[#22]
Quoted: You can get about any size if you can place an anvil/backer on it then whack it with a hammer, thin sheet metal wouldn't be a problem, as long as it's not roofing tin 14 gauge stuff. Faster than a drill and far neater hole. www.amazon.com/dp/B000Q7AVL0www.amazon.com/dp/B0002T87E0 |
|
|
|
[#23]
We've informally started discussing how to melt the plexiglass into the shape of our cockpit cabin windows.
One thing we did to help both the CAD students finish the cockpit, and give us more information on the contours was not have the lathe cut out the sections where the windows are in the cockpit. We plan to skin right over where they are, then go back and draw in the lines. We think this will help us get the proper shape, as the cut out piece could then be used as a stencil on the glass. Melting it is where we are a little lost. My thought now is we may draw out the windows, cut a slightly larger piece of glass, overlay it on the skin and heat it up, pressing it down on the skin to form. Heating it with a heat gun is the plan. Trying to cut after would be pretty difficult. 
This is all well and good if we don't set the drawing board on fire. Someone also had the idea of casting the contours, but I'm not sure how we are going to get that done accurately, and to withstand heat any better. If we are lucky enough to manage a thin layer of clay, fire it without it collapsing or warping slightly, we could easily put it in the kiln with the plexiglass and let it melt to shape with even heat. Maybe let a thicker layer of clay dry up on the frame/fuselage? Do one for each window? We are still a bit away from this but it will probably be one of the most challenging aspects of this entire project. |
|
|
|
[#24]
Quoted:
We've informally started discussing how to melt the plexiglass into the shape of our cockpit cabin windows. One thing we did to help both the CAD students finish the cockpit, and give us more information on the contours was not have the lathe cut out the sections where the windows are in the cockpit. We plan to skin right over where they are, then go back and draw in the lines. We think this will help us get the proper shape, as the cut out piece could then be used as a stencil on the glass. Melting it is where we are a little lost. My thought now is we may draw out the windows, cut a slightly larger piece of glass, overlay it on the skin and heat it up, pressing it down on the skin to form. Heating it with a heat gun is the plan. Trying to cut after would be pretty difficult.
This is all well and good if we don't set the drawing board on fire. Someone also had the idea of casting the contours, but I'm not sure how we are going to get that done accurately, and to withstand heat any better. If we are lucky enough to manage a thin layer of clay, fire it without it collapsing or warping slightly, we could easily put it in the kiln with the plexiglass and let it melt to shape with even heat. Maybe let a thicker layer of clay dry up on the frame/fuselage? Do one for each window? We are still a bit away from this but it will probably be one of the most challenging aspects of this entire project. 
|
|
|
|
[#25]
Quoted: Our rivet supply is about exhausted again. I ordered some before Christmas, but they are on a slow boat from China....literally. |
|
|
|
[#26]
Quoted: How about a diy vacuum form? Make a mold from some rigid foam, then trim to fit after its formed. All kinds of DIY videos on ebay. Use thinner plastic meant for thermoforming. I'm sure it would be useful on future projects too. www.amazon.com/dp/B0015H4B84 |
|
|
|
[#27]
Quoted:
Hopefully not this oneBoat on fire Quoted:
Quoted: Our rivet supply is about exhausted again. I ordered some before Christmas, but they are on a slow boat from China....literally. 
|
|
|
|
[#28]
That flag is made in my hometown! Keep up the great work as always!
|
|
|
|
[#29]
Quoted:
We've informally started discussing how to melt the plexiglass into the shape of our cockpit cabin windows. One thing we did to help both the CAD students finish the cockpit, and give us more information on the contours was not have the lathe cut out the sections where the windows are in the cockpit. We plan to skin right over where they are, then go back and draw in the lines. We think this will help us get the proper shape, as the cut out piece could then be used as a stencil on the glass. Melting it is where we are a little lost. My thought now is we may draw out the windows, cut a slightly larger piece of glass, overlay it on the skin and heat it up, pressing it down on the skin to form. Heating it with a heat gun is the plan. Trying to cut after would be pretty difficult.
This is all well and good if we don't set the drawing board on fire. Someone also had the idea of casting the contours, but I'm not sure how we are going to get that done accurately, and to withstand heat any better. If we are lucky enough to manage a thin layer of clay, fire it without it collapsing or warping slightly, we could easily put it in the kiln with the plexiglass and let it melt to shape with even heat. Maybe let a thicker layer of clay dry up on the frame/fuselage? Do one for each window? We are still a bit away from this but it will probably be one of the most challenging aspects of this entire project. https://www.youtube.com/watch?v=TZVz4asH9oo --Make a Form to heat and push it down to match? Maybe before you cut out the windows on the fuselage itself, so the glass fits right where the paper was. (*lots of gloves involved, attached to lots of hands *) |
|
|
|
[#30]
Quoted: We've informally started discussing how to melt the plexiglass into the shape of our cockpit cabin windows. One thing we did to help both the CAD students finish the cockpit, and give us more information on the contours was not have the lathe cut out the sections where the windows are in the cockpit. We plan to skin right over where they are, then go back and draw in the lines. We think this will help us get the proper shape, as the cut out piece could then be used as a stencil on the glass. Melting it is where we are a little lost. My thought now is we may draw out the windows, cut a slightly larger piece of glass, overlay it on the skin and heat it up, pressing it down on the skin to form. Heating it with a heat gun is the plan. Trying to cut after would be pretty difficult.
This is all well and good if we don't set the drawing board on fire. Someone also had the idea of casting the contours, but I'm not sure how we are going to get that done accurately, and to withstand heat any better. If we are lucky enough to manage a thin layer of clay, fire it without it collapsing or warping slightly, we could easily put it in the kiln with the plexiglass and let it melt to shape with even heat. Maybe let a thicker layer of clay dry up on the frame/fuselage? Do one for each window? We are still a bit away from this but it will probably be one of the most challenging aspects of this entire project.
|
|
|
|
[#31]
interesting video
 Vacuum forming...failures and success! This is more of a primer, and probably more helpful. Perhaps somewhat tedious, though.  DIY Vacuum Forming - Complete Video Guide |
|
|
|
[#32]
Update 1/7
Long busy day. New student teacher started today, and jumped right into the lessons. She even supervised the hanging of the flag, certificate, and Marine One print. We had a few minutes to discuss the support here and I showed her the thread, but did not have time to go into any depth. At some point I'd like her to read this just so she can see how important you all are to the final results of the project. 
The hydraulic hoses are about finished. 
Look closely here.  I heard Mr. Kuhn laughing all the way down the hall when the student showed him. I heard Mr. Kuhn laughing all the way down the hall when the student showed him.

It was awesome watching the students take extra time to check for the proper placement of the bulkhead frames today. They specifically stated they did not want to have to fix them later.  


All set for ribbing and skin tomorrow.  The Marine One fender well also got more attention today.
Door just about ready for windows. 
 Looking forward to tomorrow. |
|
|
|
[#33]
Hello new Student Teacher
 Be inspired by this teacher. I am. That flag is AWESOME Guns. |
|
|
|
[#34]
I thought the submarine had a lot of rivets... Didn't get the full scope until the photos above.

Have you decided on a hole creation method and a windshield bending plan yet? |
|
|
|
[#35]
Quoted:
I thought the submarine had a lot of rivets... Didn't get the full scope until the photos above.
Have you decided on a hole creation method and a windshield bending plan yet? The side windows will be an easier start, and those are moving closer to the top of our list. We are going to have a student visit the welding shop today and discuss the holes through the roofing tin with the instructor. He might have a punch set that will work. |
|
|
|
[#36]
From TN welcome new teacher
Guns has been voted bestest teacher in the world for the last 6 years or so What does she think of all the previous projects? any 1 favorite for her; at 1st glance? |
|
|
|
[#37]
Quoted:
+ 45.00 spray paint, pvc, _________________________ $2268.00 . total for materials as of 12/13 We think we may get some plywood donated to finish up the top cowlings, and cockpit sections of the helo. ______________________________ $2418.00 total as of 1/8/19 |
|
|
|
[#38]
looking good Guns!
From someone who sees them being built everyday, it is almost like looking down final assembly with the work you are doing |
|
|
|
[#39]
Quoted:
looking good Guns! From someone who sees them being built everyday, it is almost like looking down final assembly with the work you are doing |
|
|
|
[#40]
Quoted:
From TN welcome new teacher
Guns has been voted bestest teacher in the world for the last 6 years or so What does she think of all the previous projects? any 1 favorite for her; at 1st glance? |
|
|
|
[#41]
Quoted:
looking good Guns! From someone who sees them being built everyday, it is almost like looking down final assembly with the work you are doing |
|
|
|
[#42]
Update 1/8
Busy day again, but the students are getting much accomplished. Having more time to consult with students is nice. The football is getting an inside skin layer to enclose the original football skin. We decided to leave it to give a little more structure. We also laid out where the screen goes and needs cut out. 

My muralist is doing outstanding work. This gal can seriously paint. 
More and more details to the contours on the Blackhawk side shocktower cover. 
Windows being cut out of the sliding door. She added some structure to the edges later in the day. We aren't exactly sure what we have to attach to this to make it hang on the track. We may still have to add to the structure before we are all said and done. 
Some gluing to secure the blades on the tail rotor today. We did this so we could then attach out little metal brackets that will attach to the outside star that sits on top of the tail rotor shaft. 

I found a leather punch in my tools, and a student messed around to see if it would work. The punch is small, so I'm not sure we will use it, but it did work. This is about a 1/2" hole. 
We got serious about the ribbing for contours on the nose section, but we managed to upset a few folks with out noise level. I made some apologies this afternoon and told them we would only be another day or two with this.

We ended up ripping out ribs to 1/8th inch instead of 1/4". This allowed us to get better curves. 
Unfortunately, this is where we realized we should have placed the ribs along the edges of the windows, instead of just where we wanted. Much work down the drain, and starting over tomorrow. We did get the center lines mapped out late this afternoon and have a starting point tomorrow.  This was a leadership failure. 
|
|
|
|
[#43]
Quoted:
Update 1/8 Busy day again, but the students are getting much accomplished. Having more time to consult with students is nice. The football is getting an inside skin layer to enclose the original football skin. We decided to leave it to give a little more structure. We also laid out where the screen goes and needs cut out. https://i.imgur.com/wjGuq7z.jpg https://i.imgur.com/aEH3Nw0.jpg My muralist is doing outstanding work. This gal can seriously paint. https://i.imgur.com/ycV1GmJ.jpg More and more details to the contours on the Blackhawk side shocktower cover. https://i.imgur.com/T3Qm7q0.jpg Windows being cut out of the sliding door. She added some structure to the edges later in the day. We aren't exactly sure what we have to attach to this to make it hang on the track. We may still have to add to the structure before we are all said and done. https://i.imgur.com/zbMKYyU.jpg Some gluing to secure the blades on the tail rotor today. We did this so we could then attach out little metal brackets that will attach to the outside star that sits on top of the tail rotor shaft. https://i.imgur.com/zZh0vZm.jpg https://i.imgur.com/NCKV7cS.jpg I found a leather punch in my tools, and a student messed around to see if it would work. The punch is small, so I'm not sure we will use it, but it did work. This is about a 1/2" hole. https://i.imgur.com/QWv4K9q.jpg We got serious about the ribbing for contours on the nose section, but we managed to upset a few folks with out noise level. I made some apologies this afternoon and told them we would only be another day or two with this.https://i.imgur.com/CKoIO3l.jpg https://i.imgur.com/ELBQudl.jpg We ended up ripping out ribs to 1/8th inch instead of 1/4". This allowed us to get better curves. https://i.imgur.com/uNyYQ3Q.jpg Unfortunately, this is where we realized we should have placed the ribs along the edges of the windows, instead of just where we wanted. Much work down the drain, and starting over tomorrow. We did get the center lines mapped out late this afternoon and have a starting point tomorrow. https://i.imgur.com/DpAPbRP.jpg This was a leadership failure. https://i.imgur.com/1zHKu5q.jpg Just an idear on how to mount windows that aren't perfect, even if a flow simulation was done, I doubt the lines would be right. Option 2: Cut the formed window with a jigsaw usinig a blade meant for plexigass, throw good masking tape or gaffer tape (less residue than duck tape) on both sides to reduce crack tendencies. |
|
|
|
[#44]
If you watched any vacuum forming videos, don't use plexiglass. it becomes brittle and cracks. You need to use PETG.
|
|
|
|
[#45]
Quoted:
If you watched any vacuum forming videos, don't use plexiglass. it becomes brittle and cracks. You need to use PETG. We will probably play with the plexiglass first and see how much of a disister it is, and go from thrre. |
|
|
|
[#46]
Quoted:
Update 1/8 Busy day again, but the students are getting much accomplished. Having more time to consult with students is nice. The football is getting an inside skin layer to enclose the original football skin. We decided to leave it to give a little more structure. We also laid out where the screen goes and needs cut out. https://i.imgur.com/wjGuq7z.jpg https://i.imgur.com/aEH3Nw0.jpg My muralist is doing outstanding work. This gal can seriously paint. https://i.imgur.com/ycV1GmJ.jpg More and more details to the contours on the Blackhawk side shocktower cover. https://i.imgur.com/T3Qm7q0.jpg Windows being cut out of the sliding door. She added some structure to the edges later in the day. We aren't exactly sure what we have to attach to this to make it hang on the track. We may still have to add to the structure before we are all said and done. https://i.imgur.com/zbMKYyU.jpg Some gluing to secure the blades on the tail rotor today. We did this so we could then attach out little metal brackets that will attach to the outside star that sits on top of the tail rotor shaft. https://i.imgur.com/zZh0vZm.jpg https://i.imgur.com/NCKV7cS.jpg I found a leather punch in my tools, and a student messed around to see if it would work. The punch is small, so I'm not sure we will use it, but it did work. This is about a 1/2" hole. https://i.imgur.com/QWv4K9q.jpg We got serious about the ribbing for contours on the nose section, but we managed to upset a few folks with out noise level. I made some apologies this afternoon and told them we would only be another day or two with this.https://i.imgur.com/CKoIO3l.jpg https://i.imgur.com/ELBQudl.jpg We ended up ripping out ribs to 1/8th inch instead of 1/4". This allowed us to get better curves. https://i.imgur.com/uNyYQ3Q.jpg Unfortunately, this is where we realized we should have placed the ribs along the edges of the windows, instead of just where we wanted. Much work down the drain, and starting over tomorrow. We did get the center lines mapped out late this afternoon and have a starting point tomorrow. https://i.imgur.com/DpAPbRP.jpg This was a leadership failure. https://i.imgur.com/1zHKu5q.jpg For contours, have you ever played with superglue and fiberglass? lets a contoured "rib" be made in place, but accelerator helps once it's just right. This also works to fix plastic crack almost- permanently, fiberglass goes on nearly clear. |
|
|
|
[#47]
Quoted: Sharpen the punch, or get a new one of the correct size, and it won't deform the metal as much. I hit on a chunk of 2x4 or (former) self-healing mat that doesn't quite heal after a bunch of hits and get clean holes. That's with 1/16" copper, softer and a little thinner than what you're using. For contours, have you ever played with superglue and fiberglass? lets a contoured "rib" be made in place, but accelerator helps once it's just right. This also works to fix plastic crack almost- permanently, fiberglass goes on nearly clear. We may need to use that same method for around the shocktower especially and other softer, subtle contours. |
|
|
|
[#48]
Update 1/9
The "Rocket Sled" began its journey into our display today. Tomorrow we should have the remaining pieces for the front end. 
Each piece had to have the bottom cut to fit the contour as the CAD team had left them flat for us. It seemed the best chance to make this fit correctly. Unfortunately, it also means a lot of fit and cut, fit and cut. 
After fitting, they are secured to the 2x2. 

We still need tabs for the football to help secure it and allow us to take it off and one when needed. 
We tried a little fiberglashish today on the shocktower top. Tomorrow we will trim it up. 
Some paint on the main rotor hub. 
More tail rotor details. .... 


Much better planning when working around the windows of the cockpit cabin today. We still have many pieces to add, but it's starting to take shape. 

We had a little luck soaking this piece in hot watwr, then bending it to fit the top of the cabin windshield line. 
|
|
|
|
[#49]
We were informed today that we did not win the Magna Award this year.
Thank you for entering your district program, Powell High School Multi-Disciplinary Installation Artwork, in the 2019 Magna Awards. I regret to inform you that your program did not win this year. The judges had a difficult time choosing among so many worthy entries.
I encourage you to apply for next year’s awards. Regards, Kathleen Kathleen Vail Director of Publications National School Boards Association American School Board Journal
|
|
|
|
[#50]
Update 1/10
Space Shuttle Overflight! 
We also got our White House Interesting Facts graphic framed and displayed yesterday. 
|
|
|
 Win a FREE Membership!
Sign up for the ARFCOM weekly newsletter and be entered to win a free ARFCOM membership. One new winner* is announced every week!
You will receive an email every Friday morning featuring the latest chatter from the hottest topics, breaking news surrounding legislation, as well as exclusive deals only available to ARFCOM email subscribers.

AR15.COM is the world's largest firearm community and is a gathering place for firearm enthusiasts of all types.
From hunters and military members, to competition shooters and general firearm enthusiasts, we welcome anyone who values and respects the way of the firearm.

Subscribe to our monthly Newsletter to receive firearm news, product discounts from your favorite Industry Partners, and more.
Copyright © 1996-2024 AR15.COM LLC. All Rights Reserved.
Any use of this content without express written consent is prohibited.
AR15.Com reserves the right to overwrite or replace any affiliate, commercial, or monetizable links, posted by users, with our own.


