|
[#1]
Quoted:
what filament? assuming it was well stuck to the bed check your belt tension. also the sd card on these is well known crap that can cause issues a well. mine began having some weird layer shift issues and then the thermistor connector blew and just refused to read anymore. the genl board fixed it all. i had planned on upgrading the power supply to a decent one at some point as well but so far it's fine. i have not done a firmware flash on these so i am not real sure how easy it is. that is why i ordered the board preflashed. i am sure the guys on the FB page can help with that. Just download the Arduino IDE (use 1.8.5, the compiler on the newer releases is fucky). Download the firmware. Then open the .ino file in the firmware within the IDE. This will pull all of the configuration files within that directory into the same project. Finally, plug in your printer via usb and hit upload in the top left corner. If you aren’t modifying the firmware, it’s a really easy process. |
|
|
|
[#2]
Quoted:
what filament? assuming it was well stuck to the bed check your belt tension. also the sd card on these is well known crap that can cause issues a well. mine began having some weird layer shift issues and then the thermistor connector blew and just refused to read anymore. the genl board fixed it all. i had planned on upgrading the power supply to a decent one at some point as well but so far it's fine. i have not done a firmware flash on these so i am not real sure how easy it is. that is why i ordered the board preflashed. i am sure the guys on the FB page can help with that. The belt seems tight and the supplied SD card was tossed in the trash long ago. Any opinion about the MKS GEN L vs. the MKS GEN v1.4 board? They are described as being the same just the GEN L being a more economical build. |
|
|
|
[#3]
Quoted: The filament used was Esun PLA in a nice green color that matches the Tornado nicely. I use that filament just for upgrade parts. This has been the only part that has failed. The belt seems tight and the supplied SD card was tossed in the trash long ago. Any opinion about the MKS GEN L vs. the MKS GEN v1.4 board? They are described as being the same just the GEN L being a more economical build. the genl has replaceable drivers. the board i received worked perfectly and i noticed a few things improved.salmon skin was significantly reduced fan control on the control box is better, fans only run when needed not constantly from power on. fan control on hotend seems more consistent at reduced speeds. old board had issues driving the fans below 75%. genl seems to run fine down to around 45-50% speeds. extrusion seems to be much more consistent. i won't say the original board was horrible before it failed but this was an improvement for me. I did have one of the first gen machines. |
|
|
|
[#4]
OK, this is getting stupid. Before the Tornado started having problems I was printing some holiday candy dishes to give out. I printed 5 green dishes in PETG with no problems. After switching colors to red (same brand and type of a filament) everything went to shit. I moved the red PETG from the Tornado over to my Ender 2. I printed 1 red dish and I didn't like it. Not very good layer adhesion. Started printing today with a brand new roll of red PLA. After halfway through the print I noticed it layer shifted. I stopped the print, let it cool, and removed from the bed. Layer adhesion on it sucked also. Not just one or two layers but over the whole thing. Surface finished was poor also. I thought that was strange since the Ender 2 usually prints super clean prints.
|
|
|
|
[#5]
I had been using binder clips to secure the coated glass build plate to the Ender 3 heater bed as it seemed to be the common method, but I didn't like the potential for interference when the printhead traveled near the bed edges. This became more of a concern after adding a Petsfang Bullseye cooling duct.
I ended up trying some 1/2" kapton tape I had lying around from some ham radio projects. I did the corners & a few tabs along the front & back edge. So far it has been working without issue. Kapton tape can tolerate a large heat range & uses a silicon adhesive which is also heat tolerant and has been used in the past as a print bed surface. 
|
|
|
|
[#6]
Quoted:
OK, this is getting stupid. Before the Tornado started having problems I was printing some holiday candy dishes to give out. I printed 5 green dishes in PETG with no problems. After switching colors to red (same brand and type of a filament) everything went to shit. I moved the red PETG from the Tornado over to my Ender 2. I printed 1 red dish and I didn't like it. Not very good layer adhesion. Started printing today with a brand new roll of red PLA. After halfway through the print I noticed it layer shifted. I stopped the print, let it cool, and removed from the bed. Layer adhesion on it sucked also. Not just one or two layers but over the whole thing. Surface finished was poor also. I thought that was strange since the Ender 2 usually prints super clean prints. |
|
|
|
[#7]
Any idea why cura, with brim enabled, doesn't print the supports on layer 1, but starts them on layer 2.. This causes a big mess and failed prints.
Turn brim off, prints supports just fine. FWIW, cura 3.4.0 and 3.6.0 both doing it. It's an upside down box so it needs support inside. |
|
|
|
[#8]
New MKS board has been ordered. Hopefully sometime next month I can get this thing running reliably again. I want to print a V8 engine.
|
|
|
|
[#9]
Quoted:
Any idea why cura, with brim enabled, doesn't print the supports on layer 1, but starts them on layer 2.. This causes a big mess and failed prints. Turn brim off, prints supports just fine. FWIW, cura 3.4.0 and 3.6.0 both doing it. It's an upside down box so it needs support inside. They had said it would be fixed in 3.6, so you might want to start a new ticket on GitHub. They will want a saved project file from Cura (.3mf not an .STL or .gcode) to reproduce the issue. |
|
|
|
[#10]
Been playing around with tinkercad a bit. Wanted to build a shot capsule for .45 ACP. I have some commercial ones for .38 special, but no luck with finding .45.
It has taken a few iterations, but things are looking like I might get something workable. The first issue was getting a shell thin enough to shatter on firing, but thick enough to print & load. I ended up making use of the option of turning a solid item to a void & using that to define wall thickness with the basic cylinder portion of the object. The same trick with a truncated parabolic solid worked for defining the projectile end profile. I also found I could use a couple of small, very thin rectangles at right angles to insert fine line cuts on the nose to weaken it further. The base is thick enough to act as a wad & has a 2.5 mm hole for loading the shot (figure on sealing it with some hot glue). These samples are printed with PLA, not sure what material might be best for actual use. 


Cracked one open to show wall thickness 
|
|
|
|
[#11]
Broke out my ANET A8 after a long break and I'm about ready to throw it through a wall.
I can't get the bed leveling right. First the bed was warped, so i put glass on, then the glass made it impossible to level, so I flashed the Marlin firmware to use their manual leveling, now I level it dead nuts and as soon as it prints, I'm hitting the glass on one side. |
|
|
|
[#12]
Ender 3 is $180 on Woot today:
https://computers.woot.com/offers/sainsmart-x-creality-ender-3-3d-printer-1?ref=w_cnt_cdet_pc_dly_wobtn |
|
|
|
[#13]
My Ender 3 is a Sainsmart version. No complaints on how it was packaged, what was included, or the quality of the components.
I do recommend this video for a good assembly walk through:  Creality Ender 3 assembly and pro build tips |
|
|
|
[#14]
A couple of simple add-ons to the Ender 3 extruder have been pretty useful for me.
#1 was a simple knob added to the top of the stepper shaft: 
It is on Thingiverse.com: https://www.thingiverse.com/thing:2776404 (CR-10 Extruder Knob by ReplayMD) I used version 2, the high clearance one. It makes inserting/removing filament a whole lot easier. It is also a nice visual reference for filament use & makes it easy to see things like jump back if the extrusion rate is set too high. #2 was a filament guide to the extruder that makes use of a short piece of bowden tube material: 
It is on Thingiverse.com: https://www.thingiverse.com/thing:2579008 (CR-10/Ender-2 Filament Guide/Cable Holder by MasterFX) I used the 4mm version without a cutout (size should match your bowden tube OD). After printing, you insert a short piece of tubing (same size as your bowden tube) that is the actual guide. I used a scrap piece of the replacement bowden tube I installed. This guide keeps the filament free from contamination from the z axis threaded rod and at a gentle angle heading into the extruder. I beveled corners of the cable support by the extruder lever, then ran the hot end cable underneath & zip tied it to the support. I had previously tried a clip-on filament guide, but it quickly developed a very annoying squeak as filament traveled through. This one is very quiet & low drag. |
|
|
|
[#15]
I've had my Ender 3 for about 2 weeks. I was ready to throw it away until 3 nights ago.
Why? I messed around with it, and removed the bowden tube from the hotend. When I reassembled it, I didn't put it in deep enough or tight enough against the nozzle. It clogged up my hot end, and made my extruder seize up. A quick cleaning and removing the cotton insulation and going with a silicone boot and THEN doing a proper bed leveling and it is printing like a champ! I can only speak to the Ender 3 and the Makermot Replicator Plus gen 5. The Ender is like driving stick. The Makerbot is like driving a golf cart. I have my autodesk student version downloaded, and will be firing it up soon. Figure I might as well learn how to design things to pint instead of just DLing STLs to print... |
|
|
|
[#16]
Merry Christmas to me. My mamorubot build surface arrived while I was on vacation.
|
|
|
|
[#17]
you gonna like it.
|
|
|
|
[#18]
New board is not here yet but I want to print anyway. Me and PETG just don't get along. Spent all day dicking with it and I want to smash the thing with a hammer. In the end I got one good small print. An upgrade part for another printer. I had to replace everything except the heater cartridge to make the thing work. Fuck it. I'll print shit in PLA. Better but Y axis layer shifts returned to kick my ass again. A little research online says that the Y axis driver voltage needs to be raised to 1.1 volts. I'm not going to fix it until the GEN L board gets here. The mamorubot build surface adds a lot of mass so I'll change to a high torque stepper at the same time.
|
|
|
|
[#19]
something is majorly wrong. petg prints fine for me just need to turn up the a bit over pla.
i will say with cooler temps outside i am using a cover over the printer like i do with abs. it seems a bit more sensitive to ambient air temps than pla. |
|
|
|
[#20]
Played around with doing some lithophanes in white PLA over the weekend. Made the wife very happy with one done from an old pic of her with her mom (now deceased), brother & sister when all the kids were all pre-teen. Ended up having to do two more copies for her siblings. Check out this site for making .stl from a .jpg original.
http://3dp.rocks/lithophane/ Cura can also do the job, but the site above makes it easy to add a base and/or frame or to do a curved one without having to do any post processing Since I had more PLA & PETG filament come in, I wanted something for storage. I got a couple of Gamma lids for the 5 gallon utility buckets you get from the building or tractor supply places & picked up a pound of desiccant packs to throw in the buckets with the spools. I also appropriated the "spare" round dehydrator (american harvest) & modified a half dozen trays so I can use it to dry out a spool or two if they get "soggy". It was just a matter of cutting out the center portion of the trays, then sealing trays to base with some packing tape. It hasn't been used for a couple of years so no complaints from the wife. |
|
|
|
[#21]
When I'm printing I have a space heater in the room to make sure the room stays at 70f -75f. Nozzle temp at 250 and the bed at 80. After the 6th layer I turn down the fan to 40%. I'm looking at a failed part right now. It was about 1cm from finishing and just stopped extruding. In another part of the print, it's missing just part of one layer. Also had several instances of no layer adhesion to the previous layer. Came home several times today to a big birds nest. I've printed a lot of stuff this past year with no issues but lately I have had bad karma. I wonder what I have done to piss off the universe.
|
|
|
|
[#22]
you octoprint or astroprint. lets you control and monitor the printer from your phone. no more massive chaos models
|
|
|
|
[#23]
Definitely a challenge learning both the printer and the vagaries of design software. Made an old time vernier radio knob with a 5-1 planetary gear reduction. The gears and dial were a learning experience. Found a good reference for gears here:
https://khkgears.net/new/gear_knowledge/gear_technical_reference/calculation_gear_dimensions.html And a site where you can generate a dxf file of a spur gear: http://www.me-bac.com/index.php?task=gear The dial was also a challenge. Markings have to be drawn on a plane tangent to the cone and wrapped around the dial. It came out looking good. 2 1/2 turns of the knob moves the dial from 0 - 100. |
|
|
|
[#24]
Quoted:
Definitely a challenge learning both the printer and the vagaries of design software. Made an old time vernier radio knob with a 5-1 planetary gear reduction. The gears and dial were a learning experience. Found a good reference for gears here: https://khkgears.net/new/gear_knowledge/gear_technical_reference/calculation_gear_dimensions.html And a site where you can generate a dxf file of a spur gear: http://www.me-bac.com/index.php?task=gear The dial was also a challenge. Markings have to be drawn on a plane tangent to the cone and wrapped around the dial. It came out looking good. 2 1/2 turns of the knob moves the dial from 0 - 100. https://www.AR15.Com/media/mediaFiles/428674/20181228_090232_jpg-793036.JPG |
|
|
|
[#25]
Anyone have any advice for installing a BLTouch on an Ender 3?
|
|
|
|
[#26]

|
|
|
|
[#27]

|
|
|
|
[#28]
Quoted:
Bought my son an Ender 3 Pro for Xmas. I'll be referencing this thread quite abit I'm sure. My 3d printer is a forge and anvil, this new tech is witchcraft to me but it does seem to be something that can be extremely useful. 
This is really cool and I appreciate this thread. Now the question is, where do if find the AR prints I have heard about? |
|
|
|
[#29]
Quoted:
Played around with doing some lithophanes in white PLA over the weekend. Made the wife very happy with one done from an old pic of her with her mom (now deceased), brother & sister when all the kids were all pre-teen. Ended up having to do two more copies for her siblings. Check out this site for making .stl from a .jpg original. http://3dp.rocks/lithophane/ Cura can also do the job, but the site above makes it easy to add a base and/or frame or to do a curved one without having to do any post processing Since I had more PLA & PETG filament come in, I wanted something for storage. I got a couple of Gamma lids for the 5 gallon utility buckets you get from the building or tractor supply places & picked up a pound of desiccant packs to throw in the buckets with the spools. I also appropriated the "spare" round dehydrator (american harvest) & modified a half dozen trays so I can use it to dry out a spool or two if they get "soggy". It was just a matter of cutting out the center portion of the trays, then sealing trays to base with some packing tape. It hasn't been used for a couple of years so no complaints from the wife. |
|
|
|
[#30]
Quoted:
Is there a video tutorial on how to do this? This one has a guy that shows an example of using the 3dp.rocks website I linked. He ends up doing one that nearly max's the CR10 build volume & took 40+ hours ... 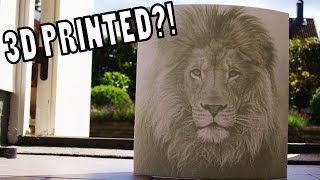 3D Printing Your Photos - Lithophanes |
|
|
|
[#31]
Quoted:
My son got an Ender 3 for Christmas and he set up the fiddly bits by himself after we got it assembled. 3 hours in he was already trying to find CAD software to design his own parts. I figured it would take a couple of weeks to make it to that point.
This is really cool and I appreciate this thread. Now the question is, where do if find the AR prints I have heard about? |
|
|
|
[#32]
Quoted:
There's a bunch out there, showing multiple ways to do them (lithophanes). This one has a guy that shows an example of using the 3dp.rocks website I linked. He ends up doing one that nearly max's the CR10 build volume & took 40+ hours ... Quoted:
Quoted:
Is there a video tutorial on how to do this? This one has a guy that shows an example of using the 3dp.rocks website I linked. He ends up doing one that nearly max's the CR10 build volume & took 40+ hours ... |
|
|
|
[#33]
Well I'm on my 2nd parts cooler plenum. I had previously been using the PetsFang Bullseye which used the stock part cooling fan (one of the configurations from here https://www.thingiverse.com/thing:2759439). I had initially thought to use one of his configurations with either 1 or 2 5015 blower fans, but ran across an alternative configuration by RaffoSan that makes hot end access easier and was a quicker print : (https://www.thingiverse.com/thing:2767047) along with his mount for the stock hot end fan (https://www.thingiverse.com/thing:2612897).
The difference in mounting between the two systems is that the PetsFang uses a hot end fan mount attached to the hot end carrier as the base for attaching the part cooling plenum. In the RaffoSan design, the part cooling plenum is mounted to the carriage (you have to dismount the hot end to do the install). The hot end fan mount snaps on/off the hot end heat sink without tools, which makes it easy to have unobstructed access to the hot end for maintenance & no need to remove the parts cooler plenum, which can stay in place. 
The bar across the front is a re-mix of the author's optional stabilizer bar that I modified to make a mounting point for a dial indicator for bed adjustments. The plenum & hot end fan mount were printed in blue PETG, the cross bar was done later in black PLA. So far, it looks like use of dual fan cooling has reduced the fine, spiderweb, stringing I have been seeing. It also appears to have caused the bed to become cooler (per the point & shoot IR thermometer) to the point I needed to compensate with the bed temp setting. Printing PLA on glass, I turn off the fans for the initial layer & then let it ramp up over the first 8 layers or so. |
|
|
|
[#34]
I'm just waiting on the 3D printed Tyler-T-grip for a K frame...please
|
|
|
|
[#35]
Got the new MKS board in and flashed the firmware. Hit the power switch and it is DRT
ETA - I don't know if it is the only issue but there is no voltage coming out of the power supply. |
|
|
|
[#36]
Anyone know of an offline free modeling software?
|
|
|
|
[#37]
Quoted:
Anyone know of an offline free modeling software? FreeCAD : https://www.freecadweb.org/ Matter Hackers MatterControl : https://www.matterhackers.com/store/l/mattercontrol/sk/MKZGTDW6 Blender : https://www.blender.org/ Autodesk Fusion 360 (free hobbyist license available, offline operation will not have access to files stored in A360) are the first that come to mind ... |
|
|
|
[#38]
If anyone is interested in using Gamma Seal lids for air tight filament storage & has a local Tractor Supply Co. store nearby, there is currently a sale on that lets you buy white lid sets for $5 each w/free ship to store. I just picked up 4 more. Lid + bucket + desiccant makes for dry filament...
https://www.tractorsupply.com/tsc/product/gamma2-seal-white-lid-4122p-1289326 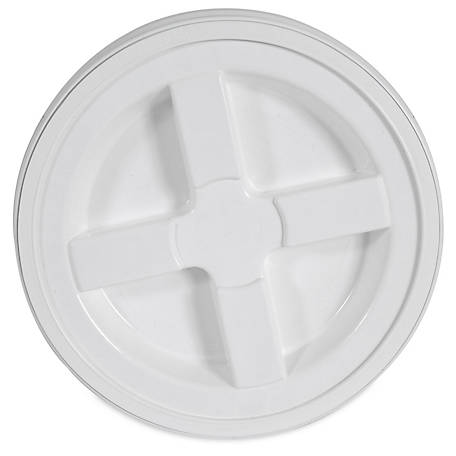
|
|
|
|
[#39]
Been dicking with the Tornado for awhile today. Power supply is changed and it fires right up. I did have to reverse the plugs going to the display. I'm down to one issue. No movement in the extruder. I really hope I don't have to pull the board again but I'm sure I'm going to have to. I will say though that the 2208 drivers are super quiet. That's going to be nice.
|
|
|
|
[#40]
Finally! The printer is running again. I have a bed leveling marvin printing right now. Everything seems to be running in the right direction. This ordeal has been a lot more of a pain in the ass than it needs to be. Such is my luck.
|
|
|
|
[#41]
I had picked up some cheap ($13 for 4) digital hygrometers via Amazon (https://www.amazon.com/gp/product/B07DHRRZHF/ref=oh_aui_detailpage_o04_s00?ie=UTF8&psc=1) to add to the Gamma Seal lids on the buckets where I'm storing filament. I just cut out an appropriate opening & popped them in, adding a little hot glue as an airtight seal. The sensor air intake is on the underside of the meter. Figured it would make for less need to open buckets up to check desiccant condition.
 The other thing I got done was something to appease SWMBO. I've been dealing with cold like symptoms since right around Christmas that later turned into a nice sinus infection I'm still getting over. The wife is convinced it was from lots of hours working near the Ender 3 while it was printing & being affected by the "fumes" from the (mostly) PLA I've been using. To keep the peace (hopefully) I whipped up a foam board enclosure with an exhaust fan into a combo filter (particulate filter + activated charcoal). About as simple as construction gets. The panels are joined/sealed with packing tape on all joints, as is the perimeter of the filter unit on top. I can close the doors, seal their perimeter with some wide masking tape & crank up the exhaust fan to put a slight amount of negative pressure on the box. If needed, it lifts right off the printer.  
Who knows, it may actually do some good ... |
|
|
|
[#42]
I saw a vid on building an enclosure out of a cheap IKEA table. Looked pretty cool.
That's a neat light. What is it? |
|
|
|
[#43]
It's a 10 watt landscape (water resistant) LED flood that runs off 120v, left over from an old project that ended up using a 12v version. It is attached with a couple of 5mm allen head bolts w/the nuts fed into a channel on the top extrusion from the end. Like I said, the foam enclosure was a quickie solution to make the wife happy without having to wait on materials. I probably will end up doing something like the stacked IKEA table enclosure with some plexi-glass or polycarbonate sides & doors + a better fan & filter system with multiple layers of HEPA & activated charcoal (this was just a salvaged PC power supply fan & a desktop air filter refill).
|
|
|
|
[#44]
|
|
|
|
[#45]
Frickin' Tornado is fixing to be taken apart for parts. Shit started going south last November with random layer shifts. Then the board died. Got the board changed and then the power supply died. Replaced that and got a few of the best prints this thing has ever done. Now the big problem is under extrusion. It started off light but got worse and worse. I've changed nozzles several times and changed the bowden tube. No clogs in the hot end that I can find. Even with my FLOW turned up to 200 I can't get a good print. To make things worse, my Ender 2 has just started showing signs of under extrusion.
|
|
|
|
[#46]
Quoted:
Ordered a bunch of 2020. Going to do a scratch build on a triple purpose - Printer, CNC, Laser. I'll post pics as I go along. |
|
|
|
[#47]
what filament and settings?
got pics of some failed prints? one of the hardest things i found on the tornado is getting the bed level. the bed tends to warp under the spring tension on the corners which causes layer issues that only seem to get worse as it goes up. i also found i tend to run the heat about 5-10 degrees hotter than recommended on the hot end or i get weird layer issues and extrusion problems. have you checked the tension on the extruder itself? i have had issues with the tension spring loosening over time causing the filament to slip on the gears without making any noise. i replaced the spring in it with a better spring and that went away. did you do the extruder calibration with the new board? |
|
|
|
[#48]
Quoted:
what filament and settings? got pics of some failed prints? one of the hardest things i found on the tornado is getting the bed level. the bed tends to warp under the spring tension on the corners which causes layer issues that only seem to get worse as it goes up. i also found i tend to run the heat about 5-10 degrees hotter than recommended on the hot end or i get weird layer issues and extrusion problems. have you checked the tension on the extruder itself? i have had issues with the tension spring loosening over time causing the filament to slip on the gears without making any noise. i replaced the spring in it with a better spring and that went away. did you do the extruder calibration with the new board? 
Top is FLOW at 150 Bottom is FLOW at 200 Was having similar issues with eSun PLA PRO and Hatchbox PETG |
|
|
|
[#49]
have you tried and e-step calibration? any chance you have some petg clogged in there?
|
|
|
|
[#50]
I took the hotend assembly apart and soaked the metal parts in MEK for an hour then took the torch to it. t looked clean with a magnifying glass.
ETA - I did calibrate when the new board was installed. Just now I had the printer extrude 100mm of filament 3 times. I got 90mm, 95, and 100mm. 
|
|
|
 Win a FREE Membership!
Sign up for the ARFCOM weekly newsletter and be entered to win a free ARFCOM membership. One new winner* is announced every week!
You will receive an email every Friday morning featuring the latest chatter from the hottest topics, breaking news surrounding legislation, as well as exclusive deals only available to ARFCOM email subscribers.

AR15.COM is the world's largest firearm community and is a gathering place for firearm enthusiasts of all types.
From hunters and military members, to competition shooters and general firearm enthusiasts, we welcome anyone who values and respects the way of the firearm.

Subscribe to our monthly Newsletter to receive firearm news, product discounts from your favorite Industry Partners, and more.
Copyright © 1996-2024 AR15.COM LLC. All Rights Reserved.
Any use of this content without express written consent is prohibited.
AR15.Com reserves the right to overwrite or replace any affiliate, commercial, or monetizable links, posted by users, with our own.


