IN, USA
|
[Last Edit: RedZ06Vette]
[#1]
Supposedly my SF 97 is going to arrive tomorrow.
I finally started to try to research some unit information on the 998. The right front corner says 38 AVN BDE under the black spray paint, and they never covered the US ARMY NG2V10 on the inside of the A-pillars. So, it looks like it came from the Indiana National Guard's 38th Infantry Division Combat Aviation Brigade. I'm not sure on the 2V10 part yet. Edit: Now I don't feel so bad about my horn being weak. |
|
|
|
[#2]
Originally Posted By RedZ06Vette:
Supposedly my SF 97 is going to arrive tomorrow. I finally started to try to research some unit information on the 998. The right front corner says 38 AVN BDE under the black spray paint, and they never covered the US ARMY NG2V10 on the inside of the A-pillars. So, it looks like it came from the Indiana National Guard's 38th Infantry Division Combat Aviation Brigade. I'm not sure on the 2V10 part yet. Edit: Now I don't feel so bad about my horn being weak. Cool you got the markings figured out! The "US ARMY NG2V10" is just your truck's registration number. Should also be listed on your data plate. Even though it may seem like it, the "NG" part does not stand for "National Guard". |
|
|
|
|
[#3]
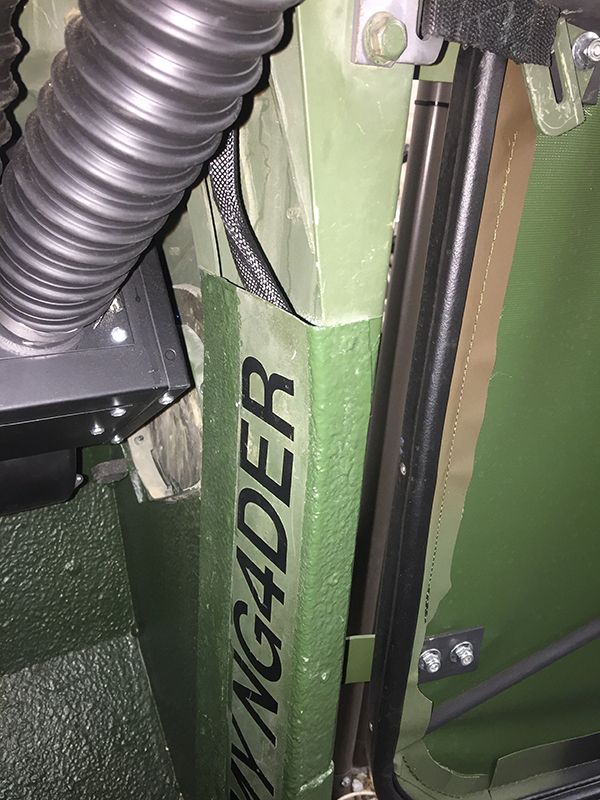
I has been a busy two weeks with picking up the slantback kit, fitting it all in the garage and finding time to work on the HMMWV. Found some neat things this weekend. First was a log book that was wedged under the passenger seat when I removed it from the base. Will post pics of it later, but has stuff from Afghanistan. The other thing I found was the marking on the sponson for the slantback. If anyone has any ideas as to what unit it belongs to let me know. I think it says RAIPEOS. Per the guy I got it from, it came out of Fort Hood same as my HMMWV.

Since I had time yesterday and today and prepped and applied the Lizard Skin. Spent a ton of time cleaning again, taping, taping a lot more, and then wiping down again. But it came out nice. It will be another week before I get to the bedliner part and then a few days after that until I start assembling. 

|
|
|
|
|
[#4]
Originally Posted By jake-cutter:
I has been a busy two weeks with picking up the slantback kit, fitting it all in the garage and finding time to work on the HMMWV. Found some neat things this weekend. First was a log book that was wedged under the passenger seat when I removed it from the base. Will post pics of it later, but has stuff from Afghanistan. The other thing I found was the marking on the sponson for the slantback. If anyone has any ideas as to what unit it belongs to let me know. I think it says RAIPEOS. Per the guy I got it from, it came out of Fort Hood same as my HMMWV. <a href="http://s208.photobucket.com/user/jake-cutter/media/IMG_20161017_192706_resized_20161031_054646235.jpg.html" target="_blank">http://i208.photobucket.com/albums/bb304/jake-cutter/IMG_20161017_192706_resized_20161031_054646235.jpg</a> Since I had time yesterday and today and prepped and applied the Lizard Skin. Spent a ton of time cleaning again, taping, taping a lot more, and then wiping down again. But it came out nice. It will be another week before I get to the bedliner part and then a few days after that until I start assembling. <a href="http://s208.photobucket.com/user/jake-cutter/media/IMG_20161031_151230_resized_20161031_054711438.jpg.html" target="_blank">http://i208.photobucket.com/albums/bb304/jake-cutter/IMG_20161031_151230_resized_20161031_054711438.jpg</a> <a href="http://s208.photobucket.com/user/jake-cutter/media/IMG_20161031_151237_resized_20161031_054712086.jpg.html" target="_blank">http://i208.photobucket.com/albums/bb304/jake-cutter/IMG_20161031_151237_resized_20161031_054712086.jpg</a> You've definitely been hard at work! Isn't prep work fun! Looking forward to the pics of the book. That sounds like a very cool find! That big marking is pretty awesome too. Could it possibly be "RAIDERS"? A Co 1-6 INF Raiders skull is really close and 1-6 is based out of Ft. Bliss, TX. Did you end up going with both Lizard Skin products? |
|
|
|
|
[#5]
I sorted through all of the Grade 8 nuts, bolts and washers this weekend - while sorting through all of it, I found most (definitely not all) of the gun-roof hardware if anybody wants it.
|
|
|
|
|
[Last Edit: jake-cutter]
[#6]
Originally Posted By Ryan_Ruck:
Did you end up going with both Lizard Skin products? I found out Lizard Skin is made locally to me so I called and talked to their tech department. They recommended the Sound Insulation on the entire tub, but only the Ceramic Insulation on the firewall, front floor boards, and tunnel as well as the roof. This is what they recommend for older Jeeps without AC. He said that the Ceramic insulation does a great job at keeping heat out, but can also keep heat in like an oven so only putting where there was direct heat was the recommendation. He also said the Monstaliner will have some of the same properties as the Lizard Skin and reduce sound and temps. Almost eluded that there is no extra benefit to the Ceramic when applying all 3, but I sprayed about 2 gallons where there is direct heat. The sound insulation is easy to apply and only needed about 3 gallons, but the ceramic required more air and was harder to spray and feather into the areas where I was not applying it. Plus cleaning the ceramic off of the gun seemed harder or I was just tired from 4 days of painting. |
|
|
|
|
[#7]
Originally Posted By jake-cutter:
I found out Lizard Skin is made locally to me so I called and talked to their tech department. They recommended the Sound Insulation on the entire tub, but only the Ceramic Insulation on the firewall, front floor boards, and tunnel as well as the roof. This is what they recommend for older Jeeps without AC. He said that the Ceramic insulation does a great job at keeping heat out, but can also keep heat in like an oven so only putting where there was direct heat was the recommendation. He also said the Monstaliner will have some of the same properties as the Lizard Skin and reduce sound and temps. Almost eluded that there is no extra benefit to the Ceramic when applying all 3, but I sprayed about 2 gallons where there is direct heat. The sound insulation is easy to apply and only needed about 3 gallons, but the ceramic required more air and was harder to spray and feather into the areas where I was not applying it. Plus cleaning the ceramic off of the gun seemed harder or I was just tired from 4 days of painting. That was generally my experience with both products too. The Ceramic was definitely more challenging to work with. Honestly, I'd rather go with the overkill on application of products since these trucks need as much help as they can get. After putting a couple thousand miles on my truck, once I get the exterior painted, I'm actually thinking of adding some butyl mat insulation to the engine bay and underside of the drivetrain tunnel to help mitigate heat and sound even more. |
|
|
|
|
[#8]
I agree anything for sound and heat is needed. I have been meaning to pick up a horse stall mat from Tractor Supply. The 4X3 or 4x6 should fit well in the back as I think the rear is 49-50" wide, this should help to reduce road noise in the rear. |
|
|
|
|
[#9]
Obviously they're our trucks and we're free to do as we please to personalize them, but I really don't get the deal of "anything for sound and heat is needed". I live in Georgia - a rather balmy place as well and the heat isn't oppressive. I have fresh insulation in my truck and it's really not what I would describe as horrible. The sound? Even H1's are loud vehicles. You can take the edge off, but there's only so much that you can do.
I look at these as unusual, but not exactly rare vehicles now - but who's to say what they'll be in 25 or 50 years. While I don't try to keep things specific to "as issue", I also don't want to do any permanent mods to the vehicle that isn't reversible, like covering it in bedliner, drilling holes in it or whatever. Even a rusty but running Ford GPW or Willy's MB is worth a lot more than one that was turned into a half-ass rock crawler - and there were a hell of a lot more of those made than humvees. Again, to each his own with our personal property and my opinion is worth exactly what you paid for it - but I don't exactly see the big deal either. |
|
|
|
|
[Last Edit: Ryan_Ruck]
[#10]
Originally Posted By jake-cutter:
I agree anything for sound and heat is needed. I have been meaning to pick up a horse stall mat from Tractor Supply. The 4X3 or 4x6 should fit well in the back as I think the rear is 49-50" wide, this should help to reduce road noise in the rear. Originally Posted By jake-cutter:
I agree anything for sound and heat is needed. I have been meaning to pick up a horse stall mat from Tractor Supply. The 4X3 or 4x6 should fit well in the back as I think the rear is 49-50" wide, this should help to reduce road noise in the rear. I'm actually really glad you posted that. I've been looking at mats on and off. While I like the Monstaliner especially for the color match and its toughness, it's a lot less tacky than I'd like and things have a tendency to slide around on it. I'll have to stop by my local TSC and check these out. Originally Posted By Lawman734:
Obviously they're our trucks and we're free to do as we please to personalize them, but I really don't get the deal of "anything for sound and heat is needed". I live in Georgia - a rather balmy place as well and the heat isn't oppressive. I have fresh insulation in my truck and it's really not what I would describe as horrible. The sound? Even H1's are loud vehicles. You can take the edge off, but there's only so much that you can do. I look at these as unusual, but not exactly rare vehicles now - but who's to say what they'll be in 25 or 50 years. While I don't try to keep things specific to "as issue", I also don't want to do any permanent mods to the vehicle that isn't reversible, like covering it in bedliner, drilling holes in it or whatever. Even a rusty but running Ford GPW or Willy's MB is worth a lot more than one that was turned into a half-ass rock crawler - and there were a hell of a lot more of those made than humvees. Again, to each his own with our personal property and my opinion is worth exactly what you paid for it - but I don't exactly see the big deal either. I know exactly where you're coming from and it's definitely a very valid point. Hell, it's a point of debate surrounding nearly any classic car with even big name guys like Foose and Coddington (when he was still alive) catching shit for "butchering" classics. Do you leave the patina, restore to like factory new, restomod, or mod all out? It's the 9mm vs .45 never ending debate of the car world! I'm kind of of the mindset though that if these trucks ever become that desirable, considering the miracles I've seen pulled off on burned out or rusted out hulks of rare cars, someone will work to restore it. Holes in aluminum can be TIG'd over. Tubs can be stripped of bedliner down to the bare metal with enough effort. And not only are there a ton of current repair parts on the surplus market but if they ever dry up and these ever reach a high level of rarity/desirability, companies like YearOne will step in. Hell, you can literally build a classic Camaro from scratch through them. I do try to keep your mindset in the back of my mind and keep my mods to a relatively low impact in that they could be undone by someone motivated enough. You won't see me doing like I've seen some do with the bobbed or stretched Deuces or 5 tons, heavy chassis/body chopping mods and the like (though I do think those look cool and have their own place). On a different note, after you posted that impact set and my giving it some serious thought, I did some looking around, bit the bullet, and picked up one too. Ended up being $30 more than you paid but it was literally brand new still in its original cardboard box with NSN label and Mylar storage bag. It just got here today and holy cow the case is huge! And heavy! I think the shipping weight was listed as 70lbs with FedEx. I guess a big chunk of that is the torque multiplier that comes with it. Even though it was new, when I unpacked it, I heard some plastic rattling around inside the driver. Found the plastic piece behind the cooling fan between the motor was broken into several pieces. No idea how that happened as the box was completely undamaged. I didn't want to deal with a return since shipping it back probably would have been expensive and the guy only had a couple listed so, I carefully disassembled it enough to get the pieces out. Doesn't seem to affect function without it in there. What pushed me to dropping the money was thinking back on how little fun it was rotating my tires in the comfort of my driveway and with even having an impact gun. Then I remembered back to the time I had to change a flat on my Econoline service van and how much it sucked undoing and reinstalling 8 lugs with a wrench on the side of the road. I suspect should I ever have to need it, I'll be very glad I spent the money. I'm going to test it out once my new tires show up. Like you, I definitely want to repackage it so it can fit under one of the rear seats. I'd like to find some sort of watertight bag/container though so I don't have to worry about it getting wet if I'm in deep enough water. |
|
|
|
|
[Last Edit: Lawman734]
[#11]
Ryan - you're absolutely right regarding the "how far do you take it" mentality and I don't disagree at all. I guess I just don't find the heat to really be an issue and while I don't disagree about noise, I'll be using dynomat in the tunnel versus spraying all that in the truck. I'll probably also get some horsemat for the bed of the GMV simply because anything you put in the bed tends to bounce around and make a racket.
Good score on the impact! I've determined that mine is brand new as well - no cardboard box, but undeniably new and unused. I'd still say the price you paid was very fair - I think I got the deal I did simply because I was there with cash and the guy was willing to be more negotiable considering we were like minded people at a mil vehicle rally. I haven't used mine yet, but it'll get a lookout for sure on Friday. I've been told that these aren't very good on big stuff like deuces and five-ton''s, but should be adequate for a humvee. The biggest thing I think it'll be of benefit with is for the wheels - really the only thing I wanted it for. The damned lug nuts on the humvee maintain tension just about all the way on/off - you're WORKING the whole time if you use a standard 4 way or lug wrench! If I don't have to work as hard, that's a-ok with me. I haven't repackaged mine yet, but it'll definitely be getting broken down due to the overall size and weight and just keep a 3/4" and 7/8" socket for the big stuff. |
|
|
|
|
[Last Edit: Ryan_Ruck]
[#12]
Originally Posted By Lawman734:
Ryan - you're absolutely right regarding the "how far do you take it" mentality and I don't disagree at all. I guess I just don't find the heat to really be an issue and while I don't disagree about noise, I'll be using dynomat in the tunnel versus spraying all that in the truck. I'll probably also get some horsemat for the bed of the GMV simply because anything you put in the bed tends to bounce around and make a racket. Good score on the impact! I've determined that mine is brand new as well - no cardboard box, but undeniably new and unused. I'd still say the price you paid was very fair - I think I got the deal I did simply because I was there with cash and the guy was willing to be more negotiable considering we were like minded people at a mil vehicle rally. I haven't used mine yet, but it'll get a lookout for sure on Friday. I've been told that these aren't very good on big stuff like deuces and five-ton''s, but should be adequate for a humvee. The biggest thing I think it'll be of benefit with is for the wheels - really the only thing I wanted it for. The damned lug nuts on the humvee maintain tension just about all the way on/off - you're WORKING the whole time if you use a standard 4 way or lug wrench! If I don't have to work as hard, that's a-ok with me. I haven't repackaged mine yet, but it'll definitely be getting broken down due to the overall size and weight and just keep a 3/4" and 7/8" socket for the big stuff. Yes! That's exactly what I noticed too! My air impact was working the whole time to remove each nut. When I was looking, I noticed there are 2 different 24v slave connection impact drivers. There's a smaller, gun style and these. I wonder if the people saying these don't work well on Deuces and 5 tons were using the smaller one and/or not using the torque multiplier that comes with the kit? I'm going to see if I can't give it a try on my buddy's 5 ton. By the way, have you found a manual for these? I haven't looked. The driver operation is pretty straightforward but I'd like to make sure I know how to properly setup the torque multiplier should I need to use it. ETA: The impact driver is so close to fitting in one of these with no padding. It it was a half inch taller or the cord were not sticking out of the bottom of the handle, it would fit perfect in there diagonally. And I think that case is small enough to fit under the seat, might be borderline. So close... |
|
|
|
|
[#13]
I borrowed a neighbors dealer plate and was able to drive around town yesterday and really let the truck run for a good bit. Several times I had pedestrians wave at me and I even got a thumbs up from a Jeep guy. The engine runs strong and my next goal is to get it registered. I'm going to get it insured today and attempt the motor vehicle department tomorrow.
Questions about paining for you guys through, I've read all through this tread multiple times and I'm really stuck between getting a spray gun for my compressor or just buying cans from Rapco. Is there a huge difference in final product appearance either way? I know prep is a huge part and I'm ready for that. I'm t thinking the Rapco will be easier and have less cleanup work but if getting actual Carc paint and spraying it on looks a ton better, I'll probably go that route. And no, I've never painted a vehicle before. |
|
|
|
|
[Last Edit: Lawman734]
[#14]
There's a smaller, gun style and these. I wonder if the people saying these don't work well on Deuces and 5 tons were using the smaller one and/or not using the torque multiplier that comes with the kit? If the smaller style looks like your standard handheld impact, then no as I know they were referring to the style specifically like we have. I'd be very curious to know how yours does though - it's possible that they used the gun-only and didn't have the full kit with the torque multiplier. Maybe the torque multiplier is a game changer for big stuff? By the way, have you found a manual for these? I haven't looked. The driver operation is pretty straightforward but I'd like to make sure I know how to properly setup the torque multiplier should I need to use it. Mine didn't come with a manual either, only the map on the lid of the case showing what everything is and where it goes. As much as a manual would be quite handy, I think some trial and error in in order. I wonder if RoboImpact can be of assistance? ETA: The impact driver is so close to fitting in one of these with no padding. It it was a half inch taller or the cord were not sticking out of the bottom of the handle, it would fit perfect in there diagonally. And I think that case is small enough to fit under the seat, might be borderline. So close... I think a hard-case would be nice if you have the room - hell, even if you were to strap it against a bulkhead or something, it would still be a good bit smaller. For a little bit more security (out of sight, out of mind), I would also like to keep it under a seat though. Since 1 of the rear seats in both of my trucks is partially consumed with a TCM box, I'm even more limited than I was when it was a 3-speed. I had more in mind of a stiff sided tool bag for my storage option - it's not exactly a hard case, but if it's under the seat - the seat mount and bottom essentially becomes the hard case for the higher level of protection. I borrowed a neighbors dealer plate and was able to drive around town yesterday and really let the truck run for a good bit. Several times I had pedestrians wave at me and I even got a thumbs up from a Jeep guy. The engine runs strong and my next goal is to get it registered. I'm going to get it insured today and attempt the motor vehicle department tomorrow. Very cool! I drive my trucks to several times a week going back and forth to work or to run errands, etc and the looks and waves never stop. I was kinda curious if the Jeepers would turn their nose up at us, but they typically wave with even more enthusiasm. Even living in a college town, I've never received the first bit of negativity regarding the vehicle. I took mine out the other night with the kids trick or treating - it was an absolute hit. 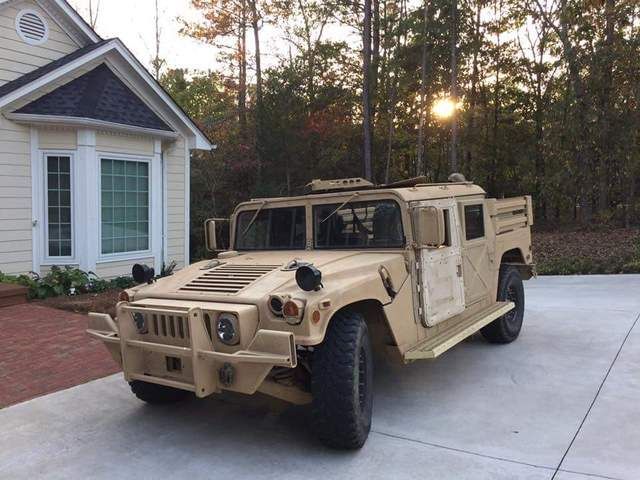

I think the biggest thing to remember with these vehicles is that they need to be driven. I know you guys up north are not in prime open or soft top weather right now and it may be tempting to just say screw it and drive something with better heat, but nothing seems to kill these vehicles more than sitting sedentary. If it might be few and far between this winter for you driving it, I'd encourage you to get one of the Solartec chargers for your hood so that the batteries are always staying topped off. Questions about paining for you guys through, I've read all through this tread multiple times and I'm really stuck between getting a spray gun for my compressor or just buying cans from Rapco. Is there a huge difference in final product appearance either way? I know prep is a huge part and I'm ready for that. I'm t thinking the Rapco will be easier and have less cleanup work but if getting actual Carc paint and spraying it on looks a ton better, I'll probably go that route. And no, I've never painted a vehicle before. Like you, I've never painted a vehicle before and read through the threads ad-nauseam on the military boards and couldn't make up my mind. I ultimately decided to go the airbrush route for a few of reasons: - I had genuine concern over how some spray-paint holds up over time. I've heard of where tans turn pink, etc. and absolutely wanted to avoid doing anything like that. - If you're going to paint your truck inside and out (or even just out), it requires a lot of cans. - Spray is very technique driven to make it look like it hasn't been spraypainted. I've seen more than a few vehicles that look like crap, even with a fresh coat of paint. - The longest part of the paint job was the prep. The airbrush didn't take long at all - and as long as you shoot your test patterns on scrap, it's almost idiot proof and goes considerably faster. I've spray painted my brushguard, hard doors, bed divider, etc and thought about how much it would suck if I had to do an entire vehicle. I bought a cheap gun at Walmart and threw it away when I was finished. Fortunately the Rustoleum Camo "Sand" color is about a dead-on match for the CARC Desert Sand, so I use it for touch up and small items. I know that CARC is the real-deal, but as we've seen from Jake-Cutter, it requires some special techniques and isn't exactly the easiest to get. Now I get to sound like a hypocrite regarding my thoughts on "original" from earlier, but I used the Behr Ultra-Premium latex on the GMV. It's been used by guys for years, so we know it's durable and that the color holds up very well. It's cheaper, stupid simple to obtain and even easier to put down. It looks and wears just like CARC - I wouldn't rub an acetone soaked rag on it, but I wouldn't normally do that to a CARC truck for that matter either. I've heard with the Ultra-Premium that you shouldn't let it get rained on for up to a few weeks after application so it can cure, but I didn't have any issues when it rained a few days after painting. With the Behr Marquis, it's ready to go as soon as it dries from what I understand. |
|
|
|
|
[Last Edit: jake-cutter]
[#15]
When applying CARC, its all about the equipment. At first I used the cheap Harbor Freight paint gun and was only able to spray about a golf ball type pattern due to the thickness of the paint and had splatter that eventually went away after increasing the PSI. I recommend having a large enough compressor, I went with the Husky 30 Gallon from Home Depot. Next is the spray gun. As I said the Harbor Freight spray gun sucks, no way around it and would not recommend. I found out CARC needs a 1.8-2.2 tip size. I ordered a Neiko 2.0 tip size spray gun from Amazon and a 1.8 tip size spray gun From Eastwood. The big thing is the regulator at the gun. You need a regulator at the gun to make adjustments right there as the one on the compressor is too far down line to be accurate. CARC requires a lot of air to atomize and spray. Also be aware the different colors of CARC have different thicknesses which is why there is a large range from 1.8-2.2. From reading Green CARC has less solids than Tan CARC so the green should not be as thick.
After getting all of these parts, I tried again last weekend and the results were night and day from before. Using the Eastwood spray gun with the regulator from the Neiko gun, I got great results and it was easy. As Lawman has said, the prep work takes forever, but spraying is real quick. Will try to post some pics tonight of the small parts and windshield frame I painted. I can say CARC paint is very durable. I had some bad flaking paint in the bed and tried chemical strippers, the CARC would bubble a little then go back down or flake a little more. Ended up spending a ton of time sanding. I have also wiped CARC and Rapco with MEK, the CARC nothing happened, the Rapco came right off. |
|
|
|
|
[#16]
Originally Posted By kevin101:
I borrowed a neighbors dealer plate and was able to drive around town yesterday and really let the truck run for a good bit. Several times I had pedestrians wave at me and I even got a thumbs up from a Jeep guy. The engine runs strong and my next goal is to get it registered. I'm going to get it insured today and attempt the motor vehicle department tomorrow. Questions about paining for you guys through, I've read all through this tread multiple times and I'm really stuck between getting a spray gun for my compressor or just buying cans from Rapco. Is there a huge difference in final product appearance either way? I know prep is a huge part and I'm ready for that. I'm t thinking the Rapco will be easier and have less cleanup work but if getting actual Carc paint and spraying it on looks a ton better, I'll probably go that route. And no, I've never painted a vehicle before. Originally Posted By kevin101:
I borrowed a neighbors dealer plate and was able to drive around town yesterday and really let the truck run for a good bit. Several times I had pedestrians wave at me and I even got a thumbs up from a Jeep guy. The engine runs strong and my next goal is to get it registered. I'm going to get it insured today and attempt the motor vehicle department tomorrow. Questions about paining for you guys through, I've read all through this tread multiple times and I'm really stuck between getting a spray gun for my compressor or just buying cans from Rapco. Is there a huge difference in final product appearance either way? I know prep is a huge part and I'm ready for that. I'm t thinking the Rapco will be easier and have less cleanup work but if getting actual Carc paint and spraying it on looks a ton better, I'll probably go that route. And no, I've never painted a vehicle before. I'd say each way has it's pros and cons. So far we've seen all 3 methods in use with EagleArms's Rapco paint, Lawman's Behr paint, and Jake's CARC and I'd say each has looked equally good (well, from what Jake said it does!) I know I'll be interested to see how the Rapco holds up. From what I've used of it on my snorkel, divider, and dash pieces, it's a dead on color match but the texture is smoother than actual CARC. With the stock nozzles I had issues sometimes getting even coverage which wasn't an issue on smaller parts. EagleArms said he used a handle nozzle though so maybe that helps. My application of the Lizard Skin via the airgun was the first product I've ever applied like that and it was surprisingly easy. Then I stepped into the actual painting realm with the Behr on my top and doors and it was just as easy. One thing I liked was how I wasn't constantly running out of product like you might with spray cans. A 20oz pot lasts a long while! Originally Posted By Lawman734:
If the smaller style looks like your standard handheld impact, then no as I know they were referring to the style specifically like we have. I'd be very curious to know how yours does though - it's possible that they used the gun-only and didn't have the full kit with the torque multiplier. Maybe the torque multiplier is a game changer for big stuff? Mine didn't come with a manual either, only the map on the lid of the case showing what everything is and where it goes. As much as a manual would be quite handy, I think some trial and error in in order. I wonder if RoboImpact can be of assistance? I think a hard-case would be nice if you have the room - hell, even if you were to strap it against a bulkhead or something, it would still be a good bit smaller. For a little bit more security (out of sight, out of mind), I would also like to keep it under a seat though. Since 1 of the rear seats in both of my trucks is partially consumed with a TCM box, I'm even more limited than I was when it was a 3-speed. I had more in mind of a stiff sided tool bag for my storage option - it's not exactly a hard case, but if it's under the seat - the seat mount and bottom essentially becomes the hard case for the higher level of protection. Very cool! I drive my trucks to several times a week going back and forth to work or to run errands, etc and the looks and waves never stop. I was kinda curious if the Jeepers would turn their nose up at us, but they typically wave with even more enthusiasm. Even living in a college town, I've never received the first bit of negativity regarding the vehicle. I took mine out the other night with the kids trick or treating - it was an absolute hit. http://i28.photobucket.com/albums/c238/Lawdog734/FB_IMG_1477964480059_zpsdnkqkzny.jpg http://i28.photobucket.com/albums/c238/Lawdog734/20161022_150038_zpsse2tkxeh.jpg Yeah, that's the one I was talking about. I'll report back when I'm able to give it a try on the 5 ton. Maybe this weekend? We'll see. It is officially called the Bradley (Fighting Vehicle) Impact Tool so if it's good enough to break track on those, I would hope it can handle Deuces and 5 tons. I did see on, I think, Aircraft Dynamics' site, that they recommend using the breaker bar to break the nuts loose and then using the impact tool for removal and reinstallation. I looked on their site but didn't see a manuals section so I'll probably shoot them a message. I found this Plano case that is slightly larger but hopefully still small enough to fit in the seat compartment. I've got one coming so we'll see how it works out. Like I said, I just want something waterproof so I don't have to worry about soaking it. That is really damn clever! I wish I would have thought of that! I've got a younger nephew who is big into Cars (the movie) and guarantee he'd have gotten a big kick out of that. I'll have to save that for next year. Hopefully he won't have grown bored of Cars by then. Sorry for all the colors but I was one quote block over the limit with my message. 
Originally Posted By jake-cutter:
When applying CARC, its all about the equipment. At first I used the cheap Harbor Freight paint gun and was only able to spray about a golf ball type pattern due to the thickness of the paint and had splatter that eventually went away after increasing the PSI. I recommend having a large enough compressor, I went with the Husky 30 Gallon from Home Depot. Next is the spray gun. As I said the Harbor Freight spray gun sucks, no way around it and would not recommend. I found out CARC needs a 1.8-2.2 tip size. I ordered a Neiko 2.0 tip size spray gun from Amazon and a 1.8 tip size spray gun From Eastwood. The big thing is the regulator at the gun. You need a regulator at the gun to make adjustments right there as the one on the compressor is too far down line to be accurate. CARC requires a lot of air to atomize and spray. Also be aware the different colors of CARC have different thicknesses which is why there is a large range from 1.8-2.2. From reading Green CARC has less solids than Tan CARC so the green should not be as thick. After getting all of these parts, I tried again last weekend and the results were night and day from before. Using the Eastwood spray gun with the regulator from the Neiko gun, I got great results and it was easy. As Lawman has said, the prep work takes forever, but spraying is real quick. Will try to post some pics tonight of the small parts and windshield frame I painted. I can say CARC paint is very durable. I had some bad flaking paint in the bed and tried chemical strippers, the CARC would bubble a little then go back down or flake a little more. Ended up spending a ton of time sanding. I have also wiped CARC and Rapco with MEK, the CARC nothing happened, the Rapco came right off. Thanks for those links to the guns! Which one did you end up using, the 2.0 or the 1.8? By the way, stopped by TSC on my way home and took a look at those stall mats. Holy balls are these things heavy! Each mat weighs about 100lbs. That said they are a pretty good deal for the money. My store had 2 styles. A couple left of one with a circle pattern on it and a full pallet with a diamond plate style pattern. I ended up bringing 3 home with me (an extra for using to lay under the truck!) and of course went with the diamond plate pattern. I'm not quite sure how I'm going to cut these with how thick and dense they are. Maybe just multiple passes with many blades in a utility knife? They're reasonably tacky and should help keep things from sliding around. Plus with as thick as they are, I have no doubt they'll cut down on noise and heat transfer. A good find for sure! |
|
|
|
|
[#17]
Below is a pic of the shield mount and a sponson bracket that I painted in CARC. The texture is a 100% match to the original paint applied by the military. As you can see the CARC applied by the military has faded in the sun so the color is a little off, but that wont matter as I will be painting everything. At first I was very frustrated as no one had answers on how to apply it and Sherwin Williams did not have any knowledgeable people. More trial and a little error, but it has worked out. Again, its all about the right equipment. By the way, the parts below only have 1 coat, as these were my test pieces I plan on doing another coat or two .

|
|
|
|
|
[Last Edit: jake-cutter]
[#18]
Originally Posted By Ryan_Ruck:
Thanks for those links to the guns! Which one did you end up using, the 2.0 or the 1.8? By the way, stopped by TSC on my way home and took a look at those stall mats. Holy balls are these things heavy! Each mat weighs about 100lbs. That said they are a pretty good deal for the money. My store had 2 styles. A couple left of one with a circle pattern on it and a full pallet with a diamond plate style pattern. I ended up bringing 3 home with me (an extra for using to lay under the truck!) and of course went with the diamond plate pattern. I'm not quite sure how I'm going to cut these with how thick and dense they are. Maybe just multiple passes with many blades in a utility knife? They're reasonably tacky and should help keep things from sliding around. Plus with as thick as they are, I have no doubt they'll cut down on noise and heat transfer. A good find for sure! So far I have used the 1.8 tip size gun from Eastwood and it went well. I did use the regulator off of the Neiko gun and put it on the Eastwood gun and also used a Harbor Freight air dryer. Reason I started with the Eastwood gun was that it was easier to clean, the Neiko gun has a lot more oil on it that I need to clean off. The Eastwood gun gives a good 6"-8" vertical spray pattern and I hope the Neiko gun give me 8-10" to cover more at one time. Either way I am happy with the CARC now that I figured out the gun and regulator were the problem and no thinning was needed. The texture is 100% the same and does a good job had filling in small imperfections. As for the mats, I have a buddy that uses them as gym mats and cuts them with a jig saw and circular saw. Does the 4X3 fit well in the back with the divider, I really need to measure that area again. |
|
|
|
|
[#19]
Originally Posted By jake-cutter:
So far I have used the 1.8 tip size gun from Eastwood and it went well. I did use the regulator off of the Neiko gun and put it on the Eastwood gun and also used a Harbor Freight air dryer. Reason I started with the Eastwood gun was that it was easier to clean, the Neiko gun has a lot more oil on it that I need to clean off. The Eastwood gun gives a good 6"-8" vertical spray pattern and I hope the Neiko gun give me 8-10" to cover more at one time. Either way I am happy with the CARC now that I figured out the gun and regulator were the problem and no thinning was needed. The texture is 100% the same and does a good job had filling in small imperfections. Originally Posted By jake-cutter:
So far I have used the 1.8 tip size gun from Eastwood and it went well. I did use the regulator off of the Neiko gun and put it on the Eastwood gun and also used a Harbor Freight air dryer. Reason I started with the Eastwood gun was that it was easier to clean, the Neiko gun has a lot more oil on it that I need to clean off. The Eastwood gun gives a good 6"-8" vertical spray pattern and I hope the Neiko gun give me 8-10" to cover more at one time. Either way I am happy with the CARC now that I figured out the gun and regulator were the problem and no thinning was needed. The texture is 100% the same and does a good job had filling in small imperfections. That's good info! Thanks! Originally Posted By jake-cutter:
As for the mats, I have a buddy that uses them as gym mats and cuts them with a jig saw and circular saw. Does the 4X3 fit well in the back with the divider, I really need to measure that area again. They only had the 4x6 ones so I got those. Was running out of daylight and feeling lazy today so I didn't really do anything with them other than lay them out in my auto shelter to air out a bit since the rubber smell is so strong. TSC had them stored outside but they were strapped together on a pallet so I don't think they really breathed. I had considered a circular saw but that seemed like it would make a big mess, even outside. I may have to give the jigsaw a try. Does he use a wood or metal cutting blade? I'm thinking a finer tooth metal cutting blade would give a cleaner cut. |
|
|
|
|
[Last Edit: kevin101]
[#20]
Big update for me. I called Geico yesterday and got the humvee insured with no problems. Full coverage for 500 a year. I went to the motor vehicle department this morning and was able to register the humvee and get plates pretty easily. The biggest issue they had was trying to enter the 6 digit number into the vin field. After calling her supervisor over, it was entered manually and I was handed the plates and registration sticker. It only took about 10 minutes. I was also asked if I would come back and give the girls a ride in it.....
One other smallish problem is the fact that New York and Kentucky, where the humvee was purchased, don't have a tax agreement and I had to pay the 8% tax here. I'm going to call GovPlanet later today and see if I can get the 6% Kentucky tax refunded to me. |
|
|
|
|
[#21]
Originally Posted By kevin101:
Big update for me. I called Geico yesterday and got the humvee insured with no problems. Full coverage for 500 a year. I went to the motor vehicle department this morning and was able to register the humvee and get plates pretty easily. The biggest issue they had was trying to enter the 6 digit number into the vin field. After calling her supervisor over, it was entered manually and I was handed the plates and registration sticker. It only took about 10 minutes. I was also asked if I would come back and give the girls a ride in it..... I'm stunned that it went that easily in NY - did you do it with the Off-Road stamped SF97 or via a Montana title? One other smallish problem is the fact that New York and Kentucky, where the humvee was purchased, don't have a tax agreement and I had to pay the 8% tax here. I'm going to call GovPlanet later today and see if I can get the 6% Kentucky tax refunded to me. While I would press the issue of a refund regarding tax, I wouldn't hold my breath that anything will get done. I've been emailing directly with JWade who told me that a refiund wasn't a problem and how to send proof that additional tax was paid - that was 6 months ago. I pinged him after 90 days and he said "I thought that was taken care of already" and that he'd "take care of it" and I still don't have anything. I'm going to ping him again today now that you've reminded me. |
|
|
|
|
[#22]
Originally Posted By Ryan_Ruck:
They only had the 4x6 ones so I got those. Was running out of daylight and feeling lazy today so I didn't really do anything with them other than lay them out in my auto shelter to air out a bit since the rubber smell is so strong. TSC had them stored outside but they were strapped together on a pallet so I don't think they really breathed. I had considered a circular saw but that seemed like it would make a big mess, even outside. I may have to give the jigsaw a try. Does he use a wood or metal cutting blade? I'm thinking a finer tooth metal cutting blade would give a cleaner cut. Mark your line where you are going to cut, then use a 2x4 on top and bottom and clamp them together along the line. Use them as your guide and use a circular saw with a fine tooth blade and cut. (he has used regular blades and it went fine too) Since the 2X4's are acting as a guide you should have a nice clean line and the mats are not flopping around on you, just try to do it without stopping. |
|
|
|
|
[#23]
Big Brown Truck just dropped off my new Plano case.
The good is that it is plenty big to not only hold the impact driver but all of the set contents! The bad is that it is just a hair too big to fit under the seat. I really think when they designed these trucks, interior layout was a bit of an afterthought.  If the rear of the seat compartment were the actual rear of the tub instead of that little bit of wasted space where the factory seat backboard sits and, that angled piece on the door side were vertical instead of angled inward, the case would fit in there no problem at all. If the rear of the seat compartment were the actual rear of the tub instead of that little bit of wasted space where the factory seat backboard sits and, that angled piece on the door side were vertical instead of angled inward, the case would fit in there no problem at all.
I'm wondering if it might make sense to go back on my "no body modification" mindset to make that whole under seat area more efficient for storage, which is definitely lacking in these trucks. I'd probably have to get a metal fab shop involved to redesign the way the seat mounts. Maybe a hinged lid on the storage compartment. Just kind of brainstorming out loud... In the mean time, I think I'm going to just add some footman loops to the divider and use some extra fuel can straps I've got to tie it down. 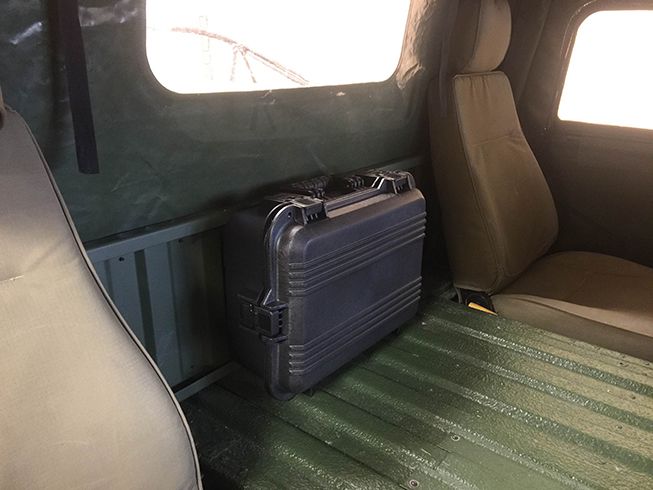
Originally Posted By kevin101:
Big update for me. I called Geico yesterday and got the humvee insured with no problems. Full coverage for 500 a year. I went to the motor vehicle department this morning and was able to register the humvee and get plates pretty easily. The biggest issue they had was trying to enter the 6 digit number into the vin field. After calling her supervisor over, it was entered manually and I was handed the plates and registration sticker. It only took about 10 minutes. I was also asked if I would come back and give the girls a ride in it..... One other smallish problem is the fact that New York and Kentucky, where the humvee was purchased, don't have a tax agreement and I had to pay the 8% tax here. I'm going to call GovPlanet later today and see if I can get the 6% Kentucky tax refunded to me. Originally Posted By kevin101:
Big update for me. I called Geico yesterday and got the humvee insured with no problems. Full coverage for 500 a year. I went to the motor vehicle department this morning and was able to register the humvee and get plates pretty easily. The biggest issue they had was trying to enter the 6 digit number into the vin field. After calling her supervisor over, it was entered manually and I was handed the plates and registration sticker. It only took about 10 minutes. I was also asked if I would come back and give the girls a ride in it..... One other smallish problem is the fact that New York and Kentucky, where the humvee was purchased, don't have a tax agreement and I had to pay the 8% tax here. I'm going to call GovPlanet later today and see if I can get the 6% Kentucky tax refunded to me. Haha! That's totally awesome! Congrats! Like Lawman, I'm really surprised it was that easy in NY. If you could, would you mind doing a bit of a more formal step-by-step on how it went? I'll put it in the OP of the thread for future prospective NY buyers and link to your post. Originally Posted By jake-cutter:
Mark your line where you are going to cut, then use a 2x4 on top and bottom and clamp them together along the line. Use them as your guide and use a circular saw with a fine tooth blade and cut. (he has used regular blades and it went fine too) Since the 2X4's are acting as a guide you should have a nice clean line and the mats are not flopping around on you, just try to do it without stopping. Good idea on the 2x4s! I'll pick up a fine tooth blade and give it a shot with the circular saw then. |
|
|
|
|
[Last Edit: kevin101]
[#24]
Thanks guys.
My experience with NY was pretty simple. 1. I called Geico and was able to insure it pretty easily. It's insured as a normal vehicle with full coverage and didn't cost too much. 2. Brought my insurance card, SF97 marked "off road use only", my reassignment letter from GovPlanet, and the paid invoice from GovPlanet. 3. I handed everything over to the motor vehicle clerk who looked everything over. She mentioned the off road use only stamp but didn't seem to give it much thought and it didn't come up again. 4. Due to the truck not having a standard VIN she had to enter the vehicle manually. The only problem she had was having the computer accept the 6 digit ID number. She called a supervisor over who also looked over the paperwork quickly and the supervisor was able to override the system to enter the 6 digits. 5. I had to pay NY sales tax for the purchase price of the truck. I paid a 6% tax for Kentucky but NY doesn't have a tax agreement with that state. I'm hoping to get a refund from GovPLanet for the KY tax I paid. I showed a few pictures of the truck to the clerk who then showed it to her supervisor and another coworker. They all thought is was cool and asked me to come back and give them a ride. I promised I would...... |
|
|
|
|
[#25]
Oops, didn't see you edited your post with the step-by-step Kevin! I'll get that added.
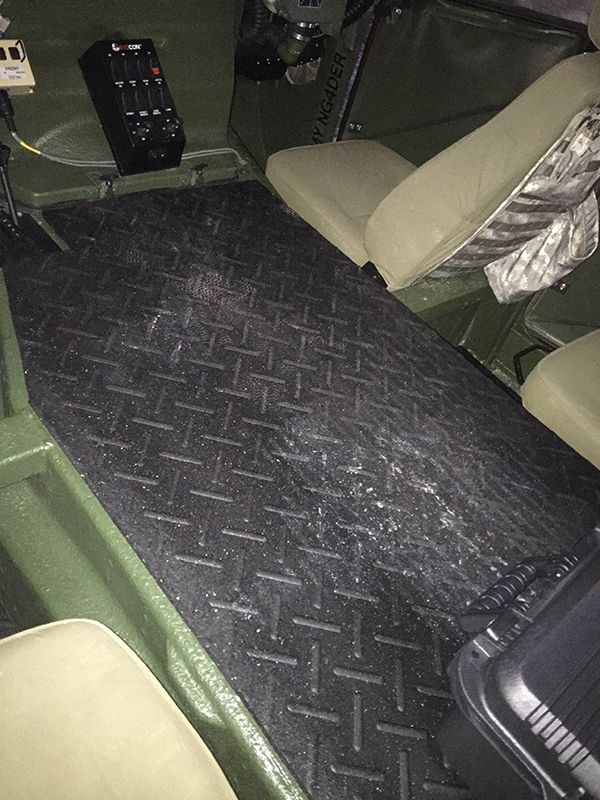
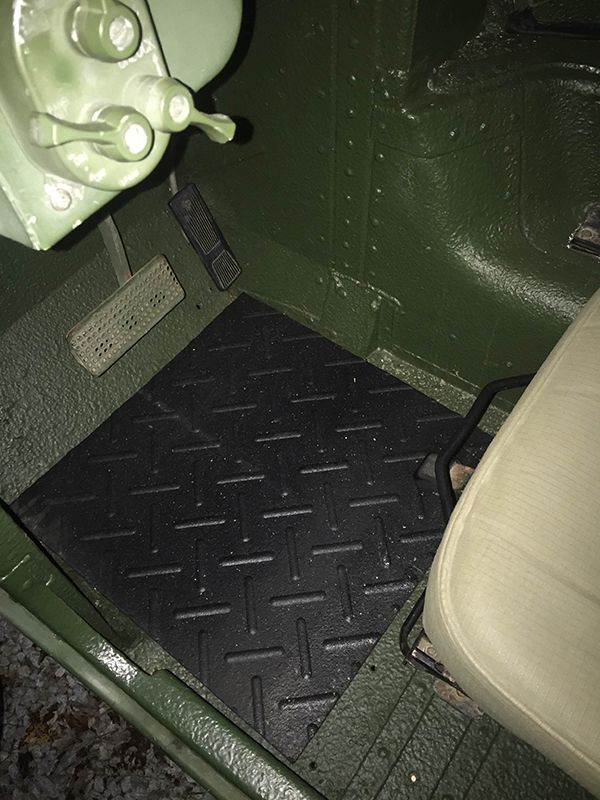
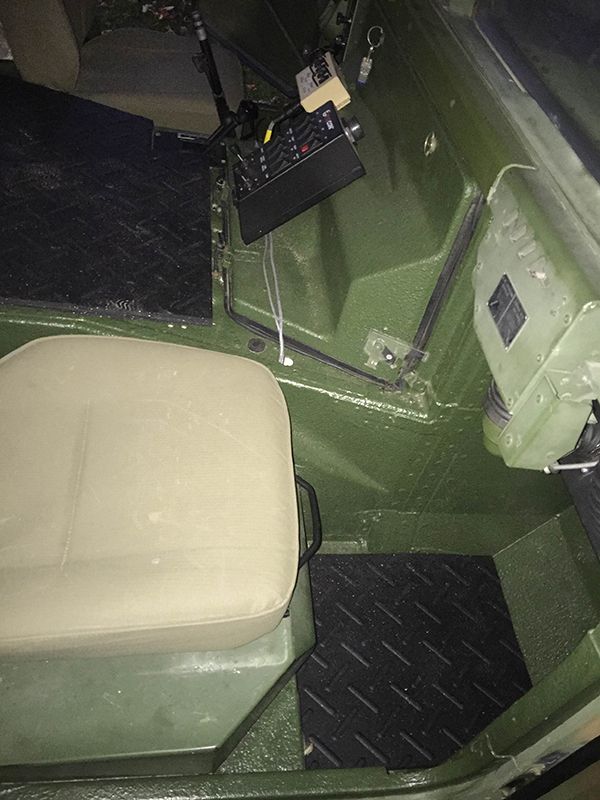
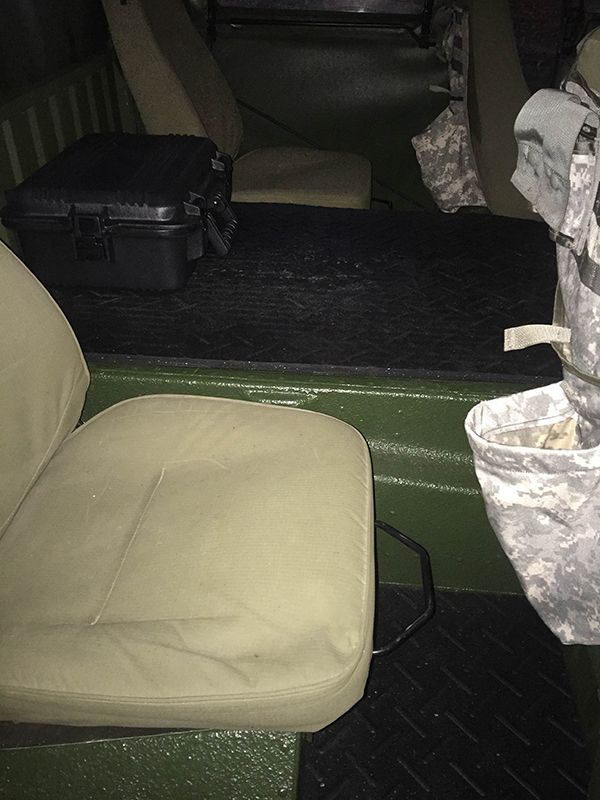
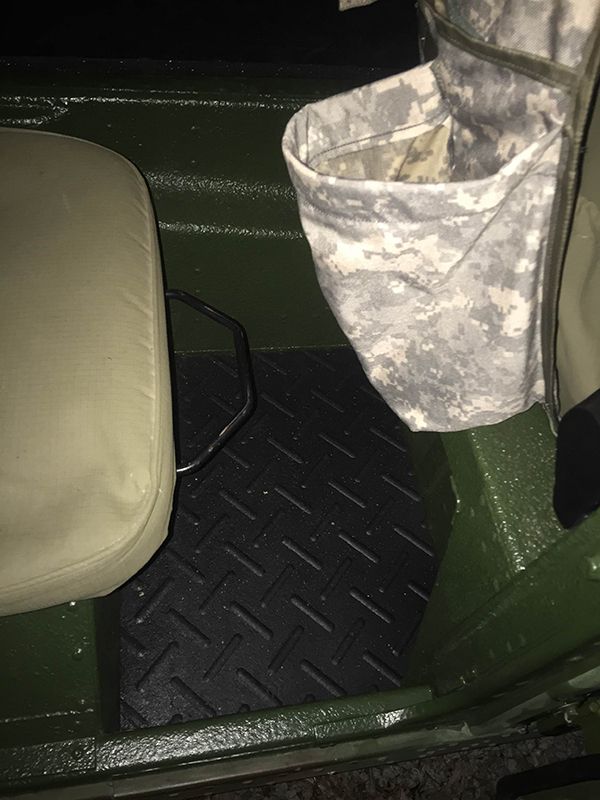
I was busy all weekend trying to get last minute outdoor stuff done while temps were still plenty warm so I didn't have the energy to update that Friday evening I got my stall mats cut and installed. Even had enough left over to put some down on the floorboards. I started out trying to cut it with the circular saw but the mat kept grabbing the blade and stalling out the saw. Since I didn't want to burn it up, I ended up just going with the razor blade. Wasn't as bad as I thought but because of the multiple passes needed the edges aren't as clean as they would ideally be. Only went through both ends of 3 blades. Pretty happy with how it turned out overall though and it does indeed cut down on noise plus, it's nice not having stuff sliding all over the place. The mats are a little dirty in the pics. Need to clean them off. 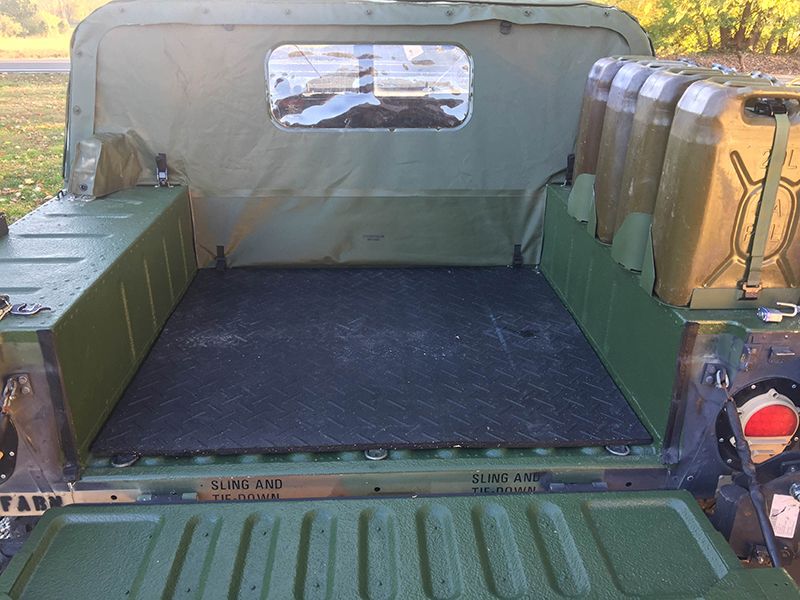
|
|
|
|
|
[#26]
The mats look good. While I was visiting the Ar15.com store in Canton Texas, I got a call from Sherwin Williams. It was the original sales rep that I talked to first when ordering the CARC. He found a sticky on his desk from a couple of weeks ago to call me on how to spray it. Well he was very knowledgeable of the product and said they actually sale a lot for vendors that have govt contracts. So below are the recommendations he gave me: Tip size 1.8-2.0 no larger Dilutions: Do not dilute if you want the texture we all know and love, but expect a very small area the size of a mini foot ball or a little smaller than a baseball. Dilute 10% with water will give almost the same texture and a little more coverage. Dilute 25% will give you a normal spray pattern with little to no texture. This is what he recommend for a top coats after spraying it undiluted. Dilute 25-33% (or more he said up to 1 part) to freshen up faded paint or prepare for a car show. |
|
|
|
|
[#27]
Originally Posted By jake-cutter:
The mats look good. While I was visiting the Ar15.com store in Canton Texas, I got a call from Sherwin Williams. It was the original sales rep that I talked to first when ordering the CARC. He found a sticky on his desk from a couple of weeks ago to call me on how to spray it. Well he was very knowledgeable of the product and said they actually sale a lot for vendors that have govt contracts. So below are the recommendations he gave me: Tip size 1.8-2.0 no larger Dilutions: Do not dilute if you want the texture we all know and love, but expect a very small area the size of a mini foot ball or a little smaller than a baseball. Dilute 10% with water will give almost the same texture and a little more coverage. Dilute 25% will give you a normal spray pattern with little to no texture. This is what he recommend for a top coats after spraying it undiluted. Dilute 25-33% (or more he said up to 1 part) to freshen up faded paint or prepare for a car show. Thanks! That's really good to know on the paint. I bet that's why the texture on my Ibis Tek bumper is so smooth relative to the CARC on the truck. Now I'm wondering if going with a 25% dilution and little/no texture will make the truck any easier to clean up and hold less dirt. I assume you would do the final green coat(s), blacks, and browns in 25%... Not going to lie, less opportunity to skin my knuckles on my paint is somewhat appealing.
I guess I'll have a while to contemplate it. You decide what route you're going? |
|
|
|
|
[#28]
Originally Posted By Ryan_Ruck:
I guess I'll have a while to contemplate it. You decide what route you're going? Yesterday and today I have been trying all the different methods using the 1.8 tip Eastwood Primer gun. Spraying it undiluted the first time to give a texture and then top coating with 25% seemed to give a nice finish. The 25% diluted takes forever to dry, several hours compared to the 60 minutes or less of straight CARC. For parts that were sanded smooth, straight carc for two coats and then a coat of the diluted seemed to give nice results. The tech did say that the diluted would take a lot longer to dry and may shrink so go light on the coats and let it sit for 24 hrs before the next. I tried ordering the Tan 686 Monstaliner today and they have to get back with me, was quoted ~$500 shipped for the 3 gallon kits which seemed high, but they will give a final cost once they talk to their tech guy. What did you do between the curing of the Lizard Skin and applying of the Monstaliner? Any special prep since the Lizard Skin has cured fully? |
|
|
|
|
[#29]
Originally Posted By jake-cutter:
Yesterday and today I have been trying all the different methods using the 1.8 tip Eastwood Primer gun. Spraying it undiluted the first time to give a texture and then top coating with 25% seemed to give a nice finish. The 25% diluted takes forever to dry, several hours compared to the 60 minutes or less of straight CARC. For parts that were sanded smooth, straight carc for two coats and then a coat of the diluted seemed to give nice results. The tech did say that the diluted would take a lot longer to dry and may shrink so go light on the coats and let it sit for 24 hrs before the next. I tried ordering the Tan 686 Monstaliner today and they have to get back with me, was quoted ~$500 shipped for the 3 gallon kits which seemed high, but they will give a final cost once they talk to their tech guy. What did you do between the curing of the Lizard Skin and applying of the Monstaliner? Any special prep since the Lizard Skin has cured fully? Eric at Monstaliner told me to give the Lizard Skin a light scuffing with either 120 grit or the brown pads they sell, then vacuum thoroughly, don't solvent clean. |
|
|
|
|
[#30]
Those mats look sharp.
|
|
|
|
|
[Last Edit: Ryan_Ruck]
[#31]
Originally Posted By kevin101:
Those mats look sharp. Thanks! So far after putting in some seat time with them in, I'm really liking them. Thankfully the rubber smell seems to be lessening. My new MTRs showed up at my local Fastenal yesterday. Got a call from them 10 minutes before they closed so I went and picked them up today! 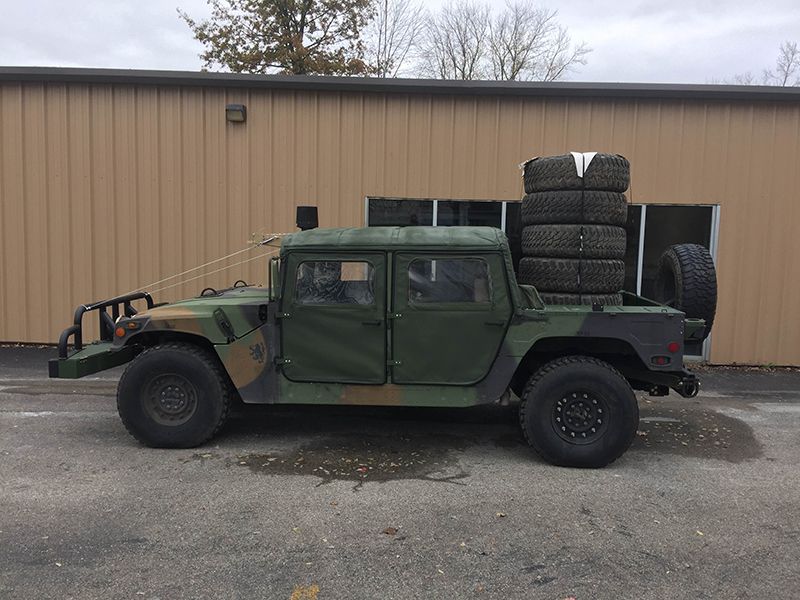
The guy that helped load them said my freight shipment (and I'm assuming method of pickup) was the coolest one behind a pinball machine they received. I was hoping the pallet would have fit without removing the cargo partition but no luck. With the tire carrier on the back, I couldn't just leave the tailgate open either. Since it was in the mid 40s most of the day, with the bottom part of the curtain loose, I just ended up cranking the heat. Which I'd like to mention has done a great job so far! I've mostly needed to only use it sparingly on low fan, low heat before it starts getting too warm in the truck, even running without the cargo cover on but with the partition in. I am going to work at sealing up the rear curtain area a little better. I've got some ideas to include some small pieces of angle aluminum to add to the tops of the fenders and some outdoor grade Velcro to add to those and the curtain. Not sure when I'll get around to working on that though. But back to the tires... Overall they do look like they have roughly 90% tread left but, a couple (those two in the middle) look like they must have spent most of their life rock crawling with as chewed up as some of the tread is. Free siping I guess?
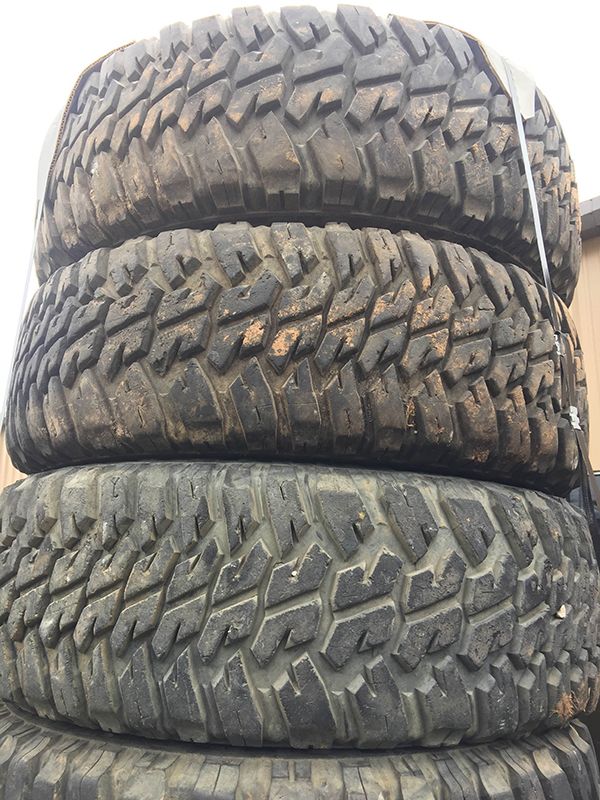
There were also some pretty deep "holes" which I was concerned could be actual punctures. 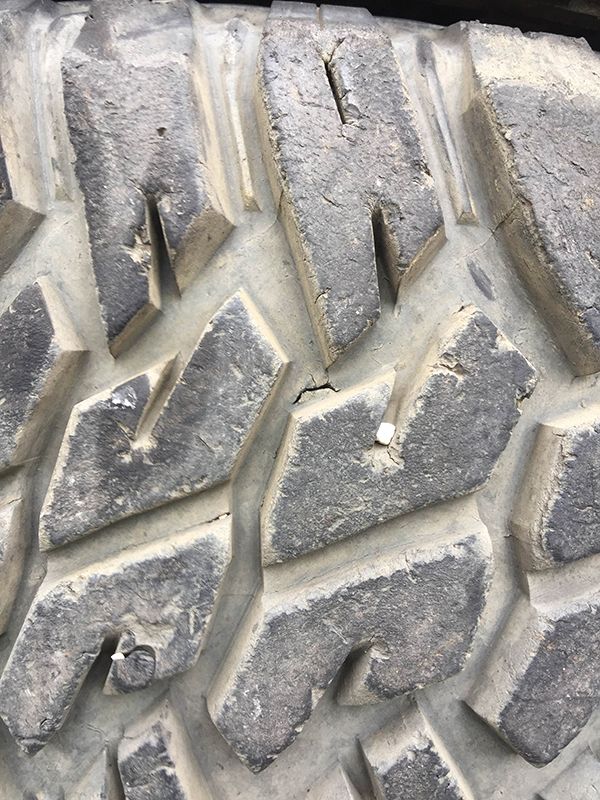
I got the two roughest looking ones mounted on the 24 bolt wheels first. I aired them up and sprayed them with soapy water and thankfully no leaks. These tires must be a lot tougher than I gave them credit for! They are all E load rated and the seller did include runflats in all of them like I asked if he could. So I'm happy I didn't have to mess with putting those in. Installing the tires on the 24 bolt wheels is actually pretty easy but time consuming since you've got to make 2 passes to torque them down after installing the locknuts. A word of advice. Make sure you have the proper side of the runflat facing out! You'll be able to tell this two ways. First, if you have it backwards, the wheel will be very hard to get into the runflat because of how they are tapered. Second, if you don't see the "outside" label, look for a small notch. 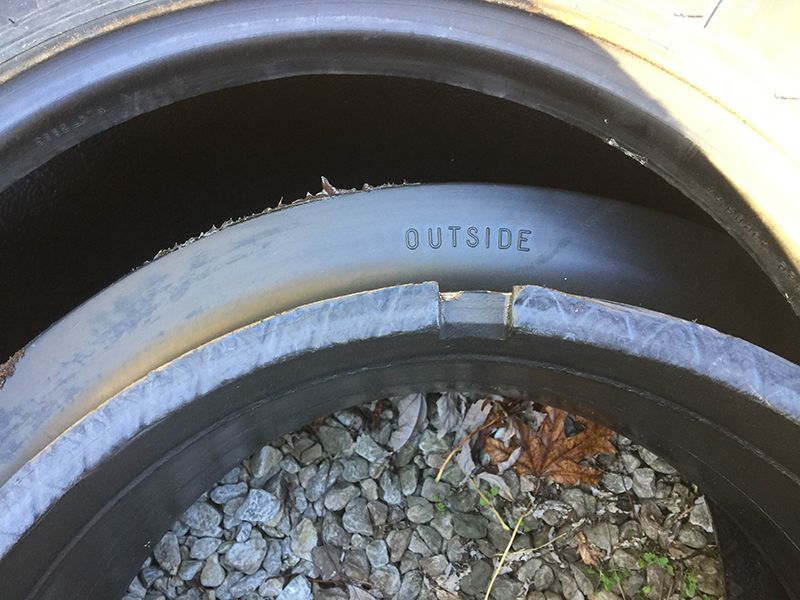
That notch is there to allow the air from the valve stem to pass into the tire. If you put the outside in, you'll be able to tell because the tire will be hard to air up and will prematurely show higher pressures than it should. Also, should you successfully manage to install it backwards, the wheel will be very hard to get out of the runflat. I am of course offering all of this up as the voice of experience.
I'd mention I used my new 24v impact driver and I've got to say I really love it! It did have a bit of trouble breaking the locknuts free on that wheel I misassembled and had to redo after I had torqued them to 110 ft. lbs. However it was very fast taking them off once they were broken free. It was equally fast putting the locknuts on and from what my torque wrench was telling me, it was torquing them to at least 85 ft. lbs. more often than not on the first pass. I'd then go back with my torque wrench and torque to 85 then 110 ft. lbs. like the TM says. I think the air wrench offers more torque but I think the electric one offers a lot more speed. A great addition to the truck's tools! Could have gotten more than 2 done if I hadn't had to go back and redo that one I screwed up. |
|
|
|
|
[#32]
I just got a few M998's in. We are having a issue with the lighting where no matter what we do we can't get the flashers to work. Everything else seems to be fine except a known light that doesn't work all ready.
Am I missing something or has anyone had any issues with this? |
|
|
|
|
[Last Edit: Ryan_Ruck]
[#33]
Originally Posted By thefreshman991:
I just got a few M998's in. We are having a issue with the lighting where no matter what we do we can't get the flashers to work. Everything else seems to be fine except a known light that doesn't work all ready. Am I missing something or has anyone had any issues with this? Are you installing LED lighting? ETA: TM 9-2320-280-20-1, Page 495 is the lighting troubleshooting flowchart. It's not complex but it should give you some connections to check. Also, thoroughly check all nearby and associated grounds. Cleaning them with a wire wheel on a Dremel can help. |
|
|
|
|
[Last Edit: Ryan_Ruck]
[#34]
Finished getting the MTRs mounted on the wheels yesterday and wanted to get them balanced.
Ended up running into a bit of a surprise problem. Most every shop I called, including Sam's Club, Costco, Pep Boys, Tire Discounters, Tires Plus, a local RV dealer, and a Goodyear heavy truck tire shop all said they couldn't balance them. The Goodyear shop said they're only setup for semi sized tires and all the others said the 37s were too big. Finally found a local shop by the name of Bob Sumerel that is a regional company that said they've done up to 40x15.5s on their machine. Turns out their machine is called a Hunter Road Force balancing machine. So, if you've got to hunt around for a shop to balance your tires, see if they've got a Road Force balancer. But that was only half the adventure... There was one tire in the set that just did not want to balance. So, I figured we could rotate the tire in relation to the wheel. Well, that would be an additional $50 since it would now be considered a "mounting". But, of course, they didn't know how to deal with the 2 piece wheel. So I explained how the locknuts need to come off and the outer part of the wheel removed so the tire can be rotated on the inner part. In the middle of removing one of the locknuts, one of the studs strips out before the locknut comes off. I suggested using an angle grinder to just cut the back of the stud off. Once we got the outer part of the wheel off, I started using a rubber mallet to knock the wheel out of the runflat when out pops another stud!  Not previously mentioned is that this was the wheel I installed on the runflat wrong side out and when getting it out a totally different 3rd stud had popped out. So there was definitely something up with how the studs had been secured in this wheel. Not previously mentioned is that this was the wheel I installed on the runflat wrong side out and when getting it out a totally different 3rd stud had popped out. So there was definitely something up with how the studs had been secured in this wheel.
Good thing I had my two spare wheels I had picked up from that guy I ran into! Ended up going home, getting the tire with the totally shot tread, bringing it back to the tire shop, transferring the good tire to the new wheel, and helping the tech get the locknuts torqued since I had that section of the TM on my phone. So what should have ended up being a $75 balance job ended up being $130, plus me helping reinstall the tire on the other wheel. They didn't even cut me a break for helping out their tech get the locknuts properly torqued either.
Not sure if I'm going to repair that problem wheel with some new studs or just scrap it. Anyway, after all that here she is with the new shoes! 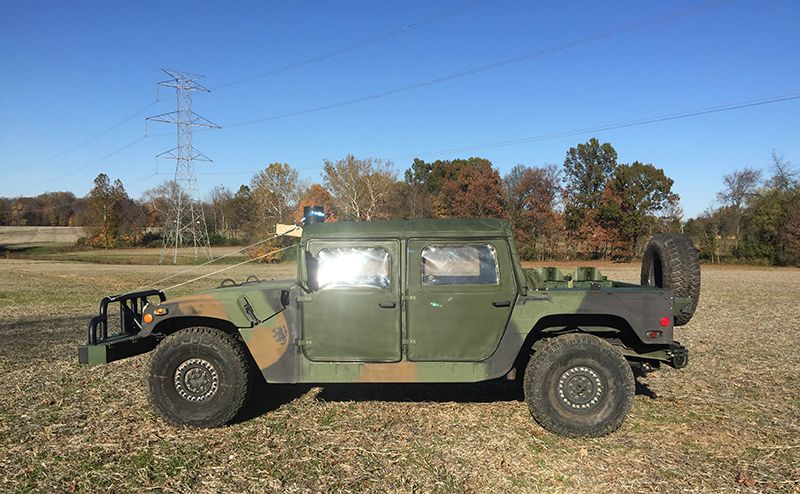
I used the new Aircraft Dynamics impact driver exclusively to change the tires on the truck. I had no problem breaking the nuts loose with just the impact driver. Now a caveat, I did previously have the nuts off when I rotated the tires a couple months back and had applied anti-seize on the stud threads like I do with every vehicle here in the land of road salt but, talk about fast! I had all 4 tires changed out in just under 30 minutes including time spent letting the driver free run for 30 seconds to stay cool every 4th lug nut! No problem with installing the lug nuts with the driver either. After using the driver on all 8 lugs I went back and torqued the bolts to spec but most of them were already torqued sufficiently. Having the driver would likely turn a roadside flat into just a 20 minute delay, including time to jack up the truck with the screw jack and getting the tire off and then back on the carrier! Thanks Lawman for the suggestion! After getting the tires switched out, I took it out for a test drive. At first there was a bit of bounce and side to side wander to the ride but after a few miles, it smoothed out. I guess the rubber was just a little stiff from sitting so long and putting some miles on it got it flexing again. There's still a very slight side to side wander the MTs didn't have but I'm betting it's just because of the MTR's much more aggressive tread. Can't wait to try these out in the snow! Really hoping we get some deep stuff this winter. 
|
|
|
|
IA, USA
|
[#35]
I like the silver colored bolts on the 24 bolt wheels. Did you have to clean them up, or do they stay looking good?
Do you know if they are different from the ones on the 12 bolt wheels? |
|
|
|
[Last Edit: Ryan_Ruck]
[#36]
Originally Posted By Beef1911:
I like the silver colored bolts on the 24 bolt wheels. Did you have to clean them up, or do they stay looking good? Do you know if they are different from the ones on the 12 bolt wheels? I agree! They look good from about that far though. We're supposed to get another warm spell soon and I'm going to try and pressure wash them. When I paint the truck I'll give them a fresh shot of black CARC. They don't look too bad as is though. On the spare wheel I had to sub in (it's up on the front passenger side), someone had painted black over the whole wheel at some point, including the locknuts and studs. Some of it came off disassembling the wheel. I'm going to try using a wire wheel on a Dremel to clean them back up though. |
|
|
|
|
[#37]
Those 24 bolt wheels look nice. I'm glad I ordered them too. I got a call from Rallequip the other day and my tires and wheels were on the dock waiting to be picked up by the shipping company. Hopefully I'll have them here soon.
I also took the truck to get it's maiden NYS inspection. Passed no problem. |
|
|
|
|
[#38]
Ryan, when I get home tonight I am going to tape off and prep for the Monstaliner and plan on doing it tomorrow. Any tips for applying and do you have any pics showing how high you went on the A pillar and door surrounds?
|
|
|
|
|
[#39]
Originally Posted By jake-cutter:
Ryan, when I get home tonight I am going to tape off and prep for the Monstaliner and plan on doing it tomorrow. Any tips for applying and do you have any pics showing how high you went on the A pillar and door surrounds? For application, I started with the passenger wells first up under the dash. Then the front passenger wells starting at the top of the drivetrain tunnel to about half way, and then inside the rocker to finish the other half. Then inside the rear seat boxes. And then the rear passenger wells like the front. Then I went from the front of the drivetrain tunnel to the rear of the passenger compartment. From there I did the tops of the fenders including the slanted side behind the rear seats, then the sides, and then I finished the floor from the drivetrain tunnel to the bed. Tailgate was last. I'll go out and snap a couple pics of how high up the A pillar and door sills. |
|
|
|
|
[#40]
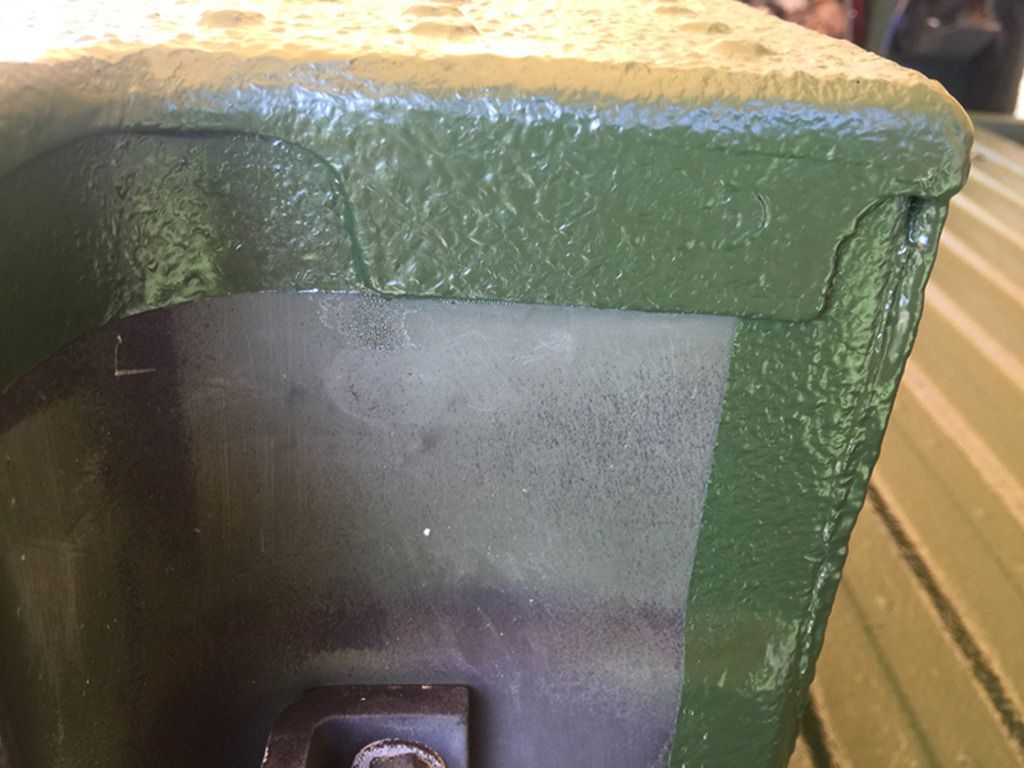
I tried to keep the lines clean and straight but I didn't sweat it if they weren't 100% because I knew I'd be going back over the area with paint exactly the same color with the CARC.
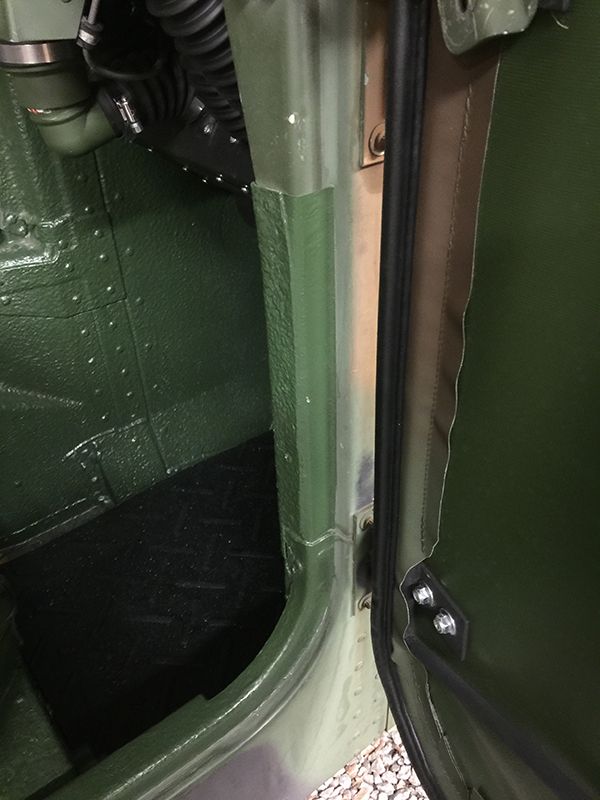

Also, some of the areas around the A pillar and door sills have more texture because there's Lizard Skin under them while other smoother areas don't. I didn't really give them texture, again, because I knew I'd be going back with paint in those areas. You'll have to decide how far out from the rear fender sides and how far down from the fender tops you want to go in the tailgate area. Here's a couple rear edge shots: 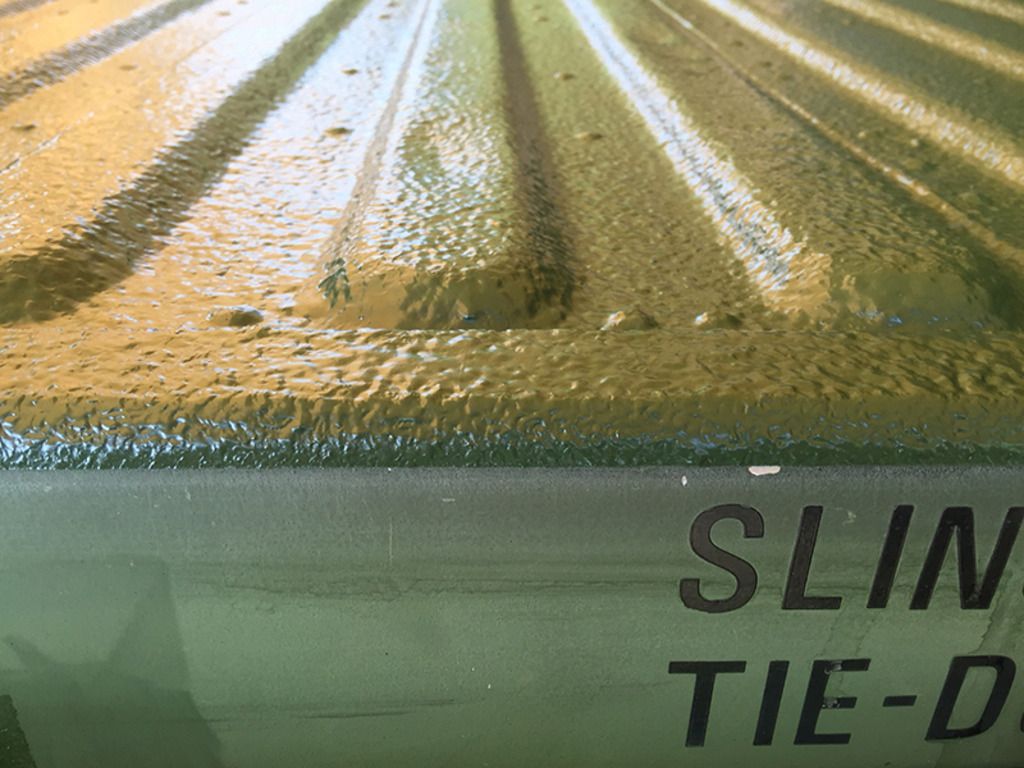
|
|
|
|
|
[#41]
About how long between coats and were you able to stand on it do to the second coat?
|
|
|
|
|
[#42]
Originally Posted By jake-cutter:
About how long between coats and were you able to stand on it do to the second coat? Shoot... Now you've got me wracking my brain. I think it was 5 or 6 hours and I started checking the tack 2 hours in. I let it dry a bit longer than Monstaliner recommended so I could get on it without worrying. I only let it dry more than 24 hours in some spots before the second coat because I ran out. Then came the extra scuffing and cleaning. Also, with the floor ribs, I did side to side following the contours AND front to back angled to get the sides of the ribs and flat to get the tops. |
|
|
|
|
[#43]
The Monstaliner is in. The guys at Monstaliner recommend spraying it in since the Tan is a light color and it was going over the dark colored Lizard Skin. If I was just going over tan, rolling would have been fine. I started by doing the cut in and rolling so areas and soon found out you could see the lizard skin no matter how thick I tried to roll it. Then I got the spray gun for the Lizard Skin out and sprayed the rest in. Went real easy after that just time consuming and waiting for the coats to dry. Took all day with the wait times and clean up in between. Will snap pics when I get home tonight. I will say the color is not 100% a match for the new CARC that I sprayed, but does seem to match the faded CARC.
|
|
|
|
|
[Last Edit: Ryan_Ruck]
[#44]
Deal alert for anyone that needs to replace their ball joints or wants to upgrade to the newer, heavier duty version.
I got an alert that wolfer-parts on eBay has marked both his upper and lower ball joints down from the normal price of $50 to $37.50 and will accept an offer of $35 each. http://www.ebay.com/itm/181274844301 http://www.ebay.com/itm/171188181439 Mine could use replacement since the boots are rotting and I was going to hold off until Spring but, at that price, they're hard to pass up. At Kascar these are $100+ a piece! Upper Lower |
|
|
|
TN, USA
|
[#45]
I'd be curious who manufactured those BJ, that's something not to save a few bucks on...
The 4 haft shafts is a smoking ass deal, I wish they would fit on my H1 |
|
|
|
[Last Edit: Ryan_Ruck]
[#46]
Originally Posted By JohnyRotten:
I'd be curious who manufactured those BJ, that's something not to save a few bucks on... The 4 haft shafts is a smoking ass deal, I wish they would fit on my H1 Pretty sure all his parts are all milsurp and he does advertise them as such. The 10k halfshafts I got before I picked up my truck came from him. They came sealed in bags and boxes with NSN stickers. ETA: Just saw he's got those marked down pretty significantly as well, less than what I paid! Wonder if he's trying to clear out some inventory before the tax man comes calling. |
|
|
|
TN, USA
|
[#47]
Originally Posted By Ryan_Ruck:
Pretty sure all his parts are all milsurp and he does advertise them as such. The 10k halfshafts I got before I picked up my truck came from him. They came sealed in bags and boxes with NSN stickers. ETA: Just saw he's got those marked down pretty significantly as well, less than what I paid! Wonder if he's trying to clear out some inventory before the tax man comes calling. Originally Posted By Ryan_Ruck:
Originally Posted By JohnyRotten:
I'd be curious who manufactured those BJ, that's something not to save a few bucks on... The 4 haft shafts is a smoking ass deal, I wish they would fit on my H1 Pretty sure all his parts are all milsurp and he does advertise them as such. The 10k halfshafts I got before I picked up my truck came from him. They came sealed in bags and boxes with NSN stickers. ETA: Just saw he's got those marked down pretty significantly as well, less than what I paid! Wonder if he's trying to clear out some inventory before the tax man comes calling. looks like a topic just started about them, you'll recognize a username. http://www.hummernetworkforums.com/viewtopic.php?t=244544 |
|
|
|
[Last Edit: jake-cutter]
[#48]
Put the hardtop windshield on today and installed the glass with new seals and the wiper parts. Also riveted the hardtop seal onto the windshield frame, just need to figure out the last few rivets on each side as the holes were not predrilled. I used an FSI D100 riveter and it worked great, very easy to use one handed. Also, got the drivers seat back in but found out the rear seat lids don't quite fit due to the lizard skin/monstaliner, I guess its a little too thick on that lip. Plan to be off on Wednesday and hope to install more parts.
Only issue I ran into today was I drained the batteries when doing the wiper motor. Did not realize it until I went to move it back into the garage. Got the car charger out and started charging the batteries. Slow process with a regular charger but only needed a little on 1 battery to get it started. Since the Noco G7200 24V Charger is on sale at Amazon for under $70 I got one. This is the unit that is recommended on Steel Soldiers so I will see. |
|
|
|
|
[#49]
Originally Posted By jake-cutter:
Put the hardtop windshield on today and installed the glass with new seals and the wiper parts. Also riveted the hardtop seal onto the windshield frame, just need to figure out the last few rivets on each side as the holes were not predrilled. I used an FSI D100 riveter and it worked great, very easy to use one handed. Also, got the drivers seat back in but found out the rear seat lids don't quite fit due to the lizard skin/monstaliner, I guess its a little too thick on that lip. Plan to be off on Wednesday and hope to install more parts. Only issue I ran into today was I drained the batteries when doing the wiper motor. Did not realize it until I went to move it back into the garage. Got the car charger out and started charging the batteries. Slow process with a regular charger but only needed a little on 1 battery to get it started. Since the Noco G7200 24V Charger is on sale at Amazon for under $70 I got one. This is the unit that is recommended on Steel Soldiers so I will see. Is it the clips on the back part of the lid you had a problem with? I ended up opening up the clips on mine slightly to clear. |
|
|
|
|
[#50]
Originally Posted By Ryan_Ruck:
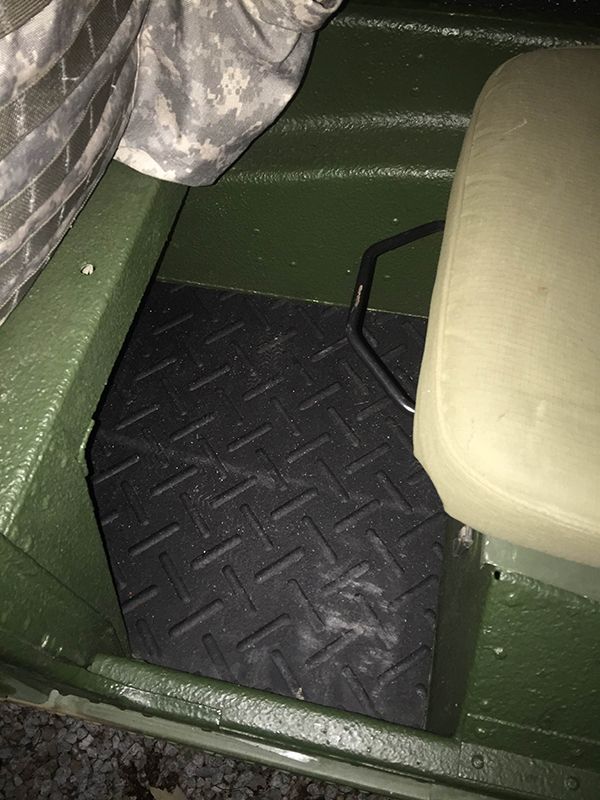
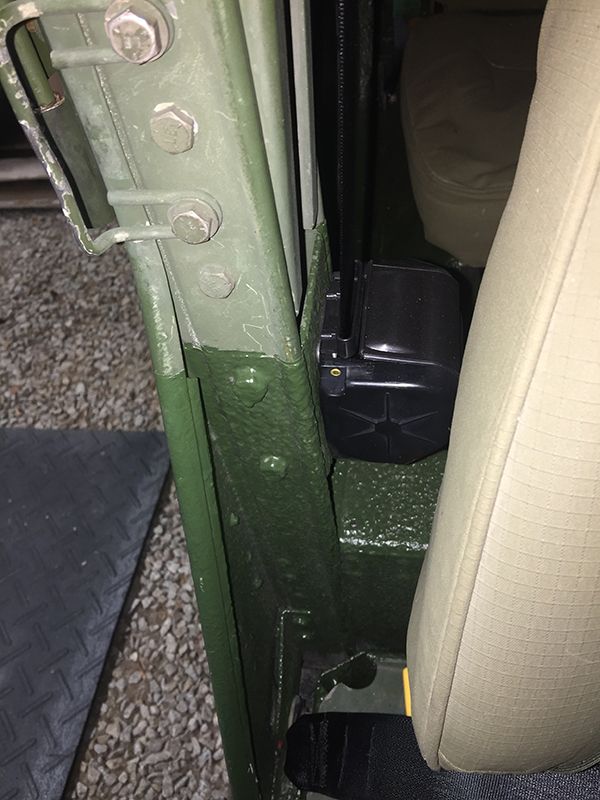
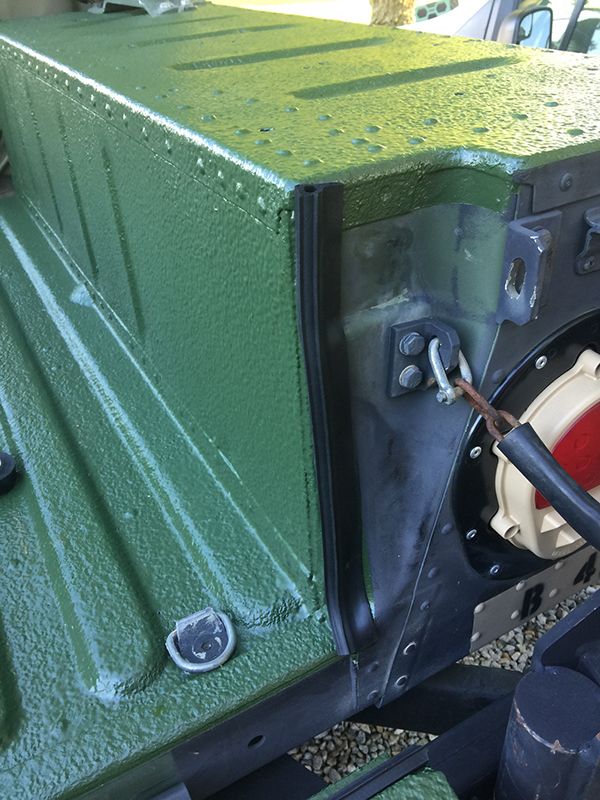
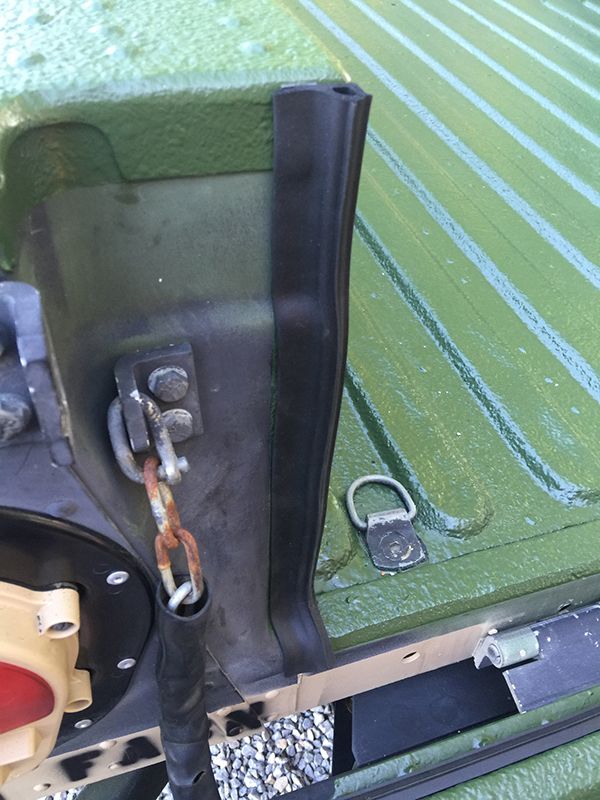
Is it the clips on the back part of the lid you had a problem with? I ended up opening up the clips on mine slightly to clear. Clips? Mine has just one lip riveted to the seat base as seen in the pic below. Its pretty heavy duty, but I am going to try to heat it up and pry it open a little. I have been told there are two types or lids, one for the cushion pad type seats and the re-enforced version for the high back seats. Does yours look like the pic below? 
Also the pic shows the Monstaliner that I sprayed in. Went in well and is nice, only thing is the light color shows dirt, but unlike the carc paint, the dirt just wipes off. With Tan CARC you have to really scrub to remove dirt. |
|
|
|
 Win a FREE Membership!
Sign up for the ARFCOM weekly newsletter and be entered to win a free ARFCOM membership. One new winner* is announced every week!
You will receive an email every Friday morning featuring the latest chatter from the hottest topics, breaking news surrounding legislation, as well as exclusive deals only available to ARFCOM email subscribers.

AR15.COM is the world's largest firearm community and is a gathering place for firearm enthusiasts of all types.
From hunters and military members, to competition shooters and general firearm enthusiasts, we welcome anyone who values and respects the way of the firearm.

Subscribe to our monthly Newsletter to receive firearm news, product discounts from your favorite Industry Partners, and more.
Copyright © 1996-2024 AR15.COM LLC. All Rights Reserved.
Any use of this content without express written consent is prohibited.
AR15.Com reserves the right to overwrite or replace any affiliate, commercial, or monetizable links, posted by users, with our own.


