|
[#1]
Quoted:
I tend to go all in on hobbies, and I can already see that this one is going to be lasting. Because of that, I am going to build my own dome for the backyard. I was going to build a ROR, but then stumbled on some plans for building geodesic domes. I already have all the foam cutting tools since I was in the business of hot wire cutting wing cores for many years, so this seems right up my alley. I am going by these plans: https://users.eoni.c...tzj/geodome.htm . I scaled them down to an 8' dome though. I'll also be fiberglassing the dome instead of using stucco. Today I'll be firing up the hotwire and cutting the triangles needed. A great thing about this type of dome is that it can be built on the cheap. I'm going to keep track of the expenses, but I think I can get away with building the whole observatory for under $1000.00. More posts, with pictures to follow after I get some cutting done! One of my friends has this one, but I don't think they make it anymore. |
|
|
|
[#2]
Once my kids are out of daycare I want to buy a piece of land that I can throw an observatory on. My house property is shitty for astrophotography, I want clear open skies, too many trees at my place.
My dream is to have the whole site somewhere near by but completely automated so that I can shoot from the comfort of my couch, or shoot on clear nights if I'm out of town for work. You guys out west have no idea how jealous I am of the skies you have, not just amount of clear nights but much darker as well. |
|
|
|
[#3]
Quoted:
My folks bought me a guide scope and camera for Christmas! I set it all up today, cleaned up the wiring and installed all the programs needed for guiding/imaging/planetarium. I have it all working through a USB3 hub, so I only need a singe USB3 cable going to my computer. The EQMOD Direct Cable I made myself with an FDTI chip I had laying around. Everything works great, I just have to learn about the guiding setup. Unfortunately, weather has rolled in, so I won't be able to try it under the stars for a while  https://farm5.staticflickr.com/4829/31537496777_c2cf523d7d_o.jpgAstrophotography Setup by Andrew Marjama, on Flickr I'd have no clue where to start, what to say, and probably mess it up. 
|
|
|
|
[#4]
Quoted: That'd be like a supermodel showing up in my house out of the blue, stripping naked, then looking seductively at me. I'd have no clue where to start, what to say, and probably mess it up. |
|
|
|
[#5]
Quoted:
My folks bought me a guide scope and camera for Christmas! I set it all up today, cleaned up the wiring and installed all the programs needed for guiding/imaging/planetarium. I have it all working through a USB3 hub, so I only need a singe USB3 cable going to my computer. The EQMOD Direct Cable I made myself with an FDTI chip I had laying around. Everything works great, I just have to learn about the guiding setup. Unfortunately, weather has rolled in, so I won't be able to try it under the stars for a while https://farm5.staticflickr.com/4829/31537496777_c2cf523d7d_o.jpgAstrophotography Setup by Andrew Marjama, on Flickr Your new guide scope setup looks almost the same as mine - and it works very well. I also use the guide scope for doing polar alignment using the Polar alignment plate solver in Sharpcap 2.9, Sharpcap 2.9 is free but the later versions cost (I only use Sharpcap 2.9 for the Polar alignment). |
|
|
|
[#6]
Quoted:
My folks bought me a guide scope and camera for Christmas! I set it all up today, cleaned up the wiring and installed all the programs needed for guiding/imaging/planetarium. I have it all working through a USB3 hub, so I only need a singe USB3 cable going to my computer. The EQMOD Direct Cable I made myself with an FDTI chip I had laying around. Everything works great, I just have to learn about the guiding setup. Unfortunately, weather has rolled in, so I won't be able to try it under the stars for a while https://farm5.staticflickr.com/4829/31537496777_c2cf523d7d_o.jpgAstrophotography Setup by Andrew Marjama, on Flickr What computer software are you using to guide it? |
|
|
|
[#7]
Quoted:
That's awesome. What computer software are you using to guide it? Quoted:
Quoted:
My folks bought me a guide scope and camera for Christmas! I set it all up today, cleaned up the wiring and installed all the programs needed for guiding/imaging/planetarium. I have it all working through a USB3 hub, so I only need a singe USB3 cable going to my computer. The EQMOD Direct Cable I made myself with an FDTI chip I had laying around. Everything works great, I just have to learn about the guiding setup. Unfortunately, weather has rolled in, so I won't be able to try it under the stars for a while https://farm5.staticflickr.com/4829/31537496777_c2cf523d7d_o.jpgAstrophotography Setup by Andrew Marjama, on Flickr What computer software are you using to guide it? |
|
|
|
[#8]
Quoted: That's awesome. What computer software are you using to guide it? |
|
|
|
[#9]
Well, I have about half the foam cut for the dome. If I stayed on it, I could probably have the dome finished by Monday.
I am using 2" EPS foam and once constructed, it will be fiberglassed on both sides. This will make a strong, light dome. I don't know why more aren't made this way. I'll only have ~$250.00 in the dome itself once I figure in epoxy and fiberglass, maybe a little more. It is going to be an 8' Dome. I couldn't help myself and had to stick a few pieces together. It is all made out of triangles, which are glued into hexagons and pentagons, which will then be glued together in a soccerball kind of pattern.  Dome Construction by Andrew Marjama, on Flickr Dome Construction by Andrew Marjama, on Flickr
|
|
|
|
[#10]
Quoted: There are a few good programs but PHD2 is probably the best, in large part because the user base is so incredible. |
|
|
|
[#11]
Quoted:
Well, I have about half the foam cut for the dome. If I stayed on it, I could probably have the dome finished by Monday. I am using 2" EPS foam and once constructed, it will be fiberglassed on both sides. This will make a strong, light dome. I don't know why more aren't made this way. I'll only have ~$250.00 in the dome itself once I figure in epoxy and fiberglass, maybe a little more. It is going to be an 8' Dome. I couldn't help myself and had to stick a few pieces together. It is all made out of triangles, which are glued into hexagons and pentagons, which will then be glued together in a soccerball kind of pattern. https://farm8.staticflickr.com/7886/31566423817_2f84491028_c.jpgDome Construction by Andrew Marjama, on Flickr Vacuum fiberglass around 3/4" and it's plywood of 1/3 thickness for durability to flex/impact. Used for everything from cars to surfboards to R/C Aircraft. Cut angle on wooden miter with hot knife so they stick together, then pull a vacuum on individual panels to make it literally glass. Lots of info and kits at the top guys in the show, about $300 or less to get a 3 CFM 25+ inHg continuous duty pump, bag, cover film/gel coat/decoration optional, release agent, Good epoxy (West or System Three is what I use, store in refrigerator). Don't get a "HVAC Service vacuum pump" that's not rated for continuous duty, it'll die on first or second use. https://www.fibreglast.com/category/Vacuum_Bagging http://shop.fiberglasssupply.com/Products-Vacuum_Bagging_Supplies.html You can get the components listed above for about $200 from eBay sellers that are pretty reliable and use decent epoxy to save money. Depends how durable you want it - purely fiberglass and epoxy materials chosen, pump and bag don't matter on durability other than convenience if it goes to at least 20inHg, but higher is better for super smooth bubble free finish. Techniques Having a high continuous duty (important, needs to run for > 24 hrs for best cure) vacuum pump around is also very handy for many things. Re-seal DI resin and otehr air sensitive products so they don't go bad from air/moisture contact, etc. WAY stronger vacuum than any countertop vac sealer can make, and custom sized bags using plastic and an iron to make your own storage bag (start with shop vac when doing dozens of cubic feet to get it to 5inHg to start). Just a few examples. ---ETA: --ETA2: That eBay link is Bad. It's a good example of how they run now. Stuff in the photo is not included, must look in list below, which has no pump, sealing clay, and other details... |
|
|
|
[#12]
Quoted: Yes I think I changed a few things, are you saving your profile after you make changes? On a semi-related note, made some temporary/prototype spacer blocks for the ZenithStar 73 today, work great, gives the camera 360 degree rotation and allows me to properly balance. Will make some nicer ones down the road when time permits. |
|
|
|
[#13]
Quoted:
Well, I have about half the foam cut for the dome. If I stayed on it, I could probably have the dome finished by Monday. I am using 2" EPS foam and once constructed, it will be fiberglassed on both sides. This will make a strong, light dome. I don't know why more aren't made this way. I'll only have ~$250.00 in the dome itself once I figure in epoxy and fiberglass, maybe a little more. It is going to be an 8' Dome. I couldn't help myself and had to stick a few pieces together. It is all made out of triangles, which are glued into hexagons and pentagons, which will then be glued together in a soccerball kind of pattern. https://farm8.staticflickr.com/7886/31566423817_2f84491028_c.jpgDome Construction by Andrew Marjama, on Flickr |
|
|
|
[#14]
Quoted: Yes, saving after every change and before going to a new tab. Some seem to be indicating that some information, i.e. FOV is only generated when a sequence is actually be conducted, and it's based off the parameters for the camera and focal length, which I've put in. Hopefully it works in the field (okay, my backyard) when I try it. On a semi-related note, made some temporary/prototype spacer blocks for the ZenithStar 73 today, work great, gives the camera 360 degree rotation and allows me to properly balance. Will make some nicer ones down the road when time permits. https://www.AR15.Com/media/mediaFiles/158414/49498820_1665808440231417_54425256577644625922_jpg-788519.JPG I'll check out my settings this weekend and post them up. Have you played with the Framing and Mosaic Wizard? It is the best damn thing for planning shots. |
|
|
|
[#15]
Quoted: @Zach540 I'll check out my settings this weekend and post them up. Have you played with the Framing and Mosaic Wizard? It is the best damn thing for planning shots. |
|
|
|
[#16]
First light went well with the CEM60 and William Optics ZenithStar 73, did have some issues with SGP, could be due to first time using it or the fact that I was freezing my butt off, so I just resorted to BackyardNikon.
|
|
|
|
[#17]
Quoted:
First light went well with the CEM60 and William Optics ZenithStar 73, did have some issues with SGP, could be due to first time using it or the fact that I was freezing my butt off, so I just resorted to BackyardNikon. https://www.AR15.Com/media/mediaFiles/158414/Autosave2_-_Copy_jpg-789825.JPG What went wrong with sgp? |
|
|
|
[#18]
Quoted: Nice! Image details? What went wrong with sgp? As for SGP, I'm sure it was 100% user error, got an error saying "A telescope has been detected, but it is currently unable to slew (parked or not tracking). Do you want to start your telescope when the sequence begins?" I clicked yes, and nothing happened, not sure if the sequence was delayed due to a specific start time or something of the like, but just figured I'd carry on and make the most of the night while I could. If it were a little warmer, I'd likely have tried to figure it. |
|
|
|
[#19]
Quoted:
First light went well with the CEM60 and William Optics ZenithStar 73, did have some issues with SGP, could be due to first time using it or the fact that I was freezing my butt off, so I just resorted to BackyardNikon. https://www.AR15.Com/media/mediaFiles/158414/Autosave2_-_Copy_jpg-789825.JPG How many images/exposures? It looks VERY awesome. What, specifically, is the image of? |
|
|
|
[#20]
Quoted: No false color, full spectrum from a DSLR? How many images/exposures? It looks VERY awesome. What, specifically, is the image of? As for number of images and time for exposures, it was 10x120", 10x180", 10x240", 10x300", 3x360" stacked. |
|
|
|
[#21]
Quoted:
Thanks, quite a different color than what is traditional for that particular nebula, which is the Rosette Nebula, most have a lot more red to them. Mine was taken with my D7000 and a Baader UHC-S filter. My camera is non-modified - so not as sensitive to red, when post processing, I was able to really bring out the red, but looked very unnatural due to this, so I tried going with what looked more natural. As for number of images and time for exposures, it was 10x120", 10x180", 10x240", 10x300", 3x360" stacked. Quoted:
Quoted: No false color, full spectrum from a DSLR? How many images/exposures? It looks VERY awesome. What, specifically, is the image of? As for number of images and time for exposures, it was 10x120", 10x180", 10x240", 10x300", 3x360" stacked. |
|
|
|
[#22]
Quoted: Which software do you use for stacking? I only have Lightroom and hear many others out there from free to subscription pricing. Nebulosity is $99 PixInsight is around $280 I use nebulosity right now because I haven't sat down to learn the PI routine for stacking. I've never used deep sky stacker but people like it. You want something that you can stack all your darks, lights, bias and flat frames with. |
|
|
|
[#23]
Quoted:
Deep sky stacker is free. Nebulosity is $99 PixInsight is around $280 I use nebulosity right now because I haven't sat down to learn the PI routine for stacking. I've never used deep sky stacker but people like it. You want something that you can stack all your darks, lights, bias and flat frames with. Quoted:
Quoted: Which software do you use for stacking? I only have Lightroom and hear many others out there from free to subscription pricing. Nebulosity is $99 PixInsight is around $280 I use nebulosity right now because I haven't sat down to learn the PI routine for stacking. I've never used deep sky stacker but people like it. You want something that you can stack all your darks, lights, bias and flat frames with. |
|
|
|
[#24]
Quoted: Thanks, I'm looking for one that's not "automatic", but simpler and faster than merging 2 layers at a time in GIMP. Try deep sky stacker |
|
|
|
[#25]
Quoted:
I've been there, merging manually sucks. Try deep sky stacker Quoted:
Quoted: Thanks, I'm looking for one that's not "automatic", but simpler and faster than merging 2 layers at a time in GIMP. Try deep sky stacker |
|
|
|
[#26]
Quoted: Which software do you use for stacking? I only have Lightroom and hear many others out there from free to subscription pricing. I'd love to try Pixinsight, but that is a LOT of money for a yearly subscription. |
|
|
|
[#27]
... double tap
|
|
|
|
[#28]
Pixinsight is not a subscription, one time payment for the software.
|
|
|
|
[#29]
I used Deep Sky Stacker for mine, while I'm open to trying other software down the road for processing, I'd rather learn SGP for capture.
|
|
|
|
[#30]
My first two photos of 2019
Andromeda (38 images at 300 seconds and 400 ISO) and The Heart Nebula (39 images at 300 seconds and 640 ISO) 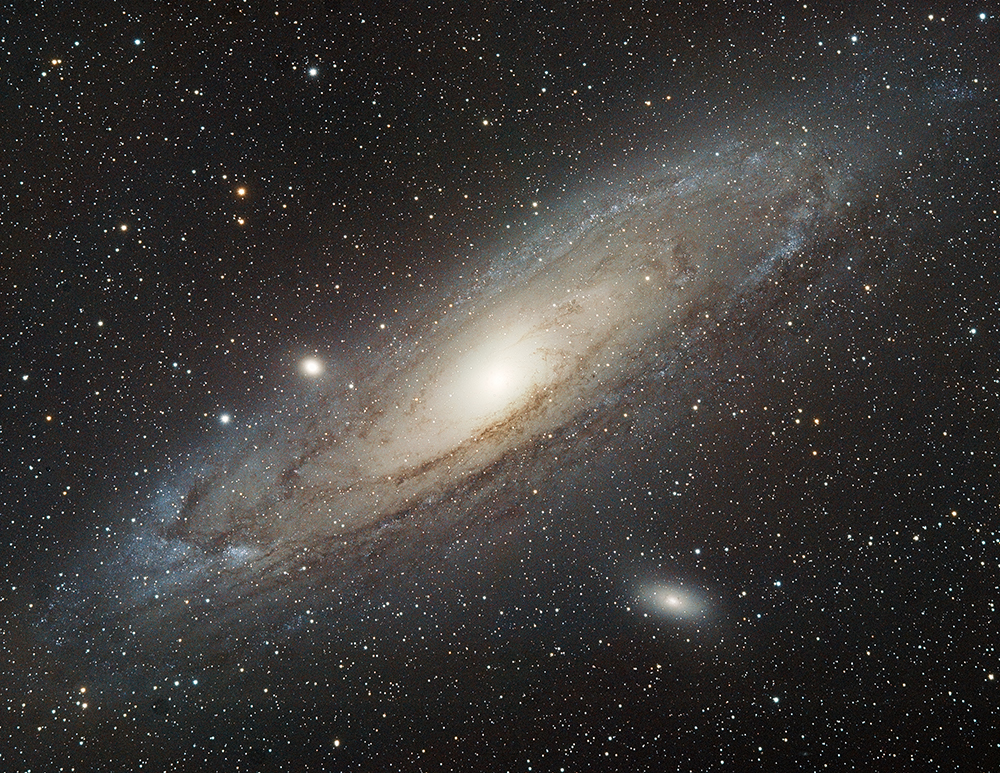 Andromeda Galaxy - New Years Day by Andrew Marjama, on Flickr Andromeda Galaxy - New Years Day by Andrew Marjama, on Flickr Heart Nebula 195 Minutes by Andrew Marjama, on Flickr Heart Nebula 195 Minutes by Andrew Marjama, on Flickr
|
|
|
|
[#31]
Quoted:
My first two photos of 2019 Andromeda (38 images at 300 seconds and 400 ISO) and The Heart Nebula (39 images at 300 seconds and 640 ISO) https://farm5.staticflickr.com/4809/46577223371_a38c15c042_o.jpgAndromeda Galaxy - New Years Day by Andrew Marjama, on Flickr https://farm5.staticflickr.com/4898/46602108551_741a26d2b9_o.jpgHeart Nebula 195 Minutes by Andrew Marjama, on Flickr Do you decide what to shoot, then get as many photos as you can in one night, then do the next? Trying to figure out how to do 3+ hours of exposure plus 30 flat and 30 dark Is there currently a meteor shower that can be captured on camera to any effect? The "Quadrantids" is Jan 3-4, unsure how to even go about getting something like that, I saw none with naked eye. |
|
|
|
[#32]
Quoted:
Very Nice work! Do you decide what to shoot, then get as many photos as you can in one night, then do the next? Trying to figure out how to do 3+ hours of exposure plus 30 flat and 30 dark Is there currently a meteor shower that can be captured on camera to any effect? The "Quadrantids" is Jan 3-4, unsure how to even go about getting something like that, I saw none with naked eye. Quoted:
Quoted:
My first two photos of 2019 Andromeda (38 images at 300 seconds and 400 ISO) and The Heart Nebula (39 images at 300 seconds and 640 ISO) https://farm5.staticflickr.com/4809/46577223371_a38c15c042_o.jpgAndromeda Galaxy - New Years Day by Andrew Marjama, on Flickr https://farm5.staticflickr.com/4898/46602108551_741a26d2b9_o.jpgHeart Nebula 195 Minutes by Andrew Marjama, on Flickr Do you decide what to shoot, then get as many photos as you can in one night, then do the next? Trying to figure out how to do 3+ hours of exposure plus 30 flat and 30 dark Is there currently a meteor shower that can be captured on camera to any effect? The "Quadrantids" is Jan 3-4, unsure how to even go about getting something like that, I saw none with naked eye. If I need to build more image time I'll do the same thing the following night (or whenever) on the same target. |
|
|
|
[#33]
You can create a master dark and bias that you can use night to night. I update it every few months. My camera doesnt need the bias but a dslr would benefit from it.
Then make sure to apply the dark and bias masterfiles to your flat files before applying those to your lights |
|
|
|
[#34]
Quoted:
You can create a master dark and bias that you can use night to night. I update it every few months. My camera doesnt need the bias but a dslr would benefit from it. Then make sure to apply the dark and bias masterfiles to your flat files before applying those to your lights Might be stupid question, but when I look on this, many sites show dark and bias as nearly synonyms. Darks are with cap over objective/no light, what's a bias done like? Other question: How long are your dark exposures each? They suggest over 16 to make a profile/master dark, not sure what that exposure would be (like 1/250th or 1"). Both the shooting and post processing sides of this are pretty intricate to even 'try', along with the equipment. So yeah, I'm jealous of these photos. |
|
|
|
[#35]
Quoted:
@AZ_sky Might be stupid question, but when I look on this, many sites show dark and bias as nearly synonyms. Darks are with cap over objective/no light, what's a bias done like? Other question: How long are your dark exposures each? They suggest over 16 to make a profile/master dark, not sure what that exposure would be (like 1/250th or 1"). Both the shooting and post processing sides of this are pretty intricate to even 'try', along with the equipment. So yeah, I'm jealous of these photos. Quoted:
Quoted:
You can create a master dark and bias that you can use night to night. I update it every few months. My camera doesnt need the bias but a dslr would benefit from it. Then make sure to apply the dark and bias masterfiles to your flat files before applying those to your lights Might be stupid question, but when I look on this, many sites show dark and bias as nearly synonyms. Darks are with cap over objective/no light, what's a bias done like? Other question: How long are your dark exposures each? They suggest over 16 to make a profile/master dark, not sure what that exposure would be (like 1/250th or 1"). Both the shooting and post processing sides of this are pretty intricate to even 'try', along with the equipment. So yeah, I'm jealous of these photos. I image with a DSLR so my Darks, Flats, and Bias are done for my camera. Here is a copy/paste from the help menu in Deep Sky Stacker that explains the differences: Light, Dark, Flat, Bias... What are they and how to create them? (if you are wondering how all the files are used during the calibration process you can have a look here) Light Frames The Light Frames are the images that contains the real information: images of galaxies, nebula... This is what you want to stack. Dark Frames and Dark Flat Frames The Dark Frames are used to remove the dark signal from the light frames (or the flat frames for the Dark Flat frames). With DSLRs and CCD Camera, the CMOS or CCD is generating a dark signal depending of the exposure time, temperature and ISO speed (DSLR only). To remove the dark signal from the light frames you use a dark frame that contains only the dark signal. The best way to create the dark frames is to shoot pictures in the dark (hence the name) by covering the lens. The dark frames must be created with the exposure time, temperature and ISO speed of the light frames (resp. flat frames). Since the temperature is important try to shoot dark frames at the end or during your imaging session. Take a few of them (between 10 and 20 is usually enough). DeepSkyStacker will combine them automatically to create and use a clean master dark or master dark flat. Bias Frames (aka Offset Frames) The Bias/Offset Frames are used to remove the CCD or CMOS chip readout signal from the light frames. Each CCD or CMOS chip is generating a readout signal which is a signal created by the electronic just by reading the content of the chip. It's very easy to create bias/offset frames: just take the shortest possible exposure (it may be 1/4000s or 1/8000s depending on your camera) in the dark by covering the lens. The bias frames must be create with the ISO speed of the light frames. The temperature is not important. Take a few of them (between 10 and 20 is usually enough). DeepSkyStacker will combine them automatically to create and use a clean master bias/offset frame Flat Frames The Flat Frames are used to correct the vignetting and uneven field illumination created by dust or smudges in your optical train. To create good flat frames it is very important to not remove your camera from your telescope before taking them (including not changing the focus). You can use a lot of different methods (including using a flatbox) but I found that the simplest way is to put a white T shirt in front of your telescope and smooth out the folds. Then shoot something luminous (a flash, a bright white light, the sky at dawn...) and let the camera decide of the exposure time (Av mode), The flat frames should be created with the ISO speed of the light frames. The temperature is not important. Take a few of them (between 10 and 20 is usually enough). DeepSkyStacker will combine them automatically to create and use a clean master flat frame. Is it possible to use colored flat frames? The short answer is yes. The overall tint of your flat frames is not really important because DeepSkyStacker is processing each channel separately and is applying the flat frames to each channel accordingly. Of course if your flat frames are fully red only the red channel of your light frames will be properly calibrated but otherwise as long as as the peak in each channel is between 1/3 and 2/3 of the maximum you should have no problem using slightly colored flat frames. |
|
|
|
[#36]
I don't do any of this but I love the pictures. Tag
|
|
|
|
[#37]
I've been having a hard time with my flats. They always seem to degrade the final image. On my Andromeda image, when I used my Master Flat, there was hardly any detail left in the disk.
Because of that, I just use my Master Darks, Master Bias and Bad Pixel Map and leave the Master Flats out. I just get rid of the dust bunnies with the clone tool. |
|
|
|
[#38]
Quoted:
@brass I image with a DSLR so my Darks, Flats, and Bias are done for my camera. Here is a copy/paste from the help menu in Deep Sky Stacker that explains the differences: Light, Dark, Flat, Bias... What are they and how to create them? (if you are wondering how all the files are used during the calibration process you can have a look here) Light Frames The Light Frames are the images that contains the real information: images of galaxies, nebula... This is what you want to stack. Dark Frames and Dark Flat Frames The Dark Frames are used to remove the dark signal from the light frames (or the flat frames for the Dark Flat frames). With DSLRs and CCD Camera, the CMOS or CCD is generating a dark signal depending of the exposure time, temperature and ISO speed (DSLR only). To remove the dark signal from the light frames you use a dark frame that contains only the dark signal. The best way to create the dark frames is to shoot pictures in the dark (hence the name) by covering the lens. The dark frames must be created with the exposure time, temperature and ISO speed of the light frames (resp. flat frames). Since the temperature is important try to shoot dark frames at the end or during your imaging session. Take a few of them (between 10 and 20 is usually enough). DeepSkyStacker will combine them automatically to create and use a clean master dark or master dark flat. Bias Frames (aka Offset Frames) The Bias/Offset Frames are used to remove the CCD or CMOS chip readout signal from the light frames. Each CCD or CMOS chip is generating a readout signal which is a signal created by the electronic just by reading the content of the chip. It's very easy to create bias/offset frames: just take the shortest possible exposure (it may be 1/4000s or 1/8000s depending on your camera) in the dark by covering the lens. The bias frames must be create with the ISO speed of the light frames. The temperature is not important. Take a few of them (between 10 and 20 is usually enough). DeepSkyStacker will combine them automatically to create and use a clean master bias/offset frame Flat Frames The Flat Frames are used to correct the vignetting and uneven field illumination created by dust or smudges in your optical train. To create good flat frames it is very important to not remove your camera from your telescope before taking them (including not changing the focus). You can use a lot of different methods (including using a flatbox) but I found that the simplest way is to put a white T shirt in front of your telescope and smooth out the folds. Then shoot something luminous (a flash, a bright white light, the sky at dawn...) and let the camera decide of the exposure time (Av mode), The flat frames should be created with the ISO speed of the light frames. The temperature is not important. Take a few of them (between 10 and 20 is usually enough). DeepSkyStacker will combine them automatically to create and use a clean master flat frame. Is it possible to use colored flat frames? The short answer is yes. The overall tint of your flat frames is not really important because DeepSkyStacker is processing each channel separately and is applying the flat frames to each channel accordingly. Of course if your flat frames are fully red only the red channel of your light frames will be properly calibrated but otherwise as long as as the peak in each channel is between 1/3 and 2/3 of the maximum you should have no problem using slightly colored flat frames. Quoted:
Quoted:
Quoted:
You can create a master dark and bias that you can use night to night. I update it every few months. My camera doesnt need the bias but a dslr would benefit from it. Then make sure to apply the dark and bias masterfiles to your flat files before applying those to your lights Might be stupid question, but when I look on this, many sites show dark and bias as nearly synonyms. Darks are with cap over objective/no light, what's a bias done like? Other question: How long are your dark exposures each? They suggest over 16 to make a profile/master dark, not sure what that exposure would be (like 1/250th or 1"). Both the shooting and post processing sides of this are pretty intricate to even 'try', along with the equipment. So yeah, I'm jealous of these photos. I image with a DSLR so my Darks, Flats, and Bias are done for my camera. Here is a copy/paste from the help menu in Deep Sky Stacker that explains the differences: Light, Dark, Flat, Bias... What are they and how to create them? (if you are wondering how all the files are used during the calibration process you can have a look here) Light Frames The Light Frames are the images that contains the real information: images of galaxies, nebula... This is what you want to stack. Dark Frames and Dark Flat Frames The Dark Frames are used to remove the dark signal from the light frames (or the flat frames for the Dark Flat frames). With DSLRs and CCD Camera, the CMOS or CCD is generating a dark signal depending of the exposure time, temperature and ISO speed (DSLR only). To remove the dark signal from the light frames you use a dark frame that contains only the dark signal. The best way to create the dark frames is to shoot pictures in the dark (hence the name) by covering the lens. The dark frames must be created with the exposure time, temperature and ISO speed of the light frames (resp. flat frames). Since the temperature is important try to shoot dark frames at the end or during your imaging session. Take a few of them (between 10 and 20 is usually enough). DeepSkyStacker will combine them automatically to create and use a clean master dark or master dark flat. Bias Frames (aka Offset Frames) The Bias/Offset Frames are used to remove the CCD or CMOS chip readout signal from the light frames. Each CCD or CMOS chip is generating a readout signal which is a signal created by the electronic just by reading the content of the chip. It's very easy to create bias/offset frames: just take the shortest possible exposure (it may be 1/4000s or 1/8000s depending on your camera) in the dark by covering the lens. The bias frames must be create with the ISO speed of the light frames. The temperature is not important. Take a few of them (between 10 and 20 is usually enough). DeepSkyStacker will combine them automatically to create and use a clean master bias/offset frame Flat Frames The Flat Frames are used to correct the vignetting and uneven field illumination created by dust or smudges in your optical train. To create good flat frames it is very important to not remove your camera from your telescope before taking them (including not changing the focus). You can use a lot of different methods (including using a flatbox) but I found that the simplest way is to put a white T shirt in front of your telescope and smooth out the folds. Then shoot something luminous (a flash, a bright white light, the sky at dawn...) and let the camera decide of the exposure time (Av mode), The flat frames should be created with the ISO speed of the light frames. The temperature is not important. Take a few of them (between 10 and 20 is usually enough). DeepSkyStacker will combine them automatically to create and use a clean master flat frame. Is it possible to use colored flat frames? The short answer is yes. The overall tint of your flat frames is not really important because DeepSkyStacker is processing each channel separately and is applying the flat frames to each channel accordingly. Of course if your flat frames are fully red only the red channel of your light frames will be properly calibrated but otherwise as long as as the peak in each channel is between 1/3 and 2/3 of the maximum you should have no problem using slightly colored flat frames. |
|
|
|
[#39]
Quoted:
Ok, I have a translucent white "spring out" photodisk (also silver, gold, black, white, all 36"), can I pop that in front of the lens and take a photo with the flash going off behind for the dustprint/flat frame? A Lightbox, without the box, just me holding them about 4 feet apart in front of lens. Quoted:
Quoted:
Quoted:
Quoted:
You can create a master dark and bias that you can use night to night. I update it every few months. My camera doesnt need the bias but a dslr would benefit from it. Then make sure to apply the dark and bias masterfiles to your flat files before applying those to your lights Might be stupid question, but when I look on this, many sites show dark and bias as nearly synonyms. Darks are with cap over objective/no light, what's a bias done like? Other question: How long are your dark exposures each? They suggest over 16 to make a profile/master dark, not sure what that exposure would be (like 1/250th or 1"). Both the shooting and post processing sides of this are pretty intricate to even 'try', along with the equipment. So yeah, I'm jealous of these photos. I image with a DSLR so my Darks, Flats, and Bias are done for my camera. Here is a copy/paste from the help menu in Deep Sky Stacker that explains the differences: Light, Dark, Flat, Bias... What are they and how to create them? (if you are wondering how all the files are used during the calibration process you can have a look here) Light Frames The Light Frames are the images that contains the real information: images of galaxies, nebula... This is what you want to stack. Dark Frames and Dark Flat Frames The Dark Frames are used to remove the dark signal from the light frames (or the flat frames for the Dark Flat frames). With DSLRs and CCD Camera, the CMOS or CCD is generating a dark signal depending of the exposure time, temperature and ISO speed (DSLR only). To remove the dark signal from the light frames you use a dark frame that contains only the dark signal. The best way to create the dark frames is to shoot pictures in the dark (hence the name) by covering the lens. The dark frames must be created with the exposure time, temperature and ISO speed of the light frames (resp. flat frames). Since the temperature is important try to shoot dark frames at the end or during your imaging session. Take a few of them (between 10 and 20 is usually enough). DeepSkyStacker will combine them automatically to create and use a clean master dark or master dark flat. Bias Frames (aka Offset Frames) The Bias/Offset Frames are used to remove the CCD or CMOS chip readout signal from the light frames. Each CCD or CMOS chip is generating a readout signal which is a signal created by the electronic just by reading the content of the chip. It's very easy to create bias/offset frames: just take the shortest possible exposure (it may be 1/4000s or 1/8000s depending on your camera) in the dark by covering the lens. The bias frames must be create with the ISO speed of the light frames. The temperature is not important. Take a few of them (between 10 and 20 is usually enough). DeepSkyStacker will combine them automatically to create and use a clean master bias/offset frame Flat Frames The Flat Frames are used to correct the vignetting and uneven field illumination created by dust or smudges in your optical train. To create good flat frames it is very important to not remove your camera from your telescope before taking them (including not changing the focus). You can use a lot of different methods (including using a flatbox) but I found that the simplest way is to put a white T shirt in front of your telescope and smooth out the folds. Then shoot something luminous (a flash, a bright white light, the sky at dawn...) and let the camera decide of the exposure time (Av mode), The flat frames should be created with the ISO speed of the light frames. The temperature is not important. Take a few of them (between 10 and 20 is usually enough). DeepSkyStacker will combine them automatically to create and use a clean master flat frame. Is it possible to use colored flat frames? The short answer is yes. The overall tint of your flat frames is not really important because DeepSkyStacker is processing each channel separately and is applying the flat frames to each channel accordingly. Of course if your flat frames are fully red only the red channel of your light frames will be properly calibrated but otherwise as long as as the peak in each channel is between 1/3 and 2/3 of the maximum you should have no problem using slightly colored flat frames. I'm not sure what your setup is. A flat frame is taken at the end of whatever your 'image tube' is with a constant flat natural light. I use the tee shirt method over my telescope for flat frames. https://astrobackyard.com/how-to-take-flat-frames/ As Sixgunner45 said, flats can be tricky, if not done correctly I also have found that they can cause more problems than they cure....
|
|
|
|
[#40]
Quoted:
I've been having a hard time with my flats. They always seem to degrade the final image. On my Andromeda image, when I used my Master Flat, there was hardly any detail left in the disk. Because of that, I just use my Master Darks, Master Bias and Bad Pixel Map and leave the Master Flats out. I just get rid of the dust bunnies with the clone tool. |
|
|
|
[#41]
Quoted:
I haven't done flats yet, but out of curiosity, what did the histogram look like during your flats? was it more in the middle or the right? Quoted:
Quoted:
I've been having a hard time with my flats. They always seem to degrade the final image. On my Andromeda image, when I used my Master Flat, there was hardly any detail left in the disk. Because of that, I just use my Master Darks, Master Bias and Bad Pixel Map and leave the Master Flats out. I just get rid of the dust bunnies with the clone tool. |
|
|
|
[#42]
Histogram on flats is usually on left side, they should be dark. I'll upload a non stretched flat later for you to see. I'll also try to explain how I create them better.
Going to have to be tomorrow though, had carpal tunnel surgery today so i need to stay off the computer for at least 1 day
|
|
|
|
[#43]
Quoted:
Histogram on flats is usually on left side, they should be dark. I'll upload a non stretched flat later for you to see. I'll also try to explain how I create them better. Going to have to be tomorrow though, had carpal tunnel surgery today so i need to stay off the computer for at least 1 day Looking forward to your upload, maybe that will help me understand why I also have occasional problems with my flats... |
|
|
|
[#44]
Quoted:
Man, that sucks - get well soon! Looking forward to your upload, maybe that will help me understand why I also have occasional problems with my flats... As far as flats here is a quick snap shot of my master flat for when I shot M33, this was for my luminance filter. 
This is how dark it typically is, you don't want you flats too bright. It varies by camera I think but I'll look up the value that you want to shoot for in a flat. Here is the same flat stretched. 
Filters were very dirty then. You also want to make sure you calibrate all of your files. If you use a bias, you want to apply that bias to your master dark file, you then want to apply your master dark to all of your flats. From there you apply both the master dark and master flat to each light frame before stacking. For years I never did this and now I'm going to reshoot almost everything, it makes a huge difference. If I get time later maybe I'll do a comparison between a shot with and without calibration files. |
|
|
|
[#45]
I took this last night with my Stellarvue SV80 Access and Nikon D600. This is 31 frames at 300 seconds, 20 frames at 60 seconds and 30 frames at 30 seconds.
I am not real happy with it, but it is better than my last photo of Orion. Can't seem to get the colors just right and the trap isn't as defined as I'd like. 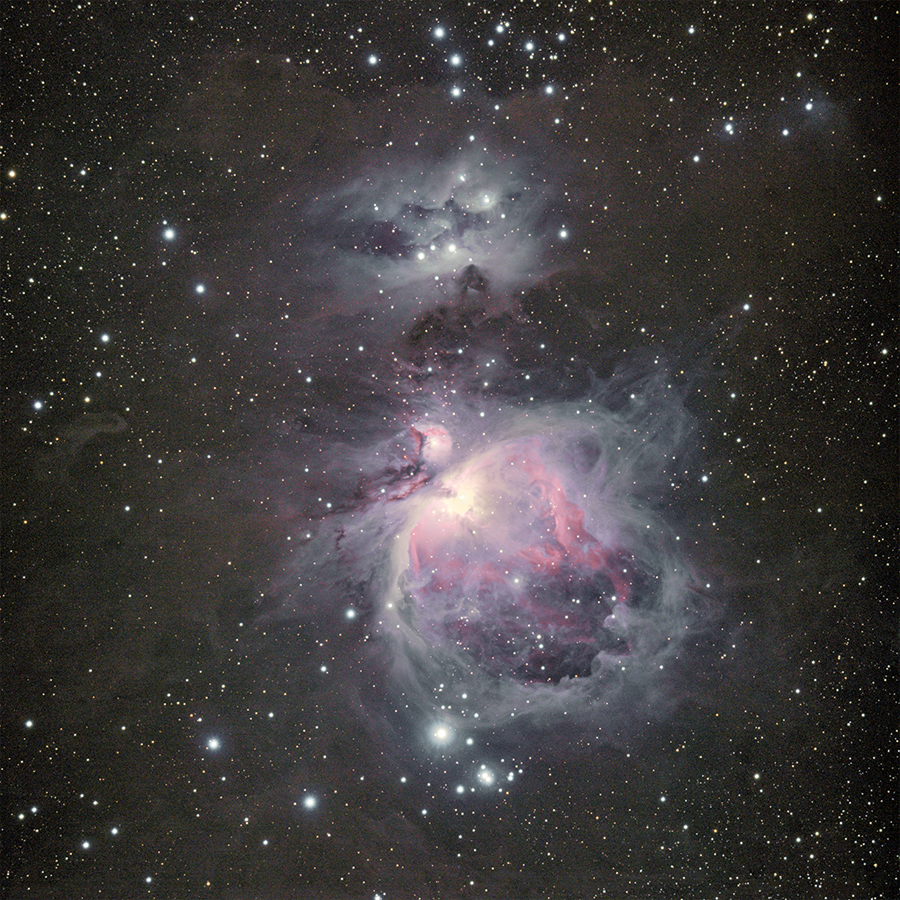 Orion 190 Minutes by Andrew Marjama, on Flickr Orion 190 Minutes by Andrew Marjama, on Flickr
|
|
|
|
[#46]
Very nice! I'm jealous, can never seem to get the surrounding darker dust to show up here.
Takes a lot more time than it should to get dusty objects, damn heavy light pollution. How dark are your skies? |
|
|
|
[#47]
Quoted:
I took this last night with my Stellarvue SV80 Access and Nikon D600. This is 31 frames at 300 seconds, 20 frames at 60 seconds and 30 frames at 30 seconds. I am not real happy with it, but it is better than my last photo of Orion. Can't seem to get the colors just right and the trap isn't as defined as I'd like. https://farm5.staticflickr.com/4806/46654705541_da14725e0f_o.jpgOrion 190 Minutes by Andrew Marjama, on Flickr Even if you showed me exactly what is wrong with that photo in your mind, I doubt I'd see it. It's a True Color image, which helps a lot. The monochrome + filters can give a lot more tweaking, but your setup captures it as the eye would see it. I'm curious why the 60 second and 30 second frames, however. I'm still only reading and learning and unsure on these, through long lens, I can't really even see what I'm taking a picture of, so until I get tracking mount, it's pointless, but I find it fascinating! I'll wait til it warms up to consider it. --ETA: Your image tops the first page of an Image Search by a long way |
|
|
|
[#48]
Quoted:
Very nice! I'm jealous, can never seem to get the surrounding darker dust to show up here. Takes a lot more time than it should to get dusty objects, damn heavy light pollution. How dark are your skies? I have some darks skies just a 30 minute drive away, but it is pretty easy imaging from the backyard. |
|
|
|
[#49]
Orion from last night, this is only about an hour and a half worth of imaging. I only get a small window of time in that part of the sky from my backyard. I was too lazy to go set up at the dark site, plus it was only about 1 degree out.
If I get another clear night soon I'll do longer exposures and shorter ones to blend the image, plus some Ha. 
Also I rushed to do my flats this morning and screwed them up, so I need to redo them all tonight when I get home, I also need to update my master dark file. |
|
|
|
[#50]
Quoted:
Orion from last night, this is only about an hour and a half worth of imaging. I only get a small window of time in that part of the sky from my backyard. I was too lazy to go set up at the dark site, plus it was only about 1 degree out. If I get another clear night soon I'll do longer exposures and shorter ones to blend the image, plus some Ha. https://i.imgur.com/N1TJVHp.jpg Also I rushed to do my flats this morning and screwed them up, so I need to redo them all tonight when I get home, I also need to update my master dark file. Is that an hour and a half on each LRGB filter? Unfortunately, we haven't had any decent imaging nights here in weeks due to weather. I am excited though, a friend of mine gave me a Dell Inspiron i7 Windows 10 laptop that had a margarita spilled into the keyboard and she managed to damage it trying to fix it - it also had a bad battery. I bought a replacement keyboard ($20), a replacement battery ($35), and just for the hell of it I cloned the HDD to a 500GB SSD that I had laying around. I now have a great dedicated astro laptop that I just finished setting up all my astro programs on (my old XP laptop wouldn't run half of the programs). So I'm looking forward to getting it all up and running as soon as the weather clears (now I just need that new cooled astro camera)!! |
|
|
 Win a FREE Membership!
Sign up for the ARFCOM weekly newsletter and be entered to win a free ARFCOM membership. One new winner* is announced every week!
You will receive an email every Friday morning featuring the latest chatter from the hottest topics, breaking news surrounding legislation, as well as exclusive deals only available to ARFCOM email subscribers.

AR15.COM is the world's largest firearm community and is a gathering place for firearm enthusiasts of all types.
From hunters and military members, to competition shooters and general firearm enthusiasts, we welcome anyone who values and respects the way of the firearm.

Subscribe to our monthly Newsletter to receive firearm news, product discounts from your favorite Industry Partners, and more.
Copyright © 1996-2024 AR15.COM LLC. All Rights Reserved.
Any use of this content without express written consent is prohibited.
AR15.Com reserves the right to overwrite or replace any affiliate, commercial, or monetizable links, posted by users, with our own.


