|
Posted: 5/9/2013 9:44:18 AM EDT
I hit up youtube trying to see different methods for color filling the receiver logo & letters.
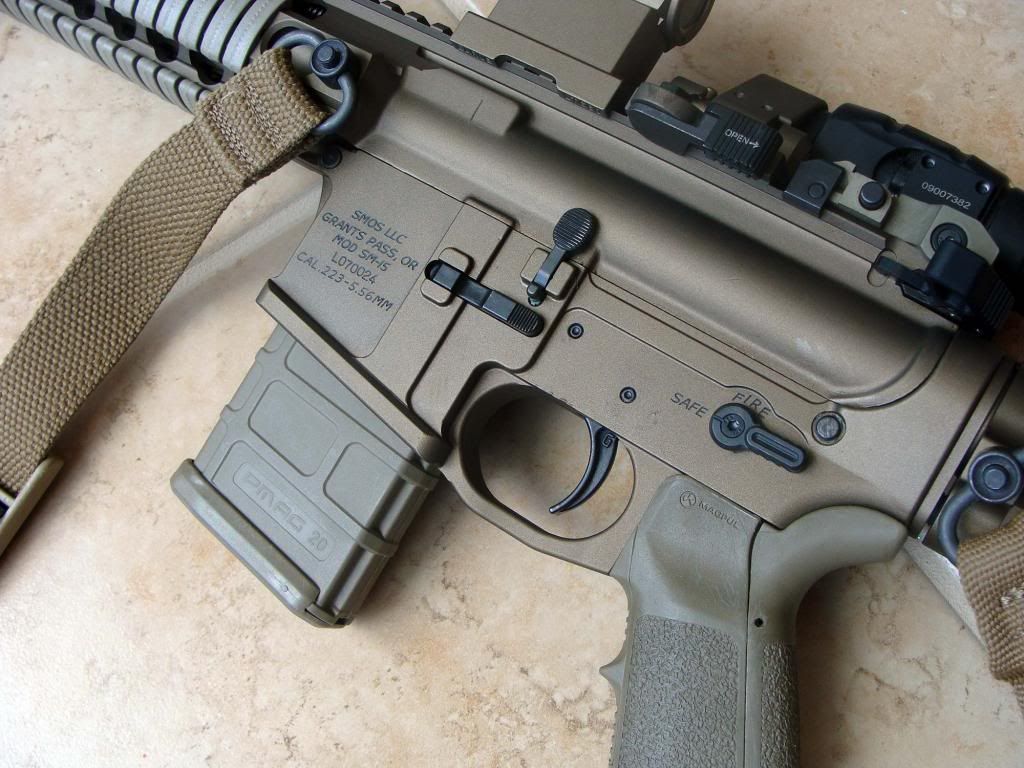
Decided to use crayon and some Rem Oil. The result: Best. Thing. Ever. I love doing this! Scrub crayon on the engravings, almost as hard as you can, trying to get crayon fill up evenly and tightly. Then rub the excess away with Rem Oil. Super duper easy! I hope it lasts in Texas heat... 
http://imageshack.us/a/img713/2162/img1882xd.jpg http://imageshack.us/a/img19/1280/img1881pv.jpg http://imageshack.us/a/img850/7406/img1880xe.jpg http://imageshack.us/a/img707/217/img1879vo.jpg |
|
|
|
[#1]
I use Lacquer Stik from brownell's or midway.
|
|
|
|
[#2]
Crayons are actually very effective at this and have been used and tested under heat to excel. Lots of guys over on XDTalk have doing their xd/xdm's for years now with positive results so your good in Tx heat. I just don't know about the coloring of firearms yet my jury is still out on it......
|
|
|
|
[#3]
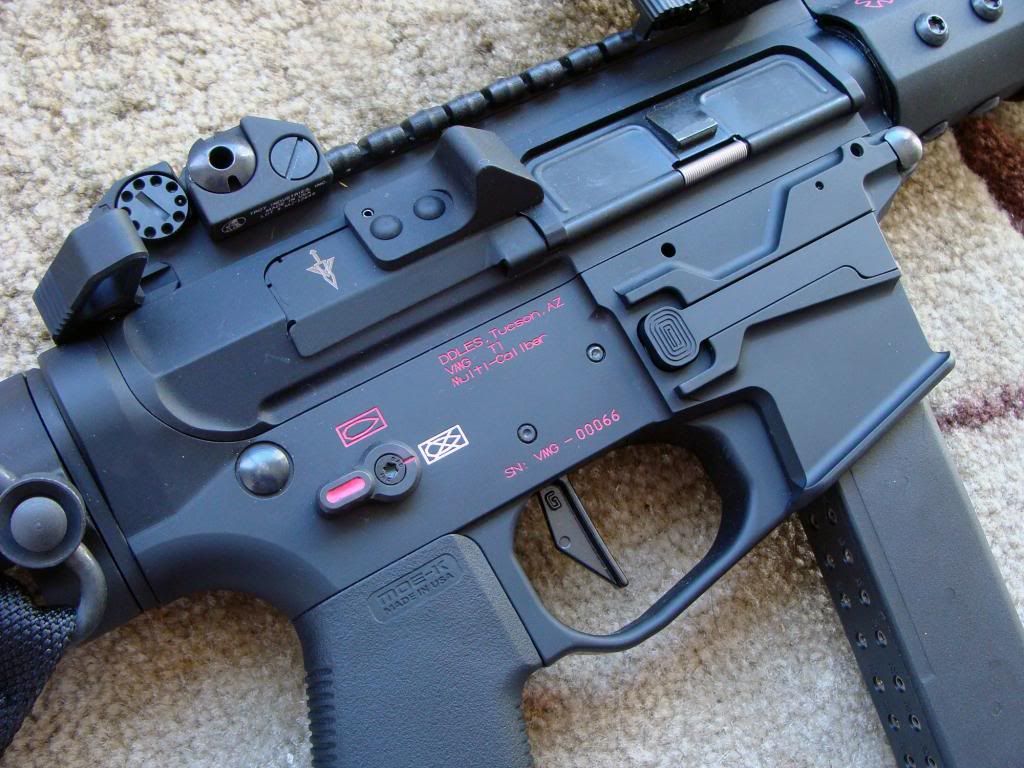
I've been debating back and forth which method to use to at least color the Safe/Fire. The crayon actually came out looking real nice. My fear with the lacquer sticks is some people I have seen the red looks more pink than red.
|
|
|
|
[#4]
These are done in lacquer stik, it has haze but I little it sit for a few hours then clean up with mineral oil.  Quoted: I've been debating back and forth which method to use to at least color the Safe/Fire. The crayon actually came out looking real nice. My fear with the lacquer sticks is some people I have seen the red looks more pink than red. |
|
|
|
[#5]
Those look good!
|
|
|
|
[#6]
I do them to every gun I build, like I said they always have a haze when I am done, but I let the lacquer harden then come back with mineral oil. My friend who got one of the first color jobs I did with Lacquer Stik ...I dunno 4 or 5 months ago, he brought it over the other day so I could detail clean it, the color was still the same. |
|
|
|
[#7]
I used the lacquer sticks sold by Brownells. The only thing I don't like is the limited color options. The red isn't very red. It's more like pussy pink. I heat the work area and the stick with a heat gun. Smear it on, melt it some more with the heat gun. Wipe away the excess with a cleaning patch pulled tightly over a square object. Then let it dry/cool down. Then rub the area with a patch and mineral spirits. I'm redoing all these next week. My parts are finally getting mailed back to me from being nickel boron and burnt bronze cerakoted. So I'm going to color fill the markings with black lacquer. |
|
|
|
[#8]
I do a full 91% alcohol on the lowers first, then bake the oil on them and all mine come out RED....that pink looks weird.
|
|
|
|
[#9]
Trust me if I gave my padna's that shit I would be dead.....I dunno I have always coated the lowers first in alcohol, then I bake the oil into them, then do coloring and everything pops...the white and the red.
|
|
|
|
[#10]
just use fingernail polish all the colors you can imagine.
Brush it on let it dry for a few min then wrap a paper towel on a small wood block put some acetone free nail polish remover on the paper towel DON'T SOAK IT very small amount of remover and rub the paper towel over the area till it removes the excess nail polish and leaves the groves full :) instant and no need to worry about Texas heat :) Dont push hard on the paper towel let the remover do its job. |
|
|
|
[#11]
I've had great results with Testors model paint. Just did the Zombie Killer with some green and a Rainier Arms Lower with Desert Tan to match the FDE.
|
|
|
|
[#12]
Testers model paint and thinner
 " /> " />

and BOOM!!! |
|
|
|
[#13]
Great idea with the crayons.
Pre: 
Post: 

I think when the crayon wears out I'll go with nail polish. My wife has lots of them laying around. |
|
|
|
[#14]
Quoted:
Testers model paint and thinner Which Testors paint? Acrylic, Enamel, Lacquer, Metalizer? |
|
|
|
[#15]
I color filled using nail polish. Took me longer to remove the color fill than it did to do the actual color filling. Never again am I doing a colorfill. I got real bored of the color. My buddy's color fill was done in crayon and it didn't hold up too well like nail polish did.
|
|
|
|
[#16]
I do the exact same thing. Crayons and then rub the excess off with Rem oil. I did it to my on duty and off duty weapon and its holding well in this Texas weather.
|
|
|
|
[#17]
Im glad to hear that crayon lasts in TX heat ! Some people apply heatgun/blow torch to sort of melt it, not sure if that helps.
The positive side of crayon is that you can brush it off with toothbrush if decide to change color or remove it. It's pretty cool that someone colored theirs matching with the Olive drape color! |
|
|
|
[#18]
Crayon FDE to match the (not really shown) furniture

|
|
|
|
[#19]
+1 Testors enamel
This is what I use on all mine, colors are true and its long lasting. I read somewhere that it is what Spikes Tactical uses to color theirs. It was on the internet, it must be true :) |
|
|
|
[#20]
Quoted:
Quoted:
Testers model paint and thinner Which Testors paint? Acrylic, Enamel, Lacquer, Metalizer? Enamel. I Cerakote professionally and use Testors model paint when needed. I usually just use it for the "F" and "S" on custom bolt-actions but some customers want more. Not really my thing but it does look cool on some guns. 
|
|
|
|
[#21]
Testers enamel and enamel thinner.
|
|
|
|
[#22]
For all of the people using Testors model paint and thinner I have a couple questions.
Are you thinning the paint before applying it? If so what is the ratio? Do you wait any length of time for the paint to dry before wiping off the excess with thinner?
|
|
|
|
[#23]
Im not going to thin mine.
I will be using Testors model paint. I am also going to use a tooth pick to transfer the color around. Let dry, it won't take long, its not rocket science. Then wipe clean with paint thinner. |
|
|
|
[#24]
Quoted:
Im not going to thin mine. I will be using Testors model paint. I am also going to use a tooth pick to transfer the color around. Let dry, it won't take long, its not rocket science. Then wipe clean with paint thinner. This is exactly how I did mine. Holts up well in hot and humid South East Texas |
|
|
|
[#25]
The thinner is used to remove the excess paint. Put a few drops on a paper town and gently rub the dry paint changing to a clean towel regularly till the slide is clean and there is only paint left in the grooves.
|
|
|
|
[#26]
Thanks for the tips guys! The toothpick method seems to be a great idea.
Any guess how well the paint will stick to a NiB coated lower? |
|
|
|
[#27]
Quoted:
Thanks for the tips guys! The toothpick method seems to be a great idea. Any guess how well the paint will stick to a NiB coated lower? My guess is not well. I would take a sharp tool and etch the lettering to bare metal for the areas you want to paint. But you run the risk of damaging areas you don't want painted. |
|
|
|
[#28]
Quoted:
The only thing I don't like is the limited color options. Lacquer sticks are available in white, red, yellow, black, and gold. Check Amazon or a local art supply shop. |
|
|
|
[#29]
I think I am going to buy a new lower just to play around with coloring. Love to see more pics if anyone is doing anything differently.
|
|
|
|
[#30]
I have used Tester's paint, I tried the crayons and put it under test in Louisiana heat (didn't hold up past two trips), tried finger nail paint, white out, etc.... the best and the only thing I use now is Lacquer Stik's if you take 91% alcohol and wipe down the whole gun before you start, and do a quick CLP bake in the oven, and then use a microfiber towel to clean it off after, the Lacquer is bullet proof....I have friends like I have said before with guns I built for them 5 months old, and we are from Louisiana these guns are tools and get tossed in and out of mudboats all day. The lacquer is still RED as can be or WHITE....that picture of the pink lacquer stik's no clue what went on there....but I won't use anything else besides Lacquer stiks. Quoted: I think I am going to buy a new lower just to play around with coloring. Love to see more pics if anyone is doing anything differently. |
|
|
|
[#31]
I honestly think the biggest problem with some people when they go to paint the lower, is the prep work. Just wiping the whole thing down in 91% alcohol is huge...and I only clean up the gun with Mineral oil after painting, if you use gun oil, or anything of that nature it will get inside the lacquer or paint and pull it out. My wife is director of nursing so my mineral oil bottles are labeled a little different lol, if you know what mineral oil is used for in a hospital situation haha. |
|
|
|
[#32]
|
|
|
|
[#33]
Quoted:
I honestly think the biggest problem with some people when they go to paint the lower, is the prep work. Just wiping the whole thing down in 91% alcohol is huge...and I only clean up the gun with Mineral oil after painting, if you use gun oil, or anything of that nature it will get inside the lacquer or paint and pull it out.
My wife is director of nursing so my mineral oil bottles are labeled a little different lol, if you know what mineral oil is used for in a hospital situation haha.
I like the idea of crayons to prototype your color scheme, since it can be removed easily... then move on to a permanent solution. That is likely the route I will take. |
|
|
|
[#34]
I tried my hand at crayons.
http://i61.photobucket.com/albums/h46/gpreminger/7d8a01f8-2844-4af4-a5fb-cefc3976476b_zps70319290.jpg |
|
|
|
[#35]
I just filled with lacquer and did an initial mineral oil wipe, letting it dry then coming back to do clean up (haze)....lacquer stiks > all.  |
|
|
|
[#36]
Hey shooter, can you post a pics after you clean up the haze plz. I'd like to see a finished product
|
|
|
|
[#37]
No problem, this is what I do for all my builds for customers, and I can't remember how many times I have done it like this. I let it sit over night then hand clean it with alcohol and swaps, then oil bake, etc... |
|
|
|
[#38]
Great success with the wife's nail polish. Gotta get a couple of pics, but the red, white and blue that I used on my Palmetto lower came out great. Paint on, and remove excess with non-acetone nail polish remover. Finish up with a couple of swipes of CLP and it comes out great.
|
|
|
|
[#39]
Quoted:
Crayon FDE to match the (not really shown) furniture http://img837.imageshack.us/img837/3720/arfdecrayon.jpg Nice look, what color crayon is that it looks good, I was just thinking of doing the same thing. |
|
|
|
[#40]
I know you wanted to see after haze, but I just finished 3 for the initial prep and paint, now these will sit over night and tomorrow clean haze and oil bake.  |
|
|
|
[#41]
Quoted:
I know you wanted to see after haze, but I just finished 3 for the initial prep and paint, now these will sit over night and tomorrow clean haze and oil bake.
Do you mind to give me a link of what steps you use or make a step by step thread? |
|
|
|
[#42]
I know that sounds like a lot but it is basically doing good prep work to make the lacquer stick harden up, then using the gun oil to give the lower a nice metal enriched coating (seasoning) and in doing so it brings the color of the lacquer out even more and you get that nice semi gloss black look to the lowers. I practiced this with all kinds of variations and paints, and womens finger nail polish/paint, but once I do this I know I won't have anyone coming back to get a repair on the the coloring. I have seen crayon, finger nail paint, and white out, and even testers, not last past a few months because some cleaners will just rip right through them. I personally think crayons, finger nail paint and white out are a stupid idea if you just think about what they are and how you are using them. Tester's is the only other product I will use, but for the people I sell to I use lacquer stiks because they are ruff and they do some true hard cleaning. Hope this helped you in anyway possible, and yes I have tried the froglube it is a great product but for me I love Slip2000 and Mpro...that is just my opinion. I think as long as you remember to keep mineral oil, 91% alcohol, a TON of the cotton swabs on the long sticks, and do your prep work correctly this formula is basically bulletproof. Remember this is South Louisiana we have 100% humidity all the time, you have to take a shower after just going to the mailbox, this is what makes me believe (maybe not my method) but Lacquer Stik's are > than all. |
|
|
|
[#43]
I forgot one major thing also ......... on some lowers I will use a dremel with pencil cotton bit and metal compound and do the whole receiver before starting with the paint. Usually I only do that on ruff looking lowers to make sure I get every bit of oil,paint,etc...into the the gun itself.
|
|
|
|
[#44]
This is just the basic tear and tape I do, then I will use Xacto knife to cut some smaller pieces for fine tuning.  |
|
|
|
[#45]
Quoted: Quoted: Im not going to thin mine. I will be using Testors model paint. I am also going to use a tooth pick to transfer the color around. Let dry, it won't take long, its not rocket science. Then wipe clean with paint thinner. This is exactly how I did mine. Holts up well in hot and humid South East Texas Yup, have a GLOCK I did with a friend's daughter's crayon while waiting for him to come home a decade or so ago. 99% still there and I never rem-oiled or sealed it in any way. |
|
|
|
[#46]
Quoted:
I know that sounds like a lot but it is basically doing good prep work to make the lacquer stick harden up, then using the gun oil to give the lower a nice metal enriched coating (seasoning) and in doing so it brings the color of the lacquer out even more and you get that nice semi gloss black look to the lowers.
I practiced this with all kinds of variations and paints, and womens finger nail polish/paint, but once I do this I know I won't have anyone coming back to get a repair on the the coloring. I have seen crayon, finger nail paint, and white out, and even testers, not last past a few months because some cleaners will just rip right through them. I personally think crayons, finger nail paint and white out are a stupid idea if you just think about what they are and how you are using them. Tester's is the only other product I will use, but for the people I sell to I use lacquer stiks because they are ruff and they do some true hard cleaning.
Hope this helped you in anyway possible, and yes I have tried the froglube it is a great product but for me I love Slip2000 and Mpro...that is just my opinion. I think as long as you remember to keep mineral oil, 91% alcohol, a TON of the cotton swabs on the long sticks, and do your prep work correctly this formula is basically bulletproof.
Remember this is South Louisiana we have 100% humidity all the time, you have to take a shower after just going to the mailbox, this is what makes me believe (maybe not my method) but Lacquer Stik's are > than all.
Great info, thanks |
|
|
|
[#47]
Still pretty hot, but as you can see almost all the haze is gone just have to touch up the normal spots on PSA lowers. The lettering toward the top of the receiver and the safe/fire are engraved IMO bad. The safe/fire is too thick, and the lettering is not thick enough....its always the two spots I have to touch up. When it comes with the bullet symbols its engraved just like the logo and serial number. Anyway, one more quick touch with a swab and then let it cool off and toss another bake on it.....my digital camera is a samsung wifi and its been doing that weird shit with the colors on me, trying to fix my manual mode settings...I guess my fiance or I messed with it. *edit* when I was asking people in the picture thread what camera they were using I should have just bought the DSLR or whatever it was...... my S3 takes better pictures than this thing. It is hit or miss I guess when it was 65% off on amazon.com I should have known lol.  |
|
|
|
[#48]
Bake two...  |
|
|
|
[#49]
Quoted:
I know that sounds like a lot but it is basically doing good prep work to make the lacquer stick harden up, then using the gun oil to give the lower a nice metal enriched coating (seasoning) and in doing so it brings the color of the lacquer out even more and you get that nice semi gloss black look to the lowers.
I practiced this with all kinds of variations and paints, and womens finger nail polish/paint, but once I do this I know I won't have anyone coming back to get a repair on the the coloring. I have seen crayon, finger nail paint, and white out, and even testers, not last past a few months because some cleaners will just rip right through them. I personally think crayons, finger nail paint and white out are a stupid idea if you just think about what they are and how you are using them. Tester's is the only other product I will use, but for the people I sell to I use lacquer stiks because they are ruff and they do some true hard cleaning.
Hope this helped you in anyway possible, and yes I have tried the froglube it is a great product but for me I love Slip2000 and Mpro...that is just my opinion. I think as long as you remember to keep mineral oil, 91% alcohol, a TON of the cotton swabs on the long sticks, and do your prep work correctly this formula is basically bulletproof.
Remember this is South Louisiana we have 100% humidity all the time, you have to take a shower after just going to the mailbox, this is what makes me believe (maybe not my method) but Lacquer Stik's are > than all.
Thank you very much sir! |
|
|
|
[#50]
What would you use for green? I'm looking at making the stag deer head green and it doesn't come in the lacquer sticks.
|
|
|
 Win a FREE Membership!
Sign up for the ARFCOM weekly newsletter and be entered to win a free ARFCOM membership. One new winner* is announced every week!
You will receive an email every Friday morning featuring the latest chatter from the hottest topics, breaking news surrounding legislation, as well as exclusive deals only available to ARFCOM email subscribers.

AR15.COM is the world's largest firearm community and is a gathering place for firearm enthusiasts of all types.
From hunters and military members, to competition shooters and general firearm enthusiasts, we welcome anyone who values and respects the way of the firearm.

Subscribe to our monthly Newsletter to receive firearm news, product discounts from your favorite Industry Partners, and more.
Copyright © 1996-2024 AR15.COM LLC. All Rights Reserved.
Any use of this content without express written consent is prohibited.
AR15.Com reserves the right to overwrite or replace any affiliate, commercial, or monetizable links, posted by users, with our own.