|
[#1]
Quoted: @FredMan That is AWESOME. Like a cut scene in a movie awesome. I love how you can show both versions, the trails, and the frames,have both turn out excellent when presented as image or video! Add optional captions or annotations that pop up the current time for each hour, unless you have it at 10 seconds per hour, which should be in description for people as slow as me to figure out. And the bold is not a bad idea. I didn't do a stacked star trails out of the 2nd video as those clouds rolled in and killed it about halfway through the night. I did a prelim stack and it went to shit so I decided NOT to take the hours and hours of processing time (even though much of the processing is automated) to turn the full sequence into a video. The video would have benefited from some processing of the stills used to make it, but it stands well on the plain old camera jpg files. It's 11 hours in 56 seconds (7 pm to 6 am), so it's about 12 minutes real-time per second. An hour takes 5 seconds at that rate. Lots 'o titles! |
|
|
|
[#2]
Quoted: Thanks! And the bold is not a bad idea. I didn't do a stacked star trails out of the 2nd video as those clouds rolled in and killed it about halfway through the night. I did a prelim stack and it went to shit so I decided NOT to take the hours and hours of processing time (even though much of the processing is automated) to turn the full sequence into a video. The video would have benefited from some processing of the stills used to make it, but it stands well on the plain old camera jpg files. It's 11 hours in 56 seconds (7 pm to 6 am), so it's about 12 minutes real-time per second. An hour takes 5 seconds at that rate. Lots 'o titles! 13 Labels, Start at 7 pm, then next hour would say 8pm, next would be 9, and on and on to the final hour. Each only displays for about 3 seconds and fades out, gives people a sense of scale with "wow, this is beautiful, and difficult flying through their minds. Could just use raw Utube annotations so it could be saved without them, and the user can choose to disable annotations. Could also just put that in the description, "1 video second is equivalent to 12 minutes minutes of reality, Video covers 12 hours." Easy enough to add, leave location out for dox prevention. There's one similar to yours on Wiki Astrophotography which puts their own credits at the end and has annoying music with it. Maybe music at half the volume they used, but it overpowers the video, IMO (and I'm deaf, so it's gotta be pretty loud) https://upload.wikimedia.org/wikipedia/commons/transcoded/2/27/Milky_way_-route_292_shiga_kusatsu_road-_1920x1080.webm/Milky_way_-route_292_shiga_kusatsu_road-_1920x1080.webm.480p.vp9.webm Trying to keep up with the minutes would have everybody's concentration on the counter instead of the content. Extra info Right now, buy all the standalone license copies of Adobe stuff that aren't rental plans. Then you have what you need for a long time without paying the subscription. I just re-bought LightRoom and Photoshop and AfterEffects as standalones, ot the "Suite Rental plan". Find them at places like oldversions.com or even apple or other seller will let you get the last few versions. Something I'd suggest if you didn't know about it. Not the latest wiz bang easy buttons, but anything can be done, just a bit more comoplex. Tons of tutorials out there. If you don't have Sony Vegas, That's an excellent return on investment for pretty much everything, easy to annotate, etc. |
|
|
|
[#3]
Been trying to work on PixInsight work flow a bit more, to learn as much as I can.
Working on old data and you guys have seen this shot before but I love reprocessing images. 


Thoughts? I need input other than my own. I still need to clean up cosmetic stuff and work on a few oversaturated stars but I'm not going to go nuts doing that unless I think I'll use the shot for anything. Just learning the ropes in PI. Man if I ever get free time it would be cool to post a walkthrough of my processing an image. |
|
|
|
[#4]
At the rate it's playing, you'd only need to put a little box in the lower right that pops up once per "stellar hour/exposure hour" stating the ending time of each stack. That could be done with exposure time + down tim for images per hour So 13 labels in Sony Vegas (What I use, easier than Adobe AfterEffects for just making simple videos, and a couple things only found if you get Adobe Premier for only 50x the cost of After Effects, on you're renting it on top. I'm more of a still image kinda photographer, video is a whole new world that frankly, I don't quite understand fully yet. There's one similar to yours on Wiki Astrophotography which puts their own credits at the end and has annoying music with it. Maybe music at half the volume they used, but it overpowers the video, IMO (and I'm deaf, so it's gotta be pretty loud) https://upload.wikimedia.org/wikipedia/commons/transcoded/2/27/Milky_way_-route_292_shiga_kusatsu_road-_1920x1080.webm/Milky_way_-route_292_shiga_kusatsu_road-_1920x1080.webm.480p.vp9.webm Here's a swirlie with that camera/lens. It's only about 2 hours and a few hundred frames, but the D500 sensor blows the GoPro out of the water. 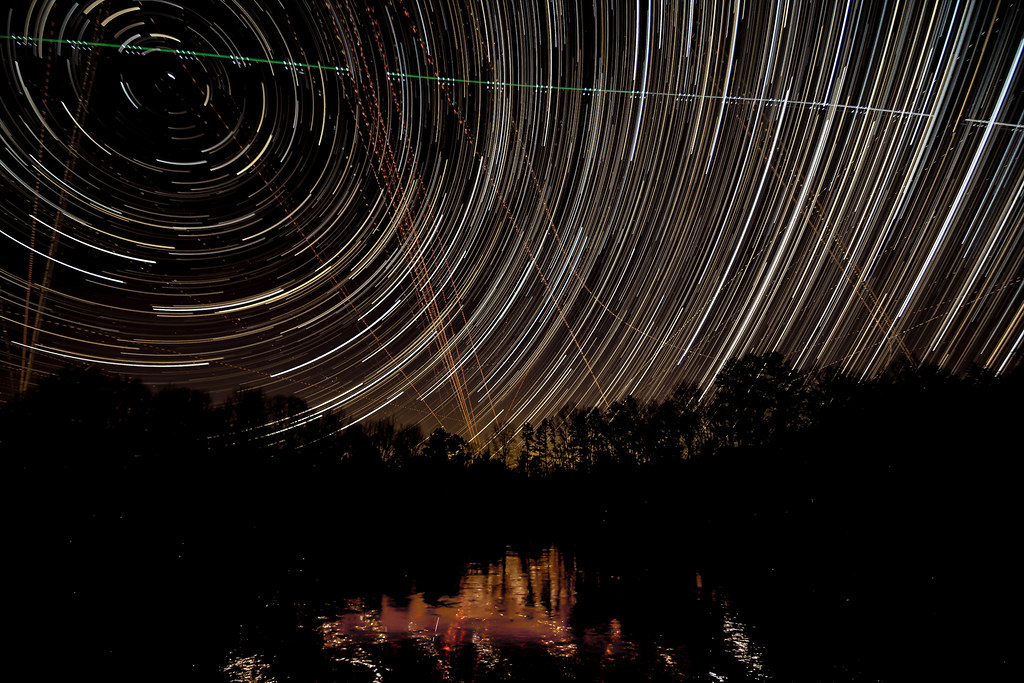 Edit by FredMan, on Flickr Edit by FredMan, on Flickr
|
|
|
|
[#5]
 Hubble discovers nearby galaxy - Bedin 1 |
|
|
|
[#6]
Quoted:
Been trying to work on PixInsight work flow a bit more, to learn as much as I can. Working on old data and you guys have seen this shot before but I love reprocessing images. https://i.imgur.com/tBkdukH.jpg https://i.imgur.com/Bvv8rQg.jpg https://i.imgur.com/mxQZBZB.jpg Thoughts? I need input other than my own. I still need to clean up cosmetic stuff and work on a few oversaturated stars but I'm not going to go nuts doing that unless I think I'll use the shot for anything. Just learning the ropes in PI. Man if I ever get free time it would be cool to post a walkthrough of my processing an image. You are making it hard for me to stick with just using a DSLR. Do you think PixInsight is worth the money, or do you think you could use photoshop to clean up/post process just as easily after stacking? I think the next thing for me to get is an ASI1600MM, then maybe PixInsight if it is worth it. |
|
|
|
[#7]
Quoted: Those look GREAT! You are making it hard for me to stick with just using a DSLR. Do you think PixInsight is worth the money, or do you think you could use photoshop to clean up/post process just as easily after stacking? I think the next thing for me to get is an ASI1600MM, then maybe PixInsight if it is worth it. Now it takes awahile to learn though, which is why I keep reprocessing everything, to build some familiarity with the software. |
|
|
|
[#8]
Quoted:
I'm almost embarrassed to say that the world turning video was made in the GoPro Studio app (now unsupported and unavailable). I'm beginning to work with HitFilm Express but it's a steep learning curve (it took me something like 2 hours to figure out how to put text on the video with the Compositing function. Seems incredibly complex for something so simple). I'm more of a still image kinda photographer, video is a whole new world that frankly, I don't quite understand fully yet. I could make mine look pretty close to the quality of that if I took the time to import nearly 2,000 raw images into Lightroom, process, export, them bring into something like the GoPro Studio to combine into video. But my experience with the stills from an earlier night (5-6 hours of edit time) kept me from it. And if I really wanted good quality imagery I'd run the D500 and the Tokina 11-20 at 11mm and run that all night. That would truly be the way to do it. Here's a swirlie with that camera/lens. It's only about 2 hours and a few hundred frames, but the D500 sensor blows the GoPro out of the water. https://farm5.staticflickr.com/4688/38653141895_de89e263fe_b.jpgEdit by FredMan, on Flickr Quoted:
At the rate it's playing, you'd only need to put a little box in the lower right that pops up once per "stellar hour/exposure hour" stating the ending time of each stack. That could be done with exposure time + down tim for images per hour So 13 labels in Sony Vegas (What I use, easier than Adobe AfterEffects for just making simple videos, and a couple things only found if you get Adobe Premier for only 50x the cost of After Effects, on you're renting it on top. I'm more of a still image kinda photographer, video is a whole new world that frankly, I don't quite understand fully yet. There's one similar to yours on Wiki Astrophotography which puts their own credits at the end and has annoying music with it. Maybe music at half the volume they used, but it overpowers the video, IMO (and I'm deaf, so it's gotta be pretty loud) https://upload.wikimedia.org/wikipedia/commons/transcoded/2/27/Milky_way_-route_292_shiga_kusatsu_road-_1920x1080.webm/Milky_way_-route_292_shiga_kusatsu_road-_1920x1080.webm.480p.vp9.webm Here's a swirlie with that camera/lens. It's only about 2 hours and a few hundred frames, but the D500 sensor blows the GoPro out of the water. https://farm5.staticflickr.com/4688/38653141895_de89e263fe_b.jpgEdit by FredMan, on Flickr You stick each frame/image (can be clip, or static photo) on to the "Time Line" Once in correct order, hit play for preview, Than you can stretch/shrink that timeline to fit to a different size. Just like photo editing, you have laysers in video editing, which be effects, color correction and more so the original frames are destroyed if tryin a filter out, and the option of saving the filters separate from file is there. Many layers are allowed. One would be the "Time" layer, where it would be inserted every x frames, and be displayed for x seconds (x you choose). Set "blending Mode" to one that allows your text to be seen clearly (Preview button is a LOT of help for learning).. Addin end credits can just be a static photo or animationnnnn. Making a video from your images is not much different than "stop motion animation" setup. Cheap and real decent editing program is Sony Vegas , for image editing, use Photoshop for getting all images equally sized/aligned. They've likely improved that so I don't know the latest bennies to latest rental Photoshop. I was daunted by it several years ago but after a day or two of struggle it all fell into place. Now the programs have gotten slicker with "howto videos" made for every video editing package out there, Just dive in t o whichever you happen to have, The Canon movie maker isn't so bad, and it's free with you camera's serial #. The more you fret it and avoid it, the more you set yourself up to fail, just dive in. Look at some of the bonehead videos out there, and you'll have to conclude that current software can let anybody, literally anybody, make videoes. 
--ETA: Thing to fix keyboard should be here tomorrow. It's dropping or doubling keys, putting in symbols, etc. Frustrating. |
|
|
|
[#9]
I still can't get pixinsight to do anything but the very minimum, then again, I haven't been out since July and I seem to always shoot the exact same thing on my crop sensor with a 50mm on it :/
|
|
|
|
[#10]
Quoted:
I still can't get pixinsight to do anything but the very minimum, then again, I haven't been out since July and I seem to always shoot the exact same thing on my crop sensor with a 50mm on it :/ Its like trying to learn photoshop for the first time. |
|
|
|
[#11]
Quoted:
I've been reading and watch tutorials in my free time, there is a lot to take in. Its like trying to learn photoshop for the first time. Quoted:
Quoted:
I still can't get pixinsight to do anything but the very minimum, then again, I haven't been out since July and I seem to always shoot the exact same thing on my crop sensor with a 50mm on it :/ Its like trying to learn photoshop for the first time. You and several others in this thread are close to masters. You've kicked down enough barriers to beat most stock photos in quality and color, even from APOD in some cases. It's down to "artistic" aspects which I suck at so can't appreciate (or even notice). |
|
|
|
[#12]
Quoted: From what I read in this thread so far, the whole process involves "learning photoshop the hard way", once a hurdle is passed, it brings up 5 more equally intense mental walls to climb. Reading the thread I feels like a liberal arts major who somehow wound up in advanced physics class. You and several others in this thread are close to masters. You've kicked down enough barriers to beat most stock photos in quality and color, even from APOD in some cases. It's down to "artistic" aspects which I suck at so can't appreciate (or even notice). There is always something, and its best to focus on them one or two at a time. Here are a list of things that are important to me -Shoot at the bare minimum two hours on target. My current thing to strive for is 4 hours per filter, which rarely happens -Dithering, always dither! Its improvements on noise are huge, plus you can then drizzle which doubles the resolution of your image, something I've only just started understanding. -Polar alignment needs to be as good as possible, either by using a polemaster, polar scope or PHD to get that set. Also level the mount as perfectly as you can -Calibration frames are now a must for me, flats can still give me issues but it is worth the trouble learning how to take and apply them correctly. So flats, darks and bias. Only flats need to be taken every imaging session and every time you rotate the camera. I know I'm rambling now, but there is so much to learn and most of it for years I put off taking the time to learn and understand and now I kick myself for being lazy. I look at older data I've collected and some of it could have been something good had I only taken the time to put a bit more effort in. |
|
|
|
[#13]
Quoted:
Man I really appreciate those kind of compliments believe me, but I am very much still a low level amateur with this stuff. Most of what holds me back is lack of clear skies, in this hobby time is the most important thing I think. the more time you can spend on a target, meaning the more images you can shoot the better. Years ago I only spent maybe an hour per target, but once you start chasing the rabbit you realize that more time is needed. Whats so much fun about this hobby is the next hurdle, for me I'm trying to work out some flaws in my mount and my scope, mainly periodic error in the mount and perfect focus with my scope. I should be able to work out PEC if I spend an hour or so on it, the focus in my scope is trickier, my autofocuser with find optimal focus for me, but it cannot correct for tilt(which I think I have) or collimation being off (less likely in a refractor). There is always something, and its best to focus on them one or two at a time. Here are a list of things that are important to me -Shoot at the bare minimum two hours on target. My current thing to strive for is 4 hours per filter, which rarely happens -Dithering, always dither! Its improvements on noise are huge, plus you can then drizzle which doubles the resolution of your image, something I've only just started understanding. -Polar alignment needs to be as good as possible, either by using a polemaster, polar scope or PHD to get that set. Also level the mount as perfectly as you can -Calibration frames are now a must for me, flats can still give me issues but it is worth the trouble learning how to take and apply them correctly. So flats, darks and bias. Only flats need to be taken every imaging session and every time you rotate the camera. I know I'm rambling now, but there is so much to learn and most of it for years I put off taking the time to learn and understand and now I kick myself for being lazy. I look at older data I've collected and some of it could have been something good had I only taken the time to put a bit more effort in. Quoted:
Quoted: From what I read in this thread so far, the whole process involves "learning photoshop the hard way", once a hurdle is passed, it brings up 5 more equally intense mental walls to climb. Reading the thread I feels like a liberal arts major who somehow wound up in advanced physics class. You and several others in this thread are close to masters. You've kicked down enough barriers to beat most stock photos in quality and color, even from APOD in some cases. It's down to "artistic" aspects which I suck at so can't appreciate (or even notice). There is always something, and its best to focus on them one or two at a time. Here are a list of things that are important to me -Shoot at the bare minimum two hours on target. My current thing to strive for is 4 hours per filter, which rarely happens -Dithering, always dither! Its improvements on noise are huge, plus you can then drizzle which doubles the resolution of your image, something I've only just started understanding. -Polar alignment needs to be as good as possible, either by using a polemaster, polar scope or PHD to get that set. Also level the mount as perfectly as you can -Calibration frames are now a must for me, flats can still give me issues but it is worth the trouble learning how to take and apply them correctly. So flats, darks and bias. Only flats need to be taken every imaging session and every time you rotate the camera. I know I'm rambling now, but there is so much to learn and most of it for years I put off taking the time to learn and understand and now I kick myself for being lazy. I look at older data I've collected and some of it could have been something good had I only taken the time to put a bit more effort in. Second, obvious, but probably stupid questions: Do you seal your gear with air/moisture-proof bags (plastic, large ziplocks)? Leave in the large bags after use with Dry and Dry, allow to cool down to operating temp for at least an hour, and warm back up to room temp for over an hour before opening bag? Or, heat to prevent it from getting moisture due to partial pressure changes of water at various temps and fast change. Here, it's 55% humidity, but inside house, it's 10% from the 60° Temp shift. The Dry and Dry is the best I've ever used, fast humidity removal and lasts a long time before needing to be recharged (rarely). Get the dry and dry, or some Cobalt Blue test strips to drop in bag and house first, if there's any air dropping out water (condensation), the strip will turn pink, it's the indicator used in blue -> pink dessicants to say "used up". Get the Dry and Dry anyway, I use it everywhere on electronics, inside electronics, inside camera bag, in cases of my nicer calipers/micrometers, and everywhere I don't want rust. It works far better than the tiny little 2 g packets that are meant to only last until you open the item. The slow cool and warm will do wonders if you don't already, in a sealed bag, seal it when packing up (camera, scope, etc), go home, unseal it next day when it's reached room temp. Pull stuff out, reseal it to have dry air for gear to go back to next time. Even if you are using a warming blanket on camera and scope, this is still good practice. Think of it like your gear "licking" a cold metal object when you don't let things equalize. Third, re-grease focusing moving parts with µLubol HELIMAX-XP to see if that fixes issues. I used it as it's 0°F and below for several months out of the year here. It's pretty good, doesn't turn into glue at freezing temps. #4 - put several 25 watt wrap heaters on camera, and on scope by lenses and lens supports. Might take 2 or 3 Battery packs, but headaches saved will be worth it. I'm not sure what you call "cold", though. If it's above zero, it's a nice day out, like today, it's all the way up to 8°F without the '-'. The sealed dry bags will prevent any internal dew in camera or scope to be created, as they Dry and Dry removes all moisture from air, even from inside camera, etc. Those packets also work for when you drop electronics in water. Pull battery if possible, if not, dump 32 floz of 91% isopopyl alcohol into wall the ports you can see, let the alcohol evaporate, then stick item in ziplock with about 30g of Dry and Dry packets for 24 hours or so. That trick has saved me money, especially on computer keyboards. See, now that was rambling. Here's the Miracle Stuff that makes you really understand why it's so awesome. Just keep what it's protecting in an area where little or no fresh air moves around. I get the 100 10g Packs of Blue-Pink indicating personally, or the 25 pack of 10g if unsure. It's way better than the cheaper Silica Gel around that are either more or less expensive.  
|
|
|
|
[#14]
I compared my image of the NGC 7000 processed in Nebulosity & Photoshop vs Pixinsight and Photoshop. A lot of the detail is lost just in converting it to a gif but you get the idea.

At the time I was pretty happy with my processing, but now looking back on it, the old version is far too noisy, too saturated and a lot of the subtle color shifts are lost. Now this is exactly the same data, just using different software to process. |
|
|
|
[#15]
Quoted:
I compared my image of the NGC 7000 processed in Nebulosity & Photoshop vs Pixinsight and Photoshop. A lot of the detail is lost just in converting it to a gif but you get the idea. https://i.imgur.com/AbpPFGJ.gif At the time I was pretty happy with my processing, but now looking back on it, the old version is far too noisy, too saturated and a lot of the subtle color shifts are lost. Now this is exactly the same data, just using different software to process. The darkened version looks 'prettier', but not sure, as detail shown in the blue wash ave less definition, while others ain a lot more definition. Which one matches what you see with a a say, HST or other telecope in space? The darker one look a bit like artistic was the end, while the blue "washed out" frame tried to show other detail, like the effect of having to peer through the OIII 'mist' to see the rest. |
|
|
|
[#16]
|
|
|
|
[#17]
This is on my list of things to try. Although I will create multiple holes as I need to see how the stars look edge to edge. Should be an easy project and I'm sure my wife has all kinds of sewing needles.
|
|
|
|
[#18]
I figured out the official thing I dislike about the super contrasty one. Dithering went too far.
Here's a small section from both styles. same area (roughly same area, the lower right star, and edge of cloud) Original: 
New:  Is there a middle ground on that? Maybe 30% of what was applied? The faint blue across the lower right portion is basically gone in new version, and he dots/dithering levels are what what was bothering me when I couldn't define what it was that seemed a bit 'too much of something'. Colors are wiped out and seem more pointillism painting-ish. Stars lost color, all going white, vs Red/blue/etc |
|
|
|
[#19]
Quoted:
I figured out the official thing I dislike about the super contrasty one. Dithering went too far. Here's a small section from both styles. same area (roughly same area, the lower right star, and edge of cloud) Original: https://i.imgur.com/N7i7du3.png New: https://i.imgur.com/imZJNBe.png Is there a middle ground on that? Maybe 30% of what was applied? The faint blue across the lower right portion is basically gone in new version, and he dots/dithering levels are what what was bothering me when I couldn't define what it was that seemed a bit 'too much of something'. Colors are wiped out and seem more pointillism painting-ish. Stars lost color, all going white, vs Red/blue/etc Its not a dithering issue. Its purely processing. Also I think you have them confused, the really contrasty and oversaturated one is the original I did years ago, the softer one is the newest processing attempt, and in my eyes is better processed. Better transitions and better stars. I'm on my phone, I'll try to post them side by side later |
|
|
|
[#20]
Quoted:
@brass Its not a dithering issue. Its purely processing. Also I think you have them confused, the really contrasty and oversaturated one is the original I did years ago, the softer one is the newest processing attempt, and in my eyes is better processed. Better transitions and better stars. I'm on my phone, I'll try to post them side by side later Quoted:
Quoted:
I figured out the official thing I dislike about the super contrasty one. Dithering went too far. Here's a small section from both styles. same area (roughly same area, the lower right star, and edge of cloud) Original: https://i.imgur.com/N7i7du3.png New: https://i.imgur.com/imZJNBe.png Is there a middle ground on that? Maybe 30% of what was applied? The faint blue across the lower right portion is basically gone in new version, and he dots/dithering levels are what what was bothering me when I couldn't define what it was that seemed a bit 'too much of something'. Colors are wiped out and seem more pointillism painting-ish. Stars lost color, all going white, vs Red/blue/etc Its not a dithering issue. Its purely processing. Also I think you have them confused, the really contrasty and oversaturated one is the original I did years ago, the softer one is the newest processing attempt, and in my eyes is better processed. Better transitions and better stars. I'm on my phone, I'll try to post them side by side later |
|
|
|
[#21]
Last night was the first clear night in about a month.
Saturday I took apart a camera I no longer use, a Sony NEX 5N, and removed the filter over the sensor to convert it to a "full spectrum" camera. That worked well and will be great to use for my IR photography. I jerry rigged it last night to my scope to see how much more sensitive it was compared to my unmodified cameras. The battery only lasted 30 minutes, but it seems like it will work well. I might modify my D600 the same way now that I see what is possible. First, here is just a quick IR shot taken as a test while out walking the dog. This is with using a 720nm IR filter in front of the camera. The settings were ISO 100 and 1/1000 sec. exposure. Before modifying the camera, this would have taken about a 5 second exposure at ISO 400 to get anything at all.  And here is an image I got last night, just a quick and dirty test. I didn't shoot any darks, bias or flats to correct the image or get rid of the noise. This is 16, 2 minute exposures at 800 ISO. Pretty decent for only 32 minutes! 
|
|
|
|
[#22]
Quoted:
Last night was the first clear night in about a month. Saturday I took apart a camera I no longer use, a Sony NEX 5N, and removed the filter over the sensor to convert it to a "full spectrum" camera. That worked well and will be great to use for my IR photography. I jerry rigged it last night to my scope to see how much more sensitive it was compared to my unmodified cameras. The battery only lasted 30 minutes, but it seems like it will work well. I might modify my D600 the same way now that I see what is possible. First, here is just a quick IR shot taken as a test while out walking the dog. This is with using a 720nm IR filter in front of the camera. The settings were ISO 100 and 1/1000 sec. exposure. Before modifying the camera, this would have taken about a 5 second exposure at ISO 400 to get anything at all. https://i.postimg.cc/3Rg6PW65/Nex-5-N-Test-1.jpg And here is an image I got last night, just a quick and dirty test. I didn't shoot any darks, bias or flats to correct the image or get rid of the noise. This is 16, 2 minute exposures at 800 ISO. Pretty decent for only 32 minutes! https://i.postimg.cc/8c4RvVFr/Orion-Nex-5-N-Modified-32-minutes-small.jpg All the photos are great on this thread. We used to do some photography with our scope, but the hubby works so much that by the time he gets home he's too tired. We have some comet shots we did a long time ago. It's been so long I don't really remember what the hell we did. |
|
|
|
[#23]
Quoted:
Last night was the first clear night in about a month. Saturday I took apart a camera I no longer use, a Sony NEX 5N, and removed the filter over the sensor to convert it to a "full spectrum" camera. That worked well and will be great to use for my IR photography. I jerry rigged it last night to my scope to see how much more sensitive it was compared to my unmodified cameras. The battery only lasted 30 minutes, but it seems like it will work well. I might modify my D600 the same way now that I see what is possible. First, here is just a quick IR shot taken as a test while out walking the dog. This is with using a 720nm IR filter in front of the camera. The settings were ISO 100 and 1/1000 sec. exposure. Before modifying the camera, this would have taken about a 5 second exposure at ISO 400 to get anything at all. https://i.postimg.cc/3Rg6PW65/Nex-5-N-Test-1.jpg And here is an image I got last night, just a quick and dirty test. I didn't shoot any darks, bias or flats to correct the image or get rid of the noise. This is 16, 2 minute exposures at 800 ISO. Pretty decent for only 32 minutes! https://i.postimg.cc/8c4RvVFr/Orion-Nex-5-N-Modified-32-minutes-small.jpg |
|
|
|
[#24]
Quoted:
Last night was the first clear night in about a month. Saturday I took apart a camera I no longer use, a Sony NEX 5N, and removed the filter over the sensor to convert it to a "full spectrum" camera. That worked well and will be great to use for my IR photography. I jerry rigged it last night to my scope to see how much more sensitive it was compared to my unmodified cameras. The battery only lasted 30 minutes, but it seems like it will work well. I might modify my D600 the same way now that I see what is possible. First, here is just a quick IR shot taken as a test while out walking the dog. This is with using a 720nm IR filter in front of the camera. The settings were ISO 100 and 1/1000 sec. exposure. Before modifying the camera, this would have taken about a 5 second exposure at ISO 400 to get anything at all. https://i.postimg.cc/3Rg6PW65/Nex-5-N-Test-1.jpg And here is an image I got last night, just a quick and dirty test. I didn't shoot any darks, bias or flats to correct the image or get rid of the noise. This is 16, 2 minute exposures at 800 ISO. Pretty decent for only 32 minutes! https://i.postimg.cc/8c4RvVFr/Orion-Nex-5-N-Modified-32-minutes-small.jpg 
It's nowhere near your zoom, but are both "pieces" (running man and orion nebula) together in that image due to lack of zoom? Se, I don't know enough about this to do it incorrectly, other people actually got something in their viewfinder. Then Hubble goes and blows everything out of the water, for just a few dollars more: 

|
|
|
|
[#25]
Quoted:
Last night was the first clear night in about a month. Saturday I took apart a camera I no longer use, a Sony NEX 5N, and removed the filter over the sensor to convert it to a "full spectrum" camera. That worked well and will be great to use for my IR photography. I jerry rigged it last night to my scope to see how much more sensitive it was compared to my unmodified cameras. The battery only lasted 30 minutes, but it seems like it will work well. I might modify my D600 the same way now that I see what is possible. First, here is just a quick IR shot taken as a test while out walking the dog. This is with using a 720nm IR filter in front of the camera. The settings were ISO 100 and 1/1000 sec. exposure. Before modifying the camera, this would have taken about a 5 second exposure at ISO 400 to get anything at all. https://i.postimg.cc/3Rg6PW65/Nex-5-N-Test-1.jpg And here is an image I got last night, just a quick and dirty test. I didn't shoot any darks, bias or flats to correct the image or get rid of the noise. This is 16, 2 minute exposures at 800 ISO. Pretty decent for only 32 minutes! https://i.postimg.cc/8c4RvVFr/Orion-Nex-5-N-Modified-32-minutes-small.jpg Nice work |
|
|
|
[#26]
Question (and bumping thread).
@Ciraxis Can you try doing the before/after night photos in .apng / .png format? In Firefox, a .APNG file can be named .PNG and still be animated, no dice in other browsers w/o plugin, they're properly named .MNG -Multiple Image Network Graphics. APNG has some documentation, but no absolute formal definition by Those Who Decide which has then been sort of written as standard, but not Absolute Standard, MNG support isn't that far, yet Far Superior. .MNG is the only format Image Magick (NO .APNG support, only the more general concept spec), the very advanced FREE "command line Photoshop" editor/composer, correct/enhance/Many more, especially with Fred's IM Scripts. If you haven't Get it (or just read the feature list) Photo noise removal could be batched using an automatic FFT/iFFT function. Wiki overview for idea of scope with PNG them from technical side. It's a VERY robust image format! Free Site that will make slideshow .APNG for you from 2 images EZgif.com will convert an entire movie to .APNG True color animation in .APNG, as a .PNG filename. 
If you see the ball above, your browser supports it. What's really cool is no dithering. 2^24 colors in each frame. Lossless compression, so they're a bit bigger, but willl look Amazingly better as a demonstration image for true color comparison. 
That one above also has just a .png filename. If you can see these, you probably see the difference in displaying a before/after, or a sequence of images. Also, frame rates can be timed by frame and faster than 50 frames/sec if desired. No limits and highly granular frame rate. Basically, all of the above is a message to Ciraxis and other AstroPhoto experts (compared to me, lowest of the low absolute novice retarded infant in the womb), with many links and informative sites that are generally educational for the bigger audience that dabbles with image modifications, making it 4x as long. |
|
|
|
[#27]
Quoted:
Question (and bumping thread). @Ciraxis Can you try doing the before/after night photos in .apng / .png format? In Firefox, a .APNG file can be named .PNG and still be animated, no dice in other browsers w/o plugin, they're properly named .MNG -Multiple Image Network Graphics. APNG has some documentation, but no absolute formal definition by Those Who Decide which has then been sort of written as standard, but not Absolute Standard, MNG support isn't that far, yet Far Superior. .MNG is the only format Image Magick (NO .APNG support, only the more general concept spec), the very advanced FREE "command line Photoshop" editor/composer, correct/enhance/Many more, especially with Fred's IM Scripts. If you haven't Get it (or just read the feature list) Photo noise removal could be batched using an automatic FFT/iFFT function. Wiki overview for idea of scope with PNG them from technical side. It's a VERY robust image format! Free Site that will make slideshow .APNG for you from 2 images EZgif.com will convert an entire movie to .APNG True color animation in .APNG, as a .PNG filename. https://i.imgur.com/wa4JsDY.png If you see the ball above, your browser supports it. What's really cool is no dithering. 2^24 colors in each frame. Lossless compression, so they're a bit bigger, but willl look Amazingly better as a demonstration image for true color comparison. https://i.imgur.com/uA03X8d.png That one above also has just a .png filename. If you can see these, you probably see the difference in displaying a before/after, or a sequence of images. Also, frame rates can be timed by frame and faster than 50 frames/sec if desired. No limits and highly granular frame rate. Basically, all of the above is a message to Ciraxis and other AstroPhoto experts (compared to me, lowest of the low absolute novice retarded infant in the womb), with many links and informative sites that are generally educational for the bigger audience that dabbles with image modifications, making it 4x as long. |
|
|
|
[#28]
Not sure if some of you guys know but dithering in astrophotography should not be confused with dithering in something like the creation of a gif.
|
|
|
|
[#29]
Well, I just ordered a new Astro Camera, a ZWO ASI183MM Pro! I also ordered a filter wheel, Astronomik LRGB V2 filters and an Astronomik 6nm Ha filter.
I can't wait to start in on imaging with this new setup! I have a lot to learn about now that I am going to be shooting LRGB and filtering, especially in the stacking side. On another note, I sure am getting tired of all the cloudy nights! I've only had one night in the past month or more that was clear. |
|
|
|
[#30]
Curious, why did you go with the 183 over say the 1600? Was it due to pixel scale in relation to the focal length on your scope?
|
|
|
|
[#31]
Quoted:
Curious, why did you go with the 183 over say the 1600? Was it due to pixel scale in relation to the focal length on your scope? The 183 is also newer technology and will give a more detailed photo with it's 20 mpx sensor. The 1600 had a few things I didn't like, the worse being the microlensing on bright stars. |
|
|
|
[#32]
Nice!
I think you'll be happy, either camera is great. I love my 1600. I'm hoping a newer camera comes out soon, I havent seen much new stuff that makes it worth buying a new camera. If I can make it to NEAF this year I'm hoping there will be new stuff, last year was a bit meh in regards to newer stuff |
|
|
|
[#33]
Quoted:
Last night was the first clear night in about a month. Saturday I took apart a camera I no longer use, a Sony NEX 5N, and removed the filter over the sensor to convert it to a "full spectrum" camera. That worked well and will be great to use for my IR photography. I jerry rigged it last night to my scope to see how much more sensitive it was compared to my unmodified cameras. The battery only lasted 30 minutes, but it seems like it will work well. I might modify my D600 the same way now that I see what is possible. First, here is just a quick IR shot taken as a test while out walking the dog. This is with using a 720nm IR filter in front of the camera. The settings were ISO 100 and 1/1000 sec. exposure. Before modifying the camera, this would have taken about a 5 second exposure at ISO 400 to get anything at all. https://i.postimg.cc/3Rg6PW65/Nex-5-N-Test-1.jpg And here is an image I got last night, just a quick and dirty test. I didn't shoot any darks, bias or flats to correct the image or get rid of the noise. This is 16, 2 minute exposures at 800 ISO. Pretty decent for only 32 minutes! https://i.postimg.cc/8c4RvVFr/Orion-Nex-5-N-Modified-32-minutes-small.jpg I modified my Nikon D80 for full spectrum. Besides astrophotography, IR photography is also fun! Also with a 720nm IR filter. 

|
|
|
|
[#34]
Quoted:
Nice. I modified my Nikon D80 for full spectrum. Besides astrophotography, IR photography is also fun! Also with a 720nm IR filter. https://a4.pbase.com/g10/72/325172/2/166196820.CwyjLWXi.jpg https://a4.pbase.com/g10/72/325172/2/166196817.FbfJV4aS.jpg |
|
|
|
[#35]
Quoted:
Weren't many of Ansel Adams (or some other famous coffee-table photographer) take photos IR film? Same view with a different view? The others in B&W were "Boring", while the IR came alive. Quoted:
Quoted:
Nice. I modified my Nikon D80 for full spectrum. Besides astrophotography, IR photography is also fun! Also with a 720nm IR filter. https://a4.pbase.com/g10/72/325172/2/166196820.CwyjLWXi.jpg https://a4.pbase.com/g10/72/325172/2/166196817.FbfJV4aS.jpg Take the first image in my post for example: Here is what it looks like as an IR image straight from the camera: By taking that image and simply swapping the red and blue channels you get this from the same original image: There is no limits - you can create any artificial coloring you want... |
|
|
|
[#36]
Quoted:
Nice. I modified my Nikon D80 for full spectrum. Besides astrophotography, IR photography is also fun! Also with a 720nm IR filter. https://a4.pbase.com/g10/72/325172/2/166196820.CwyjLWXi.jpg https://a4.pbase.com/g10/72/325172/2/166196817.FbfJV4aS.jpg |
|
|
|
[#37]
I got my ASI183MM Pro, filters and filter wheel in Wednesday. Last night was the first test of the new equipment.
It took a little while for me to get everything set up, figure out the settings to use on the camera, then to start actually imaging. Using these Astro Cameras is A LOT different than using a DSLR, I have a lot to learn yet. Anyway, because it took so long getting everything set right, I only got a chance to shoot in B&W. I decided to shoot the Rosetta Nebula in Hydrogen Alpha. This is a 90 minute total integration (9, 10 minute exposures at 179 gain). I only shot 3 dark frames, no flats, dark flats or anything else. So far i am VERY pleased with what I see. 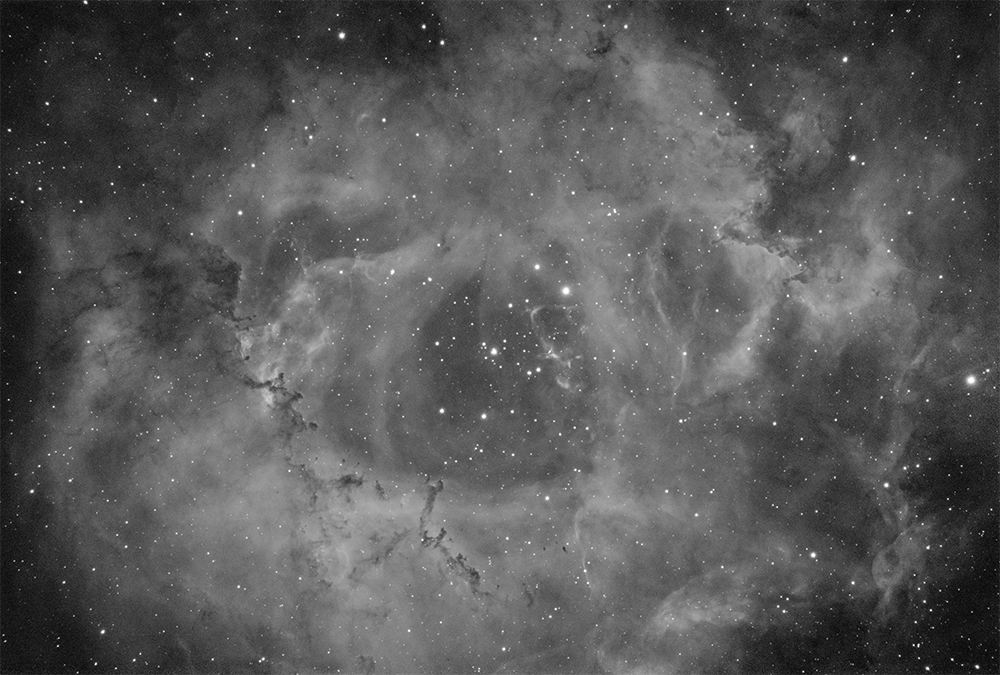
|
|
|
|
[#38]
Quoted:
I got my ASI183MM Pro, filters and filter wheel in Wednesday. Last night was the first test of the new equipment. It took a little while for me to get everything set up, figure out the settings to use on the camera, then to start actually imaging. Using these Astro Cameras is A LOT different than using a DSLR, I have a lot to learn yet. Anyway, because it took so long getting everything set right, I only got a chance to shoot in B&W. I decided to shoot the Rosetta Nebula in Hydrogen Alpha. This is a 90 minute total integration (9, 10 minute exposures at 179 gain). I only shot 3 dark frames, no flats, dark flats or anything else. So far i am VERY pleased with what I see. https://i.postimg.cc/zvTJ6XCG/Rosetta-90-Minutes-Ha-Small.jpg Dang between you and Ciraxis, you might be talking me out of purchasing the ASI294MC Pro in favor of the 183MM Pro with the wheel and filters.... |
|
|
|
[#39]
Quoted:
VERY nice!!! Dang between you and Ciraxis, you might be talking me out of purchasing the ASI294MC Pro in favor of the 183MM Pro with the wheel and filters.... The Hubble Palette is only possible with a mono camera. And if you want to image anything in narrow band, the full sensor is used to collect data. If imaging Ha with a color camera, you are only imaging with 1/4 of the pixels (the red ones), same goes for OIII, so you take much longer to image and the data isn't nearly as detailed. |
|
|
|
[#40]
Quoted:
I got my ASI183MM Pro, filters and filter wheel in Wednesday. Last night was the first test of the new equipment. It took a little while for me to get everything set up, figure out the settings to use on the camera, then to start actually imaging. Using these Astro Cameras is A LOT different than using a DSLR, I have a lot to learn yet. Anyway, because it took so long getting everything set right, I only got a chance to shoot in B&W. I decided to shoot the Rosetta Nebula in Hydrogen Alpha. This is a 90 minute total integration (9, 10 minute exposures at 179 gain). I only shot 3 dark frames, no flats, dark flats or anything else. So far i am VERY pleased with what I see. https://i.postimg.cc/zvTJ6XCG/Rosetta-90-Minutes-Ha-Small.jpg |
|
|
|
[#41]
Quoted:
VERY nice!!! Dang between you and Ciraxis, you might be talking me out of purchasing the ASI294MC Pro in favor of the 183MM Pro with the wheel and filters.... Everything will be on sale next month for NEAF |
|
|
|
[#42]
Quoted:
skip the color and get mono Everything will be on sale next month for NEAF Quoted:
Quoted:
VERY nice!!! Dang between you and Ciraxis, you might be talking me out of purchasing the ASI294MC Pro in favor of the 183MM Pro with the wheel and filters.... Everything will be on sale next month for NEAF @Sixgunner45 Yeah - I think you have talked me into the mono camera. Looks like the 1600mm Pro might be a better choice than the 183mm Pro. But I have a question - are you guys using the 1.25" or the 31mm filter set and does it really make a difference? |
|
|
|
[#43]
Quoted:
Not sure if some of you guys know but dithering in astrophotography should not be confused with dithering in something like the creation of a gif. Cool gif showing dithering removing the bright pink or red "hot pixels" DSLRs can get where they're stuck "on" (first frame of .gif, left edge, 3/4 down, then stacking removing the airplane trails and sharpening up the image by combining captures: 
|
|
|
|
[#44]
Been working on resolving scope/mount issues.
I have some photos I'll share once I get free time. I think I'm ready for a new scope and new mount. My cgem dx has never really performed well, at first it was me, it might still be partly me but I now know enough to realize that this mount sucks. I still think I have tilt as well, but I havent had the time to really test this |
|
|
|
[#45]
Quoted:
@Ciraxis @Sixgunner45 Yeah - I think you have talked me into the mono camera. Looks like the 1600mm Pro might be a better choice than the 183mm Pro. But I have a question - are you guys using the 1.25" or the 31mm filter set and does it really make a difference? |
|
|
|
[#46]
Quoted:
@Ciraxis @Sixgunner45 Yeah - I think you have talked me into the mono camera. Looks like the 1600mm Pro might be a better choice than the 183mm Pro. But I have a question - are you guys using the 1.25" or the 31mm filter set and does it really make a difference? I use the zwo 1.25 filter wheel with the 1600, works great |
|
|
|
[#47]
Quoted:
Been working on resolving scope/mount issues. I have some photos I'll share once I get free time. I think I'm ready for a new scope and new mount. My cgem dx has never really performed well, at first it was me, it might still be partly me but I now know enough to realize that this mount sucks. I still think I have tilt as well, but I havent had the time to really test this |
|
|
|
[#48]
Quoted: If you are looking for a new mount, look at the EQ6-R Pro. I have been VERY happy with mine. I am getting night-long total RMS errors of only .20-.30 in guiding, so the mount itself is extremely accurate with the belt drive. That is without even configuring the PEC yet. I don't think I need to do the PEC training with RMS numbers that low. I'm going to try and sell this mount and pick up a new one at NEAF when everything is marked way down. I havent decided what I want though, been looking at all options, ioptron, cgx and skywatcher mounts are all options |
|
|
|
[#49]
I think my chances of getting to the shoot location and pretty much zero, but here's an excellent 6 minute video about one of the most iconic pictures in history, ever.
"250 at f/11!"  NASA | Earthrise: The 45th Anniversary |
|
|
|
[#50]
I am REALLY liking this new camera.
I shot this last night directly under a near 3/4 moon. This is only 1 hour of imaging (12, 5 minute subs) with a Ha filter. I planned on shooting more tonight to get even better detail, but clouds have moved in for the week it looks like. I can't wait to get an OIII filter so I can start shooting the Hubble Palette. |
|
|
 Win a FREE Membership!
Sign up for the ARFCOM weekly newsletter and be entered to win a free ARFCOM membership. One new winner* is announced every week!
You will receive an email every Friday morning featuring the latest chatter from the hottest topics, breaking news surrounding legislation, as well as exclusive deals only available to ARFCOM email subscribers.

AR15.COM is the world's largest firearm community and is a gathering place for firearm enthusiasts of all types.
From hunters and military members, to competition shooters and general firearm enthusiasts, we welcome anyone who values and respects the way of the firearm.

Subscribe to our monthly Newsletter to receive firearm news, product discounts from your favorite Industry Partners, and more.
Copyright © 1996-2024 AR15.COM LLC. All Rights Reserved.
Any use of this content without express written consent is prohibited.
AR15.Com reserves the right to overwrite or replace any affiliate, commercial, or monetizable links, posted by users, with our own.


