|
[Last Edit: Leisure_Shoot]
[#1]
are you not trying a vacuum form?
 Upgraded Vacuum Former - Clear PETG, Inset Areas, and Tall Forms |
|
|
|
|
[Last Edit: mongo001]
[#2]
In. I love these.
|
|
|
|
|
[#3]
Originally Posted By Leisure_Shoot: are you not trying a vacuum form? No, we weren't going that far. We were going to just press it into a fiberglass mold with another mold. |
|
|
|
|
[#4]
Damn! I wish I'd have gone to a school with projects like that!
Great job, OP! You are inspiring these kids to do great things with their lives and I'm sure they will be forever grateful and never forget you! |
|
|
|
|
[#5]
Originally Posted By Former11BRAVO: Damn! I wish I'd have gone to a school with projects like that! Great job, OP! You are inspiring these kids to do great things with their lives and I'm sure they will be forever grateful and never forget you! Well, maybe not the way you think. A few were a bit too laid back about doing any quality work today and I had to get after a few of them. Probably didn't win any hearts and minds today. May be time to shake up the project a bit and get people onto different areas to keep everyone focused. Many are tired of the same type of work the last few weeks. |
|
|
|
|
[#6]
Originally Posted By guns762: Well, maybe not the way you think. A few were a bit too laid back about doing any quality work today and I had to get after a few of them. Probably didn't win any hearts and minds today. May be time to shake up the project a bit and get people onto different areas to keep everyone focused. Many are tired of the same type of work the last few weeks. Like the grass-painters, I'd guess! That would get old, really quick! Still, you've sure done a helluva job keeping them motivated and on-task thus far. You should be proud of all involved (including yourself!). |
|
|
|
|
[#7]
Originally Posted By guns762: No, we weren't going that far. We were going to just press it into a fiberglass mold with another mold. Originally Posted By guns762: Originally Posted By Leisure_Shoot: are you not trying a vacuum form? We were going to just press it into a fiberglass mold with another mold. |
|
|
|
|
[#8]
Originally Posted By guns762: Well, maybe not the way you think. A few were a bit too laid back about doing any quality work today and I had to get after a few of them. Probably didn't win any hearts and minds today. May be time to shake up the project a bit and get people onto different areas to keep everyone focused. Many are tired of the same type of work the last few weeks. You should have two sheets of aluminum, a drill, an air rivet gun, and rivets. Whenever someone gets tired, they can go play "modern art". 
|
|
|
|
|
[#9]
Originally Posted By guns762: + $215.00 for Lexan and Decal transfer material, fiberglass resin, fiberglass cloth, electrical boxes ________________________________________ = $1357.00 total as of 10/6/21 I have GOT to send a donation! |
|
|
|
USA
|
[#10]
Really neat thread.
Haven’t finished reading yet, but the title reminded me of: 
|
|
|
|
[#11]
Originally Posted By N2CH_556: Really neat thread. Haven’t finished reading yet, but the title reminded me of: https://i.pinimg.com/736x/18/76/a7/1876a7a8090000815c695dad1223efad--calvin-and-hobbes-comics-aviation-humor.jpg Going to have to print that and tape it to the whiteboard. |
|
|
|
|
[#12]
Update 10/8 Frantic Friday edition
It always amazes me that we tend to somehow get to Friday and all the sudden, everybody wants to tackle the most time consuming, technically difficult aspects of our projects. Makes for a quick day for sure, and always fun to see students try to get out of other classes to somehow end up down here. For the many substitutes and office gods, it's probably a little frustrating keeping track of everyone trying to play hooky down in the Art room. Anyway, our murals are still going well. We almost have the leaves and grass done that will behind the planters that are soon coming out of storage.   This will be part of our British airfield. I think we will put an AA gun with a road on this tier. They are trimming up the grass using scissors and heat guns.  We were about ready to put the flooring frames for our tower up last night, but need to do a little adjustment to the placement of the top one, so rework.  Wing structure went together well yesterday. We are about done with the basic frame and ready to move on to the tail.    We began installing electrical boxes and conduit into the fuselage. We also have the housing for the weapon's bay door motors installed.  Our frame for the fuselage is all finished for now.  The cockpit is still consuming much of our time in "how are we going to do this" talk.  A few reworks in the overall shape happened yesterday morning.  We also began adding bondo to clean up some spots. This turned into doing the whole thing for thermal protection to the foam. We might consider trying our hand at forming the cockpit with heatguns and using an 1/8" piece of lexan that we have from last year. What could go wrong?     |
|
|
|
|
[Last Edit: AeroE]
[#13]
Form a canopy over a female buck covered with soft fabric.
Heat the plastic in an oven made from 2X4's and Celotex insulation, drape over the buck, then quickly smooth with many hands wearing clean cotton gloves. The edges will want to wrinkle, so the buck and plastic need to be oversize, then trimmed to fit. There's a good chance you won't get it right on the first try, and there's a good chance the first try will be better than the second. The gold color of fighter transparencies is Indium Tin Oxide. Just so you know; your budget won't support the equipment, training, or experience for application. ITO is applied on the outer surface and tied to a conductive perimeter strip that is hidden under the canopy framing skirt. Flow coats are applied over the ITO for protection. In the end, a glass epoxy canopy painted will probably be easier, and still an enormous amount of work. |
|
|
|
|
[#14]
Are you going to have the engine nozzels move?
|
|
|
|
|
[#15]
Any way to pour a thin clear resin into a 2-piece mold for the canopy?
|
|
|
|
|
[#16]
Originally Posted By hoosierhick: Are you going to have the engine nozzels move? no. |
|
|
|
|
[#17]
Originally Posted By AeroE: Form a canopy over a female buck covered with soft fabric. Heat the plastic in an oven made from 2X4's and Celotex insulation, drape over the buck, then quickly smooth with many hands wearing clean cotton gloves. The edges will want to wrinkle, so the buck and plastic need to be oversize, then trimmed to fit. There's a good chance you won't get it right on the first try, and there's a good chance the first try will be better than the first. The gold color of fighter transparencies is Indium Tin Oxide. Just so you know; your budget won't support the equipment, training, or experience for application. ITO is applied on the outer surface and tied to a conductive perimeter strip that is hidden under the canopy framing skirt. Flow coats are applied over the ITO for protection. In the end, a glass epoxy canopy painted will probably be easier, and still an enormous amount of work. We tried with the 1/8th inch stuff....fail. It was a scrap we already had. We have another ready to try, but I think we will wait till next week. Not sure we can even do this with the 1/16th stuff.  |
|
|
|
|
[#18]
Originally Posted By Ashraam: Any way to pour a thin clear resin into a 2-piece mold for the canopy? Definitely has been a point of discussion. Not sure we would ever end up with something somewhat clear, or even. Not looking good today, but we didn't do our molds yet. That will probably be our next course of action. Our oven is too small to get the 33" canopy sheet in. We may have to try the kiln. |
|
|
|
|
[#19]
Updated fail photos.
         We even melted our form in a few places. 
|
|
|
|
|
[#20]
Originally Posted By guns762: no. Originally Posted By guns762: Originally Posted By hoosierhick: Are you going to have the engine nozzels move? no. No guts no glory. |
|
|
|
|
[#21]
Originally Posted By Ashraam: Any way to pour a thin clear resin into a 2-piece mold for the canopy? That is how the vacuum formed plastics are. Original made in foam, mold release wax put on that foam core, fiberglass laid over canopy with epoxy resin allowed to dry, then it is used as a form sometimes with a negative made via similar process to heat up then pull tight to the mold with vacuum and heated molds. It's a total nightmare and pointless for a one off. Similar used for making injection molded plastics MIM, and printed. Just different materials used for the form and the mold and release. Concept is the same across molded materials. |
|
|
|
|
[#22]
|
|
|
|
|
[#23]
Time to start again....
New bondo  Ready for sanding on Monday 
|
|
|
|
|
[#24]
Originally Posted By guns762: Updated fail photos. https://i.imgur.com/95EPlo3.jpeg https://i.imgur.com/s9iFDWz.jpeg https://i.imgur.com/KOg7vn8.jpeg https://i.imgur.com/PPeyOvN.jpeg https://i.imgur.com/vCXQScb.jpeg https://i.imgur.com/6U7NBAh.jpeg https://i.imgur.com/bKmJS6z.jpeg https://i.imgur.com/Ymyc70h.jpeg https://i.imgur.com/LEtyLZN.jpeg We even melted our form in a few places. https://i.imgur.com/SxTsY2y.jpeg Needed - More hands and several more heat guns. Temp very uneven so only bending at high stress points. Not sure if your outlets are on a separate breaker but maybe 6 heat guns and a dozen gloved hands keeping it evenly warming up would work. That is a total nightmare shape to try and re-create, it's a double 2D curve like the helicopter windshield was, and a lot tighter radius. |
|
|
|
|
[#25]
Originally Posted By guns762: We tried with the 1/8th inch stuff....fail. It was a scrap we already had. We have another ready to try, but I think we will wait till next week. Not sure we can even do this with the 1/16th stuff. Originally Posted By guns762: Originally Posted By AeroE: Form a canopy over a female buck covered with soft fabric. Heat the plastic in an oven made from 2X4's and Celotex insulation, drape over the buck, then quickly smooth with many hands wearing clean cotton gloves. The edges will want to wrinkle, so the buck and plastic need to be oversize, then trimmed to fit. There's a good chance you won't get it right on the first try, and there's a good chance the first try will be better than the first. The gold color of fighter transparencies is Indium Tin Oxide. Just so you know; your budget won't support the equipment, training, or experience for application. ITO is applied on the outer surface and tied to a conductive perimeter strip that is hidden under the canopy framing skirt. Flow coats are applied over the ITO for protection. In the end, a glass epoxy canopy painted will probably be easier, and still an enormous amount of work. We tried with the 1/8th inch stuff....fail. It was a scrap we already had. We have another ready to try, but I think we will wait till next week. Not sure we can even do this with the 1/16th stuff. Just measured the thickness of a 30 yr old RC body. It was 0.020". A lot thinner than 1/16". |
|
|
|
|
[Last Edit: guns762]
[#26]
Originally Posted By widowed2012: Ya'll should paint some Cuban paratroopers in the windows. https://www.ar15.com/media/mediaFiles/487364/95EPlo3_jpeg-2122577.JPG I like this.... WOLVERINES! |
|
|
|
|
[#27]
Originally Posted By guns762: I like this.... WOLVERINES! Originally Posted By guns762: Originally Posted By widowed2012: Ya'll should paint some Cuban paratroopers in the windows. https://www.ar15.com/media/mediaFiles/487364/95EPlo3_jpeg-2122577.JPG I like this.... WOLVERINES! 
|
|
|
|
|
[#28]
Originally Posted By brass: Needed - More hands and several more heat guns. Temp very uneven so only bending at high stress points. Not sure if your outlets are on a separate breaker but maybe 6 heat guns and a dozen gloved hands keeping it evenly warming up would work. That is a total nightmare shape to try and re-create, it's a double 2D curve like the helicopter windshield was, and a lot tighter radius. I think we will try using our kiln to heat the lexan, then press it into the molds. We will begin the fiberglass molds on Monday. If those fail, then we will go to the fallback, paint and clearcoat layers. |
|
|
|
|
[#29]
More from today:
T-shirt designs are starting to get closer to where we need to be.  Weapon's bay doors getting cut out   We had to put in an order for more sprockets.....wow.....little pricey these days.  We did get to put the wings up and take a few pictures.     |
|
|
|
|
[Last Edit: AeroE]
[#30]
Okay, time to regroup and blow the canopy.
Cut a piece of plywood with the shape of the canopy where it intersects the airframe. Make a second piece without, but with an opening for a shop vac blowing air. Clamp the plastic between the parts, heat in the oven then gently apply pressure. Let the shape free form and live with the result. Don't bust the transparency while trimming. Use cutoff wheels in a Dremel tool. Don't allow anyone near with a sabre saw, not even with an abrasive blade. |
|
|
|
|
[#31]
Can you do exactly that but blow it into a form?
|
|
|
|
|
[#32]
Originally Posted By AeroE: Okay, time to regroup and blow the canopy. Cut a piece of plywood with the shape of the canopy where it intersects the airframe. Make a second piece without, but with an opening for a shop vac blowing air. Clamp the plastic between the parts, heat in the oven then gently apply pressure. Let the shape free form and live with the result. Don't bust the transparency while trimming. Use cutoff wheels in a Dremel tool. Don't allow anyone near with a sabre saw, not even with an abrasive blade. That's a good idea! Inverse vacuum forming, vacuum still involved just the other way. I'm out of ideas on this one, out side of building up very thin sheets or layers of 1 or two ounce fiberglass and a ton of resin, well, a whole bunch of fiberglass too, but that could be sort of clear but blurry and could take the paint well with an adhesion promoter. @Guns762 How large is the kiln? Can the canopy mold fit inside of it with 4' Lexan/Lucite/Plexiglass on top of it? |
|
|
|
|
[#33]
Like the claws on the shirt.
Wing recontouring in 3, 2, 1...
|
|
|
|
|
[#34]
This just looks like fun. Have access to a big oven?
 Blowing Lancaster Bomb Aimer's Bubble  Perspex 1400mm Black Acrylic Blow Moulded Hemisphere Dome, Plexiglas |
|
|
|
|
[#35]
Originally Posted By UncleGAK: This just looks like fun. Have access to a big oven? He does, but Mrs Guns762 isn't gonna be happy about what he's doing in HER kitchen.
|
|
|
|
|
[Last Edit: AeroE]
[#36]
Originally Posted By brass: That's a good idea! Inverse vacuum forming, vacuum still involved just the other way. I'm out of ideas on this one, out side of building up very thin sheets or layers of 1 or two ounce fiberglass and a ton of resin, well, a whole bunch of fiberglass too, but that could be sort of clear but blurry and could take the paint well with an adhesion promoter. @Guns762 How large is the kiln? Can the canopy mold fit inside of it with 4' Lexan/Lucite/Plexiglass on top of it? Originally Posted By brass: Originally Posted By AeroE: Okay, time to regroup and blow the canopy. Cut a piece of plywood with the shape of the canopy where it intersects the airframe. Make a second piece without, but with an opening for a shop vac blowing air. Clamp the plastic between the parts, heat in the oven then gently apply pressure. Let the shape free form and live with the result. Don't bust the transparency while trimming. Use cutoff wheels in a Dremel tool. Don't allow anyone near with a sabre saw, not even with an abrasive blade. That's a good idea! Inverse vacuum forming, vacuum still involved just the other way. I'm out of ideas on this one, out side of building up very thin sheets or layers of 1 or two ounce fiberglass and a ton of resin, well, a whole bunch of fiberglass too, but that could be sort of clear but blurry and could take the paint well with an adhesion promoter. @Guns762 How large is the kiln? Can the canopy mold fit inside of it with 4' Lexan/Lucite/Plexiglass on top of it? Most likely there is no reason to cure the epoxy resin at elevated temp. At most a Celotex oven and heat guns or barn heaters to 100F or a little higher. The trick to get a layup to look right, weigh little without a ridiculous application of body filler, is to use no more resin than necessary to almost fill the weave. A peel ply applied to the non tool side will make a smooth surface that requires less sanding to finish. I wouldn't worry about scattered pin holes, the paint will hide most and viewing distance the rest. This brings up an important safety detail. Everyone handling epoxy should wear gloves and long sleeves to keep the material oof their skin. Epoxy sensitization is serious. Every person reacts different, some have temporary sensitivity, and I have seen more than one that reacted instantly by simply walking into a large shop where layup was underway, meaning they can no longer do that work. Ventilation is also necessary to move fumes away. |
|
|
|
|
[Last Edit: brass]
[#37]
Originally Posted By AeroE: Most likely there is no reason to cure the epoxy resin at elevated temp. At most a Celotex oven and heat guns or barn heaters to 100F or a little higher. The trick to get a layup to look right, weigh little without a ridiculous application of body filler, is to use no more resin than necessary to almost fill the weave. A peel ply applied to the non tool side will make a smooth surface that requires less sanding to finish. I wouldn't worry about scattered pin holes, the paint will hide most and viewing distance the rest. This brings up an important safety detail. Everyone handling epoxy should wear gloves and long sleeves to keep the material oof their skin. Epoxy sensitization is serious. Every person reacts different, some have temporary sensitivity, and I have seen more than one that reacted instantly by simply walking into a large shop where layup was underway, meaning they can no longer do that work. Ventilation is also necessary to move fumes away. Originally Posted By AeroE: Originally Posted By brass: Originally Posted By AeroE: Okay, time to regroup and blow the canopy. Cut a piece of plywood with the shape of the canopy where it intersects the airframe. Make a second piece without, but with an opening for a shop vac blowing air. Clamp the plastic between the parts, heat in the oven then gently apply pressure. Let the shape free form and live with the result. Don't bust the transparency while trimming. Use cutoff wheels in a Dremel tool. Don't allow anyone near with a sabre saw, not even with an abrasive blade. That's a good idea! Inverse vacuum forming, vacuum still involved just the other way. I'm out of ideas on this one, out side of building up very thin sheets or layers of 1 or two ounce fiberglass and a ton of resin, well, a whole bunch of fiberglass too, but that could be sort of clear but blurry and could take the paint well with an adhesion promoter. @Guns762 How large is the kiln? Can the canopy mold fit inside of it with 4' Lexan/Lucite/Plexiglass on top of it? Most likely there is no reason to cure the epoxy resin at elevated temp. At most a Celotex oven and heat guns or barn heaters to 100F or a little higher. The trick to get a layup to look right, weigh little without a ridiculous application of body filler, is to use no more resin than necessary to almost fill the weave. A peel ply applied to the non tool side will make a smooth surface that requires less sanding to finish. I wouldn't worry about scattered pin holes, the paint will hide most and viewing distance the rest. This brings up an important safety detail. Everyone handling epoxy should wear gloves and long sleeves to keep the material oof their skin. Epoxy sensitization is serious. Every person reacts different, some have temporary sensitivity, and I have seen more than one that reacted instantly by simply walking into a large shop where layup was underway, meaning they can no longer do that work. Ventilation is also necessary to move fumes away. @AeroE Thanks! Most I've ever done with fiberglass are obtuse objects like scale boat hulls and airplane wings where there aren't any dips "in" just one direction of pressure needed and no compound curves like that so this is out of my wheelhouse by a good bit. That sharp bend in all directions at the canopy peak is where I get stuck in concepts. |
|
|
|
|
[#38]
Originally Posted By AeroE: Most likely there is no reason to cure the epoxy resin at elevated temp. At most a Celotex oven and heat guns or barn heaters to 100F or a little higher. The trick to get a layup to look right, weigh little without a ridiculous application of body filler, is to use no more resin than necessary to almost fill the weave. A peel ply applied to the non tool side will make a smooth surface that requires less sanding to finish. I wouldn't worry about scattered pin holes, the paint will hide most and viewing distance the rest. This brings up an important safety detail. Everyone handling epoxy should wear gloves and long sleeves to keep the material oof their skin. Epoxy sensitization is serious. Every person reacts different, some have temporary sensitivity, and I have seen more than one that reacted instantly by simply walking into a large shop where layup was underway, meaning they can no longer do that work. Ventilation is also necessary to move fumes away. Originally Posted By AeroE: Originally Posted By brass: Originally Posted By AeroE: Okay, time to regroup and blow the canopy. Cut a piece of plywood with the shape of the canopy where it intersects the airframe. Make a second piece without, but with an opening for a shop vac blowing air. Clamp the plastic between the parts, heat in the oven then gently apply pressure. Let the shape free form and live with the result. Don't bust the transparency while trimming. Use cutoff wheels in a Dremel tool. Don't allow anyone near with a sabre saw, not even with an abrasive blade. That's a good idea! Inverse vacuum forming, vacuum still involved just the other way. I'm out of ideas on this one, out side of building up very thin sheets or layers of 1 or two ounce fiberglass and a ton of resin, well, a whole bunch of fiberglass too, but that could be sort of clear but blurry and could take the paint well with an adhesion promoter. @Guns762 How large is the kiln? Can the canopy mold fit inside of it with 4' Lexan/Lucite/Plexiglass on top of it? Most likely there is no reason to cure the epoxy resin at elevated temp. At most a Celotex oven and heat guns or barn heaters to 100F or a little higher. The trick to get a layup to look right, weigh little without a ridiculous application of body filler, is to use no more resin than necessary to almost fill the weave. A peel ply applied to the non tool side will make a smooth surface that requires less sanding to finish. I wouldn't worry about scattered pin holes, the paint will hide most and viewing distance the rest. This brings up an important safety detail. Everyone handling epoxy should wear gloves and long sleeves to keep the material oof their skin. Epoxy sensitization is serious. Every person reacts different, some have temporary sensitivity, and I have seen more than one that reacted instantly by simply walking into a large shop where layup was underway, meaning they can no longer do that work. Ventilation is also necessary to move fumes away. This is all great advice and I appreciate you fellas posting it. I'll make sure we use the vent hood, and they have gloves in before we mess with the epoxy. |
|
|
|
|
[Last Edit: guns762]
[#39]
Update 10/11
It was a productive Monday for us. We started each hour with discussion and info on where the project stands, and what current problems we need to dive into. Cockpit canopy was of course a main topic, and we laid out how we would proceed with the alternative solutions. Students seemed to be more upbeat when we discussed painting and adding epoxy layers as a last resort. I told them there is about a 95% chance that is where we will end up, but the experimenting with the fiberglass and molds would be entertaining. We also began running wiring for our Arduino and motors for the weapons bay doors and wing motor. I have a student who is an apprentice for an electrician. He was very excited to put his skills to use today, mapping out how it would be wired.   First thing we this morning was mount the wings and beginning laying outwhere the all-thread would need to be to attach through the fuselage putter edge.    We noticed a bit of a rigidity problem in the fuselage today. We had the front end clamped down, and the back two thirds would wiggle pretty good. It seems to be from the lack of structure around the weapons bays. We had a plan to reinforce thos area a bit with 1x2s, but to think we will flesh out the floor and walls of the bays, then see where we are at. It will also give us a bit more to try to tie together lengthwise.  Sanding down the hi points on the canopy area was a full time effort across the day.  My team leader emailed me ideas for tackling the canopy this weekend. He was also there early this morning going over our updated plans. He seemed to be here most of the day actually.  This afternoon he was working on the aft section of the fuselage.  |
|
|
|
|
[#40]
Hey Guns, as others have mentioned, I believe y’all should go with the vacuum idea. Watching the video of that guy molding the shapes looks a lot better than using a hair dryer.
|
|
|
|
|
[#41]
I looked into an existing canopy to trim for the model today.
It won't work, there's not enough real estate to get the aft end and overall height right. Molds will be a huge amount of work and expense in money and time. Draping has to be done with the entire sheet hot. I need to dig around for a temperature, but I'm thinking ~250F is about right. Vacuum forming over your positive tool will result in a more precise shape than free blowing as I suggested before. Experiment with a small model as in the second video before going all in. I think a bondo coat will insulate well enough. Sand it crazy smooth and two or three of coats of wax at minimum. Prime, paint, wet sand, and wax would be better. Ideas - 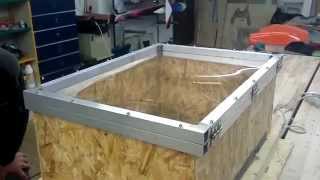 vacuum forming,canopy LA-7  How To make a canopy |
|
|
|
|
[#42]
Be amazing if Lockheed-Martin got interested in helping...
|
|
|
|
|
[Last Edit: guns762]
[#43]
Originally Posted By AeroE: I looked into an existing canopy to trim for the model today. It won't work, there's not enough real estate to get the aft end and overall height right. Molds will be a huge amount of work and expense in money and time. Draping has to be done with the entire sheet hot. I need to dig around for a temperature, but I'm thinking ~250F is about right. Vacuum forming over your positive tool will result in a more precise shape than free blowing as I suggested before. Experiment with a small model as in the second video before going all in. I think a bondo coat will insulate well enough. Sand it crazy smooth and two or three of coats of wax at minimum. Prime, paint, wet sand, and wax would be better. Ideas - That second video with the ring that pulls the shape down looks promising. Not sure how hes securing the plastic in the frame....just friction? We will start working on a ring tomorrow. If we can get the plastic on the kiln, we will give this a shot. I was thinking closer to 350f? We melt plastic beads in forms for taxidermy work. We use 375 for around 45min to get liquid form. |
|
|
|
|
[#44]
Guns,
One way to stiffen a wood structure without adding more wood is to use cables with turnbuckles. This is done in older houses in earthquake zones. On the F22 you can hide them in the structure so they are not seen. EBR |
|
|
|
|
[#45]
Originally Posted By EBR666: Guns, One way to stiffen a wood structure without adding more wood is to use cables with turnbuckles. This is done in older houses in earthquake zones. On the F22 you can hide them in the structure so they are not seen. EBR Great idea. I should have thought of that |
|
|
|
|
[Last Edit: AeroE]
[#46]
Originally Posted By guns762: That second video with the ring that pulls the shape down looks promising. Not sure how hes securing the plastic in the frame....just friction? We will start working on a ring tomorrow. If we can get the plastic on the kiln, we will give this a shot. I was thinking closer to 350f? We melt plastic beads in forms for taxidermy work. We use 375 for around 45min to get liquid form. Originally Posted By guns762: Originally Posted By AeroE: I looked into an existing canopy to trim for the model today. It won't work, there's not enough real estate to get the aft end and overall height right. Molds will be a huge amount of work and expense in money and time. Draping has to be done with the entire sheet hot. I need to dig around for a temperature, but I'm thinking ~250F is about right. Vacuum forming over your positive tool will result in a more precise shape than free blowing as I suggested before. Experiment with a small model as in the second video before going all in. I think a bondo coat will insulate well enough. Sand it crazy smooth and two or three of coats of wax at minimum. Prime, paint, wet sand, and wax would be better. Ideas - That second video with the ring that pulls the shape down looks promising. Not sure how hes securing the plastic in the frame....just friction? We will start working on a ring tomorrow. If we can get the plastic on the kiln, we will give this a shot. I was thinking closer to 350f? We melt plastic beads in forms for taxidermy work. We use 375 for around 45min to get liquid form. Do you plan to attempt to form over the buck while it is on the fuselage? That might work if the transparency is longer and deeper than the finished shape. Ideas for forming temperature; 250F might be low - https://www.curbellplastics.com/Research-Solutions/Technical-Resources/Technical-Resources/Plexiglas-Forming-Manual https://www.usplastic.com/knowledgebase/article.aspx?contentkey=583 |
|
|
|
|
[#47]
Originally Posted By AeroE: Clamp the plastic between two pieces so it is supported on the full perimeter. Do you plan to attempt to form over the buck while it is on the fuselage? That might work if the transparency is longer and deeper than the finished shape. Ideas for forming temperature; 250F might be low - https://www.curbellplastics.com/Research-Solutions/Technical-Resources/Technical-Resources/Plexiglas-Forming-Manual https://www.usplastic.com/knowledgebase/article.aspx?contentkey=583 That is the plan. The support for the lexan will have to be vertical only, on the ends. We will have to have it curved in a circle to fit in our kiln. It's the only way. I might see if the kitchen will has a larger oven, but my guess is they will not allow us to cook our lexan in it. I'll ask though. |
|
|
|
|
[#48]
Originally Posted By guns762: Great idea. I should have thought of that Originally Posted By guns762: Originally Posted By EBR666: Guns, One way to stiffen a wood structure without adding more wood is to use cables with turnbuckles. This is done in older houses in earthquake zones. On the F22 you can hide them in the structure so they are not seen. EBR Great idea. I should have thought of that Just make sure you have a stiff spar connection to push back against the cable's pull for it to work, sort of like a suspension bridge with the push/pull in balance. |
|
|
|
|
[#49]
One more processing writeup -
https://www.google.com/url?sa=t&source=web&rct=j&url=https://sfs.sabic.eu/wp-content/uploads/resource_pdf/1482256914-51422789-SABIC-SFS-6212-EN-LEXAN-Sheet-Processing-Guide-FINAL-Nov-2015.pdf&ved=2ahUKEwijy4rT-8XzAhVFCM0KHVI_BZgQFnoECCIQAQ&usg=AOvVaw3Rq3aaBkgybYPg5JFRd8e8 The buck has to be adjacent to the oven. |
|
|
|
|
[#50]
Originally Posted By AeroE: One more processing writeup - https://www.google.com/url?sa=t&source=web&rct=j&url=https://sfs.sabic.eu/wp-content/uploads/resource_pdf/1482256914-51422789-SABIC-SFS-6212-EN-LEXAN-Sheet-Processing-Guide-FINAL-Nov-2015.pdf&ved=2ahUKEwijy4rT-8XzAhVFCM0KHVI_BZgQFnoECCIQAQ&usg=AOvVaw3Rq3aaBkgybYPg5JFRd8e8 The buck has to be adjacent to the oven. Yeah......about that.... Wait till you see today's update for the full effect. We did discuss this when we were watching the video together as groups. We can get it pretty close to the kiln.....hopefully close enough. |
|
|
|
 Win a FREE Membership!
Sign up for the ARFCOM weekly newsletter and be entered to win a free ARFCOM membership. One new winner* is announced every week!
You will receive an email every Friday morning featuring the latest chatter from the hottest topics, breaking news surrounding legislation, as well as exclusive deals only available to ARFCOM email subscribers.

AR15.COM is the world's largest firearm community and is a gathering place for firearm enthusiasts of all types.
From hunters and military members, to competition shooters and general firearm enthusiasts, we welcome anyone who values and respects the way of the firearm.

Subscribe to our monthly Newsletter to receive firearm news, product discounts from your favorite Industry Partners, and more.
Copyright © 1996-2024 AR15.COM LLC. All Rights Reserved.
Any use of this content without express written consent is prohibited.
AR15.Com reserves the right to overwrite or replace any affiliate, commercial, or monetizable links, posted by users, with our own.


